How to View Advertiser information
To view the list of existing Advertisers, go to the Advertisers > Advertiser Management section.

The Advertiser Management list contains the following information:
- ID: The identification number of the Advertiser.
- Advertiser: The name of the Advertiser.
- Status: The status of the Advertiser (Active/Pending/Blocked/Deleted).
Note: The Pending status can be set only during the creation process of a new Advertiser in the “New Advertiser” pop-up window in the “Status” field. From the Advertiser Management section, you can only change the status for the Advertiser between Active, Blocked, and Deleted.
- Agent: The name of the Agent.
- Create Date: The creation date of the Advertiser.
- Impressions: The number of the Advertiser’s links shown on the websites.
- Clicks: The number of clicks on the Advertiser’s links.
- Unique Clicks: The number of unique clicks on the Advertiser’s links.
- Conversions: The ratio of the number of click-throughs with the following purchase to the total number of clicks.
- Revenue: Total income of the Advertiser.
You can narrow down the search results by using the following filters:
- Create date: Select the date range when the Advertiser was created.
- Status: Select the status of the Advertiser (Active/Pending/Blocked/Deleted).
- Agent: Select the Agent of the Advertiser.
How to Create an Advertiser
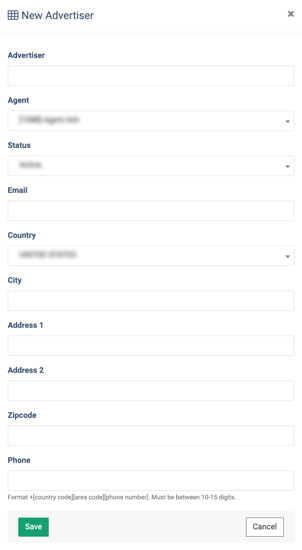
To create a new Advertiser, click the “+New” button.

In the “New Advertiser” pop-up window, fill in the following fields:
- Advertiser: Enter the name of the Advertiser.
- Agent: Select an agent from the drop-down list.
- Status: Select the status of the Advertiser (Active/Pending/Blocked/Deleted).
- Email: Enter the email address of the Advertiser.
- Country: Select the country in which Advertiser is located.
- City: Enter a city name in which Advertiser is located.
- Address 1: Enter an address to specify the location of the Advertiser.
- Address 2: Enter a second address to specify the location of the Advertiser (optional).
- Zipcode: Enter the zip code of the Advertiser.
- Phone: Enter the phone number of the Advertiser. Note: The phone number needs to start with a plus and the country code.
Click the “Save” button to complete.
How to View Advertiser Information
Click the “View” button in the “Actions” column to view the general information about the specific Advertiser. The Advertiser view tab contains the following information:
- ID: The unique identification number of the Advertiser.
- Advertiser’s Name: The name of the Advertiser.
- Status: The status of the Advertiser (Active/Pending/Blocked/Deleted).
- Email: The email of the Advertiser.
- Country: The country in which Advertiser is located.
- State: The state in which Advertiser is located.
- City: The city in which Advertiser is located.
- Address: The address of the Advertiser.
- Address (second line): Second address of the Advertiser.
- ZIP: The zip code of the advertiser.
- Phone: The phone number of the Advertiser.
- Fax: The fax number of the Advertiser.

How to Edit an Advertiser
To configure the Advertiser`s data, click the “Edit” button in the “Actions” column.
The “General” tab contains the following fields:
- Advertiser: Enter the name of the Advertiser.
- Agent: Select the Agent from the drop-down list.
- Status: Select the status for the Advertiser (Active/Blocked/Deleted).
- Email: Enter the email of the Advertiser.
- Country: Select the country in which the Advertiser is located.
- City: Enter the city in which the Advertiser is located.
- Address 1: Enter the address where the Advertiser is located.
- Address 2: Enter the second address where the Advertiser is located.
- Zipcode: Enter the zip code of the Advertiser.
- Phone: Enter the phone number of the Advertiser. Note: The phone number needs to start with a plus and the country code.
Click the “Save” button to compete.

The “Account Settings” tab contains the following fields:
- Buyer name: Enter the name of the Advertiser.
- Email(s): Enter the email or a list of emails (comma separated) to receive the invoices.
- Address: Enter the address of the Advertiser.
- Invoice Period: Select the invoice frequency (manual/weekly/biweekly/monthly/semimonthly).
- Due Period: Enter the number of days within which invoices are created.
- Report Notification Email: Select the frequency of receiving report notifications (disabled/weekly/biweekly/monthly/semi-monthly).
- Limit of all offer’s files, MB: Enter the maximum upload size of the offer’s files (optional).
Click the “Save” button to compete.

The “Global Postbacks” tab allows you to create postbacks once at the advertiser level so that you can apply them to all the offers, instead of configuring them separately for each offer.
Read more about the postbacks in the following Knowledge Base article.
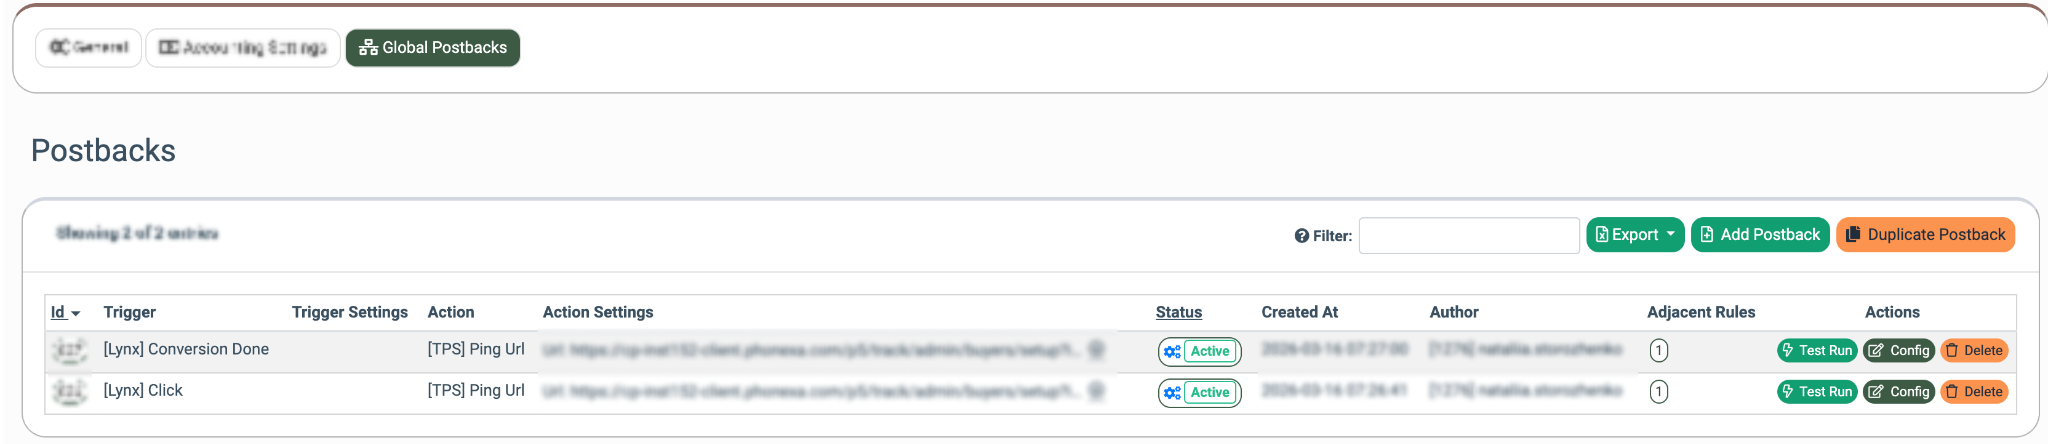
The list of postbacks contains the following information:
- ID: The unique identification number of the postback.
- Trigger: The name of the trigger.
- Trigger Settings: The combination of the general postback trigger settings for which the conversions are tracked.
- Action: The name of the action.
- Action Settings: The list of action postback settings, such as method and URL.
- Status (Active / Disabled): The status of the postback. Note: To change the postback status, click the corresponding button and select the status in the pop-up window.
- Created At: The date and time of the postback creation.
- Author: The ID and name of the user who created a postback.
- Adjacent Rules: The number of postbacks that can be applied simultaneously with the selected postback. Click on the number to see the list of postbacks that can run concurrently.
To create a new postback, click the “Add Postback” button. Fill in the following fields in the “New Postback” pop-up window:
- Trigger: Select the postback trigger.
- [Lynx] Conversion Done: The Lynx conversion is completed.
- [Lynx] Conversion Reject: The Lynx conversion is rejected.
- [Lynx] Conversion Pending: The Lynx conversion is pending.
- [Lynx] Click: The click event happened.
- Action: Select the action that determines the way to transfer the conversion data
Read more about available actions for the Postback tracking in the following Knowledge Base article.
Click the “Next” button to proceed.

Follow the instructions from the Knowledge Base article to complete the Postback creation.
To configure the postback, click the “Config” button in the “Actions” column. Perform the corresponding changes to the fields that are available depending on the previous postback selection, and click the “Save Rule” button to complete the action, or click the “Cancel” button to close the window.
Read more about the Postback rule configuration in the following Knowledge Base article.
To remove the postback, click the “Delete” button in the “Actions” column. Enter the generated number into the pop-up window and click the “Delete” button.

To create a duplicate of the postback, click the “Duplicate Postback” button. Check the boxes next to the postbacks you wish to duplicate and click the “Duplicate” button to perform the action.
