Bucket Bank
Check our short guide and learn how you can enable and use the Bucket Bank option to accumulate money on the publisher’s balance.
Bucket Bank allows you to accumulate a certain amount of money on the publisher’s balance. In the interface, the leads will appear with a reject status (though in reality they could be sold and redirected), and only when the balance reaches the necessary amount, a sold status will appear.
Find more details about Tracking URL configuration in the Knowledge Base.
To configure the Bucket Bank option, go to the Publisher Management > Publishers section, select the Publisher, and click the “View” button in the “Actions” column. On the Publisher setup page, go to the “Rev-Share” tab and open the “Bucket Bank” section.
Select the product and in the Publisher Thresholds field enter the number of deductions to the buyer on which the tracking will be triggered. The “Current Balance in the Bucket” field displays the publisher’s current balance.
To disable the Bucket Bank option remove the threshold value.
To track money when using Bucket Bank you need to configure the Tracking URL to the Lead Sold event.
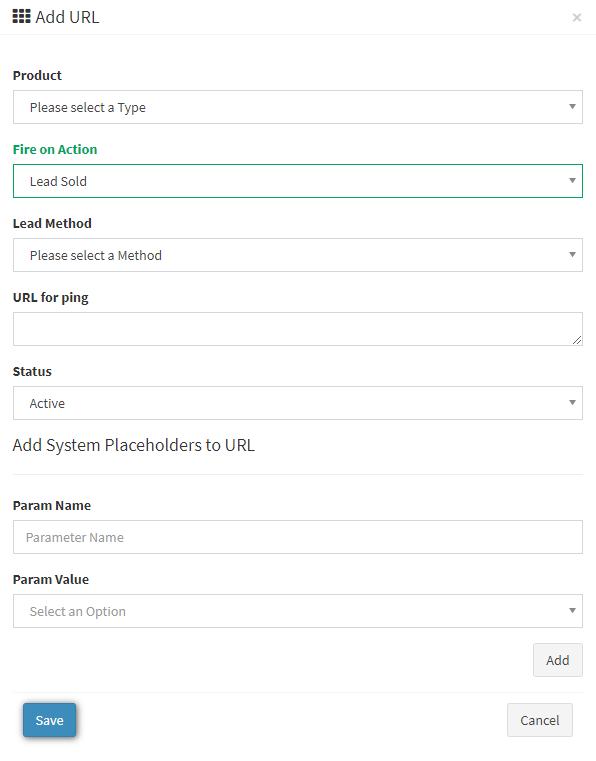
To set up the Tracking URL go to the Publisher Management > Publishers section, select the Publisher, and click the “View” button in the “Actions” column. On the Publisher setup page, go to the “Tracking” tab, and in the “Tracking URL List” section click the “Add URL” button.
Fill in the following fields in the pop-up window:
Product - Select the product where you set up the Bucket Bank option.
Fire on Action - Select the Lead Sold.
Lead Method - Ask your publisher through which method they want to receive the ping, FORM or POST.
URL for Ping - in this field you need to specify the link to which the publisher requested to ping. If you need to substitute some parameters in the link, for example, the Lead price, add it with the help of "Add System Placeholders to URL".
Status - Allows you to enable or disable ping.
Click the “Save” button to complete.

To check the Bucket Bank data go to the All Reports > Publisher Reports > Lead Details report and add the “Bucket Before” and “Bucket After” columns in the report.
Bucket Before - shows the amount in the bank before this lead was posted to the system.
Bucket After - shows the amount in the bank after the lead was posted to the system.
An example of how Bucket Bank works
| Step | Lead Status | Bucket Before | Bucket After | Publisher | ADM |
|---|---|---|---|---|---|
| 1. First Lead | Reject | 0 | 35 | 0 | 50 |
| 2. Second Lead | Reject | 35 | 70 | 0 | 50 |
| 3. Third Lead | Sold | 70 | 5 | 100 | 50 |
Use case:
-
First Lead: The lead is rejected, and 70% of its value ($50) is added to the Bucket ($35).
-
Second Lead: This lead is also rejected, and 70% of its value ($35) is added to the current Bucket value ($35), totaling $70.
-
Third Lead: The lead is sold, the Publisher receives $100, and the remaining Bucket amount ($70 – $100 = $5) stays in the system.