To view the “Phone Numbers” tab, go to the Client Management > Buyer List section, select a Buyer from the list, and click the “Settings” button in the “Actions” column. Select the “Phone Numbers” tab on the Buyer Setup page.
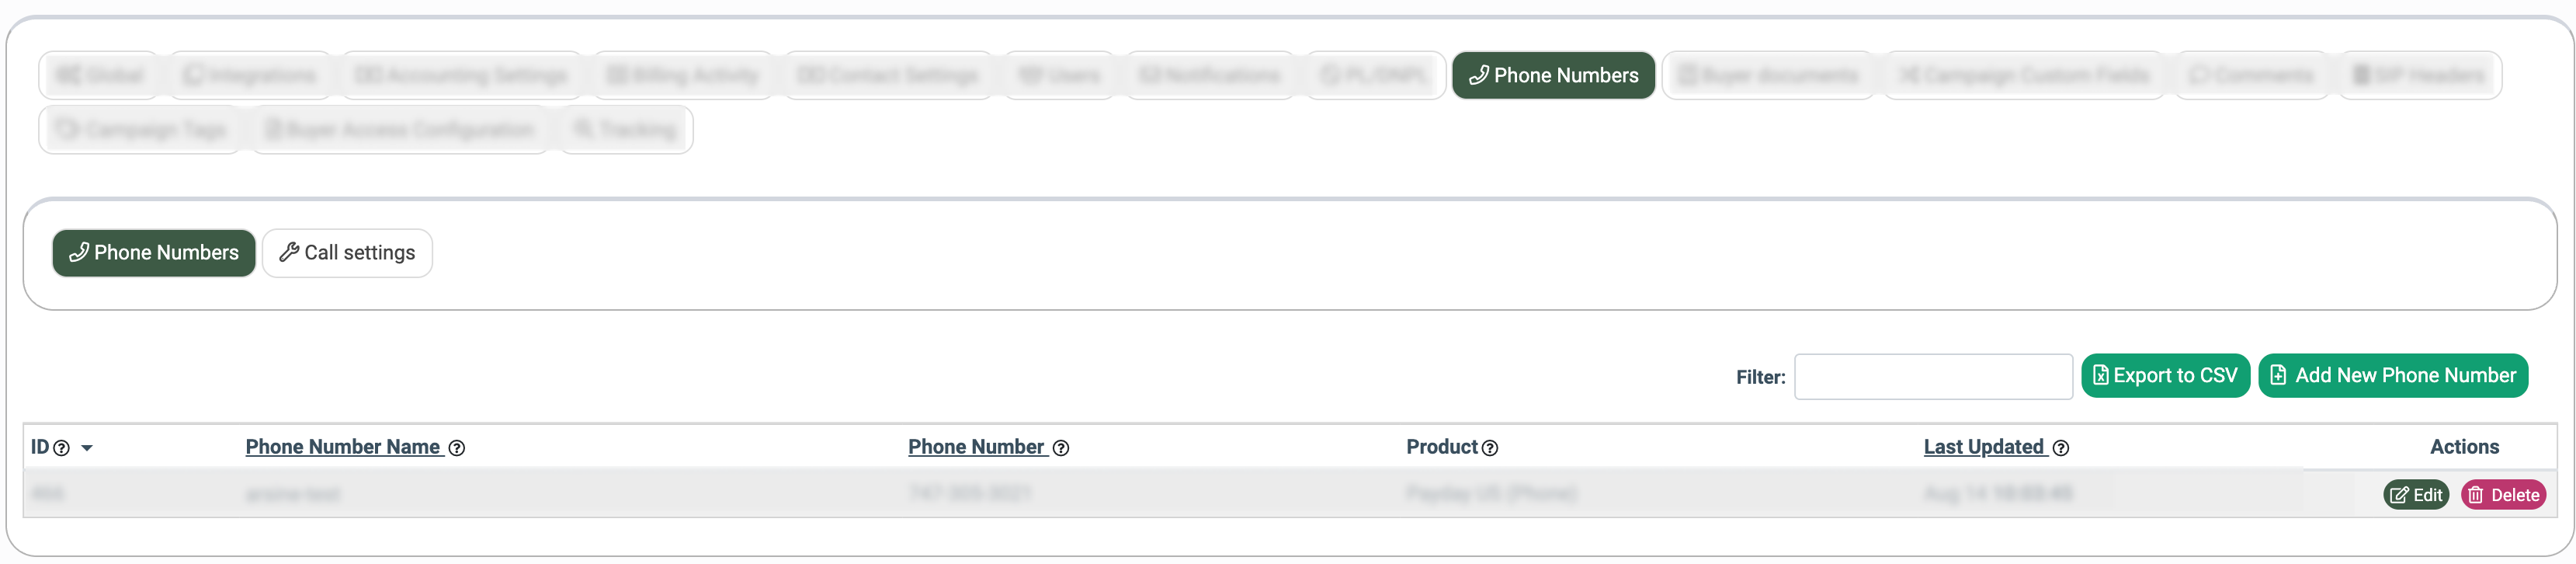
The “Phone numbers” subtab allows you to view and configure the phone numbers assigned to the Buyer.
The list of phone numbers contains the following information:
- ID: The unique identification number of the phone number recorded in the system.
- Phone Number Name: The name assigned to the phone number.
- Phone Number: The assigned phone number.
- Product: The name of the selected Product.
- Last Updated: The date and time when the record was created or last edited.
To assign a new phone number for the Buyer, click the “Add New Phone Number” button and fill in the following fields in the “Add New” pop-up window.
- Destination: Select the destination for the Buyer (External Phone Number/SIP Trunk/PBX Phone Number).
- External Phone Number: Enter a valid international phone number.
- SIP Trunk: Enter the SIP Trunk of the Buyer.
Example: xxx@trunkname, where “trunk name” is the name of the SIP Trunk created in the System Management > General > SIP Trunking section.
Read how to create a SIP Trunk in this Knowledge Base article. - PBX Phone Number: Select the PBX Phone Number for the Buyer.
Note: This option is available only if the Cloud PBX component is enabled in your system. - Phone Number Name: Enter the name that will be assigned to the phone number.
- Product: Select the Product for the Buyer.
Click the “Save” button to confirm.
-1.png?width=670&height=537&name=unnamed%20(20)-1.png)
-1.png?width=670&height=445&name=unnamed%20(21)-1.png)
To unassign the Phone Number from the Buyer, click the “Delete” button in the “Actions” column and confirm the action in the pop-up window.
-1.png?width=670&height=242&name=unnamed%20(22)-1.png)
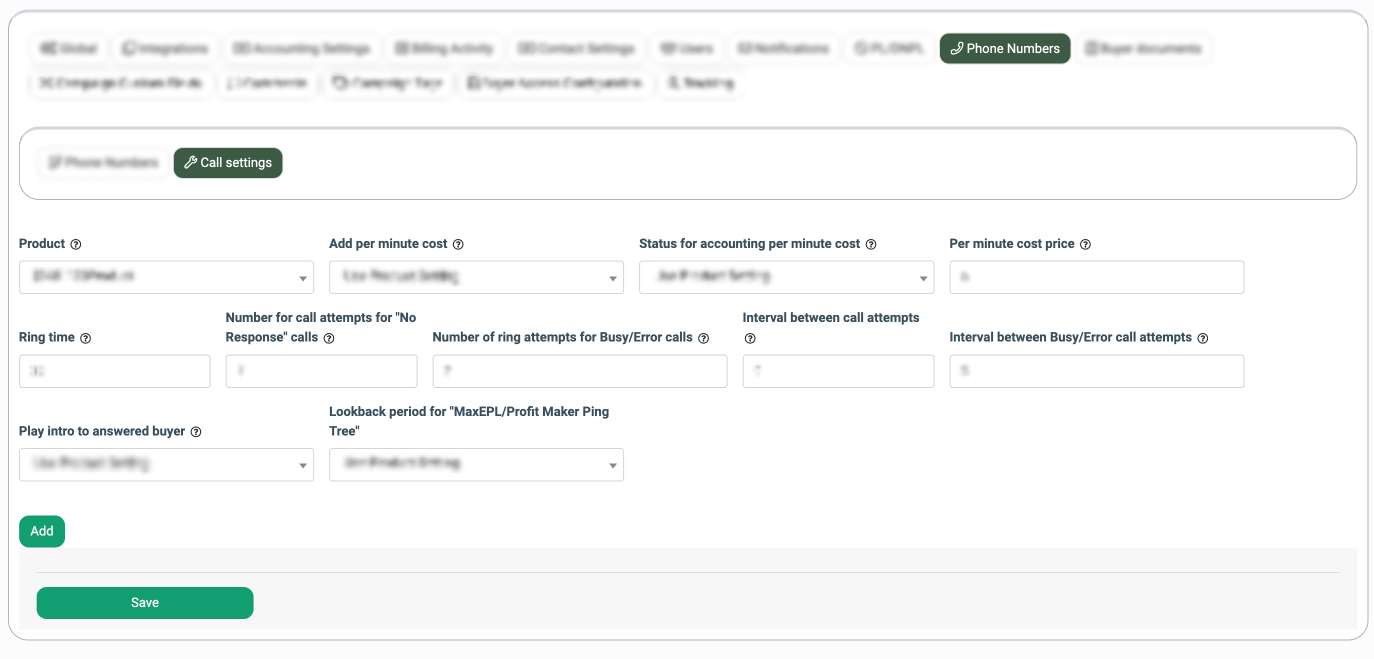
The “Call Settings” subtab allows you to configure the following settings:
- Product: Select the Product to which the following settings are applied.
- Add per minute cost: Select one of the options to configure the “Adding Call”
- Price to Buyer Call” feature on the Buyer level.
- Disabled: Select to disable the feature.
- Enabled: Select to enable the feature.
- Use Product Setting: Select to prioritize the feature configuration set on the Product level.
Read more about the “Adding Call Price to Buyer Call” feature in this Knowledge Base article.
- Status for accounting per minute cost: Select one of the options to specify for which lead status the Buyer will be charged the cost per minute fee.
- All: Select this option to charge the fee for the leads with both Sold and Reject statuses.
- Sold: Select this option to charge the fee for the leads with Sold status.
- Reject: Select this option to charge the fee for the leads with Reject status.
- Use Product Setting: Select to prioritize the feature configuration set on the Product level.
- Per minute cost price: Enter the price to be charged for each minute of the Buyer’s call.
- Ring Time: Enter the ring length in seconds before the Buyer’s Agent picks up the incoming call (The default is set to 30 seconds).
- Number for call attempts for "No Response" calls: Enter the number of attempts that the system will make to reach the Buyer if there is no response during the “Ring Time” period (The default number of attempts is set to “1”).
- Number of ring attempts for Busy/Error calls: Enter the number of attempts that the system will make to reach a Buyer if a “Busy” signal was received (The call was dropped/ the line is busy).
- Interval between call attempts: Enter the duration of time between call attempts (The default duration is set to “0”).
- Interval between Busy/Error call attempts: Enter the duration of time between call attempts if the system receives the “busy” signal (The call was dropped/ the line is busy. The default is set to “5”).
- Play intro to answered buyer: Select one of the options to configure the custom introduction for the answered call from the Buyer.
- Select the “Yes” option to enable the custom introduction.
- Select the “No” option to disable the introduction.
- Select the “Use Product Setting” option to prioritize the Product configuration for this setting.
- Intro file for answered buyer: Upload the introduction file via the “Browse” button.
- Lookback period for "MaxEPL/Profit Maker Ping Tree": Select the lookback period for the "MaxEPL/Profit Maker Ping Tree" strategy application (Use Product Setting, Last 7 Days, Previous 7 Days, Same Day Last Month). The “Max EPL” strategy allows you to reach your maximum earnings per call. Calls are distributed to the Buyer who has the highest expected price. The “Profit Maker” strategy allows you to achieve overall maximum profitability for the campaigns with the least remaining distribution time. The Profit Maker compares a Campaign’s Highest Expected Price with the available caps and hours remaining to sell. Note that the “Use Product Setting” option will be applied by default. Read more about the setting application on the Product level in the following Knowledge Base article. Read more about the strategy workflow in the following Knowledge Base article. The example of the date consideration:
- For the “Last 7 Days” option: if today's date is 02/06/2026, the period for consideration is from 01/30/2026 to 02/06/2026 (the range is from 7 days ago through today).
- For the “Previous 7 Days” option: if today’s date is 02/06/2026, the period for consideration is from 01/23/2026 to 01/29/2026 (the range is from 14 days ago through 8 days ago).
- For the “Same Day Last Month” option: if today's date is 02/06/2026, the date
Click the “Add” button to add one more group of settings.
Click the “Save” button to confirm.