A Custom Tracking URL in email/SMS marketing allows businesses to replace default tracking links with their own branded domain. This enhances brand recognition, improves email deliverability, and provides detailed insights into user interactions, such as link clicks for better campaign performance analysis.
To view the list of existing domains along with the log records, go to the List Management > Custom Tracking URL section.
The section contains two tabs:
The “Custom Tracking Domains” tab
The “Custom Tracking Domains” tab contains the list of available created domains. You can create a new domain, as well as manage, edit, or delete the existing one.
You can narrow down the search results by using the following filters:
- Domain: Enter the name of the domain.
- Domain Status: Select the domain verification status (Verified, Not Verified, Deleted).
The list of available domains contains the following information:
- ID: The unique identification number of the domain.
- Status / Domain: The current status indicated by the color(Green: Verified, Grey: Not Verified), along with the name of the domain.
- Created At: The creation date and time of the domain.
- Default: Displays which domain is set as a default.
- Short URL: Indicates whether the tracking URL has been shortened using the built-in link shortener. Click the “No” button to shorten the URL. Click the “Yes” button to return the shortened URL to its original form. Confirm the action by clicking the “Yes” button in the provided pop-up window.

- Delivery Channels: The number of channels assigned to the domain. To view the list of delivery channels in which this domain is used, click the “+” button.
The information about assigned channels is displayed in the “Delivery Channels” pop-up window. To manage the settings of the assigned channel, click the corresponding link on the “Delivery Channel” field.
You will be redirected to the “Email Delivery Channel Setup” section.
Read more about the Email Delivery Channel Setup section in the following Knowledge Base article.
To create a new domain, click the “Add Domain” button, fill in the name of the domain in the “Domain” field of the “Add Domain” pop-up window, check the “Shorten Tracking URL” box to enable the built-in link shortener (optional), and click the “Add” button to complete the action.
![]() Note: The Custom Domains must be different from the Sender Domains.
Note: The Custom Domains must be different from the Sender Domains.
Note: When adding a custom domain, we suggest it be a spare domain or a subdomain, as you will need to add the CNAME record.
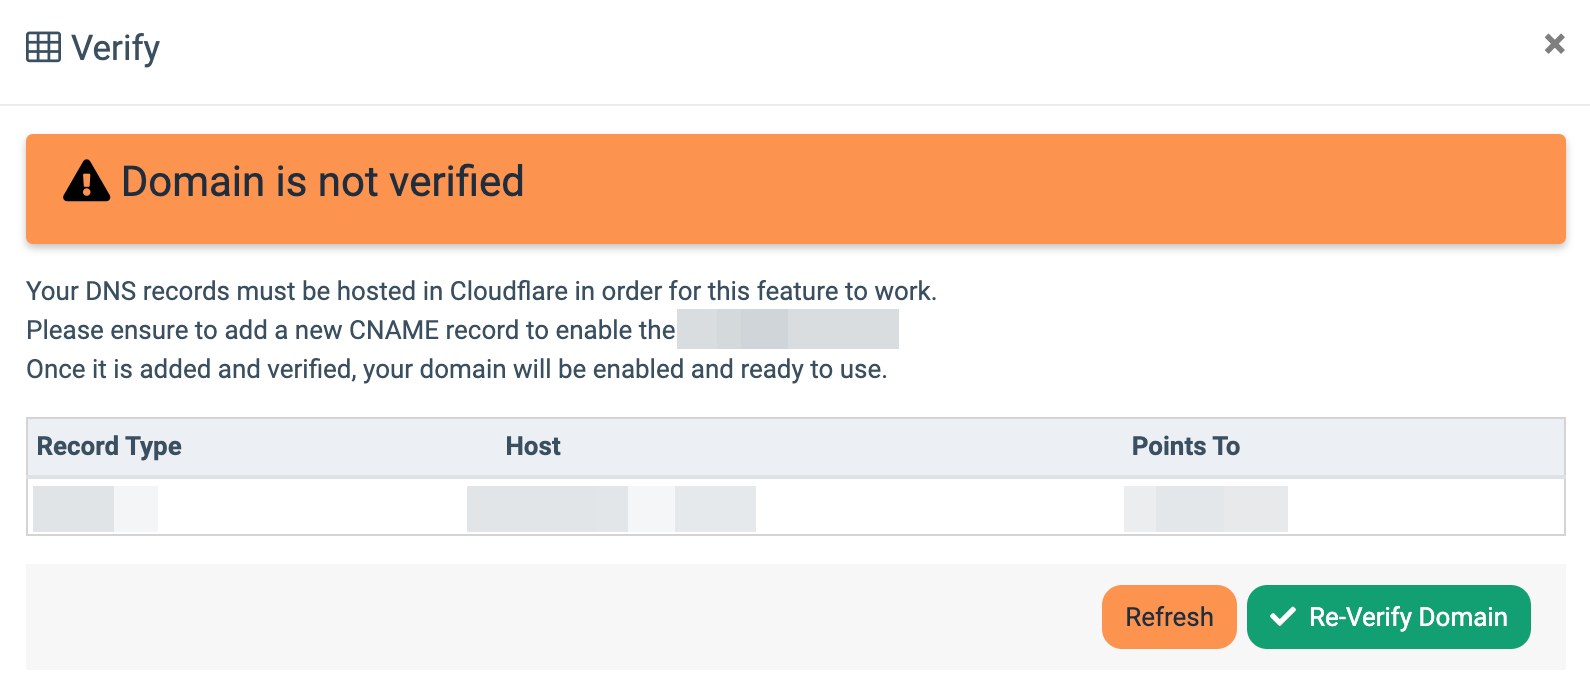
To verify the domain click the “Verify” button in the “Actions” column. To perform the domain verification, click the “Re-Verify Domain” button in the “Verify” pop-up window. Click the “Refresh” button to refresh the page.
 To set the domain as default click the “Set Default” button in the “Actions” column.
![]()
To unset the domain as default click the “Unset default” button in the “Actions” column.
![]() To enable a new domain, you have to add a CNAME record to your Cloudflare. Once the record is verified, the domain becomes enabled, and all of the messages sent through your email and SMS campaigns are sent with the custom URL (Example: track123.website.com).
To enable a new domain, you have to add a CNAME record to your Cloudflare. Once the record is verified, the domain becomes enabled, and all of the messages sent through your email and SMS campaigns are sent with the custom URL (Example: track123.website.com).
Note: You may add an unlimited amount of domains, but only one domain can be active at a time.
If your domain becomes disabled or the CNAME record is modified, you will receive an email notification.
To delete the existing domain, click the “Delete” button in the “Actions” column. Confirm the domain deletion by clicking the “Delete” button in the “Delete” pop-up window.
![]()
The “Logs” tab
The “Logs” tab contains information about all modifications made by users and system operations that were applied to the existing domains and triggered the specific event.
![]()
You can narrow down results by using the following filters:
- Date: Select the date range for the report.
- Domains: Select the domain.
- Action: Select the performed action (Verify, Internal).
- The “Verify” action means that the user performed the domain verification.
- The “Internal” action means that the system performed the domain verification.
- Event: Select the system event (Success, Error CNAME, Error Get Domain, Success Get Domain, Success Set Domain, Error Set Domain, Target Leads URL Not Matched)
- User: Select the user who performed changes.
The list of log records contains the following information:
- Date: The date and time of the log record creation.
- Domains: The name of the domain.
- Event: The name of the system event.
- Action: The name of the performed action.
- User: The user who performed changes.
To view detailed information about the log record, click the “Log” button. The information will be displayed in the “Detail Log” pop-up window.
![]()