---
title: Data Lists
description: Learn how to create Data Lists in Phonexa to continuously collect records and download them as automated daily, weekly, or monthly rotation archives.
---
[Skip to content](https://support.phonexa.com/data-lists#main-content)
[](https://support.phonexa.com/?hsLang=en)
Open main navigation
Close main navigation
- [➜\]](https://phonexa.com/)
[➜\]](https://phonexa.com/?hsLang=en)
Phonexa Support Center
- There are no suggestions because the search field is empty.
1. [Knowledge Base](https://support.phonexa.com/?hsLang=en)
2. [LMS Sync & Call Logic](https://support.phonexa.com/lms-sync-call-logic?hsLang=en)
3. [Extra Features](https://support.phonexa.com/lms-sync-call-logic?hsLang=en#extra-features)
# Data Lists
## Learn how to create Data Lists in Phonexa to continuously collect records and download them as automated daily, weekly, or monthly rotation archives.
The Data Lists feature allows you to collect records into a named list continuously over time, and then download each completed collection period as a single packaged archive. Instead of building a report, requesting an export, and waiting for that export to be approved and generated, you define a list once and let it fill in the background. The system groups incoming records according to the Rotation you selected when creating the list - daily, weekly, or monthly. When a rotation period ends, the system closes it, packages the collected records into an archive, and makes that archive available through the Download action.
Data Lists are built for volume. A single rotation period can hold a very large number of records, and the system automatically splits the underlying files into multiple parts so that no individual file becomes too large to process or open.
**Four things happen automatically once a list is configured:**
- Records are grouped and packaged. Each closed rotation period becomes a downloadable archive with no manual export request.
- Old archives are removed. Each list has a retention setting. Archives older than the retention window are deleted automatically, which keeps storage predictable and supports data minimization requirements.
- Column rules are enforced. Each column can carry a validator and a protection setting, so data quality and sensitive-field handling are applied at the point of collection rather than after the fact.
- The data can be gathered by the built-in system trigger action **“Add Record to Data List”** event trigger, or by API requests with data posting if the corresponding API access is granted.
**Use Case: *Daily traffic analysis without export requests***
A data analyst reviews the previous day's lead post traffic every morning as part of a daily quality and performance check. The volume is significant - a single day can contain close to one million records.
Under a standard report export workflow, this creates recurring friction:
- A new export has to be requested manually every morning.
- Each export request requires instance owner approval before it runs.
- On Monday, the analyst needs three separate exports covering Friday, Saturday, and Sunday.
- Large exports can take a long time to generate, which delays the start of the review.
With Data Lists, the team creates a list once with Rotation set to Daily, defines the columns they need, and configures an Add Record to Data List tracking rule to populate it. Records flow into the list continuously as traffic is processed. Every morning, the previous day's archive is already closed, packaged, and waiting. The analyst opens System Management \> Data Lists, clicks Download on the list, selects the day they need, and receives the file - no request, no approval step, and no waiting for a job to build from scratch.
On Monday, three closed periods are available side by side, so the weekend is covered in three actions rather than three approval cycles.
*Note: This feature is available only for the LMS component.*
**Benefits:**
- **On-demand availability:** Completed rotation periods are packaged in advance and ready to download, rather than generated at the moment of request.
- **No approval bottleneck:** Recurring exports do not require instance owner approval each time they are initiated.
- **Built for high volume:** Large rotation periods are automatically split into multiple parts, so files stay manageable.
- **Automated cleanup:** Retention settings delete archives past the configured age with no manual housekeeping.
### How Data Lists Work
Understanding the lifecycle makes the configuration steps and the troubleshooting section easier to follow.
1. **Collection:** Records arrive through a tracking rule or the API and are added to the list's current open rotation period. Records are processed shortly after they are received rather than instantly, so a record submitted moments ago may not appear in a file right away.
2. **File splitting:** A rotation period holding a very large number of records is written across several files rather than one. This keeps each file small enough to open and process, and is why a single period may contain multiple files.
3. **Period close:** The rotation period ends at the close of the day, week, or month, depending on the list configuration. The system then closes the period, and no further records are added to it.
4. **Packaging:** The closed period is packaged into a single compressed archive and made available under the Download action for that list, labeled by period and showing the number of records it contains.
5. **Retention:** Each archive ages according to the Retention and Retention unit settings on the list. Once an archive passes the retention window, the system deletes it, and it no longer appears under Download.
To access the data list configuration, go to the **System Management \> General \> Data Lists** section.
The section has two tabs:
- [**Lists**](https://support.phonexa.com/data-lists#Lists)
- [**API Access**](https://support.phonexa.com/data-lists#API_Access)
### The “Lists” tab
The **“Lists”** tab allows you to create, manage, and delete the data lists. Available options include managing the columns for the data being sent, managing the option for API access to the operations with the data list, setting the timeframes for the data rotation and retention, and downloading the composed archived data files.
[](https://support.phonexa.com/hubfs/q8x3JLokba.png?hsLang=en)
You can narrow down the search results by using the following filters:
- **ID:** Enter the unique identification number of the data list.
- **Name:** Enter the name of the data list.
- **Status:** Select the current status of the data list *(Active, Disabled).*
The list of available data lists contains the following information.
- **ID:** The unique identification number of the data list.
- **Name:** The name of the data list.
- **Rotation:** The rotation option that defines how often the system groups and archives records into downloadable files for a data list (*Daily, Weekly, Monthly).* At the end of each period, the system automatically creates a new ZIP archive (splitting into multiple files if there are more than 10 million records), which will be available for downloading.
- **Retention:** The value that determines how long each archived file remains available for download before being automatically deleted. The value is a number that works together with the Retention Unit to set the retention period. For example, if **“Retention”** is set to *“7”* and the **“Retention unit”** is set to *“Day(s)”*, each file will be kept for 7 days after creation before removal.
- **Retention unit:** The time unit used with the **“Retention”** value to specify the file retention period *(Day(s), Week(s), Month(s)).*
- **Total in list:** The total number of data records accumulated in the data list.
- **Status:** The current status of the data list *(Active, Disabled).*
- **Created:** The date and time of the data list creation.
- **Created by:** The name of the user who created the data list.
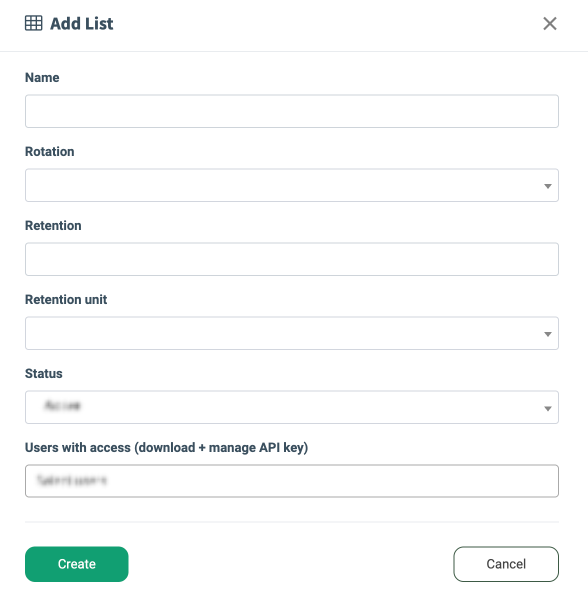
To create a new data list, click the **“Add List”** button and fill in the following fields in the pop-up window:
- **Name:** Enter the name of the data list.
- **Rotation:** Select the rotation option that defines how often the system groups and archives records into downloadable files for a data list (*Daily, Weekly, Monthly).*
- **Retention:** Enter the value that determines how long each archived file remains available for download before being automatically deleted.
- **Retention unit:** Select the time unit used with the **“Retention”** value to specify the file retention period *(Day(s), Week(s), Month(s)).*
- **Status:** Select the current status of the data list *(Active, Disabled).*
- **Users with access (download + manage API key):** Select the user(s) who will have access to download the data file(s) from the data list and manage the API Key record.
Click the **“Create”** button to complete the action.
[](https://support.phonexa.com/hubfs/jXr6o4LXQ9.png?hsLang=en)
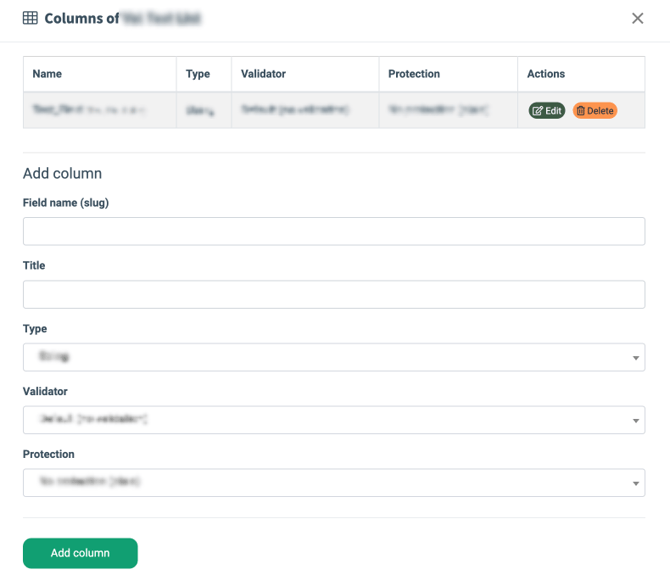
To manage the list of columns for the data list, click the **“Columns”** button in the **“Actions”** column. Fill in the following fields of the **“Add column”** block of the pop-up window:
- **Field name (slug):** Enter the name of the field. This name will be displayed in the **“Add Rule”** pop-up window while setting up the **“Add Record to Data List”** tracking rule and will also be used for sending data via API.
- **Title:** Enter the title of the field. The title will be displayed as the name of the field in the **“Add Rule”** pop-up window while setting up the **“Add Record to Data List”** tracking rule, along with the name of the field in the () that is set in the **“Field name (slug)”** field. The title may contain additional explanation for the field name.
- **Type:** Select the data type for the field *(String, Integer, Float number, Boolean, Json).*
- **Validator:** Select the validation approach for the values that should be inserted in the field *(Default (no validation), String length, Allowed values, Numeric range, Date, Date in future, Email, IP address, ZIP / Post code, Phone number). Note: If the value that should be inserted in the field fails the validation, the record will not be inserted entirely into the file for download.*
- If the *“String length”* option is selected:
- **Min length:** Enter the minimum allowed length of the string value.
- **Max length:** Enter the maximum allowed length of the string value.
- If the *“Allowed values”* option is selected:
- **Allowed values (comma separated):** Enter the values that are only allowed for the field.
- If the *“Numeric range”* option is selected:
- **Min value:** Enter the minimum allowed numeric value.
- **Max value:** Enter the maximum allowed numeric value.
- If the *“IP address”* option is selected:
- **IP type:** Select the type of the IP Address *(IPv4 + IPv6, IPv4, IPv6).*
- If the *“ZIP / Post code”* option is selected:
- **ZIP type:** Select the type of the ZIP or postal code *(US ZIP, UK Post Code, Canadian Postal Code, US / CA).*
- If the *“Phone number”* option is selected:
- **Phone type:** Select the type of the phone number *(US with country code, UK with country code).*
- **Protection:** Select the approach for the protection of the value that should be inserted in the downloadable file *(No protection (plain), Encrypted, Hash (sha1), Hash (md5)).*
Click the **“Add column”** button to complete the action.
The list of already added fields to the data list contains the following information:
- **Name:** The name of the field (the field title) with its field name (slug).
- **Type:** The data type of the field.
- **Validator:** The validation approach set for the field.
- **Protection:** The protection approach for the field value.
[](https://support.phonexa.com/hubfs/BnbpPvN0bz.png?hsLang=en)
To edit the field settings, click the **“Edit”** button in the **“Actions”** column. The field settings will be displayed in the **“Edit column”** block.
To remove the fields from the list, click the **“Delete”** button in the **“Actions”** column.
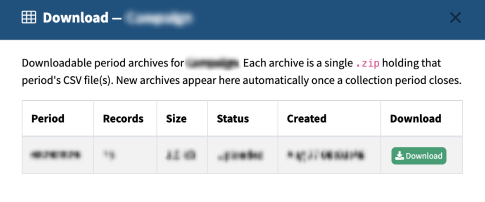
To download the file with the data that is gathered in the data list, click the **“Download”** button in the **“Actions”** column.
[](https://support.phonexa.com/hubfs/jlQwMPkdxp.png?hsLang=en)
The **“Download”** pop-up contains the following information:
- **Period:** The time period for which the data was gathered in the file.
- **Records:** The number of records gathered in the file.
- **Size:** The size of the file.
- **Status:** The current status of the file.
- **Created:** The date and time when the file was created.
- **Download:** To download the file, click the **“Download”** button in this column. *Note: The download option is available before the time range set in the* ***“Rotation”*** *and* ***“Retention”*** *fields is exceeded.*
To edit the existing data list, click the **“Settings”** button in the **“Actions”** column, change the information in the pop-up window, and click the **“Save”** button to complete the changes.
To remove the data list from the list, click the **“Delete”** button in the **“Actions”** column, and confirm the deletion in the pop-up window.
### The “API Access” tab
The **“API Access”** tab allows you to set and manage the APi access for the operations with the data lists. You can create new API access records for the system users, set the data lists that should be available for the users, along with the available operations via API, manage the existing API passwords and status of the access records, and view the API Documentation.
[](https://support.phonexa.com/hubfs/Lnb8G3VaQM.png?hsLang=en)
You can narrow down the search results by using the following filters:
- **ID:** Enter the unique identification number of the API Key record.
- **Name:** Enter the name of the API Key record.
- **Status:** Select the current status of the API Key record *(Active, Disabled).*
The list of API Key records contains the following information:
- **ID:** The unique identification number of the API Key record.
- **Name:** The name of the APi Key record.
- **API ID:** The API ID value.
- **API Password:** The API access password. To view the password, click the **“Show”** button.
- **Access:** The access level of the API Key record depending on the set of available operations *(Append (add records), Clear (reset current period), Download (fetch archives)).*
- **List:** The name of the data list to which the API access is provided.
- **Status:** The current status of the API Key record *(Active, Disabled).*
- **Created:** The date and time of the API Key record creation.
To create a new API Key record, click the **“Add API Key”** button and fill in the following fields in the pop-up window:
- **Name:** Enter the name of the API Key record.
- **Accessible List:** Select the list to which the APi access will be provided.
- **Access:** Check the boxes for the access level options depending on the operations that will be available via API:
- *Append (add records):* Allows you to add new records to the file with data.
- *Clear (reset current period):* Allows you to wipe the current period's not-yet-archived data. Records arriving during the wipe are held in the queue and written afterwards.
- *Download (fetch archives):* Allows you to download the files with data for the data list.
- **Status:** Select the current status of the API Key record *(Active, Disabled).*
Click the **“Create”** button to complete the action.
[](https://support.phonexa.com/hubfs/6nr9Z8JOQ1.png?hsLang=en)
To view the information about the API documentation for access to the data lists, click the **“API Doc”** button. You will be redirected to the **“Data Lists API Documentation”** section.
The API Documentation contains a section with the request descriptions of the endpoint URLs, a list of available fields, including value examples, samples of the code for the request, and a sample of the obtained response for the following operation with the file with the data of the data list:
- **Append record(s):** The endpoint allows you to add one or several records to the list during the current collection period.
- **Clear current period:** The endpoint allows you toclear (delete) the data for the current time period that is not yet composed into the archive. Records arriving during the clearance (deletion) are held in the queue and written afterwards.
- **List available periods:** The endpoint allows you to view the list of the composed and sealed archives that are ready to be downloaded.
- **Download an archive:** The endpoint allows you to download the archive with the data. The endpoint streams the period's zip directly as the response body (application/zip, Content-Disposition: attachment). There is no JSON wrapper; errors still use the JSON envelope (e.g., 404).
[](https://support.phonexa.com/hubfs/jNbvVv8wbW.png?hsLang=en)
To edit the existing API Key record, click the **“Edit”** button in the **“Actions”** column. Change the required information in the pop-up window below, and click the **“Save”** button to complete the changes.
To remove the API Key record from the list, click the **“Delete”** button in the **“Actions”** column and confirm the deletion in the pop-up window below.
### How To Create The “Add Records To Data List” Event Tracking Rule
The **“Add Record to Data List”** tracking rule allows you to send the data to the corresponding data list according to the trigger event that is set for the rule and the scope of the data fields set in the data list.
The **“Add Record to Data List”** tracking rule can be created on the Product, Publisher, or Campaign levels.
*Read more about Product Tracking configuration in the following Knowledge Base* [*article*](https://support.phonexa.com/product-settings-tracking-tab?hsLang=en)*.*
*Read more about Publisher Tracking configuration in the following Knowledge Base* [*article*](https://support.phonexa.com/publisher-configuration-tracking?hsLang=en)*.*
*Read more about Campaign Tracking configuration in the following Knowledge Base* [*article*](https://support.phonexa.com/campaign-configuration-tracking?hsLang=en)*.*
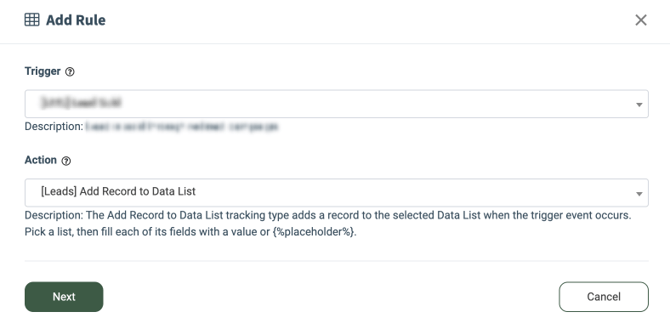
- **Trigger:** Select the event that triggers the action:
- **\[LMS\] Lead Sold:** The lead is sold through the Campaign.
- **\[LMS\] Lead Rejected:** The lead is not accepted by any Campaign.
- **\[LMS\] Campaign Rejected:** The Campaign has rejected the lead.
- **\[LMS\] Campaign Sold:** The lead was sold to the Сampaign.
- **\[LMS\] Revenue Ping Back:** The revenue pingback has been sent.
- **\[LMS\] Publisher Earning Received:** The Publisher has received earnings.
- **\[LMS\] Disposition Updated:** The Buyer Disposition has been updated.
- **\[LMS\] Publisher Earning Adjusted:** The Lead Adjustment was made by the Publisher.
- **\[LMS\] Lead Return:** The lead has been returned.
- **\[LMS\] Lead Partial Return:** The lead has been partially returned.
- **\[LMS\] Price Reject Sold:** The lead with the price reject is sold.
- **\[LMS\] Price Reject Rejected:** The lead with the price reject is rejected.
- **\[LMS\] Price Reject Register:** The lead was registered as a price reject and sold to the corresponding silent campaign.
- **Action:** Select the **“\[Leads\] Add Record to Data List”** option.
[](https://support.phonexa.com/hubfs/5ArWLpOzQ9.png?hsLang=en)
Once you select the preferred event, click the **“Next”** button to proceed with the setup.
- **Method:** Select the Method (POST, FORM).
- **Publisher:** Select the Publisher.
- **Publisher Exclude:** Select the Publisher to exclude from the rule.
- **Channel:** Select the Channel.
- **Channel Exclude:** Select the Publisher Channel to exclude from the rule.
- **Source:** Select the Source.
- **Source Exclude:** Select the Source to exclude from the rule.
- **Buyer:** Select the Buyer.
- **Buyer Exclude:** Select the Buyer to exclude from the rule.
- **Campaign:** Select the Campaign.
- **Campaign Exclude:** Select the Campaign to exclude from the rule.
- **Pingtree:** Select the Pingtree.
- **Pingtree Exclude:** Select the Pingtree to exclude from the rule.
- **Price Restrictions:** Select the Price restrictions *(Price is greater than 0, Price is greater than a certain value, Price is greater than or equal to a certain value, Price is lower than a certain value, Price is lower than or equal to a certain value, Price range inclusive). Note: The “Price range inclusive” value is available only for the “Lead Sold” and “Campaign Sold” triggers.*
- **Price Restriction Value:** Enter the price value.
- **Earning Restrictions:** Select the Earning restrictions *(Publisher Revenue is greater than 0, Publisher Revenue is greater than a certain value, Publisher Revenue is greater than or equal to a certain value, Publisher Revenue is lower than a certain value, Publisher Revenue is lower than or equal to a certain value, Publisher Revenue range inclusive).*
- **Earning Restriction Value:** Enter the earning value.
[](https://support.phonexa.com/hubfs/Deb5BDevx1.png?hsLang=en)
[](https://support.phonexa.com/hubfs/jXr6oV1KQ9.png?hsLang=en)
- **Data List:** Select the data list to which the lead data should be sent.
After selecting the data list, select the placeholder for the fields that were set as columns for the data list, from which the data will be collected to the file for download.
*Note: The list of available fields depends on the set of columns of the data list.*
[](https://support.phonexa.com/hubfs/p9Q24jpVx5.png?hsLang=en)
The Warning Notifications block allows you to specify the actions for the system to determine as an error.
*Read more about the Warning Notifications settings in the following Knowledge Base* [*article*](https://support.phonexa.com/product-settings-tracking?hsLang=en)*.*
- [General information](https://support.phonexa.com/general-information?hsLang=en#main-content)
- [Account Settings](https://support.phonexa.com/general-information?hsLang=en#account-settings)
- [Security Settings](https://support.phonexa.com/general-information?hsLang=en#security-settings)
- [Users](https://support.phonexa.com/general-information?hsLang=en#users)
- [System Customization](https://support.phonexa.com/general-information?hsLang=en#system-customization)
- [Project Customization](https://support.phonexa.com/general-information?hsLang=en#project-customization)
- [Product Customization](https://support.phonexa.com/general-information?hsLang=en#product-customization)
- [System Management](https://support.phonexa.com/general-information?hsLang=en#system-management)
- [Support](https://support.phonexa.com/general-information?hsLang=en#support)
- [LMS Sync & Call Logic](https://support.phonexa.com/lms-sync-call-logic?hsLang=en#main-content)
- [Extra Features](https://support.phonexa.com/lms-sync-call-logic?hsLang=en#extra-features)
- [Publisher Configuration](https://support.phonexa.com/lms-sync-call-logic?hsLang=en#publisher-configuration)
- [Client Management](https://support.phonexa.com/lms-sync-call-logic?hsLang=en#client-management)
- [System Logs](https://support.phonexa.com/lms-sync-call-logic?hsLang=en#system-logs)
- [Documents And References](https://support.phonexa.com/lms-sync-call-logic?hsLang=en#documents-and-references)
- [Reports and Analytics](https://support.phonexa.com/lms-sync-call-logic?hsLang=en#reports-and-analytics)
- [Publisher management](https://support.phonexa.com/lms-sync-call-logic?hsLang=en#publisher-management)
- [Call Logic Customization](https://support.phonexa.com/lms-sync-call-logic?hsLang=en#call-logic-customization)
- [Campaign Configuration](https://support.phonexa.com/lms-sync-call-logic?hsLang=en#campaign-configuration)
- [Feed CMS](https://support.phonexa.com/lms-sync-call-logic?hsLang=en#feed-cms)
- [Event Tracking](https://support.phonexa.com/lms-sync-call-logic?hsLang=en#event-tracking)
- [iClear](https://support.phonexa.com/lms-sync-call-logic?hsLang=en#iclear)
- [E-Delivery](https://support.phonexa.com/e-delivery?hsLang=en#main-content)
- [List Management](https://support.phonexa.com/e-delivery?hsLang=en#list-management)
- [Email Campaigns](https://support.phonexa.com/e-delivery?hsLang=en#email-campaigns)
- [SMS Campaigns](https://support.phonexa.com/e-delivery?hsLang=en#sms-campaigns)
- [Reports](https://support.phonexa.com/e-delivery?hsLang=en#reports)
- [Suppression Management](https://support.phonexa.com/e-delivery?hsLang=en#suppression-management)
- [Books360](https://support.phonexa.com/books360?hsLang=en#main-content)
- [Books 360 Integration](https://support.phonexa.com/books360?hsLang=en#books-360-integration)
- [Vendor Management](https://support.phonexa.com/books360?hsLang=en#vendor-management)
- [Account](https://support.phonexa.com/books360?hsLang=en#account)
- [Customer Management](https://support.phonexa.com/books360?hsLang=en#customer-management)
- [Opt-Intel](https://support.phonexa.com/opt-intel?hsLang=en#main-content)
- [List Management](https://support.phonexa.com/opt-intel?hsLang=en#list-management)
- [All Reports](https://support.phonexa.com/opt-intel?hsLang=en#all-reports)
- [Mailers](https://support.phonexa.com/opt-intel?hsLang=en#mailers)
- [Campaigns](https://support.phonexa.com/opt-intel?hsLang=en#campaigns)
- [System Management](https://support.phonexa.com/opt-intel?hsLang=en#system-management)
- [HitMetrix](https://support.phonexa.com/hitmetrix?hsLang=en#main-content)
- [Analytics](https://support.phonexa.com/hitmetrix?hsLang=en#analytics)
- [Heatmaps](https://support.phonexa.com/hitmetrix?hsLang=en#heatmaps)
- [System Management](https://support.phonexa.com/hitmetrix?hsLang=en#system-management)
- [Lynx](https://support.phonexa.com/lynx?hsLang=en#main-content)
- [Offers](https://support.phonexa.com/lynx?hsLang=en#offers)
- [LYNX Reports](https://support.phonexa.com/lynx?hsLang=en#lynx-reports)
- [Advertisers](https://support.phonexa.com/lynx?hsLang=en#advertisers)
- [Affiliates](https://support.phonexa.com/lynx?hsLang=en#affiliates)
- [Account Settings](https://support.phonexa.com/lynx?hsLang=en#account-settings)
- [Cloud PBX](https://support.phonexa.com/cloud-pbx?hsLang=en)
[](https://phonexa.com/?hsLang=en)
Phonexa Knowledge Base
Copyright © 2026, Phonexa