An Email Opt-out List, also known as a Suppression List, is used by email senders to comply with the CAN-SPAM Act of 2003. It serves as a repository for unsubscribed email addresses, allowing recipients to opt out of receiving future emails. Suppression Lists must be protected to prevent abuse, where third parties use them to send emails, potentially leading to legal liability for the original sender. Measures such as third-party list scrubbing, MD5 or SHA-512 secure hash lists help safeguard Suppression Lists.
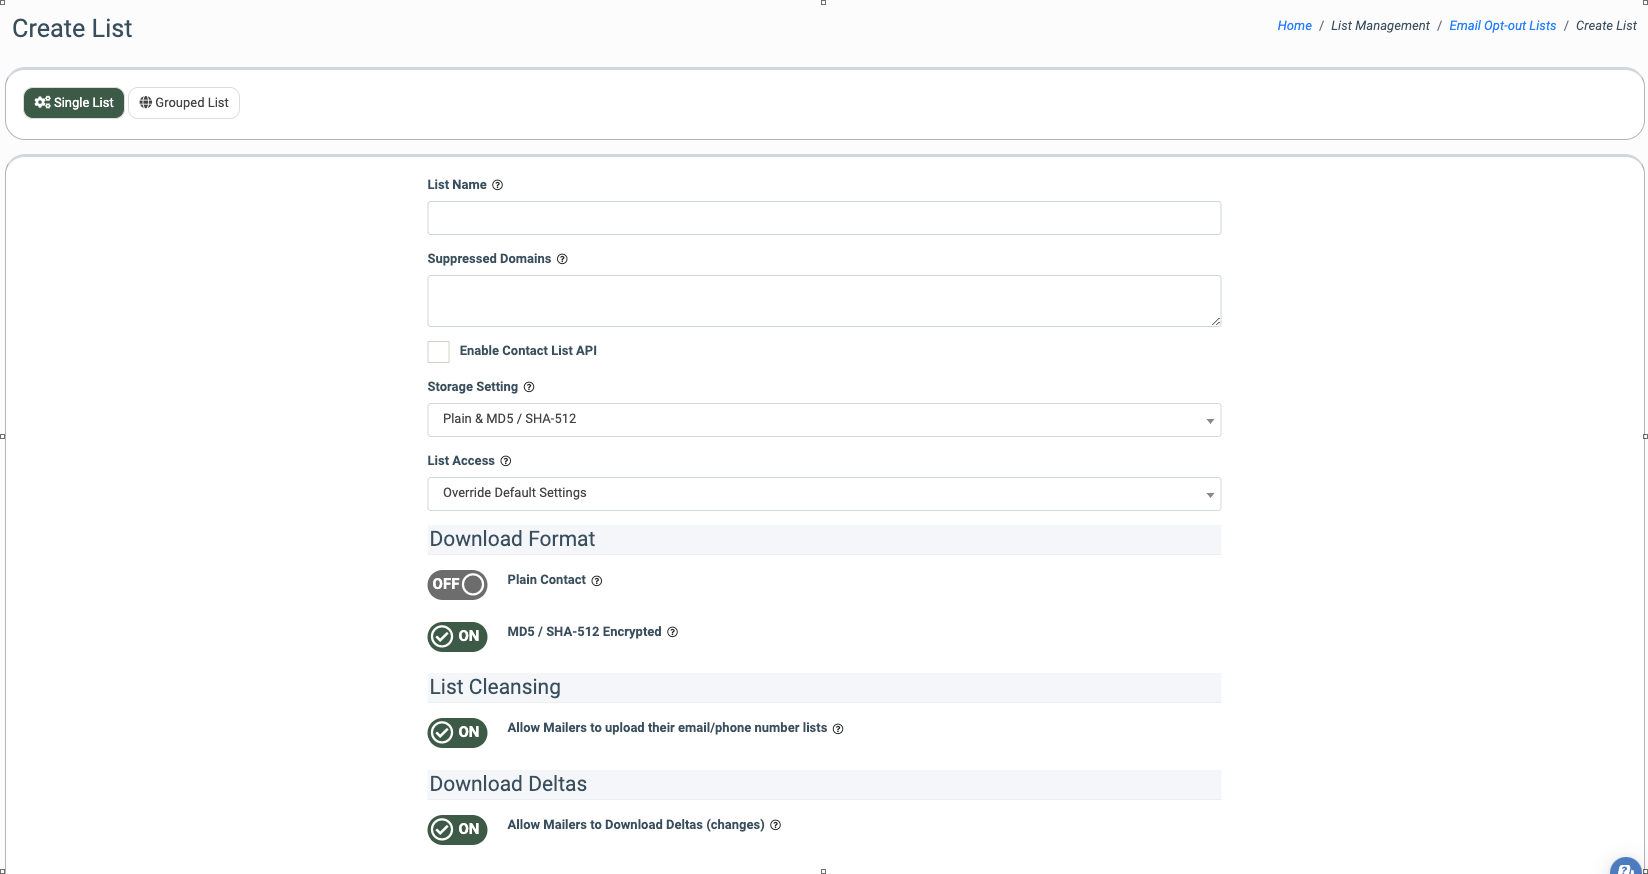
There are two types of lists: “Single List,” which comprises email addresses, and “Grouped List,” which contains multiple Single Lists.
To manage the email opt-out lists, go to the List Management > Email Opt-out Lists section.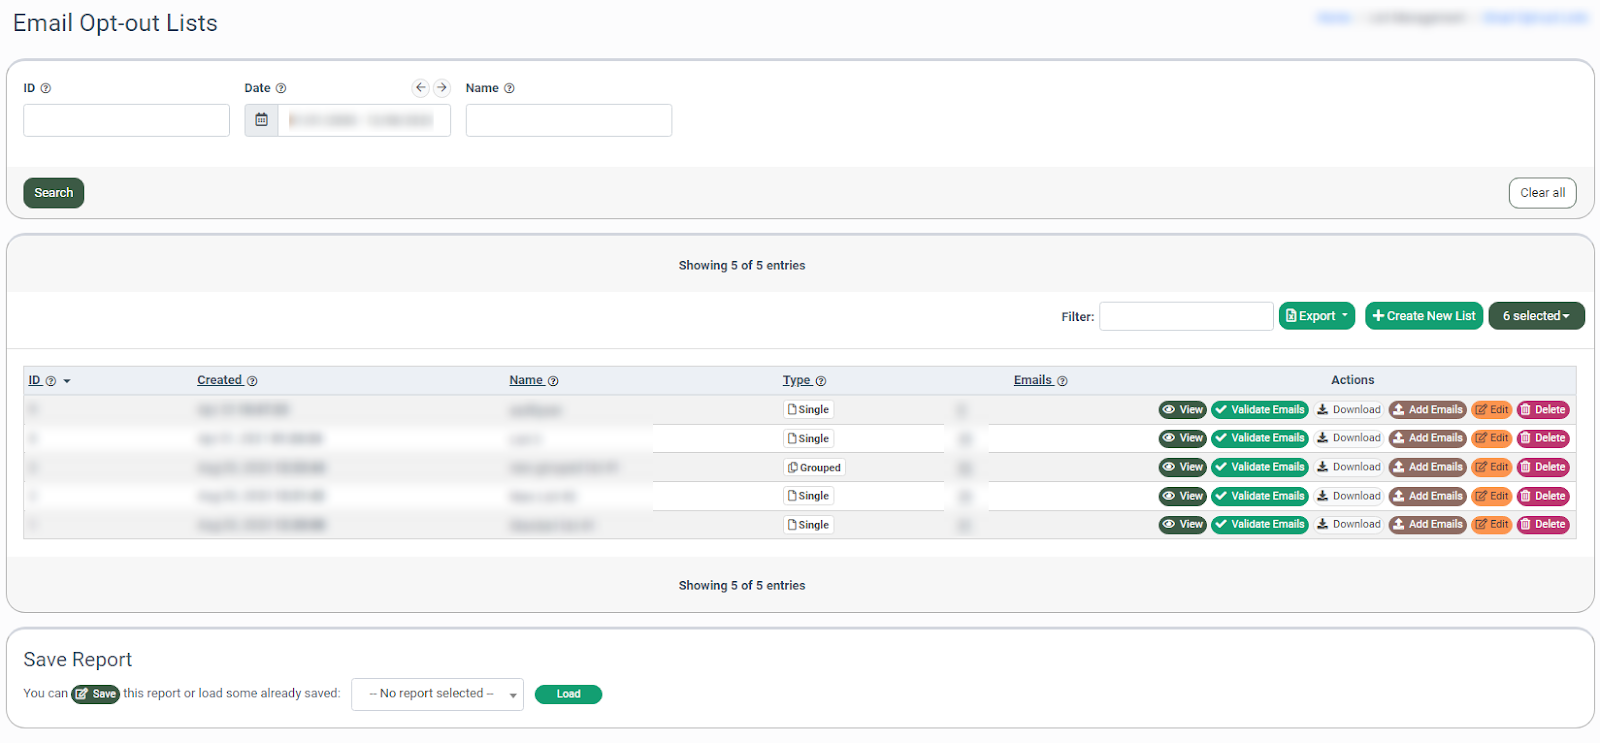
You can narrow down the search results by using the following filters:
- ID: Enter the list ID.
- Date: Select the date range.
- Name: Enter the name of the list.
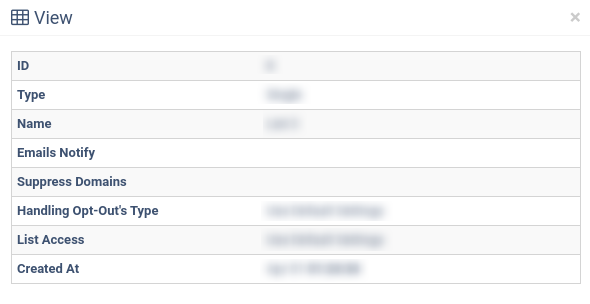
The “Email Opt-out Lists” section contains the following information:
- ID: The unique identification number of the list.
- Created: The date when the list was created.
- Name: The name of the list.
- Type: The type of the list (Single List/ Grouped List).
- Emails: The number of emails in the list.
To add a new list, click the “+ Create New List” button. The system will then redirect you to the “Create List” page. To create a Single List or a Grouped List that contains multiple Single Lists, click the corresponding tab and fill in the following fields:
- List Name: Enter the name of the list.
- Suppress Domains: Enter the domain name you want to suppress on the list level when you perform list cleansing.
- Enable Contact List API: Check the box to create API documentation automatically.
- Storage Setting (Single List): Select the data storage method: Plain & MD5 / SHA-512 (both encrypted and plain text) or MD5 / SHA-512 Only (encrypted only).
- Distribution Lists (Grouped List): Select the Single Lists to be combined into the Grouped List.
- Collection Lists (Grouped List): Select the Single List(s) you want the new opt-outs to be shared. When an opt-out is collected by any Campaign that uses this Grouped List, it will be shared with the Single List(s) added to the Collections Lists.
- List Access: Select one of the options to define the format of the list downloaded by the mailer, the mailer’s access to list cleansing, and the download deltas options (Use default settings or Override default settings). If Override Default Settings is selected, you can edit the following fields:
-
- Download Format:
- Plain Contact: Download the list in its original plain text format.
- MD5 / SHA-512 Encrypted: Download the list with MD5 and/or SHA-512 encryption for added security.
- List Cleansing:
- Allow Mailers to upload their email lists: : Allow mailers to upload their email/phone number lists and perform list cleansing.
- Download Deltas:
- Allow Mailers to Download Deltas (changes): Allow mailers to download only the latest changes (new or modified entries) since their last upload.
- Download Format:
- Handling Opt-Outs: Select one of the options to define how the system handles opt-outs:
- Use default settings: Select this option to use the default settings.
- Redirect users after opt-out: Select this option to redirect users to another page after they have unsubscribed.
-
-
- Your Return Page: Enter the URL of the page to which the system will redirect users.
- Append the Opt-Out Email Address to the return page: Switch the toggle to the “ON” position to enable.
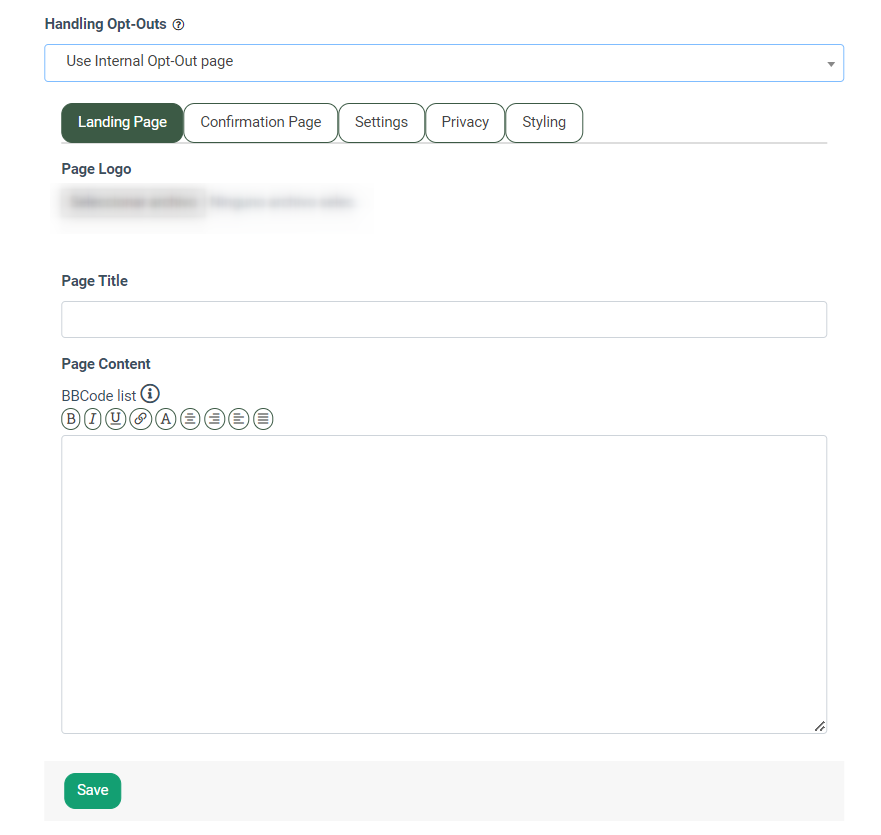
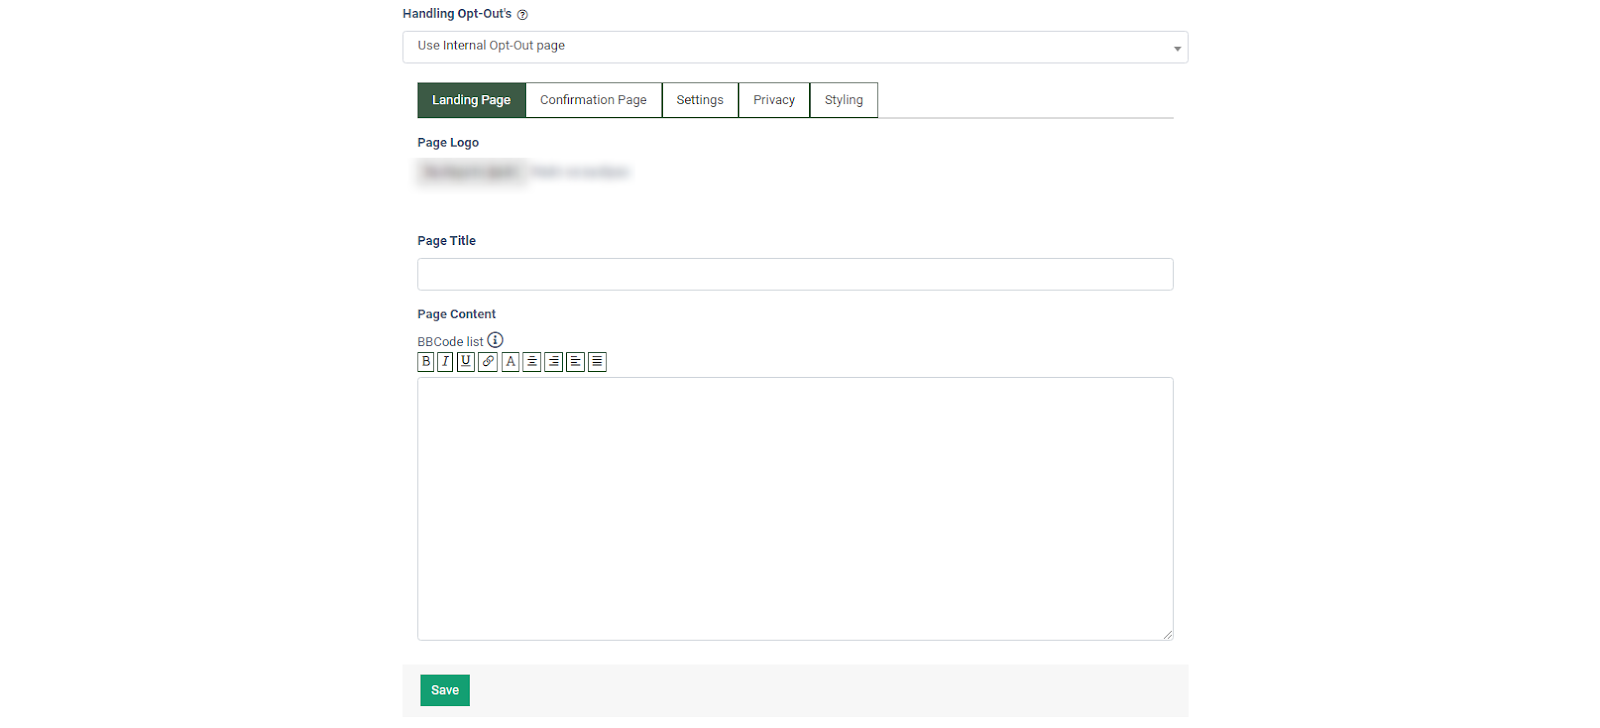
- Use Internal opt-out page: Select this option to use the Internal opt-out page settings. You can set up the following tabs:
- Landing Page:
- Page Logo: Select the landing page logo file.
- Page Title: Enter the landing page title.
- Page Content: Enter the landing page content.
- Confirmation page:
- Page Title: Enter the confirmation page title.
- Page Content: Enter the confirmation page content.
- Settings:
- Send Opt-Out Copy: Switch the toggle to the “ON” position to enable. Once enabled, enter the URL on which the Opt-Out copy will be sent.
- Privacy:
- Privacy Content: Enter the privacy content.
- Privacy Page, URL: Enter the privacy page, URL.
- Styling:
- .header: Enter the header styling.
- .body: Enter the body styling.
- .footer: Enter the footer styling.
- Landing Page:
- Opt-outs are handled by a third-party: Select this option to handle the opt-outs by a third-party service.
-
- Third Party Opt-Out Link: Enter the third-party Opt-Out link.
Click the “Save” button to confirm.
To view detailed information about the list, click the “View” button in the “Action” column.
 To perform real-time email validation, categorize email addresses based on quality, and determine responsive emails, click the "Validate Emails" button in the “Action” column, then enter "Yes" in the appropriate field to confirm the verification process.
Note: To enable the email addresses real-time validation service, you need to activate it in System Subscriptions first (System Management > System Subscription > Opt-Intel > Additional features > Email Validation and Hygiene).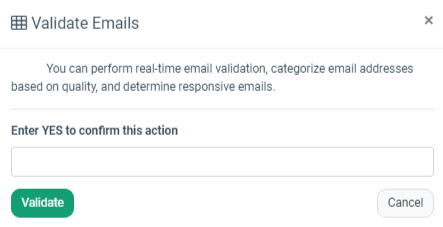
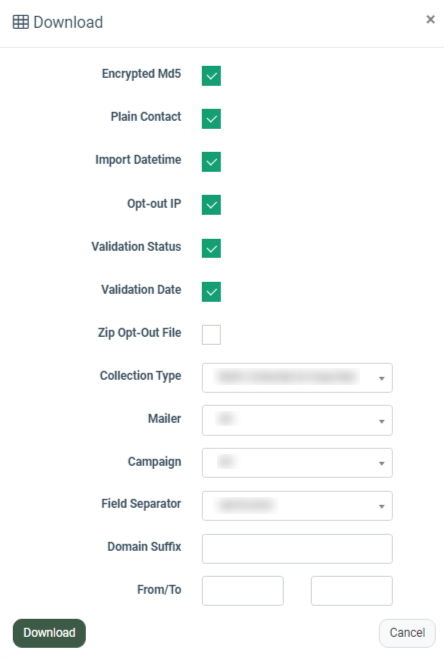
To download the Email List, click the “Download” button in the “Action” column. You can set the format of the downloaded list by selecting the following options:
- Encrypted MD5: Select the checkbox to download the emails in the encrypted format.
- Encrypted SHA-512: Select the checkbox to download the emails in the SHA-512 encrypted format.
- Plain Contact: Select the checkbox to download the emails in plain text format. This option is only available if contacts are stored in Plain&MD5 / SHA-512 format.
- Import Datetime: Select the checkbox to add the contact creation date column to the list.
- Opt-Out IP: Select the checkbox to add the out-out IP address to the list.
- Validation Status: Check the box to add the contact validation status to the list.
- Validation Date: Check the box to add the contact validation date to the list.
- Zip Opt-Out File: Select the checkbox to download the list in the .zip file format.
- Password for Zip: Check the box to enter the password for the .zip file.
- Password: Enter the password for the .zip file.
- Collection Type: Select the type of contacts to be included in the list. (Both Collected & Imported, Collected via Opt-Out Pages Only, Imported Emails,MD5s only).
- Mailer: Select the mailer to download the opt-outs for the specific mailer or select “All” to download all contacts.
- Campaign: Select the campaign related to the chosen mailer to download the opt-outs for the specific campaign only or select “All” to download all contacts related to the mailer(s).
- Field Separator: Select the field separator for the list. (semicolon, comma, tab, pipe).
- Domain Suffix (optional): Enter the domain suffix to download contacts for the specified domains only, e.g., gmail.com. You can list the domains using commas.
- From/To (optional): Enter the start and end dates to include the contacts added to the list during a specified time frame.
To download the list in the selected format, click the “Download” button.
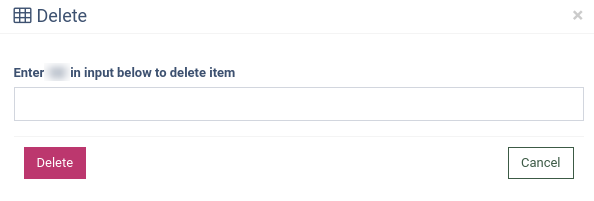
To add the emails to the list, click the “Add Emails” button in the “Action” column. You can upload the file with the email list or enter it into the “Paste List” field and click the “Add Emails” button.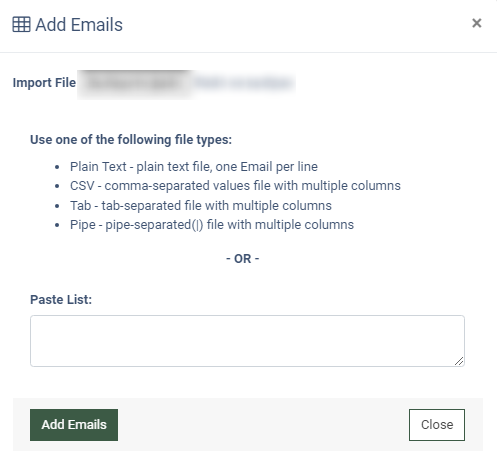 To delete a list, click the “Delete” button in the “Action” column, follow the instructions, and click the “Delete” button to confirm your action.
To edit the list, click the “Edit” button in the “Action” column, and the system will redirect you to the configuration page. Editing options will depend on the type of list (Single List, Grouped List). The descriptions for the editing options are the same as those described above.