Form Builder Overview
To view the section, go to the Publisher Management > Promo Materials > Form Builder section and click the “Form Builder” button in the “Actions” column.
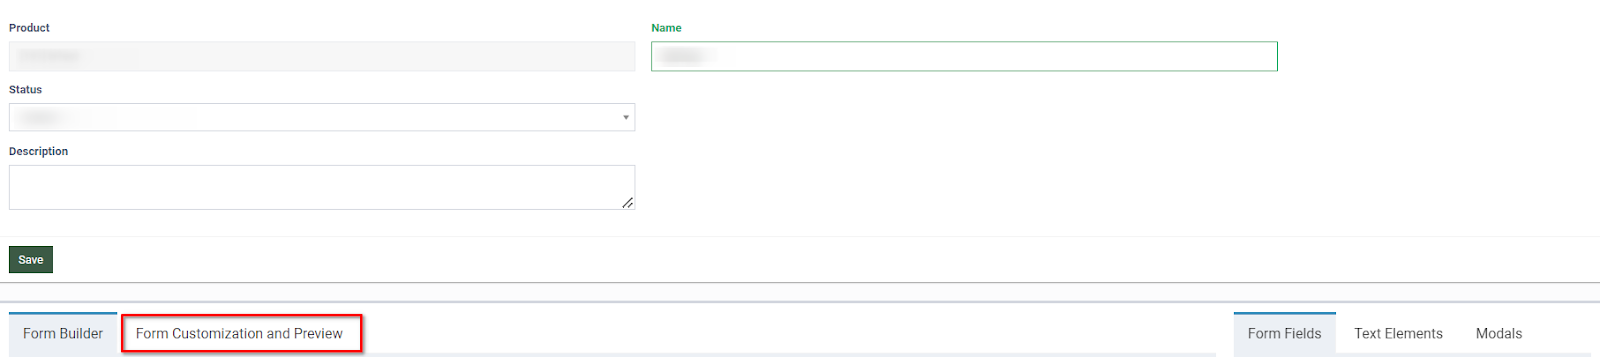
You can manage general form settings at the top section of the Form Builder setup page:
-
Product: The name of the Product.
-
Name: The name of the template.
-
Status: The status of the form (Active / Deleted / Disabled). To activate the form, change the status to "Active".
-
Description: Add additional information in the text field. Note: The description is displayed in the form.
Click the “Save” button to complete the changes.
Note: If you make any changes to the template, you will need to re-save the template. Otherwise, you will get an error under “Publisher” in the “Preview” while creating the form.
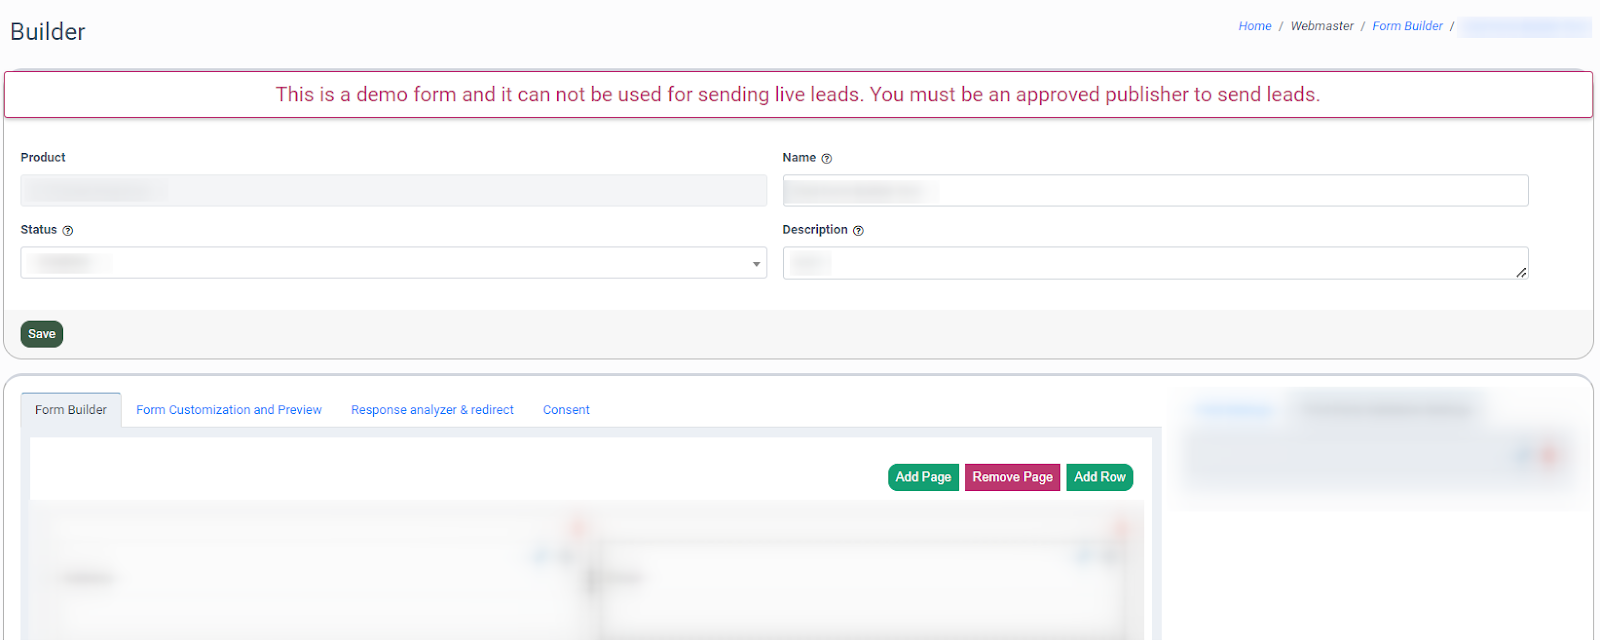
Create New Form
To create and customize the form, use the “Form Builder” tab.
Note: By default, fields included in the template (both required and optional) can not be removed or renamed, as it corresponds to the API.
Adding Elements
In the “Form Builder” section, you can add the following general elements to the form:
-
Page
-
Row
To add a new field block into the constructor, click the “Add Page” button.
If you use the multi-page forms (two or more pages), the system will automatically display the additional “Progress Bar” block. This block displays the progress of the form-filling process.

To edit the “Progress Bar” element, click the “pencil” icon in the upper right corner and configure the data in the “Field Settings” tab on the right:
- Show progress bar: Select the ‘Yes’ / ’No’ option to display / hide the progress bar in the form.
- Show progress percents: Select the ‘Yes’ / ’No’ option to display / hide the form-filling progress percents in the form.
- Show back button in the progress bar: Select the ‘Yes’ / ’No’ option to display / hide the “Back” button which brings the users back to the previous step.
Click the “Save” button to apply changes.
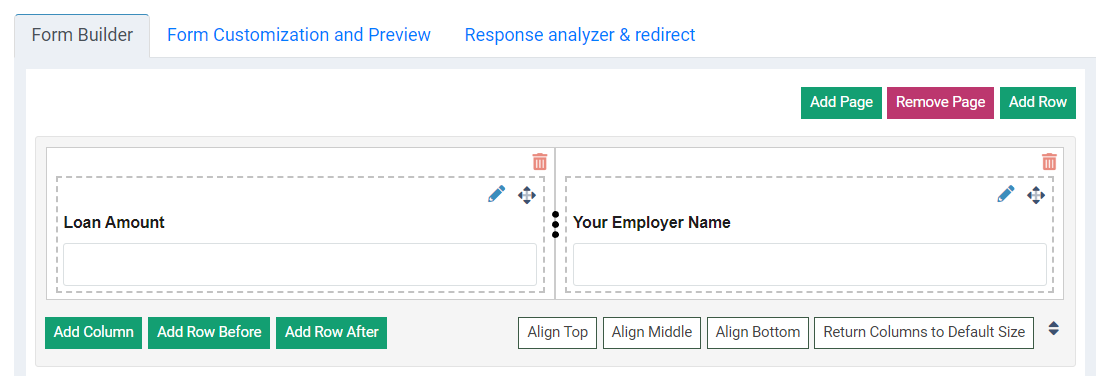
To add rows and display additional tools within the field's page, click the "Add Row" button.
To remove the page, click the “Remove page” button.
A new page is added at the bottom after the existing one by default. The page automatically will be generated with a number of the page.
A new row is added at the bottom after all other rows on the page.
To change the row position in the form, use the following buttons: “Add Column,” “Add Row Before” or “Add Row After” buttons.
To add a new column in a row (threshold is four), click the “Add Column” button.
To resize columns, use the drag and drop separator between them.
To configure the location of the columns in the block, use the following buttons:
-
Align Top: Adjust the row by top.
-
Align Middle: Adjust the row by middle.
-
Align Bottom: Adjust the row by the bottom.
-
Return Columns to Default Size: Return the width of columns to the initial state.
To add elements to the form, use the “Form Fields” tab and “Custom” subtab. Select the element and drag it into the column.
Note: If you specify an empty text value for a field that has a tooltip, the icon will disappear. You can customize the service texts and links using CSS and HTML.
Note: You cannot add another “Form Fields” or “Text Elements” if the column is not empty.
To move the field to the opposite side, click on the row and drag it to the left or right side.
To remove the field, click the “Bucket” icon (only if it is an optional field).

To delete the column from the block, click the “Red Bucket” icon.

Note: The icon is available only for not required columns.
Field Configuration
To edit the column’s element, click the “pencil” icon in the upper right corner and configure the data in the “Field Settings” tab on the right.
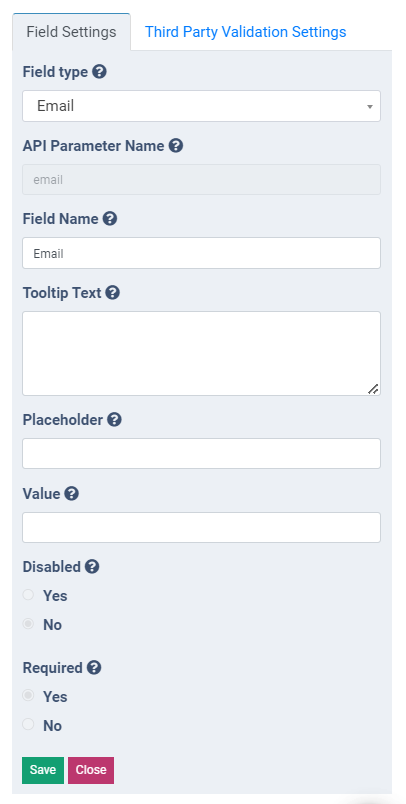
The “Field Settings” tab contains the following settings:
- Field type: The name of the field type.
- API Parameter Name: Enter the API parameter name used for field mapping. The name must start with a letter and can contain letters (A-Z, a-z), numbers (0-9), and underscore (_). It cannot contain any spaces.
-
Field Name: Enter the name of the field.
-
Tooltip Text: The entered text is shown as a hint above the row. To view the changes, click the “Save” button and navigate to the “Form Customization and Preview” tab.
-
Placeholder: Fill in the placeholder field to display text in the background and hint at what needs to be input in this field. Click the “Save” button to apply the changes.
-
Mask: Set a restriction on input values in a definite format.
-
Options: This field allows you to create checkboxes and radio buttons.
-
Date format: This field allows you to set up and display the date in a specific format.
-
Disabled: If the “Yes” value is selected, the field will be inaccessible in the form.
-
Required: If the “Yes” value is selected, the field in the form will be required to submit the form.

- Parent field dependency: If the parent field is selected, the current field becomes optional and invisible until the condition is met.
Note: This setting shows up only if the field is required. - Condition type: Select the condition type (Equal / Less / Greater).
- Condition value: Enter the value of the parent field.
Note: You can use placeholders or for Equal condition type. The "One of the values" option is allowed for Equal condition type, enter the values separated by "|". - Condition options: Set up the condition options.
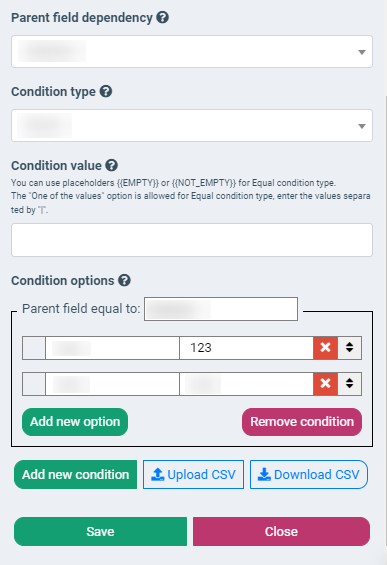
Use case: For example, showing different educational programs based on the user’s answer to the University question. If the user selects Cambridge, show Economics, Computer Science, and Sociology. If the user selects CSU, show Computer Science, Applied Informatics, and Biology.
To add a new condition, click the “Add new condition” button.
To upload the conditions via CSV file, click the “Upload CSV” button.
To download the conditions via CSV file, click the “Download CSV” button.
Click the “Save” button to apply changes.
Adjusting settings for requirements of the input value.
Note: If the field “Disabled” = “Yes” and the field “Required” = “Yes” then the user will not be able to input the value in the required field and submit the form.
-
Value: The value by default for input fields.
-
On Click: Add an action button to the form. Select one from the drop-down list (“Submit”, “Next page”, “Previous Page”).
-
Text: The field for text input.
Click the “Save” button on the right side of the page to apply and save the changes.
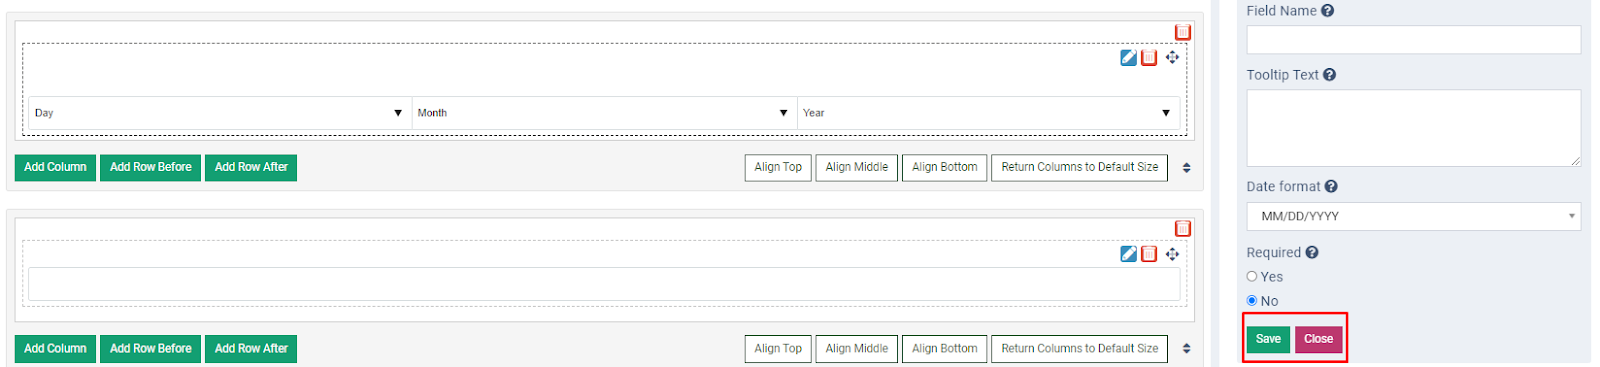
Note: If you only save settings through the “Save” button located at the top of the page, all changes will not be applied and saved.
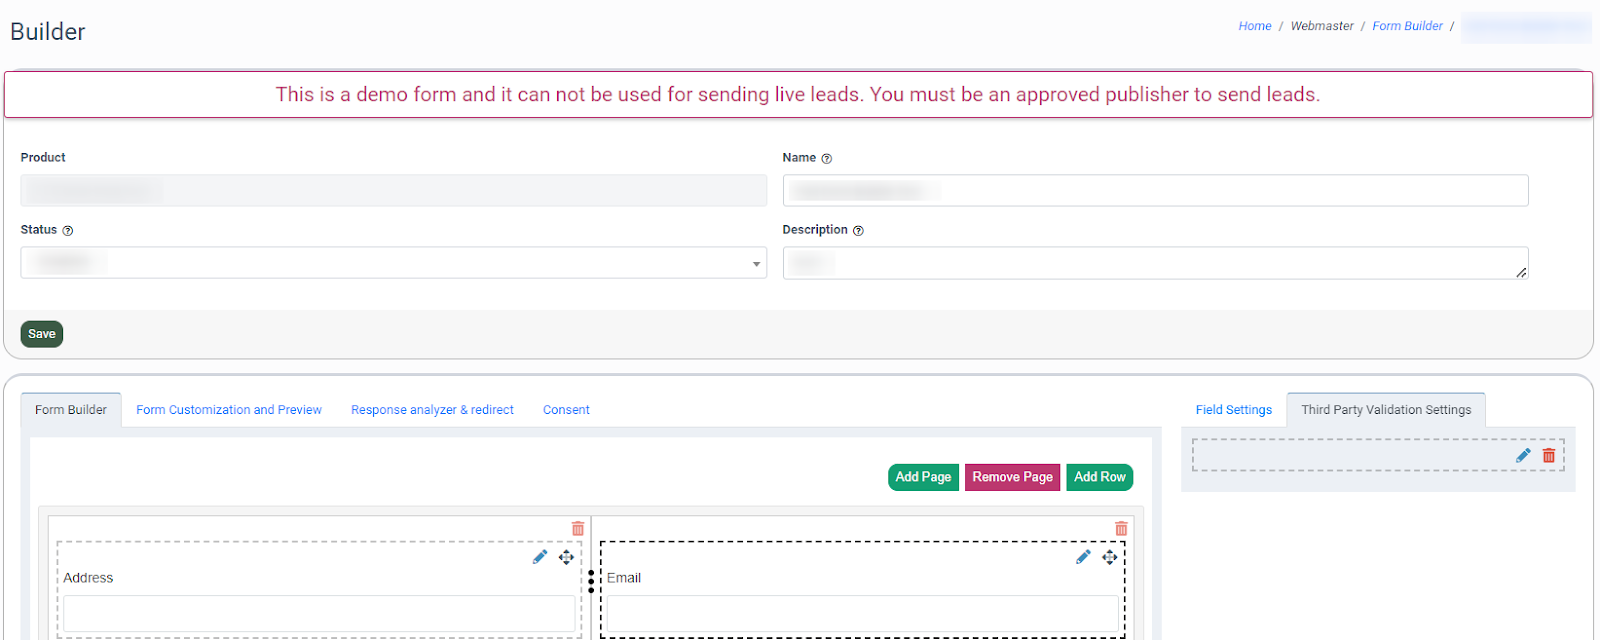
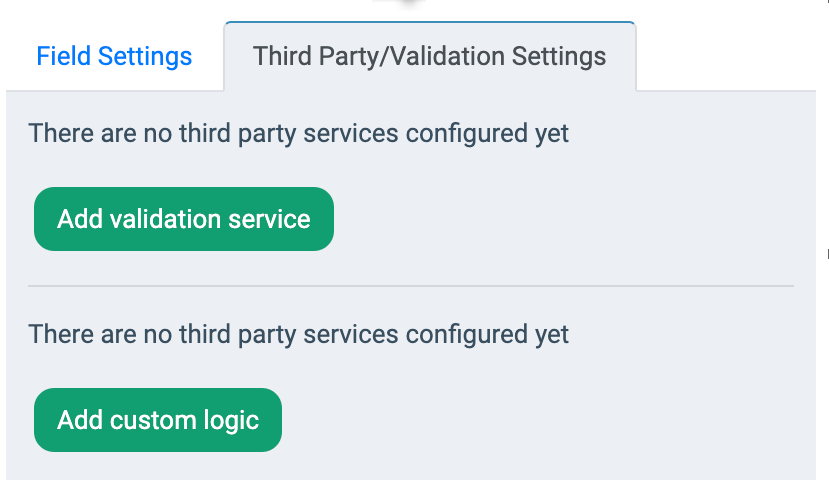
Third Party / Validation Settings
To add the third-party service to the form element, click the “Third Party / Validation Settings” tab. To validate the field via the iClear third-party service, click the “Add validation service” button. To validate the field via the third-party service with a custom logic specific to the Form Builder, click the “Add custom logic” button.
Note: Available only for Text, Email, Phone Number, URL, and Number fields.
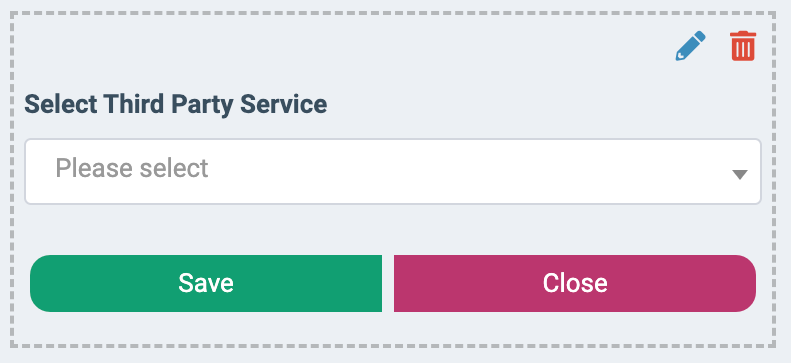
Select the service from the drop-down list and fill in the required fields.
The following services are available:
- Basic Phone Number Validation: Phone Number Validation allows you to check the phone number validity.
- Email Hygiene: Email Hygiene is the service that performs real-time validation of the lead email address and assigns it into three categories — valid, risky, and toxic.
- Geo by Phone: Allows you to define the country and area code based on phone number value and set lead processing rules.
- Geo by Postal Code (Spain): The Geo by Postal Code (Spain) third-party service allows you to determine the province in Spain based on the postal code prefix using data from our internal database.
- ImpressionWise Email Lookup: ImpressionWise Email Lookup is the service that performs real-time validation of the lead email address through ImpressionWise 3rd-party service.
- Litigant Alert: Ability to search and analyze incoming phone numbers in real-time for existing TCPA, FDCPA, and FCRA lawsuits, to help prevent fraud, enhance consumer experience, and maintain compliance.
- Litigator Database Lookup: Litigator Database Lookup is the service that identifies leads as TCPA plaintiffs and litigators.
- Phone Number Analysis: Phone Number Analysis enables quick user verification and chargeback defense on a global scale by analyzing phone numbers to verify their risk score, country of origin, carrier, validity, and line connection status while also detecting fraudulent activity in real time.
- The Blacklist Alliance: The Blacklist Alliance is the service that identifies leads as TCPA plaintiffs and litigators based on the response from the Blacklist Alliance 3rd-party service.
- US Zip Code validation: Validate the ZIP Code through the ZIP code database and extract the state from it.
- XVerify Email Lookup: XVerify Email Lookup is the service that performs real-time validation of the lead email address through XVerify 3rd-party service.
- iClear: Caller Identity: The iClear: Caller Identity service allows you to perform real-time validation of an individual’s first name, last name, address, and other identity-related details by a provided phone number using a third-party database.
- Address Validation: Address Validation is a third-party service that allows you to check and validate the lead's address and either correct or reject the lead with an invalid address.
- Do Not Call Check: The Phone Number Analysis Do Not Call check third-party service allows you to ensure quick user verification and chargeback defense on a global scale by analyzing phone numbers to verify their risk score, country of origin, carrier, validity, and line connection status while detecting fraudulent activity in real time.
- Companies House API: The Companies House API third-party service allows you to retrieve and prefill the searched company and its officers' details on your form. Note: The service is available only for the UK region.
- Property Reach - Address Auto-Complete: The Address Auto-Complete third-party service provides address, city, state, county, and owner suggestions based on your search string when completing the address field in the form.
Note: This is a paid service and must be enabled in the System Management > System Subscriptions section beforehand.
Note: You can add one third-party service for one form field, but you can use one service for different form fields.

If the required service is not available in the list, follow the next steps to add it:
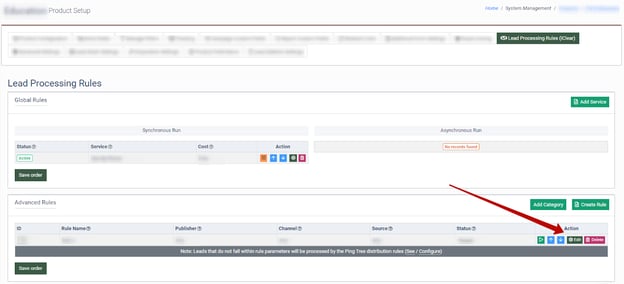
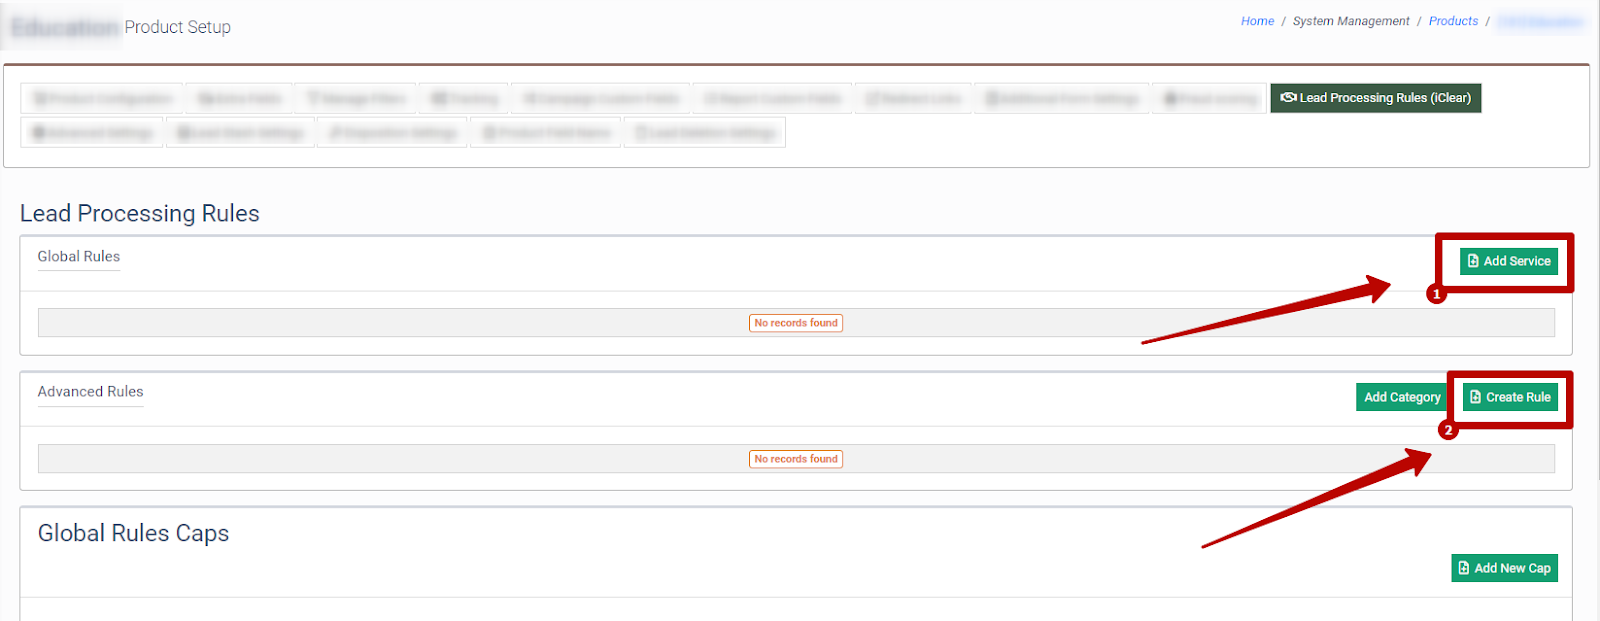
- Go to the System Management > Product section and click the “Settings” button in the Action column. Select the Lead Processing Rules (IClear) tab, click the “Add Service” button in the Global Rules block, and fill in the following fields.
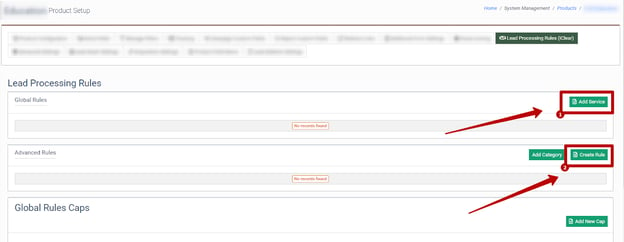
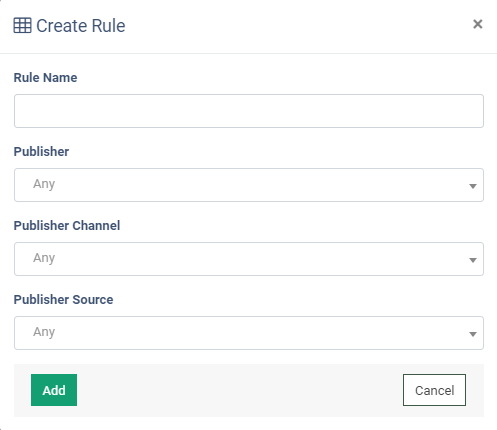
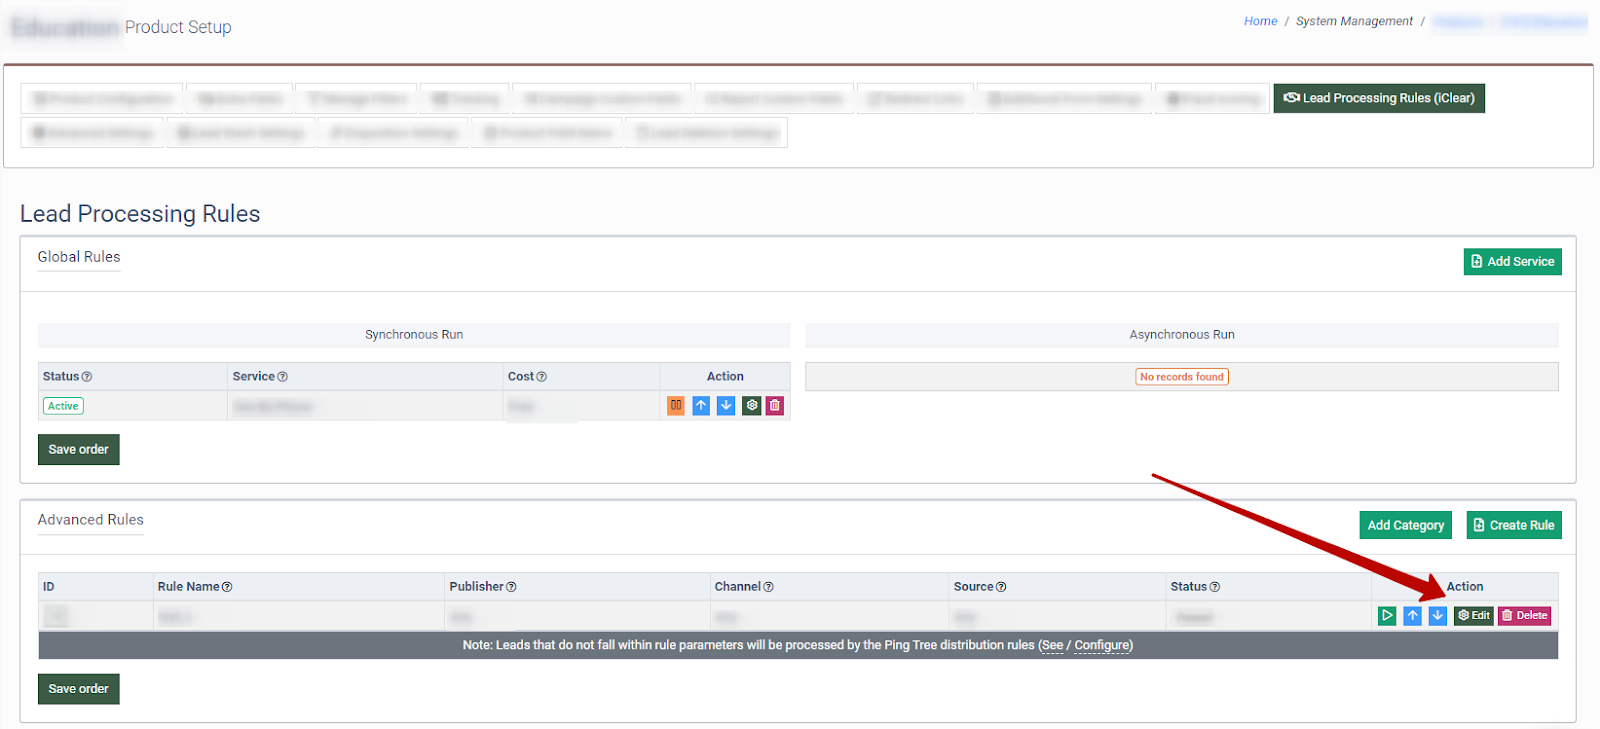
- Click the “Create Rule” button in the Advanced Rules block and fill in the following fields:
- Rule name: Enter the name of the Rule.
- Publisher: Select the Publisher.
- Publisher Channel: Select the Publisher Channel.
- Publisher Source: Select the Publisher Source.
- Click the “Edit” button in the Action column and you will be redirected to the Lead Processing Rule edit page.
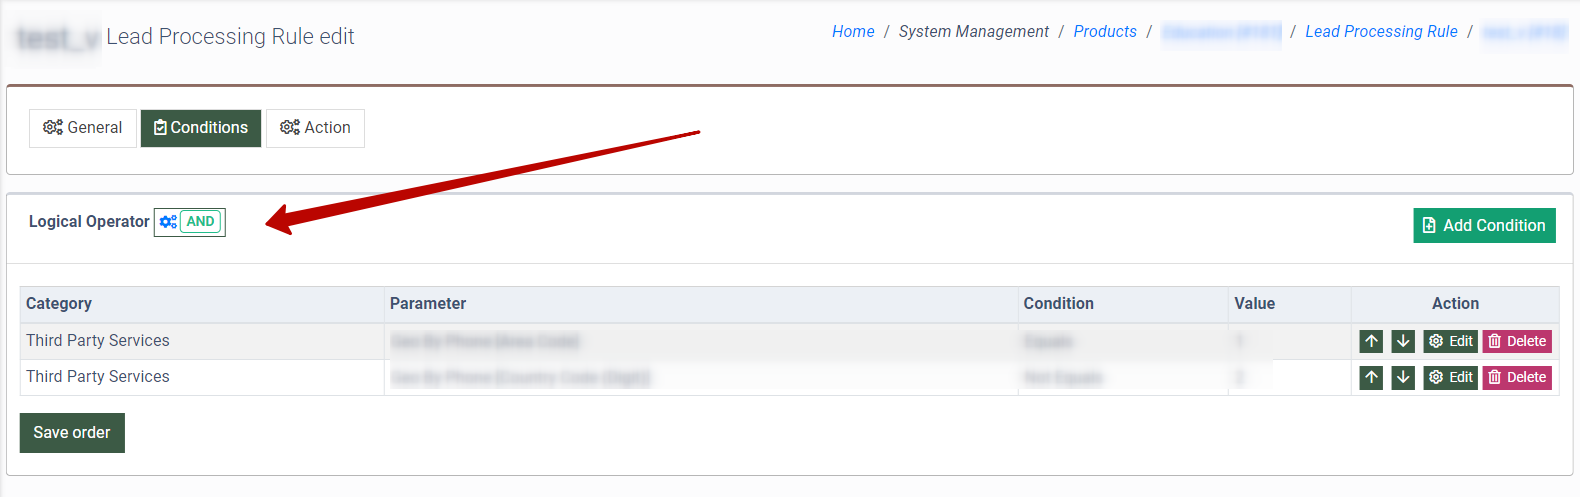
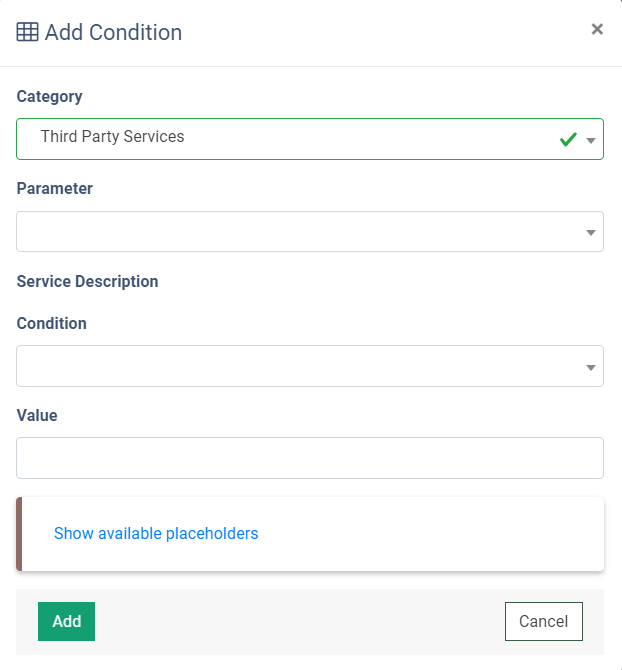
- Select the Condition tab, click the “Add Condition” button, and fill in the following fields:
- Category: Select the “Third Party Services” option.
- Parameter: Select the parameter (Depends on the Service)
- Condition: Select the condition (Equal, More, More or equal, Less, Less or equal, Is one of, Not one of, Is empty, Is not empty, String contains, String contains one of, Not equals, String starts with, String starts with one).
- Value: Enter the value.

- Select the logic operator for two and more conditions:
- AND: All of the added conditions must be met to trigger Action.
- OR: At least one of the added conditions must be met to trigger Action.