To access the global registration page, click the “Registration” button on the login page. Note: LMS/Call Logic Publisher and Lynx Advertiser registration are available by default. Other options must be enabled via the System Management > Project Settings section.
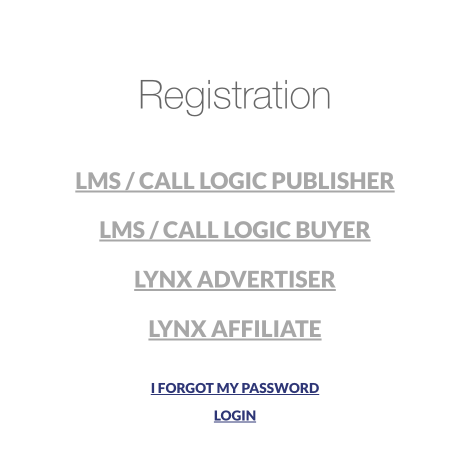
LMS/Call Logic Publisher
To let users register on the global registration page under the Publisher system role for LMS and Call Logic, go to the System Management > General > Project Settings section, select the “LMS & Call Logic” tab, and the “Publisher Settings” subtab.
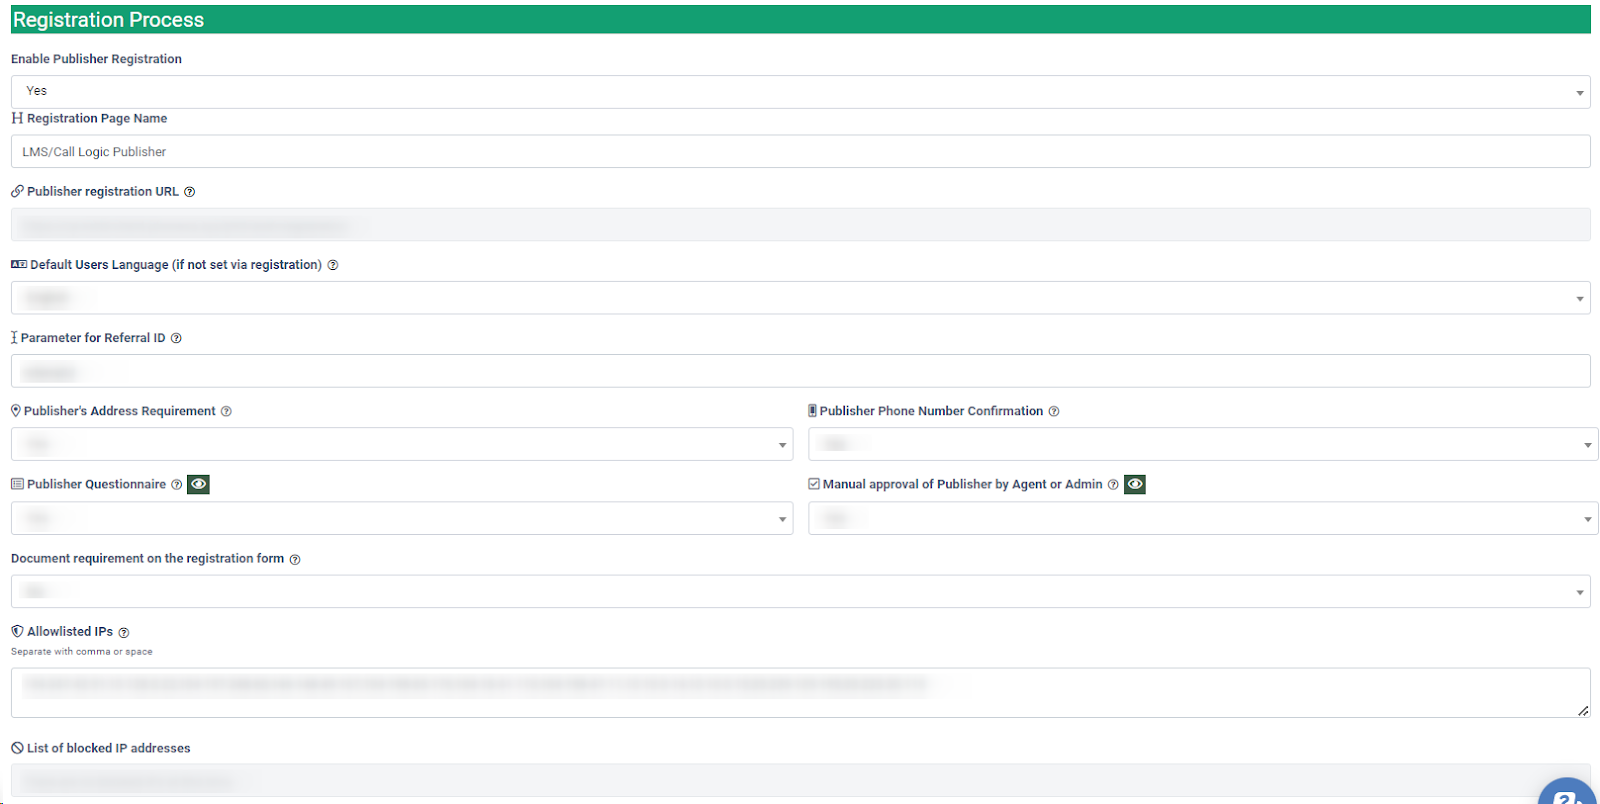
The Registration Process block allows you to customize the Publisher’s registration process. Fill in the following fields:
- Enable Publisher Registration: Select “Yes” to enable Publisher registration through the global registration page.
- Registration Page Name: Enter the registration page name.
- Publisher registration URL: The URL for the Publisher registration.
- Default Users Language (if not set via registration): Select the language for the registration process.
- Parameter for Referral ID: Add the parameter to the registration URL to track the Publishers referred by a URL.
- Publisher's Address Requirement: Select “Yes” to enable the address field during the Publisher registration.
- Publisher Phone Number Confirmation: Select “Yes” to enable the phone number confirmation during the Publisher registration.
- Publisher Questionnaire: Select “Yes” to enable the questionnaire requirement during the Publisher registration.
- Manual approval of Publisher by Agent or Admin: Select “Yes” to enable the manual approval of the Publisher by the Agent or Admin.
- Document requirement on the registration form: Select “Yes” to enable the document submission during registration.
- Allowlisted IPs: Enter white-listed IP addresses for new Publisher registrations to allow registrations from those IP addresses only.
Note: Separate with a comma or space.
- List of blocked IP addresses: The list of blocked IP addresses.
Click the “Save” button to proceed.
LMS/Call Logic Buyer
To let users register on the global registration page under the Byers system role for LMS and Call Logic, go to the System Management > General > Project Settings section, select the “LMS & Call Logic” tab, and the “Buyer Settings” subtab.
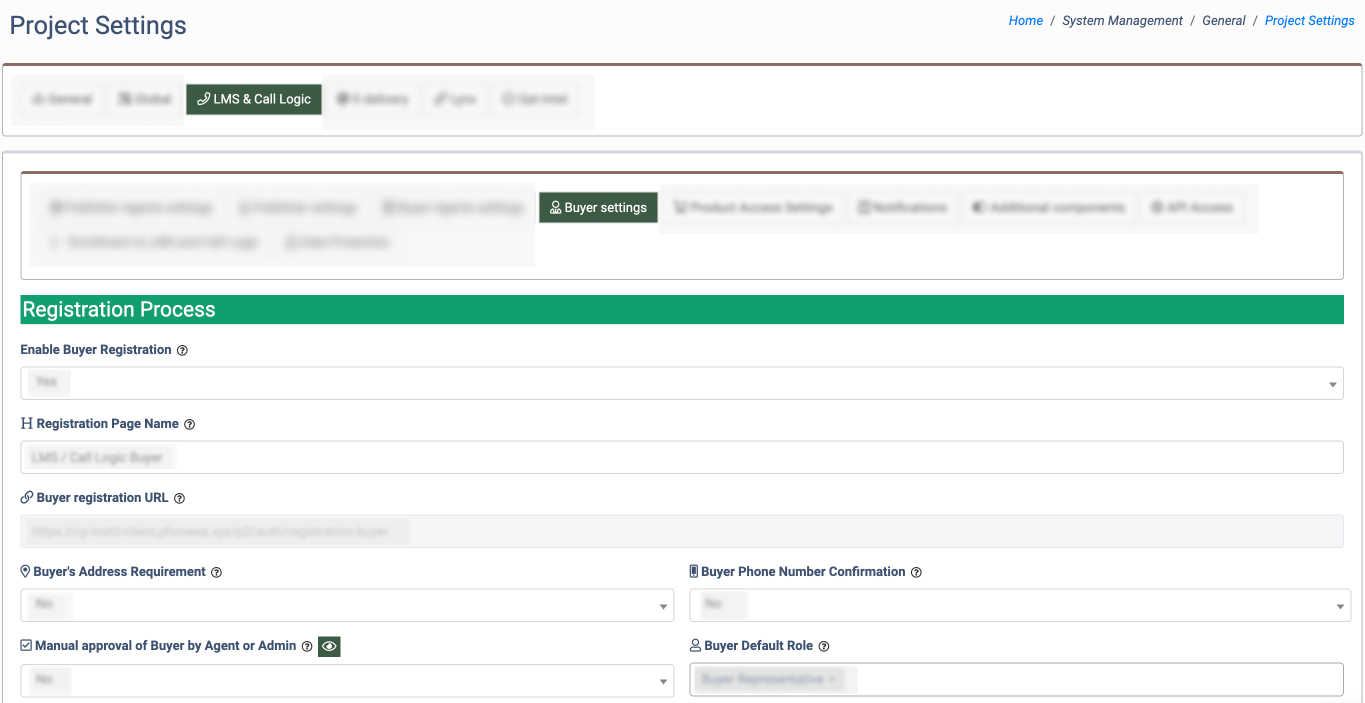
The Registration Process block allows you to customize the Buyer's registration process. Fill in the following fields:
- Enable Buyer Registration: Select “Yes” to enable Buyer registration through the global registration page.
- Registration Page Name: Enter the registration page name.
- Buyer registration URL: The URL for the Buyer registration.
- Buyer's Address Requirement: Select “Yes” to enable the address field during the Buyer registration.
- Buyer Phone Number Confirmation: Select “Yes” to enable the Buyer’s phone number confirmation.
- Manual approval of Buyer by Agent or Admin: Select “Yes” to enable the Buyer’s manual approval by the Agent or Admin.
- Buyer Default Role: Select the Buyer default role (Buyer Representative, Buyer Editor).
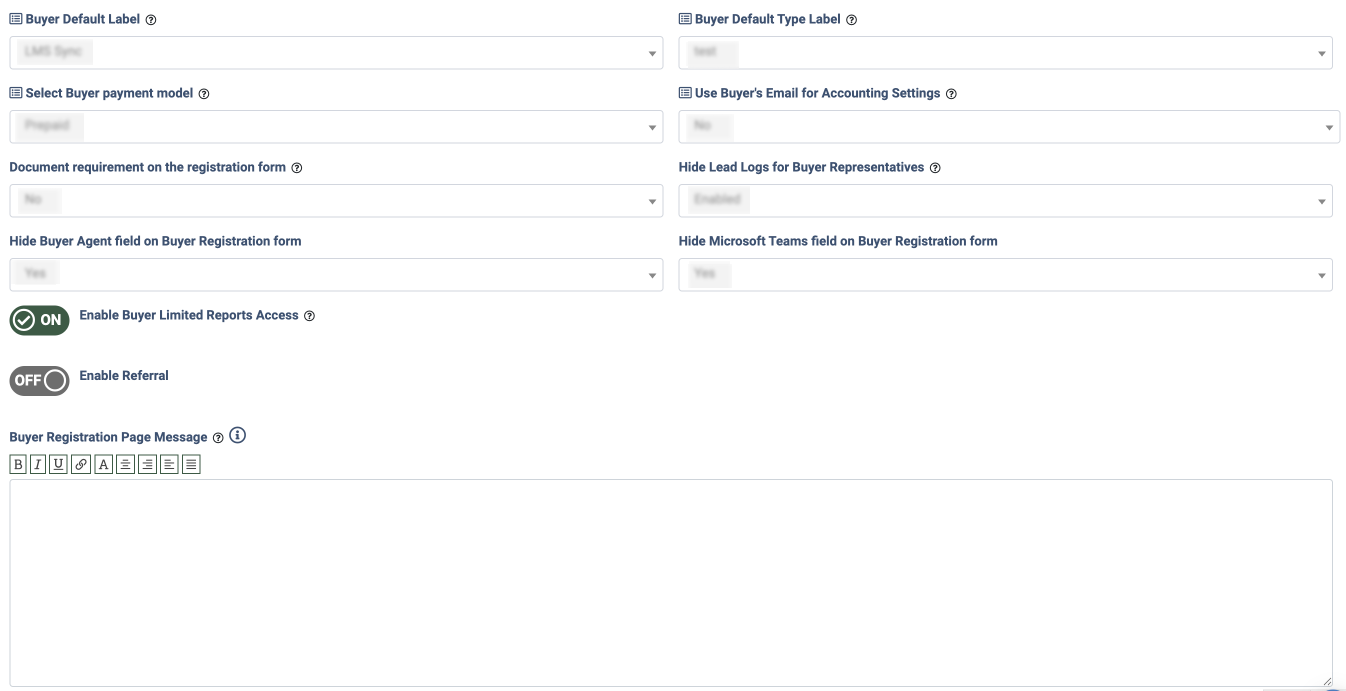
- Buyer Default Label: Select the Buyer default label (Call Logic, LMS).
- Buyer Default Type Label: Select the Buyer default type label.
- Select Buyer payment model: Select the Buyer payment model (Postpaid, Prepaid).
- Use Buyer's Email for Accounting Settings: Select “Yes” to allow using the Buyer's email for accounting settings.
- Document requirement on the registration form: Select “Yes” to enable the document requirement on the registration form
- Hide Lead Logs for Buyer Representatives: Select “Yes” to enable viewing Lead Logs for Buyer Representatives.
- Hide Buyer Agent field on Buyer Registration form: Select “Yes” to hide the Buyer Agent field on the Buyer Registration form.
- Hide Microsoft Teams field on Buyer Registration form: Select “Yes” to hide the Microsoft Teams field on the Buyer Registration form.
- Buyer Limited Report Access: Switch the toggle to the “ON” position to limit the report access for the Buyer.
- Enable Referral: Switch the toggle to the “ON” position to enable the referral selection for the existing Buyer.
- Buyer Registration Page Message: Enter the message for the buyer registration page.
Click the “Save” button to proceed.
Lynx Advertiser
To let users register on the global registration page under the Advertiser system role for Lynx, go to the System Management > General > Project Settings section, select the “Lynx” tab, and the “Advertiser” subtab.
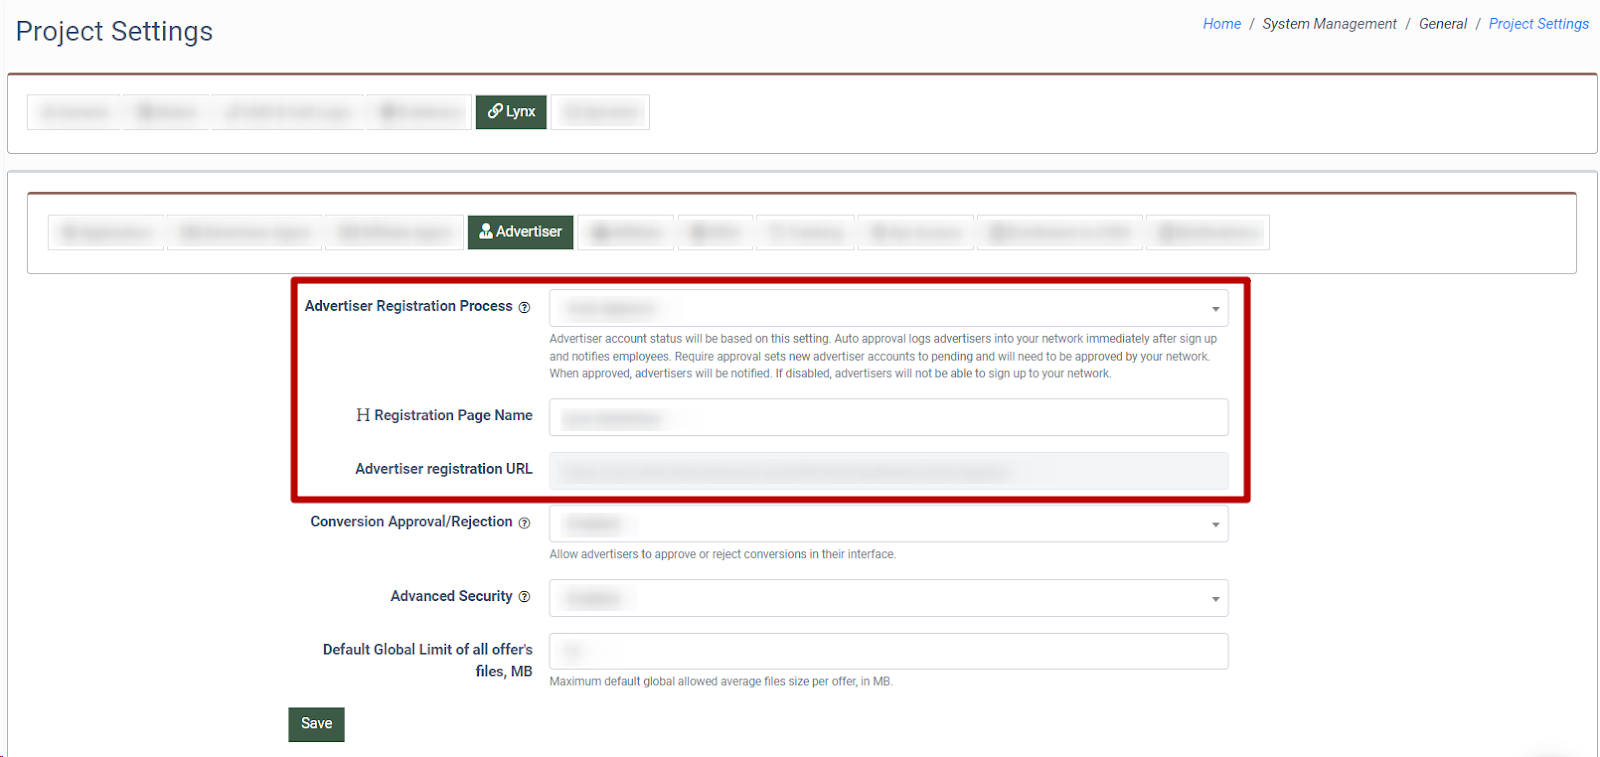
To customize the Advertiser Registration Process, fill in the following fields:
- Advertiser Registration Process: Set the preferable option for the application processing. Advertiser account status will be based on this setting.
- The “Auto approval” option allows advertisers to log into your network immediately after sign-up and notifies employees.
- The “Require approval” option sets new advertiser accounts to pending and must be approved by your network. When approved, advertisers will be notified.
- The “Disabled” option removes the ability for the advertisers to sign up for your network.
- Registration Page Name: Enter the registration page name.
- Advertiser registration URL: The URL for the Advertiser registration.
Click the “Save” button to proceed.
Lynx Affiliate
To let users register on the global registration page under the Affiliate system role for Lynx, go to the System Management > General > Project Settings section, select the “Lynx” tab, and the “Affiliate” subtab.
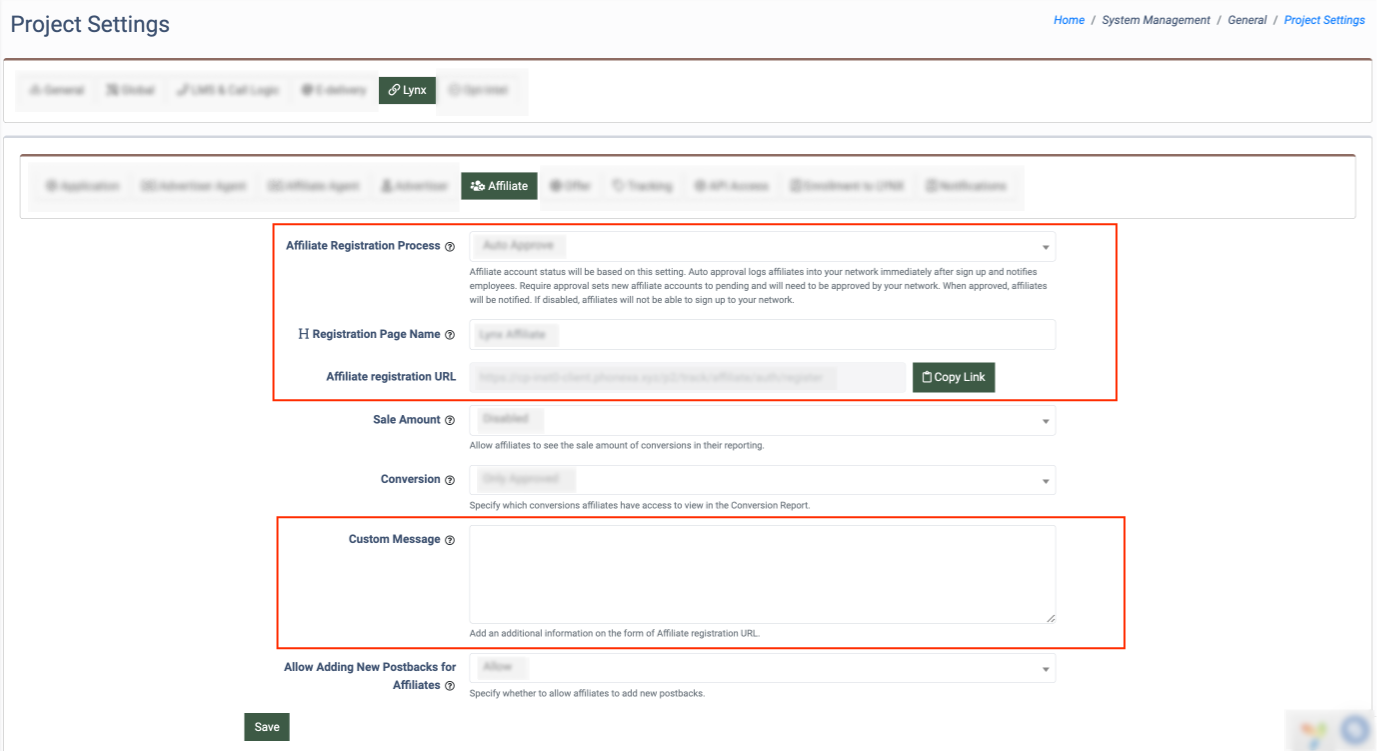
To customize the Affiliate Registration Process, fill in the following fields:
- Affiliate Registration Process: Set how Affiliate account applications are processed.
Affiliate account status will be based on this setting.
-
- The “Auto approval” option allows affiliates to log into your network immediately after sign-up and notifies employees.
- The “Require approval” option sets new affiliate accounts to pending and must be approved by your network. When approved, affiliates will be notified.
- The “Disabled” option removes the ability for the affiliates to sign up for your network.
- Registration Page Name: Enter the registration page name.
- Affiliate registration URL: The URL for the Affiliate registration.
- Custom Message: Add additional information on the form of the Affiliate registration URL.
Click the “Save” button to proceed.
Registration Process
To register in the system under the Publisher, Buyer, Advertiser, or Affiliate role, click the “Registration” button via the login page (/auth/login) and select the registration form.
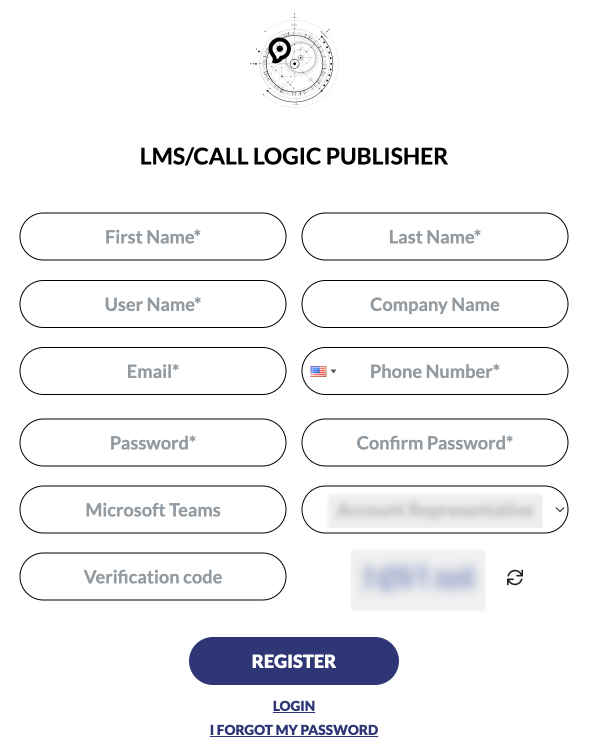
Depending on the registration form, the following fields are available:
-1.png?hsLang=en)
- First Name: Enter the first name.
- Last Name: Enter the last name.
- User Name: Enter the user name.
- Email: Enter the email address.
- Company Name: Enter the company name.
- Password: Enter the password.
- Confirm Password: Repeat the password.
- Phone Number: Enter the phone number.
- Microsoft Teams: Enter the Microsoft Teams username.
- Account Representative: Select the Account Representative from the drop-down list.
- Country: Select the country.
- City: Enter the city.
- Zip: Enter the ZIP code.
- Address 1: Enter the address.
- Address 2: Enter the address.
- Fax: Enter the fax number.
- CAPTCHA: Enter the verification code.
Note: Mandatory fields are marked with an asterisk (*).