
iClaim Overview
How the iClaim Integration Works
Accessing iClaim
iClaim Campaigns
Records
Consent Languages
Recording Reports
Claim Reports
iClaim Overview
iClaim is a ValidRecord product built to capture and store visitor interactions on web forms, converting those interactions into verifiable compliance records - complete with session recordings and insights into lead authenticity.
It helps you meet legal requirements such as TCPA while giving you visibility into how leads actually engage with your forms. iClaim, a ValidRecord product, is deeply integrated into Phonexa to give you a single point of access instead of managing two separate platforms.
Instead of maintaining a separate ValidRecord login and switching between two platforms, you can create, launch, and manage iClaim Campaigns entirely from within Phonexa.
To enable this service, go to the Fraud and Anomaly > iClear > Lead Processing Rules section and select a Product from the drop-down list.

Once you select the Product, you’ll be automatically redirected to the “Lead Processing Rules (iClear)” subtab. You may also navigate here by selecting the System Management > Products section on the left-hand menu and clicking on the “Settings” button for the corresponding product (Lead Processing Rules (iClear) subtab).
To configure this service, click the “Add Service” button in the Global Rules block. Navigate to the “iClaim” block and click the “Add to iClear” button.
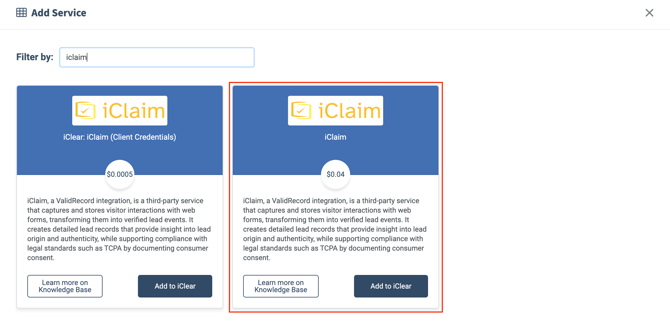
Note: Claim records through iClear:iClaim integration and all related information can be viewed and accessed in the iClaim tab.
Read more about iClaim in the Knowledge Base article.
How the iClaim Integration Works
The connection between Phonexa and ValidRecord is fully automated, so there's nothing to configure manually before you can start using iClaim:
- Automatic account creation – The first time you create an iClaim Campaign in Phonexa, Phonexa automatically provisions a corresponding account for your company on the ValidRecord side.
- Automatic API credentials – Phonexa generates the API credentials needed to connect the two platforms and securely links them to your account, so authentication is handled behind the scenes.
- Unified billing – All iClaim usage is billed through your existing Phonexa invoice. There is no separate ValidRecord bill or payment method to manage.
Note: This provisioning only happens once, on your first campaign. Every campaign you create afterward uses the same linked ValidRecord account and credentials.
Accessing iClaim
To access iClaim, navigate to Fraud and Anomaly in the left-hand menu. The module is organized into the following sections:
- iClaim Campaigns – Create and manage iClaim campaigns and their tracking codes.
- iClaim Records – Review the individual visitor interactions captured by your tracking codes, including session recordings.
- Consent Languages –Manage consent language displayed and captured on tracked pages.
- Recording Reports – Analyze session recording activity by campaign, location, device, browser, OS, and more.
- Claim Reports – Analyze claimed records and associated usage cost by domain, city, OS, browser, and more.
iClaim Campaigns
An iClaim campaign represents a unique tracking code (JavaScript snippet) used to identify and track visitor interactions on the website(s) you assign to it. Read more about the iClaim Campaigns in the ValidRecord Knowledge Base article.
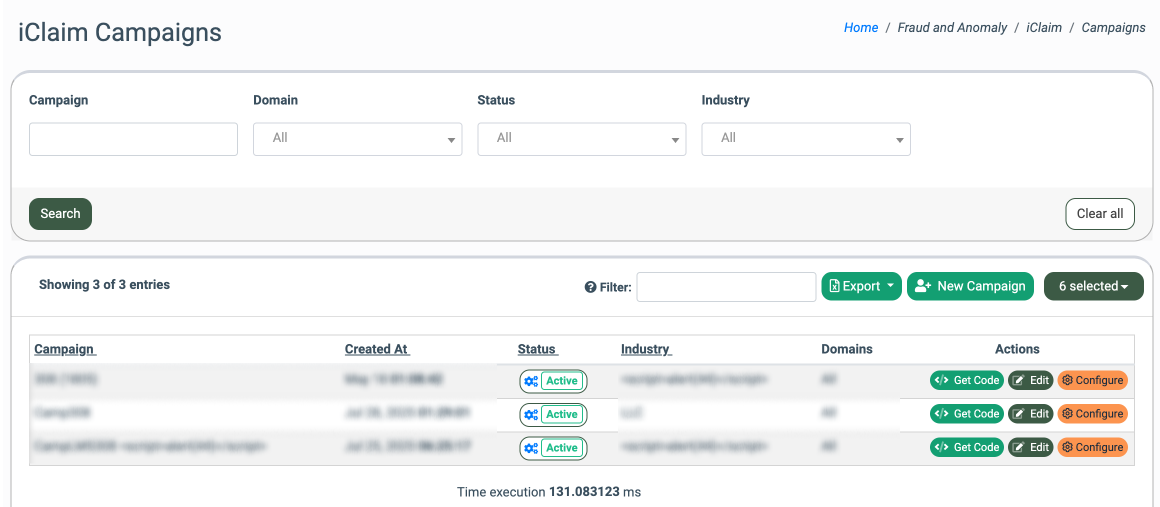
iClaim Campaigns section allows you to create and manage iClaim Campaigns. To access the section, go to the Fraud and Anomaly > iClaim > iClaim Campaigns section. The list of existing iClaim Campaigns contains the following information:
- Campaign: The name of the iClaim Campaign.
- Created At: The date and time the iClaim Campaign was created.
- Status: The ongoing status of the iClaim Campaign.
- Industry: The Industry the iClaim Campaign is related to. The Industry is an entity that represents the business sector associated with the website of the Record, specified by the user when creating an iClaim Campaign (e.g., Finance, Solar, Insurance, etc).
- Domains: The name of the Domain the iClaim Campaign is related to.
You can narrow down the search results using the following filters:
- Campaign: Enter the name of the iClaim Campaign.
- Domain: Select the corresponding Domain.
- Status: Select the ongoing status of the iClaim Campaign (Active/Disabled).
- Industry: Select the Industry the iClaim Campaign is related to.
Click the “Search” button to apply the selected filtration.
To create a new iClaim Campaign, click the “New Campaign” button and fill in the following fields in the pop-up window:
- Campaign: Enter the name of the iClaim Campaign.
- Industry: Select the Industry the iClaim Campaign is related to.
- Recording Mode: Select the recording mode option:
- Single Record: Select this option to store all pages visited by a single user in a single record.
- Separate Records: Select this option to store all pages visited by a single user in separate records.
- Auto Claim: Select the corresponding option for the Auto-Claim feature. The following options are available:
- Disabled: Auto Claim is turned off. Records must be stored manually or via API calls.
- Claim Records with Form Submit: Records are automatically stored when a lead generation form submission is detected by the iClaim tracking code. Records without form submissions will not be claimed.
- Claim All Records: All records are automatically stored, regardless of lead generation form submissions.
- Accept Traffic from All Domains: Select the ongoing status of the feature. This option allows you to choose whether to accept traffic from any domain, offering flexibility in capturing leads (toggle ON button), or restrict traffic to pre-approved domains for better control (the OFF option).
- Domains: Enter the name of the related Domain.
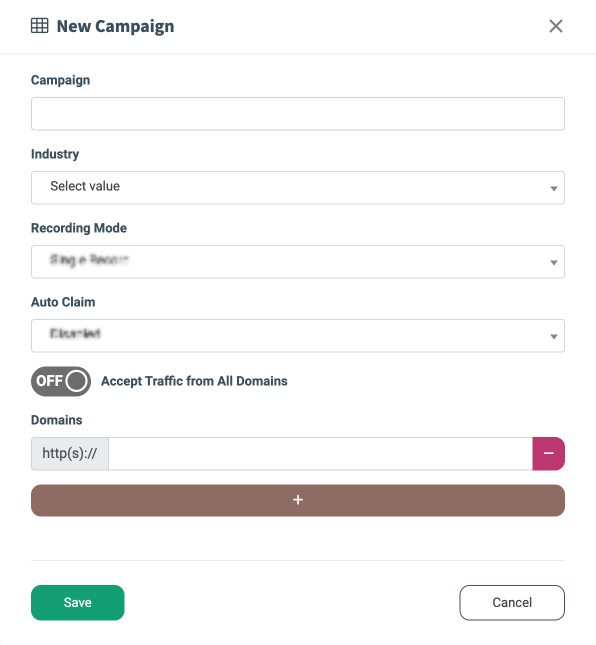
Click the “Save” button to complete the creation process.
To change the ongoing status of the existing iClaim Campaign, select the corresponding Campaign from the list and click the “Change Status” button in the “Status” column.
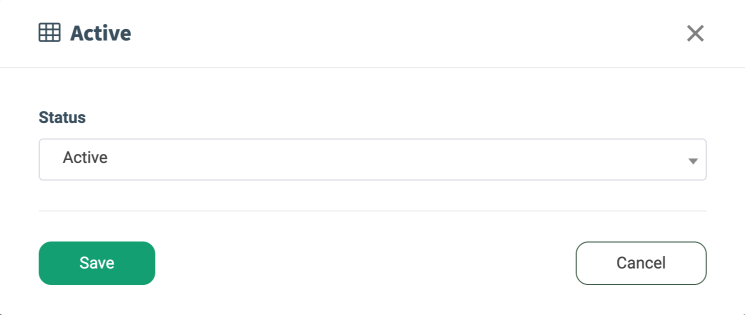
Click the “Save” button to apply changes.
To manage an existing iClaim Campaign, use the “Actions” column. The following management options are available:
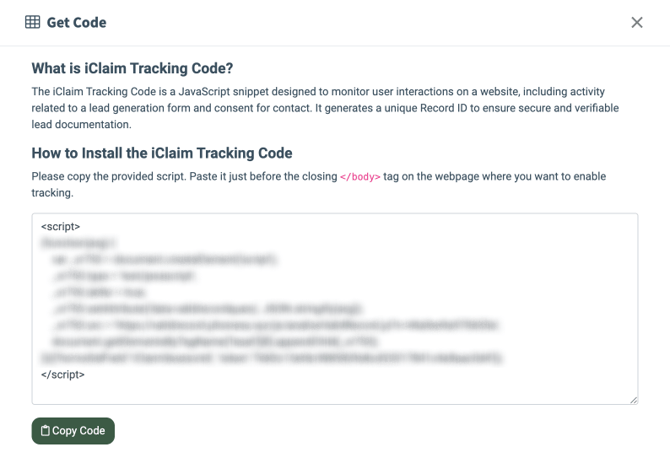
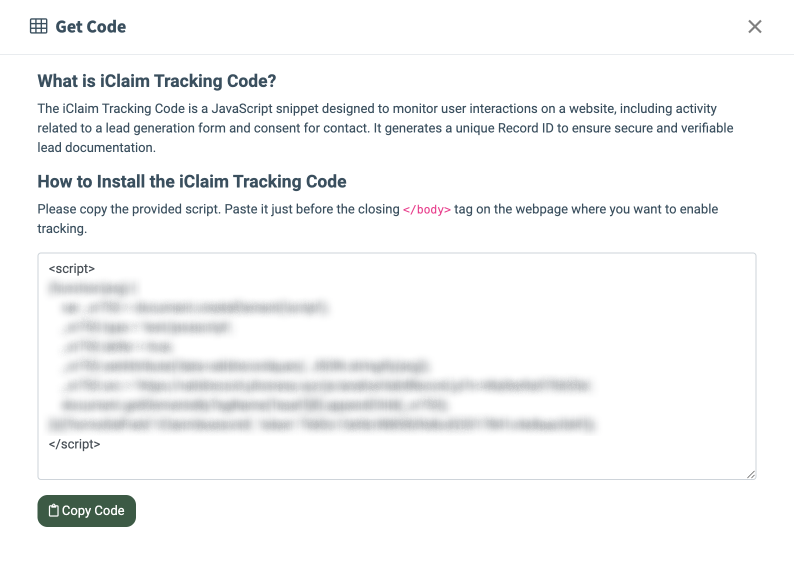
- Get Code: Select this option for obtaining a Tracking Code. The iClaim Tracking Code is a JavaScript snippet designed to monitor user interactions on a website, including activity related to a lead generation form and consent for contact. It generates a unique Record ID to ensure secure and verifiable lead documentation. To use this code for a client’s website or web form, copy the auto-generated script. To copy the provided tracking code snippet, click the “Copy Code” button in the “Get Code” pop-up window. Paste it just before the closing </body> tag on the webpage you want to enable tracking.
- Edit: Select this option to edit general information about the iClaim Campaign. Change the Campaign’s name, update the related Industry, enable or disable the Auto-Claim and Accept Traffic From All Domains options, and add, remove, or edit the list of corresponding Domains in the “Edit Campaign” pop-up window. To apply your changes, click the “Save” button.
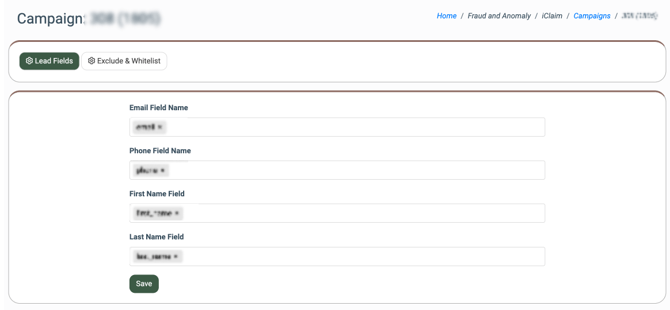
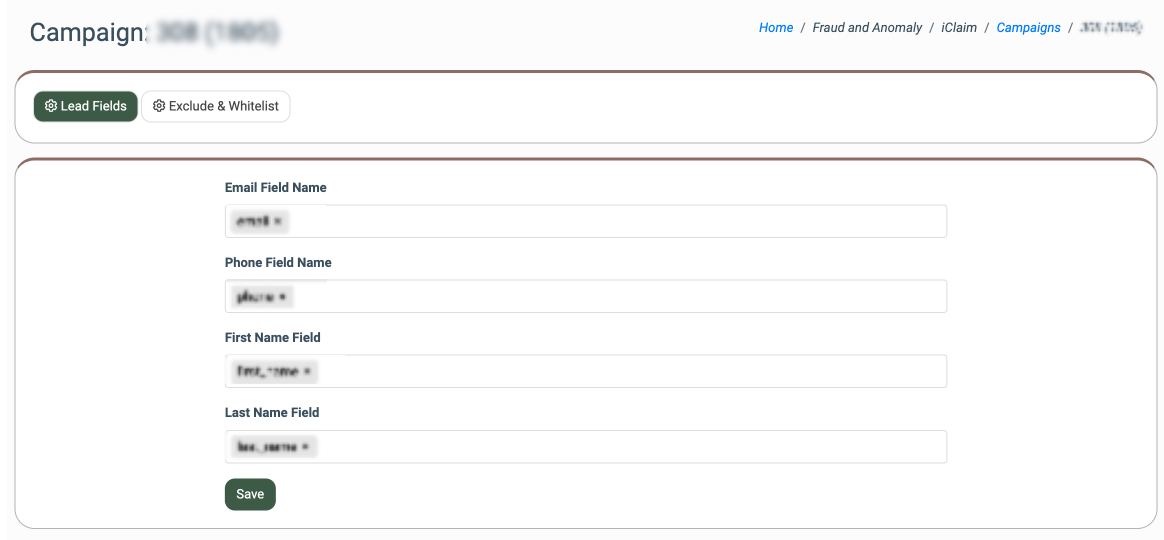
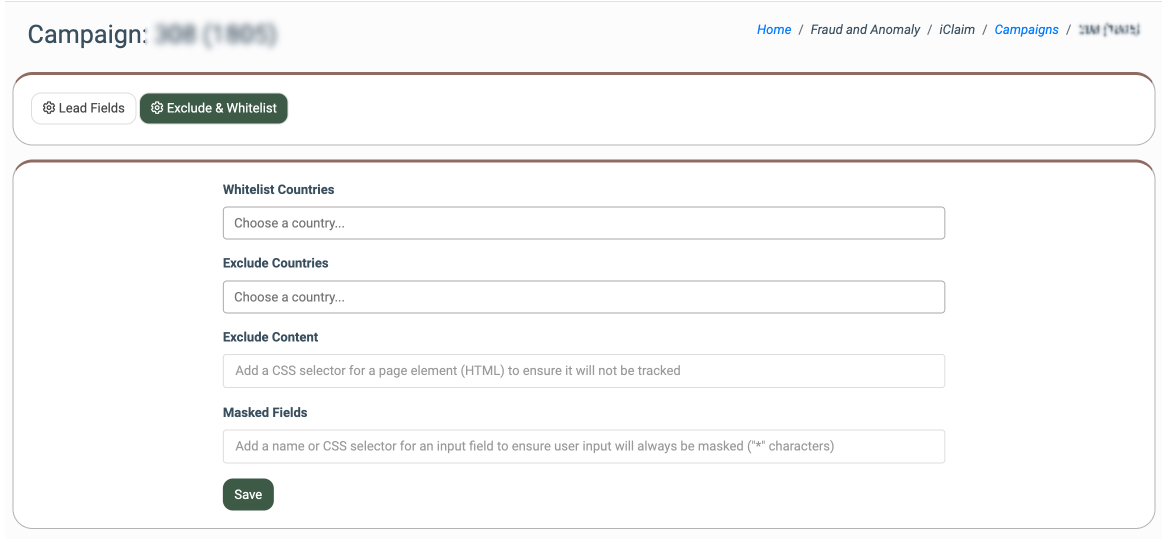
- Configure: Select this option to open the iClaim Campaign Configuration section. This section contains two tabs:
- Lead Fields: Select the fields available on your website or webform for the Lead Contact Manual Check operation.
- Exclude and Whitelist: This tab allows you to manage the settings for the iClaim Campaign tracking workflow by adjusting the list of allowed and excluded countries, excluded content available on the webpage, and masking fields input.
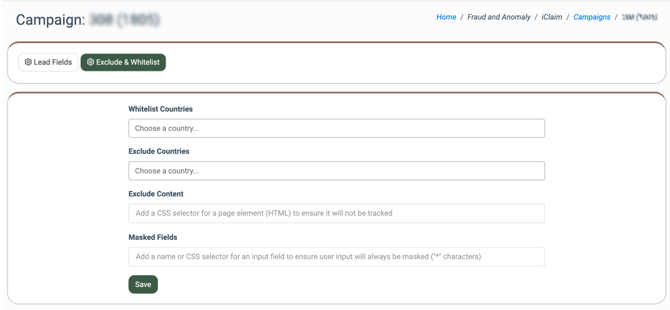
This tab contains the following settings: - Whitelist Countries: Select the countries to whitelist for the tracking code workflow, allowing you to include specific geographic regions.
- Exclude Countries: Choose countries to exclude from the tracking code workflow to prevent traffic from these regions from being recorded.
- Exclude Content: Add a CSS selector to identify elements on the page (HTML) that should be excluded from tracking. Any content within the selected element will not appear in recordings or be stored.
- Masked Fields: Add a name or CSS selector for an input field to ensure user input will always be masked (‘*’ characters). You can add a name or CSS selector to identify the input fields you wish to mask. Use the data-iclaim-mask attribute in your HTML form to apply the same behavior to specific input fields.
Records
Every tracked interaction your campaigns capture becomes a Record — a stored entry containing the session recording, visitor details, and the pages the visitor interacted with. Records can later be claimed for future access, per your compliance needs. Read more about the Records in the ValidRecord Knowledge Base article.
The “Records” section allows you to view and manage the recordings of user interactions and completed actions on client forms and websites. To view the list of iClaim Records, go to the Fraud and Anomaly > iClaim > Records section.
The list of available records includes the following information:
- Record ID – A unique identifier for the record.
- Record – The session recording playback, with duration and browser/OS/device indicators. To play the available recording, click the “Play” button. You will be redirected to the Event Player section, where you can review the timelines and view the video record of the full interaction.
- Location – The visitor's approximate location (country flag and city).
- Campaign – The campaign that captured the interaction.
- Domain – The website domain the record was captured on.
- Claimed – Whether the record has been claimed (Yes/No).
- Created At – When the record was captured.
- Expired At – When the record expires.
- Duration – How long the session lasted.
- Industry – The industry the originating campaign was set up for.
- Pages – The number of distinct interactions with the website within a Record. A new page is generated each time a user navigates to a different webpage and resumes interaction within a 5-minute inactivity window; after this period, a new Record is created instead.
To view detailed information about a recording, click the “View” button in the “Actions” column. The information about the record is organized into the following blocks:
- Record Details: This block contains general information about the record, such as RecordID, claim status, campaign name, IP address, and more.
- IP: User’s IP address.
- Browser: Hover over this icon to view the user’s browser name and version.
- Operating System: Hover over this icon to view the user’s operating system and version.
- Device: Hover over this icon to view the user’s device type and screen resolution.
- Timeline: This block contains a list of actions performed by the user on the form or webpage, including URL, number of clicks, duration of each activity, scroll depth, and timeline details.
- Consent Languages: This block provides information about the consent language submitted through the form, including its approval status and the consent granted by users, indicating who is authorized to contact them.
- Pages Actions: This block contains a log of all user actions performed on the form or webpage, including the activity name, the element interacted with, and any associated values related to the activity.
To share the record via a unique URL, click the “Share” button in the “Actions” column. In the pop-up, switch the “Shared” toggle to “ON” to generate a unique, secure, shareable RecordURL.
To claim and store a record for future access, click the “Claim” button in the “Actions” column.
Consent Languages
Consent Languages lets you review the consent text and disclosures captured on your lead generation forms, so you can confirm they meet your compliance requirements before relying on them. Consent language refers to the specific wording used in your forms to ensure that individuals clearly understand what they are consenting to, especially when it comes to communications or data processing. This is a critical element for ensuring that consent is legally valid and that the process is transparent.
To view, go to the Fraud and Anomaly > iClaim > Consent Languages section.
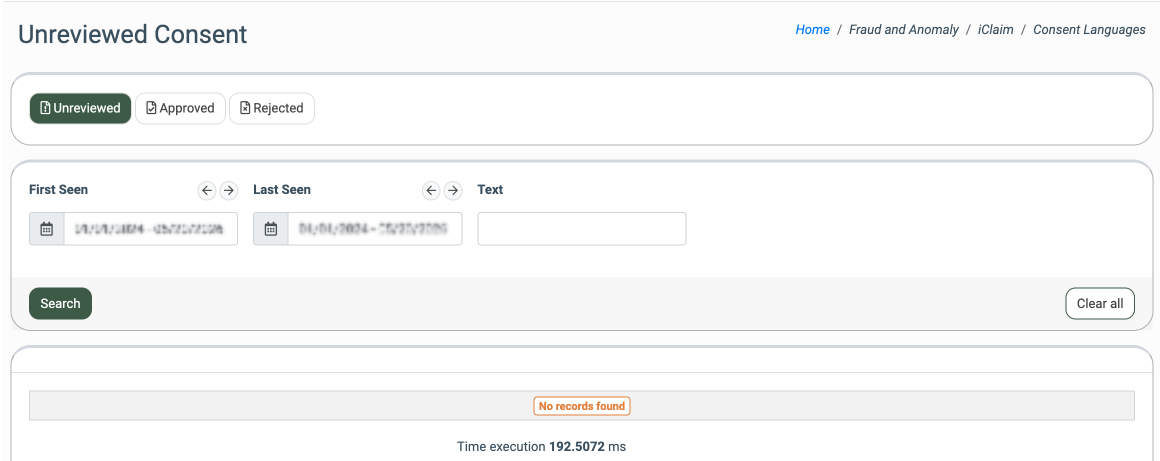
The Consent Languages section contains records of all the consents given by users, organized into three tabs:
- Unreviewed – Newly captured consent language awaiting review.
- Approved – Consent language that has been confirmed as compliant.
- Rejected – Consent language that did not meet requirements.
You can search within a tab using First Seen (a date range with quick presets like Today, This Month, or Custom Range), Text, Name, and Notes.
Recording Reports
Recording Reports analyze the session recordings your campaigns capture. Read more about the Recording Reports in the ValidRecord Knowledge Base article. The “Recording Reports” section contains the following reports:
- Performance Summary: This report provides a comprehensive summary of records processed through the system. It highlights key metrics such as the total number of records, records claimed, total claims, user counts, percentage of new users, and time spent on the website. The data is broken down by day, presented in both tabular and graphical views, offering a high-level overview of all records.
- Geo Locations: This report displays heatmaps of user activity based on global geographic distribution.
- Campaigns: This report displays statistical data on record processing, grouped by the particular tracking Campaign.
- Countries: This report displays data categorized by the user’s country.
- Browsers: This report displays data grouped by the user’s browser.
- Operating Systems: This report displays the breakdown of data by the operating system of the user’s device.
- Device Types: This report displays data grouped by the type of device used to access the website, such as desktop, tablet, or mobile.
The reporting system contains the following information:
- Date: The date when the recording was created. Note: This data field is available in the Performance Report section.
- Name: The name of the corresponding Campaign. Note: This data field is available in the Campaigns section.
- Browser: The name of the user’s Browser. Note: This data field is available in the Browsers section.
- Operating Systems: The name of the user’s Operating System. Note: This data field is available in the Operating Systems section.
- Device Type: The type of device used by the user. Note: This data field is available in the Device Types section.
- Records: The total number of records obtained from the user’s interactions.
- Records Claimed: The total number of records that were claimed by the client.
- Claims: The total number of processed claims from the client.
- Users: The total number of unique users whose interactions were recorded, processed, and stored in the system.
- % of New Users: The percentage of new users relative to the total number of users recorded.
- Time on Website: The total amount of time users spent on the website or form where the tracking code is installed.
You can narrow down the search results by using the following filters:
- Date: Select the date range for the report.
- Campaign: Select the corresponding tracking Campaign.
- Group By: Choose how the data should be grouped over time (Day, Week, or Month). Note: This filter is available in the Performance Report section.
- Country: Select the user’s country. Note: This filter field is available in the Geo Locations section.
Click the “Search” button to apply filters and make a search.
Claim Reports
Claim Reports analyze claimed records. Read more about Claim Reports in the ValidRecord Knowledge Base article. The “iClaim Reports” section contains the following reports:
- Performance Summary: This report provides both visual and tabular insights into the number of users who visited your site and the number of iClaim records that were successfully claimed during a specific time period.
- Domains: This report provides insights into how claimed records perform across the different website domains you’re tracking.
- Cities: This report offers location-based insights into where your claimed records originate, grouped by city.
- Operating Systems: This report displays which OS types (e.g., Windows, macOS, iOS, Android, etc.) are used by visitors who have generated claimed records.
- Browsers: This report breaks down claim data by the browser used, such as Chrome, Firefox, Safari, and Edge.
The reporting system contains the following information:
- Date: The date when the recording was created. Note: This data field is available in the Performance Report section.
- Records Claimed: The number of claimed records. Note: This data field is available in the Performance Report section.
- Users: The total number of unique users whose interactions were claimed in the system.
- % of New Users: The percentage of new users relative to the total number of users recorded.
- Time on Website: The total amount of time users spent on the website or form where the tracking code is installed.
- Domain: The name of the user’s domain. Note: This data field is available in the Domains section.
- Operating System: The name of the user’s operating system. Note: This data field is available in the Operating Systems section.
- Browser: The name of the user’s Browser. Note: This data field is available in the Browsers section.
You can narrow down the search results by using the following filters:
- Date: Select the date range for the report.
- Domain: Select the domain.
- Group By: Choose how the data should be grouped over time (Day, Week, or Month). Note: This filter is available in the Performance Report section.
- Country: Select the user’s country. Note: This filter field is available in the Cities section.
Click the “Search” button to apply filters and make a search.