The TrustedForm v4.0 service is useful for confirming the legitimacy of leads and ensuring compliance with data privacy regulations, gauging the level of engagement or activity of the lead, and providing additional information for analyzing and optimizing the workflow.
To enable this service, go to the Fraud Detector > iClear > Lead Processing Rules section and select a Product from the drop-down list.
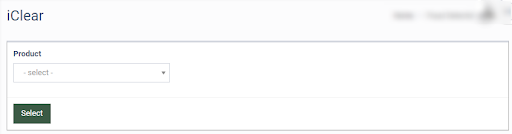
Once you select the Product, you’ll be automatically redirected to the Lead Processing Rules (iClear) sub-tab. You may also navigate here by selecting the System Management > Products section on the left-hand menu and clicking on the “Settings” button for the corresponding product (Lead Processing Rules (iClear) sub-tab).
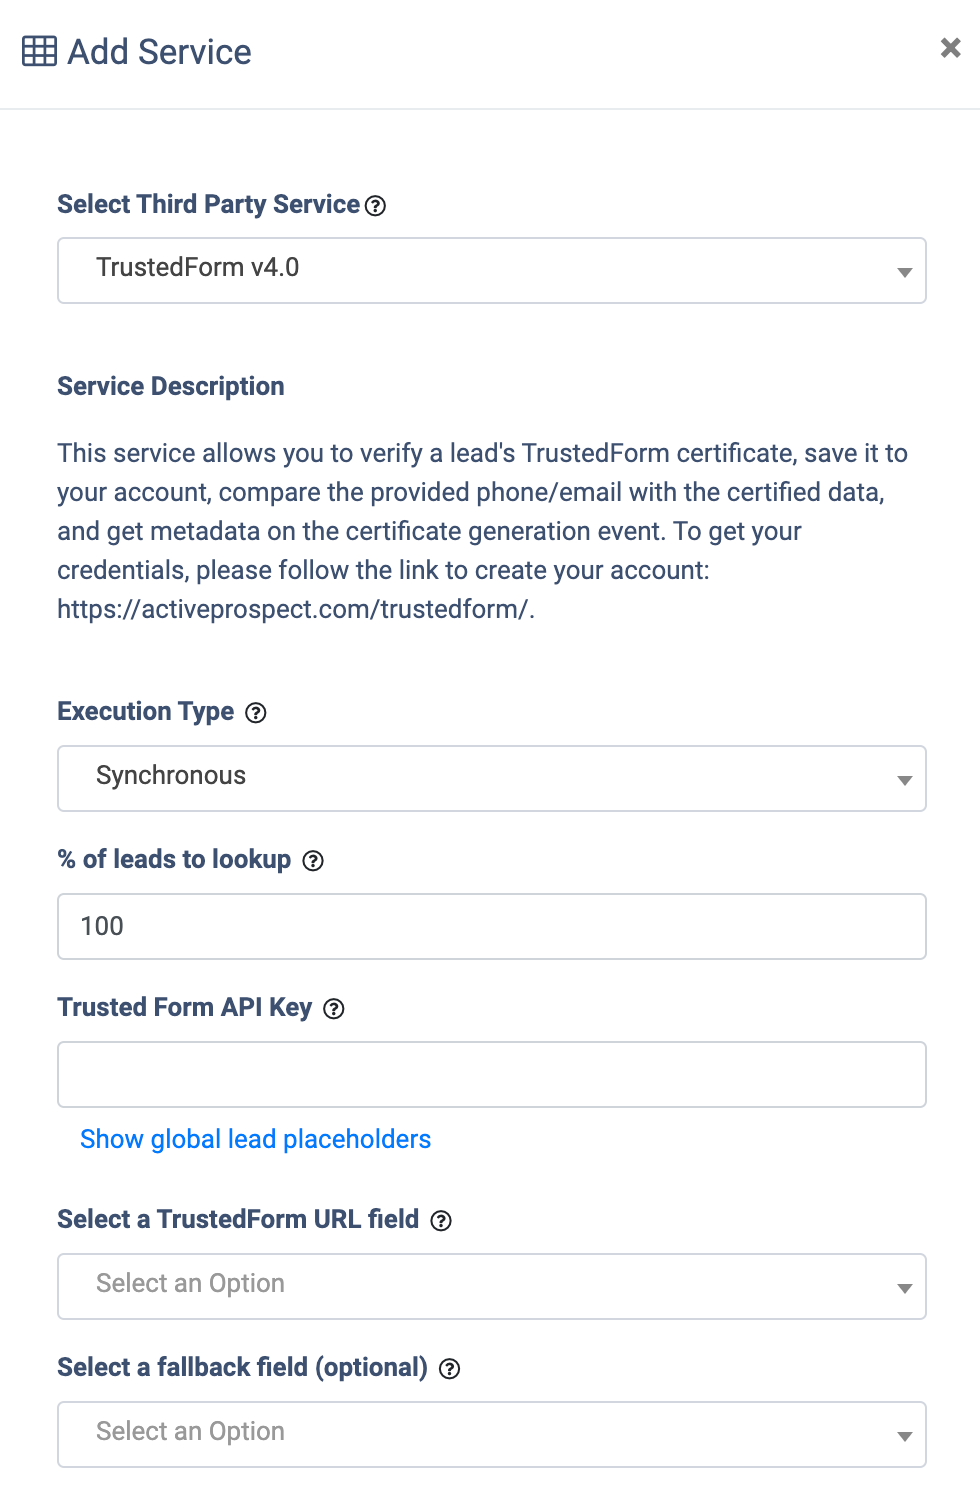
To configure this service, click the “Add Service” button in the Global Rules block. Fill in the following fields:
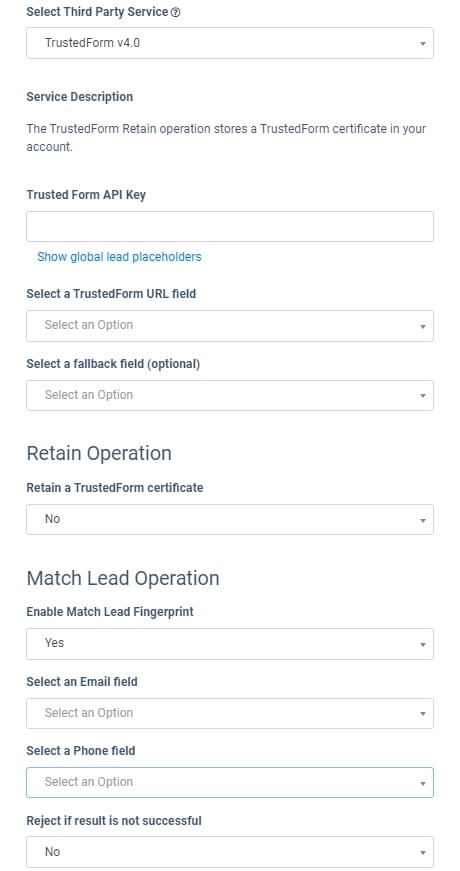
- Select Third Party Service: Select the “TrustedForm v4.0” option.
- Trusted Form API Key: Fill in the TrustedForm API key.
- Execution Type:
-
- Select the "Asynchronous" option to make a simultaneous request and process a lead without waiting for the lookup outcome. This execution type is recommended for analytical purposes and not for real-time lead filtration based on the lookup status. While processing a lead, the system makes a request to the Anura service.
- Select the "Synchronous" option to wait for the Anura lookup outcome before processing a lead. This execution type is recommended for real-time filtration of a lead based on the lookup status. Before processing a lead, the system makes a request to the Anura service. If the fraudulent activity is not found, the system will process it as usual.
- Select the “On-Demand” option to enable leads filtration when the “% of lead to lookup” is set as 0 (null).
- % of leads lookup: Set the percentage of leads to be run through this service.
- Select a TrustedForm URL field: The autodetect field. To properly post the TrustedForm URL into Phonexa, use the trustedFormUrl parameter, where the field name is case-sensitive.
- Select a fallback field (optional): Select a Product field. If the “TrustedForm URL” field is empty, this field provides the value as an alternative.
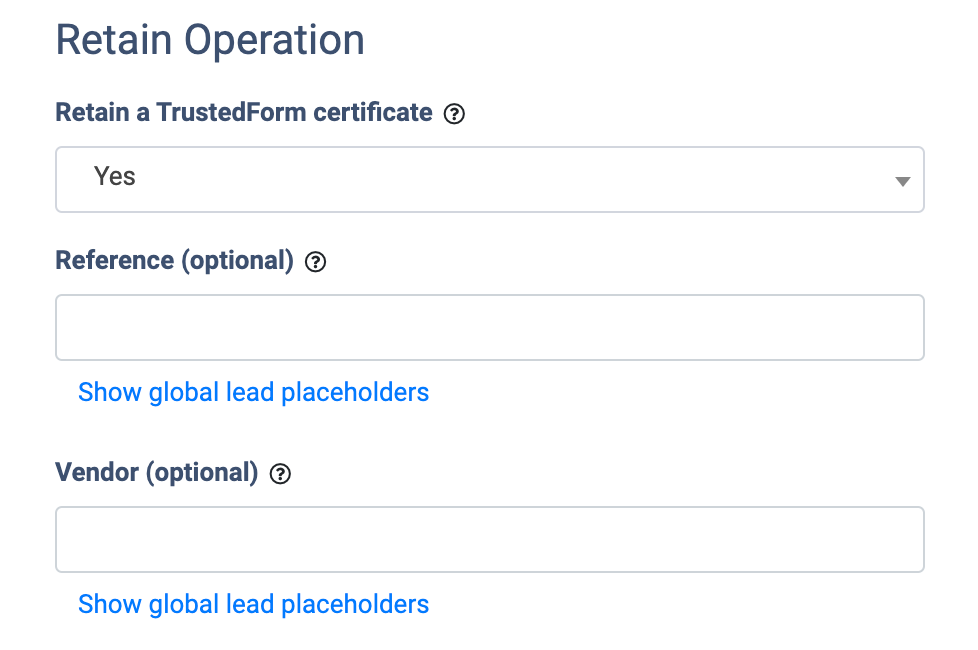
- Retain Operation: Select the “Yes” option in the “Retain a TrustedForm certificate” field to save a TrustedForm certificate in your account according to your retention setting (usually five5 years). It is important for all certificates linked to potential leads you plan to reach out to, to ensure you have a record of the relevant events. Note: When the “Retain a TrustedForm certificate” option is enabled, the “Enable Match Lead Fingerprint” option is automatically set to “Yes”.
- Reference (optional): Enter the information to identify the lead and associate it with the certificate (you can use Global Placeholders with different identification numbers).
- Vendor (optional): Enter the additional information about the user who sent the lead, for example, the name or identification number of the Publisher.
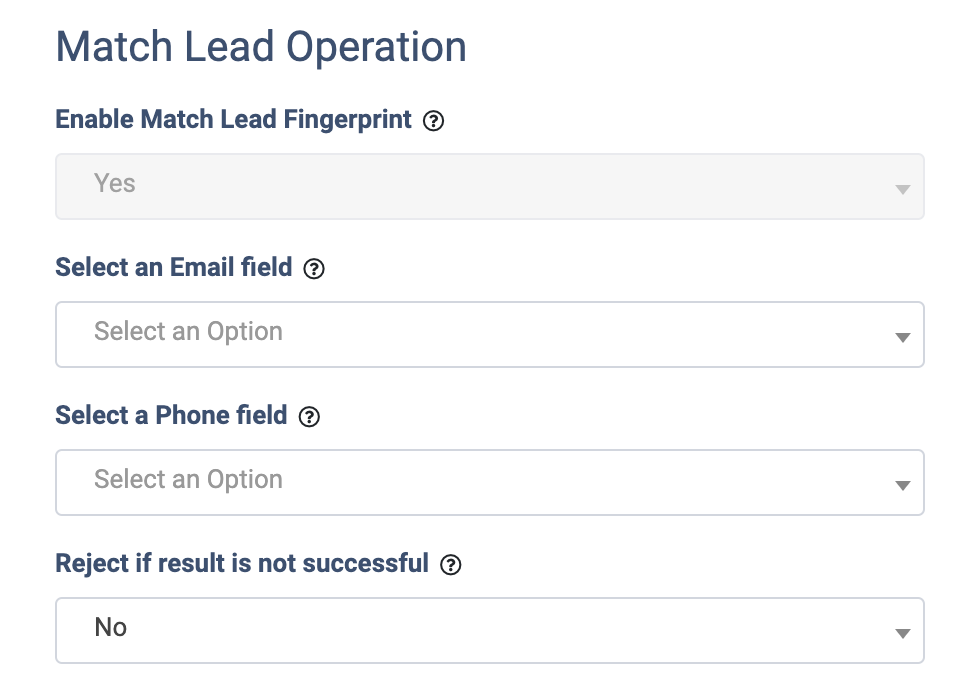
- Match Lead Operation: Select the “Yes” option in the “Enable Match Lead Fingerprint” field to compare the provided lead`s email and/or phone number with those stored in the certificate data.
- Select an Email field: Select the name of the field that contains the lead`s email to compare it with the value from the certificate data.
- Select a Phone field: Select the name of the field that contains the lead`s phone number to compare it with the value from the certificate data.
- Reject if result is not successful: Select the “Yes” value to reject the lead if the email and phone don`t match the data in the TrustedForm certificate. Note: The lead will not be rejected if at least one of the fields (email or phone number) matches the certificate data.
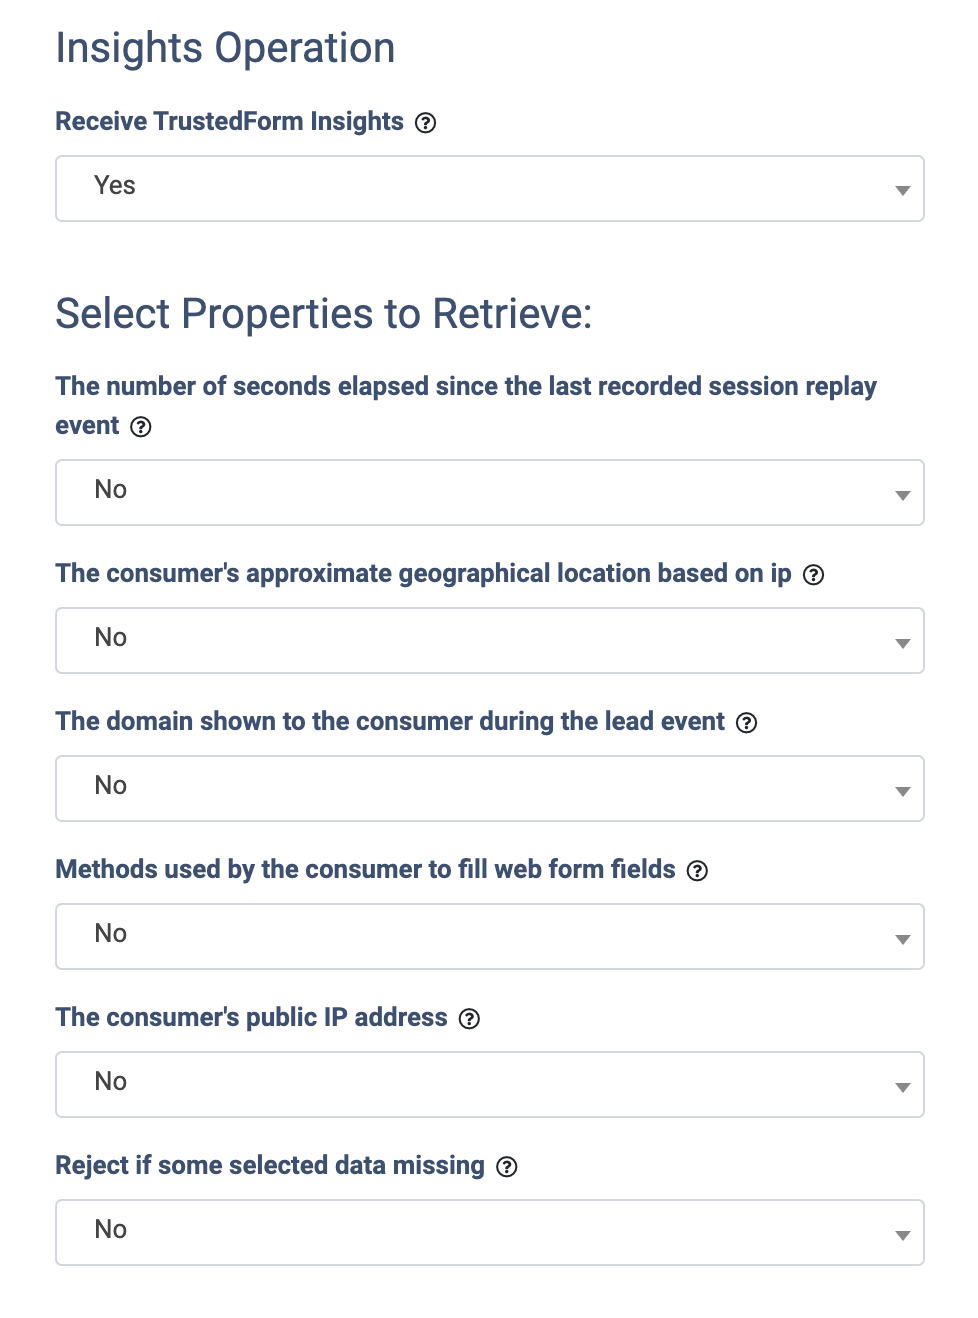
- Insights Operation: Select the “Yes” value to retrieve metadata about the event that triggered the TrustedForm certificate generation (for example, form input method or public ID of the user).
- Select Properties to Retrieve:
- The number of seconds elapsed since the last recorded session replay event: Select the “Yes” option to receive information about the recency of the lead's interaction with the website or platform monitored by TrustedForm.
- The consumer's approximate geographical location based on ip: Select the “Yes” option to receive information about the lead`s geographical location.
- The domain shown to the consumer during the lead event: Select the “Yes” option to receive the information about the website or platform where the lead interacted and submitted their information.
- Methods used by the consumer to fill web form fields: Select the “Yes” option to receive information about the method used by the lead to fill the form.
- The consumer's public IP address: Select the “Yes” option to receive the information about the public IP address of the lead.
- Reject if some selected data missing: Select the “Yes” option to reject the lead if any data to retrieve is missing.
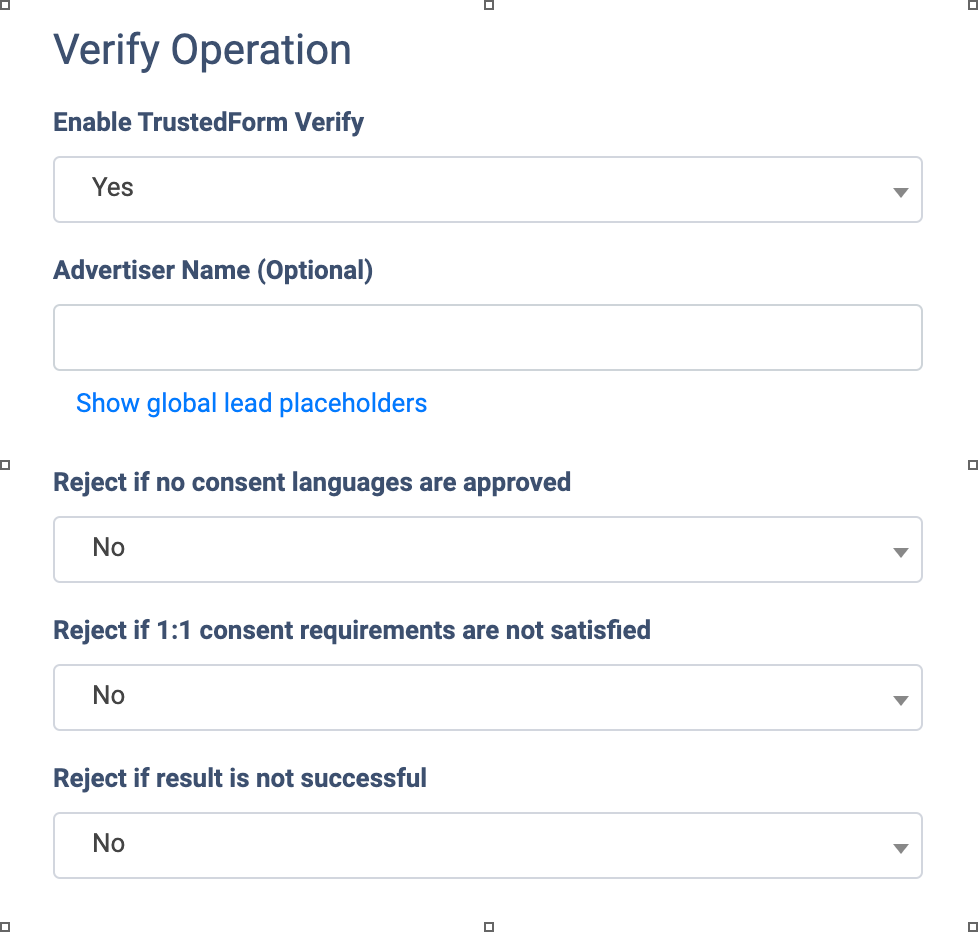
- Verify Operation: Select the “Yes” option to use data from lead events and the source from which they originated to verify that a consumer gave their express written consent to be contacted as defined by the requirements configured in your account.
- Advertiser Name: Enter the name of the legal entity for an advertiser that will be used to determine if they were given consent in a one-to-one manner. This value will be normalized to be case insensitive, ignore redundant white space, and omit non-alphanumeric characters. Both 'Acme Inc.' and 'acme inc' would result in the same processed value.
- Reject if no consent languages approved: Select the “Yes” option to reject the lead if there are no approved languages detected within the certificate.
- Reject if 1:1 consent requirements are not satisfied: Select the “Yes” option to reject the lead if the certificate structure does not satisfy the requirements for one-to-one consent.
- Reject if result is not successful: Select the “Yes” option to reject the lead if none of the found consent languages meet the success criteria defined for your account.
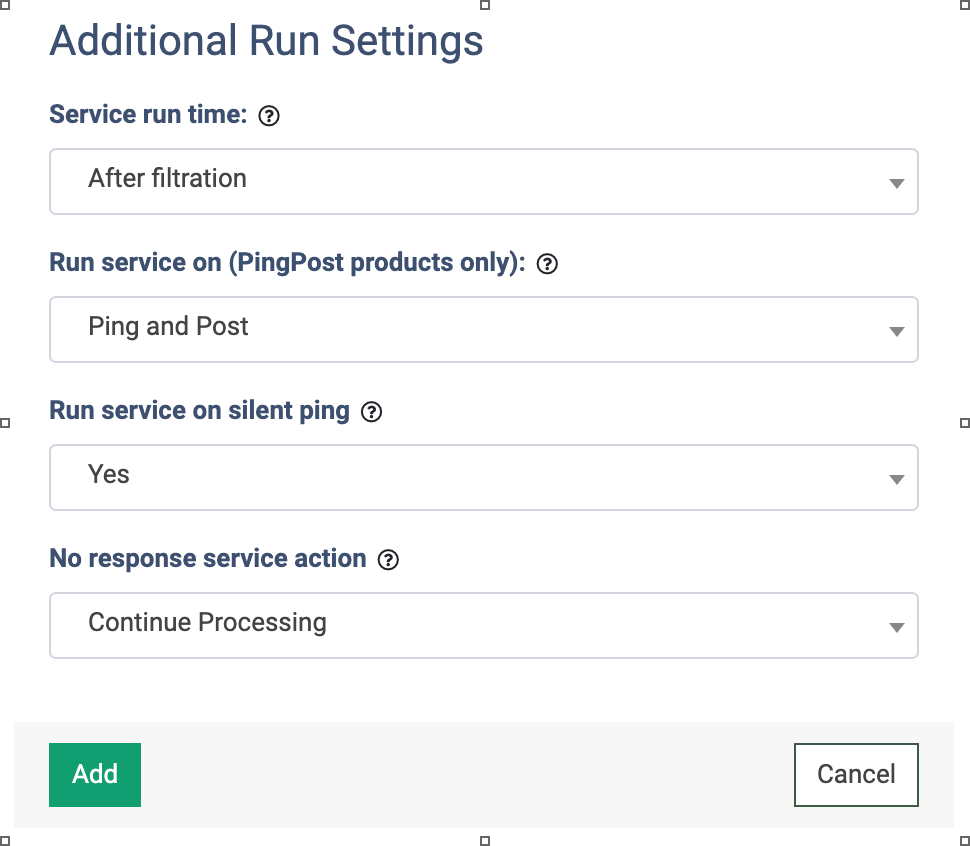
The “Additional Run Settings” configuration block allows you to configure more options to determine at which stage you would prefer to run the service.
- Service run time: Select whether you would prefer to run the service before or after the leads are filtered out (After filtration / Before filtration). Note: Please be aware that selecting this option may impact your invoice. Once this option is selected and no campaigns remain for the service to run, there will be no charges incurred.
- Run service on (PingPost products only): Select one of the options to determine at which stage you would prefer to run the service for the Ping Post products (Ping / Post / Ping and Post).
- Run service on silent ping: Select “Yes” if you would like to run the service during the silent ping stage. Select “No” to exclude this option.
- No response service action: The system runs a lookup service, in case the service does not get any response you can select the preferable action:
- Select the “Continue Processing” option if you want to continue processing leads when the service does not respond.
- Select the “Reject the Lead” option if you want to reject the lead when the service does not respond.
Click the “Add” button to confirm.