The Operator Dashboard is the central workspace for operators within the Cloud PBX Virtual Call Center (VCC) platform. It provides real-time visibility into call activity, campaign assignments, call scripts, client information, and operator status. Whether operators are handling inbound or outbound traffic, the dashboard ensures they have all the necessary tools at their fingertips - from starting a new call to logging dispositions and reviewing past interactions.
The Operator Dashboard is mainly designed for frontline operators who need to:
- Handle and manage live calls: Access current call details, see caller information, and follow scripts as needed.
- Switch quickly between campaigns and track personal performance.
- Log call outcomes: Submit call dispositions, add callers to DNC lists, or document results immediately after or within a call.
- Review past interactions: Access previous call records and voicemail messages for better customer context.
Note: Operator Dashboard is available only for operators with a SIP account.
To access the “Operator Dashboard”, click Operator Dashboard in the left-hand menu.
Operator Dashboard - Section Breakdown
Starting a Shift
The first step in using the Operator Dashboard is starting the shift session.
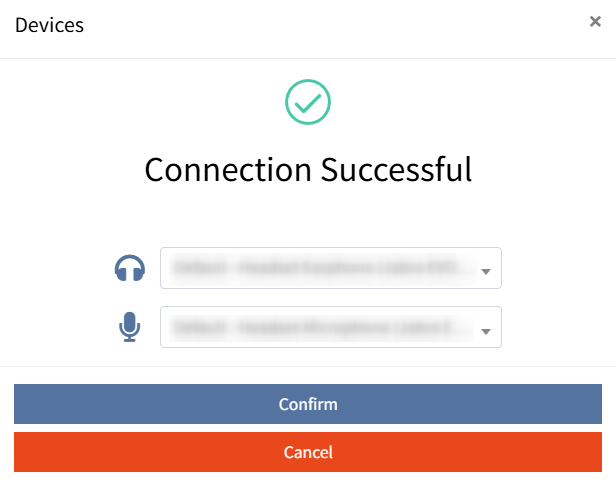
- Click Start Shift.
- A Devices pop-up window will appear. Select your speaker and microphone from the dropdown lists.
- Click Confirm to proceed.
- After the system successfully connects to your audio devices, a Connection Successful message will be displayed.
- Once confirmed, the dashboard will automatically update and display the dial pad and additional workspace panels.
After the shift is started and the device connection is confirmed, operators can set their Status to Available to begin receiving calls.
Note: To be able to start a shift and operate through the Operator Dashboard, you must have the Phonexa Cloud Softphone installed and logged in. If you have not completed this step yet, please follow the instructions in the following Knowledge Base article.
Operator Dashboard - Section Breakdown
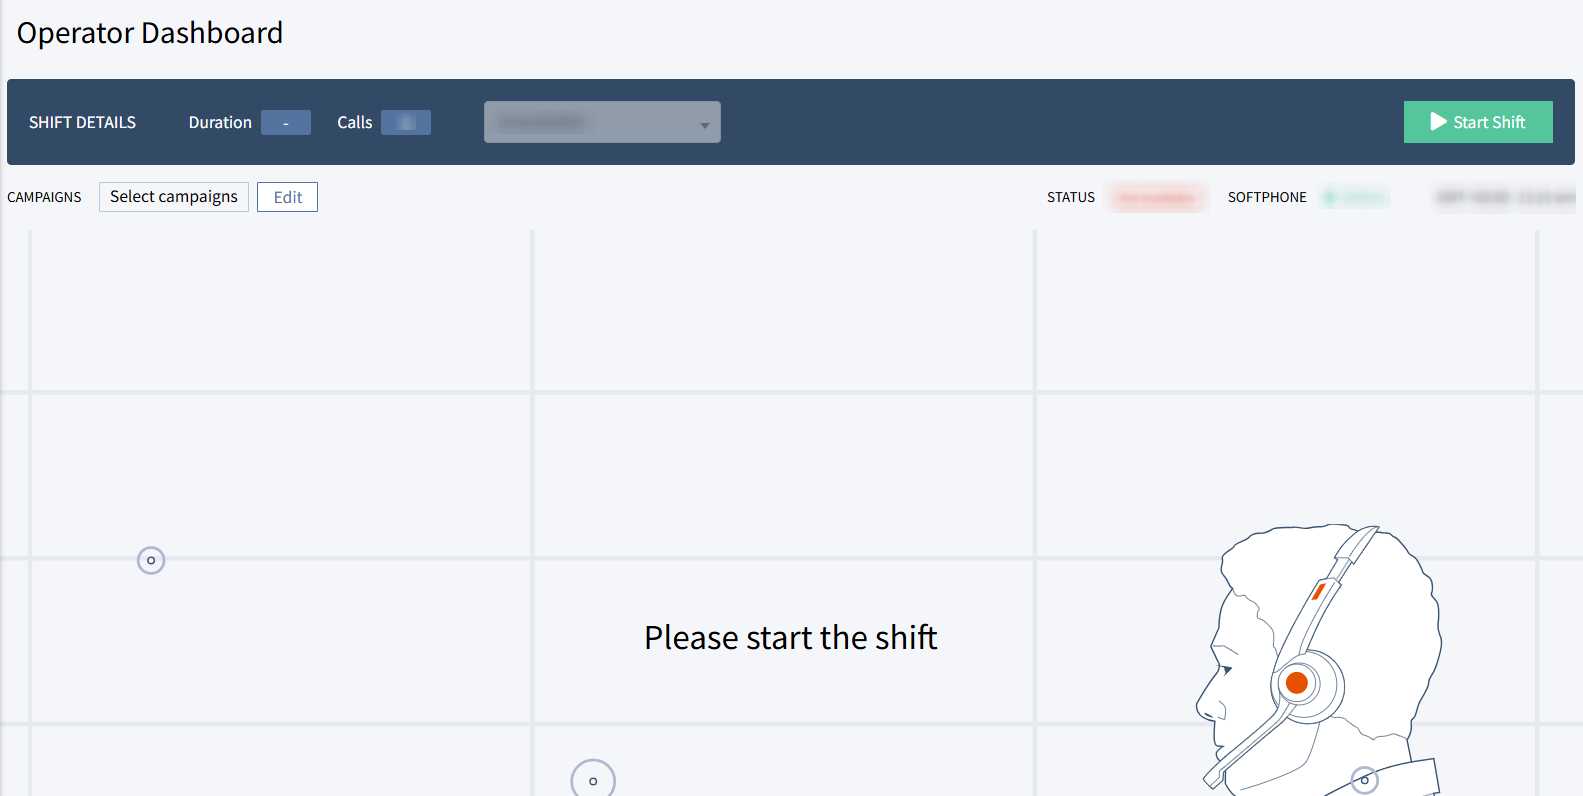
Shift Details
Located at the top of the Operator Dashboard.
This section shows key information about the operator’s active shift:
- Duration: Total time elapsed since the operator started the current shift.
- Calls: Total number of calls handled during this shift.
- Status: The operator’s current state (Available, Break, Lunch, Meeting, Training, Ticket Resolution, Follow-Up Actions, Unavailable, Off-shift call).
Operators must set their status to Available to receive calls.
Campaign Selection Bar & Status Indicators
- Campaigns: Allows operators to select and manage the campaigns they will work with during their shift. To choose campaigns, click Edit and select one or multiple campaigns from the pop-up window. After selection, the field will display the number of campaigns chosen (e.g., Selected 1 campaign). Read more about Call Campaigns in the following Knowledge Base article.
- Status Indicator: The operator’s current availability state during the shift. This status depends on the options selected in the “Status” field in the “Shift Details” block.
- Softphone Indicator: Shows whether the softphone is Online or Offline.
- Time Zone Indicator: Displays the operator’s local time and timezone.
The operator can perform the outbound manual calls by entering the phone number in the dial pad, process the Dialing List Requests through the outbound calls from the particular Dialing List by selecting the corresponding Call Campaign, and accept the inbound call.
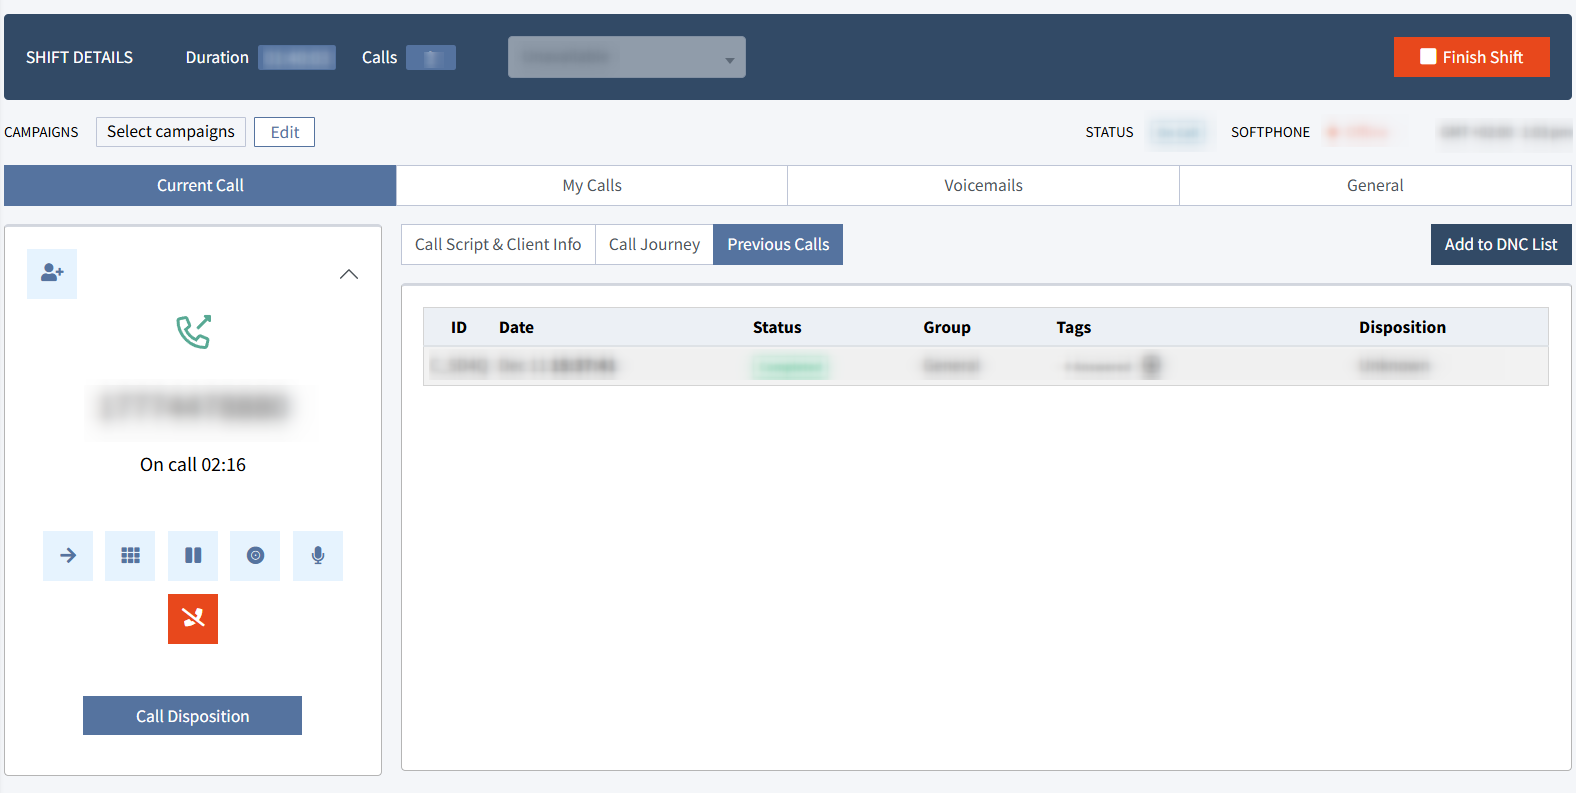
Current Call Tab
The Current Call tab is the main working area where operators manage active calls, place outbound calls, follow scripts, update client information, and submit call dispositions. This workspace is divided into the following functional blocks:
Dial Pad & Call Controls
This block is used for dialing numbers and managing live calls.
Dial Pad:
- Allows operators to manually enter and dial a phone number, or select one from the dropdown if a dialing list is applied to a manual campaign and dialing requests are available in the list.
- A Call button initiates outbound calls.
- Next Call loads the next call in the campaign queue (when applicable).
Call Controls (during a call)
Depending on the call stage, operators have access to the following actions:
- Decline: Available while the call is ringing (outbound dialing or inbound call). Cancels the call attempt before it connects.
- Accept: Available only for inbound calls. Connects the operator to the caller.
- Mute:
- During ringing: Allows the operator to mute the headset ringtone before answering an incoming call.
- During an active call: Mutes the operator’s microphone so the caller cannot hear them.
- Transfer: Transfers an active call to another operator, department, or external number. Two transfer types are available:
- Warm Transfer: Allows the operator to speak with the receiving party before completing the transfer. The operator can introduce the caller or provide context, ensuring a smooth handoff. After confirming, the operator completes the transfer. Example: The caller rang, and the first operator answered the call. However, the first operator realized that the client required specialized technical support, which he was not able to provide. Before transferring the call, the operator contacted the technical support department, explained the issue to the new operator or specialist, and then transferred the call. By the time the technical support operator/specialist picked up, they were already aware of the client's name and issue, thanks to the briefing provided by the first operator.
When a Warm Transfer is initiated, the interface updates to display additional controls for managing both the original caller and the receiving party, along with extra call-control options.- Receiving Party Information: Shows the name/number of the receiving party and their current status.
- On Hold Indicator: Indicates that the receiving operator is on hold while the first operator speaks to the caller, or vice versa, depending on the stage of the transfer.
- Hold/Unhold: Allows the operator to place the caller or receiving party on hold or remove them from hold, enabling a private conversation with the other participant during the warm transfer.
- Complete Warm Transfer: Finalizes the warm transfer by connecting the caller directly to the receiving operator and disconnecting the initiating operator.
- Cold Transfer: Transfers the call immediately without the operator speaking to the receiving party. The operator is disconnected as soon as the transfer is initiated, and the destination receives the call directly. Example: The caller rang regarding suspicious bank account activity, and the first operator answered the call. However, the first operator decides that the client needs to speak with the fraud department. The first operator simply presses a transfer button, and the caller is moved directly to the queue of the fraud department and listens to hold music or a message, awaiting the next available specialist in the fraud department. When the fraud specialist picks up, they have no information about the call and ask the client to explain the issue from the beginning.
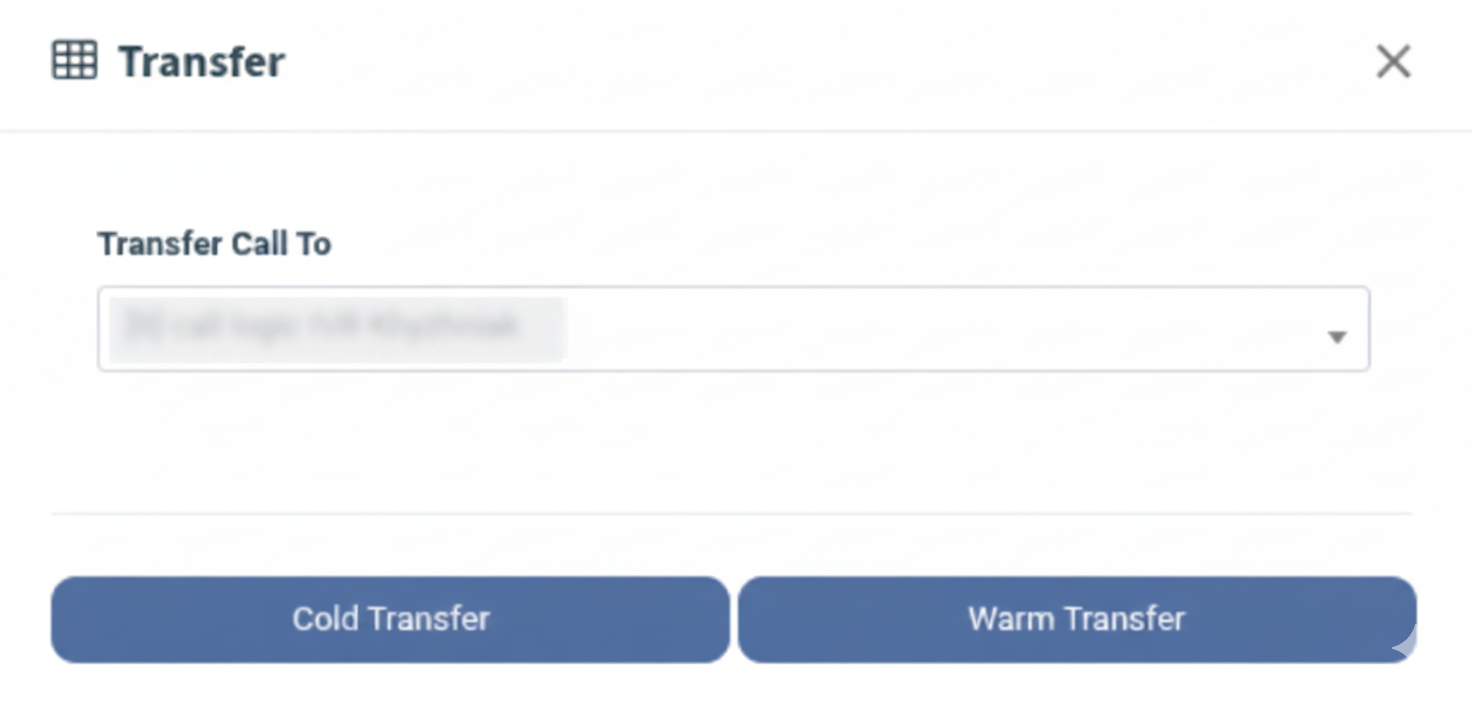
Note: Transfer routes must be predefined at the Call Group level before they can be used. Read more in the following Knowledge Base article.
- Keypad (Send DTMF): Sends numeric tones during the call for IVR navigation or entering verification codes.
- Hold: Places the caller on hold while the operator retrieves information or consults internally.
- Record: Starts or stops call recording, depending on campaign settings.
- Hangup: Ends the active call.
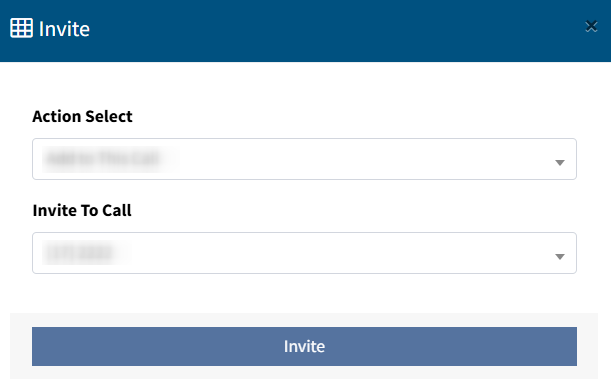
- Invite: Adds a third participant to the call, enabling a conference call. Two invite types are available:
- Add to This Call: Adds another operator, party, or number directly into the active call, creating a three-way conversation where all participants can hear and speak to each other.
- Whisper Invite: Invites another operator, party, or supervisor to join the call in whisper mode, allowing them to talk only to the operator while the caller cannot hear them.
Note: You can add only one participant per action. To remove the participant from the call, click the decline icon next to the phone number on the dialing pad.
- Call Disposition: Opens the disposition window where the operator selects the final outcome of the call (e.g., Voicemail, Busy, Disconnected) and optionally adds a comment for additional context. Note: Only one disposition can be set per call. Read more about Call Dispositions in the following Knowledge Base article.
- Reschedule Call: Allows scheduling a future callback when a follow-up is required.
- Add to DNC List: Allows the operator to add the caller’s number to the Do Not Call (DNC) list when requested by the caller, by selecting the call group, campaign, DNC type (e.g., Permanent or Temporary), and optionally adding a comment for additional context.
In Queue
If multiple calls are waiting, the In Queue panel shows:
- The total number of waiting calls
- The call type (e.g., Inbound)
- The caller’s phone number
- The waiting time counter
This helps operators prioritize calls and understand queue load at a glance.

Note: You can add only one operator per action. To remove the operator from the call, click the minus sign next to the phone number on the dialing pad.
Call Script & Client Info
The Call Script & Client Info block provides operators with all the essential tools and information needed to handle the call efficiently, including the guided call script, required data fields, integration actions, and client-specific details.
- Call Script: Displays a step-by-step script defined for the selected campaign, guiding operators through greetings, questions, and instructions to ensure consistency and accuracy during the call. The Call Script also allows operators to add or update information in the displayed data fields that must be collected or confirmed from the caller (e.g., SSN, account details, verification fields). Any information entered is saved as part of the client record and may trigger automated workflow steps depending on the campaign configuration. Read more about Call Scripts in the following Knowledge Base article. Note: Please note that call scripts are currently available only for auto campaigns.
- Client Info: Displays all information stored in the system about the lead, including call tags (automatically assigned or manually added by the operator), dispositions, comments, and any additional custom fields configured for the campaign or client group. Operators can fill in or update details during the call and save the changes using the Save button. Additionally, certain information, such as SSNs or other sensitive data, can be hidden from operators by admins or managers, which must be configured in advance at the call group level. Read more about Call Scripts in the following Knowledge Base article.
Call Journey
The Call Journey block provides a chronological timeline of all events related to the current call, including when the operator answered, when the callee was dialed, when the callee answered, transfers, and other system-recorded actions, allowing operators and managers to track the full flow of the call.
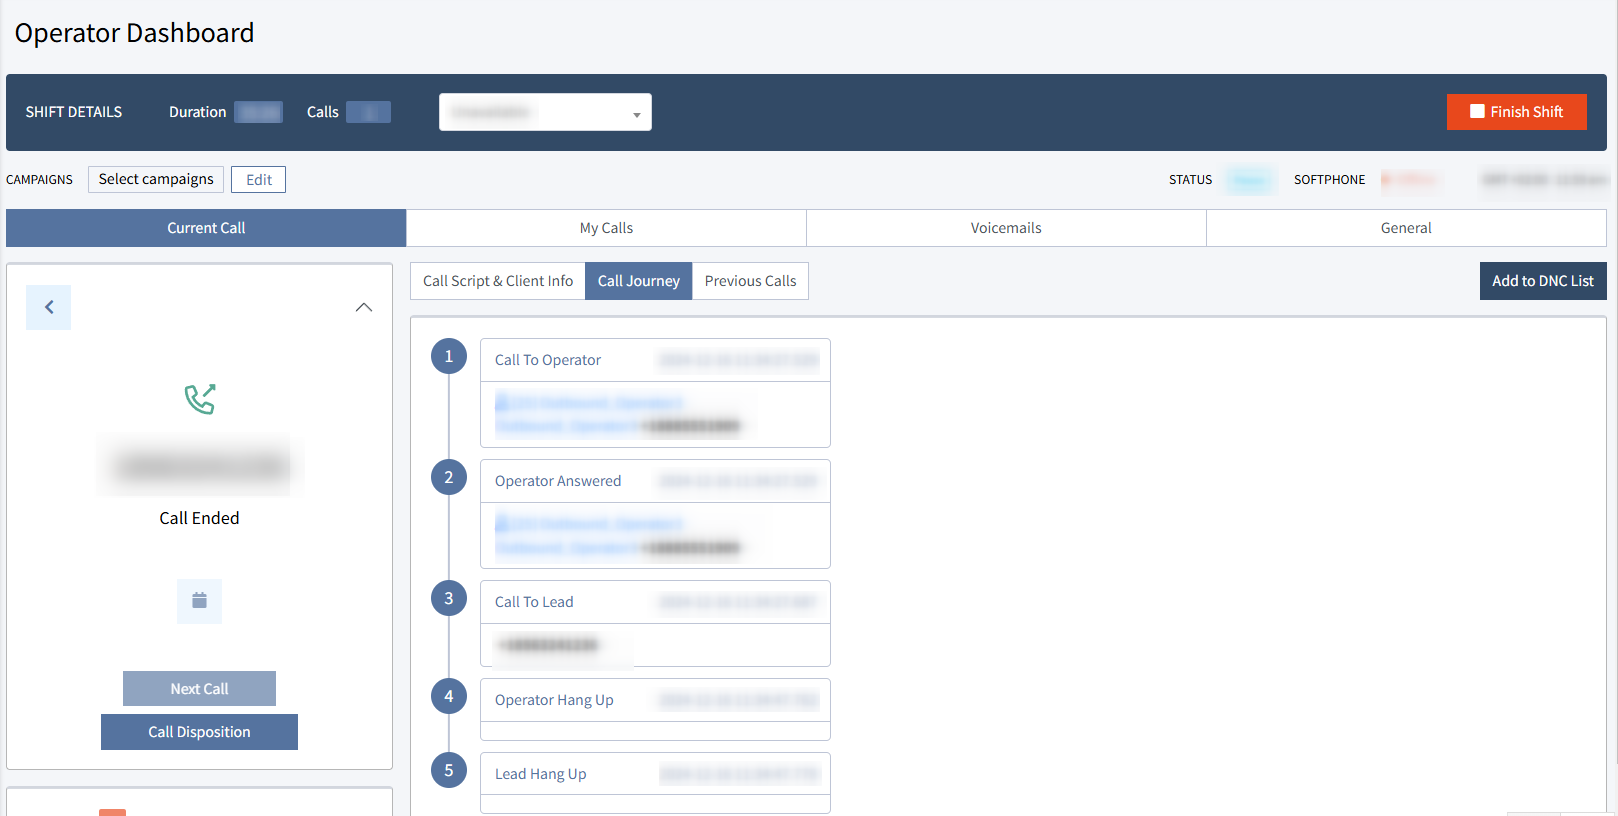
Previous Calls
The Previous Calls shows a history of past calls associated with the particular phone number, including call ID, date, call status, call group, call tags, and final disposition, enabling operators to quickly review prior interactions and outcomes.
My Calls
The My Calls tab provides operators with a complete overview of their active and completed calls for the current day.
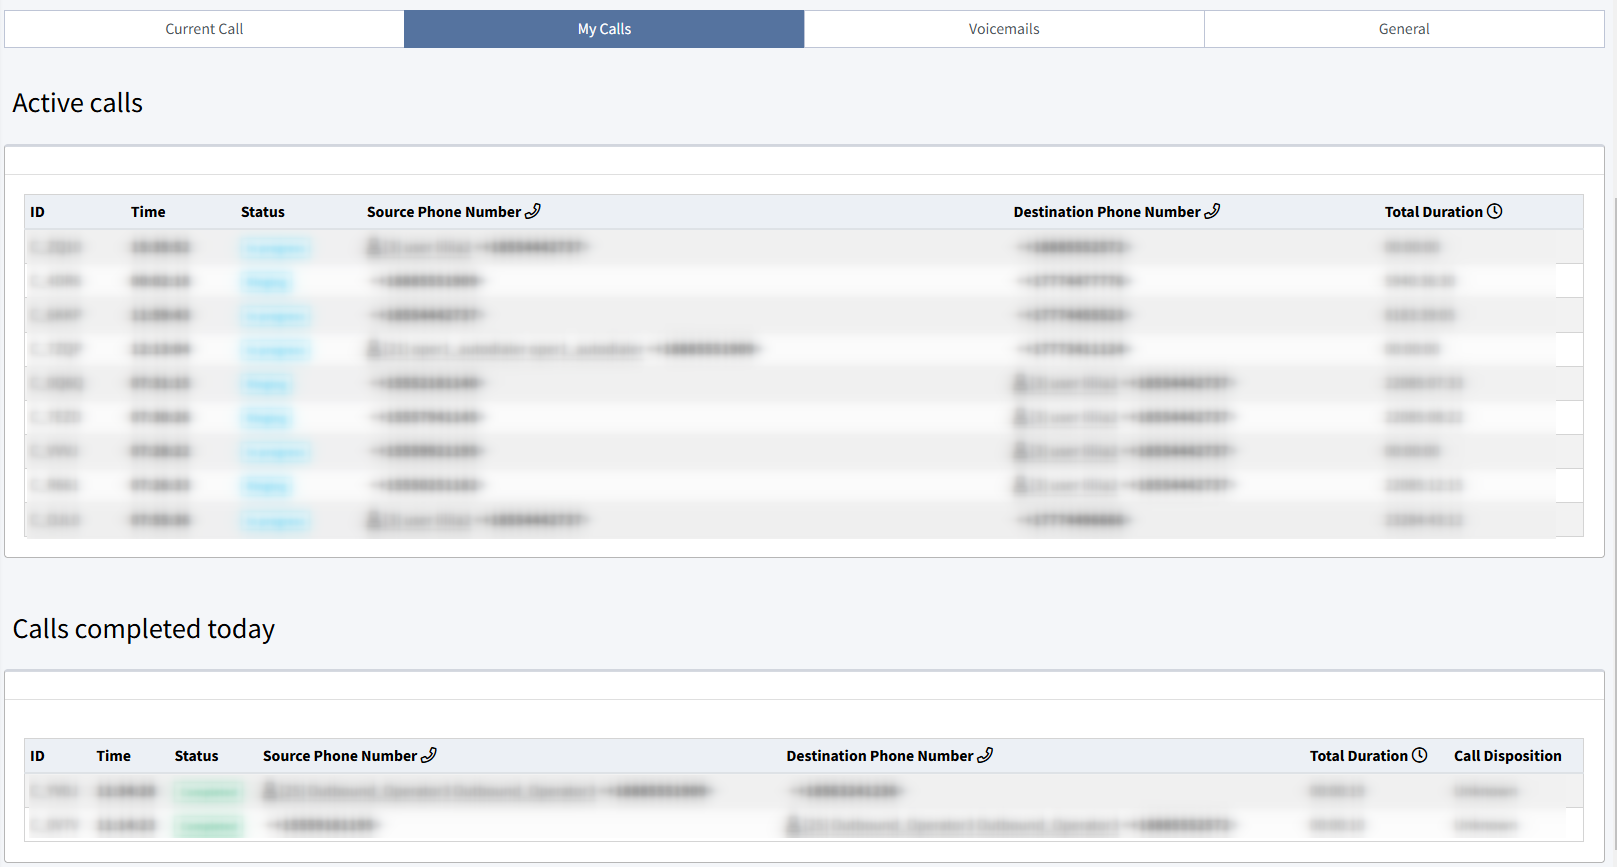
This section is useful for:
- Real-Time Monitoring: Allows operators to quickly review their workload, ongoing activity, and call outcomes throughout the shift.
- Easy Tracking & Reference: Helps operators look back at previous interactions, verify call details, and ensure accuracy when following up.
It includes the following information:
- ID: The unique identification number of the call.
- Time: The time the call starts.
- Status: The status of the call (Ringing, In progress, System, Error, Cancelled, Completed).
- Source Phone Number: The source phone number (the phone number that is assigned to the operator and from which the ongoing call is made).
- Destination Phone Number: The destination phone number (the phone number that is dialed during the ongoing call).
- Total Duration: The total duration of the call.
- Call Disposition: The disposition of the call (available only for the “Calls completed today” list).
Voicemails
The Voicemail tab allows operators to view, filter, and manage all voicemail messages. Here, operators can easily search for specific voicemails, review message details, and take follow-up actions when needed.

You can narrow down the search results by using the following filters:
- Call Group: Select the client call group.
- Direction: Select the direction of the call (Inbound, Outbound, Internal, Callback).
- Voicemail Box: Select the voicemail box.
- Status: Select the status of the voicemail (New, Listened, Email Sent).
- Updated by: Select the user who updated the voicemail.
- Date: Select the date range of the voicemail.
The Voicemail tab contains the following information:
- Call ID: The unique identification number of the call.
- Date: The date and time of the voicemail.
- Source Phone Number: The source phone number (the phone number that is assigned to the operator and from which the ongoing call is made).
- Total duration: The total duration of the voicemail.
- Status: The status of the voicemail (New, Listened, Email Sent).
- Destination: The destination phone number (the phone number that is dialed during the ongoing call).
- Call Group: The client’s call group.
- Voicemail Box: The name of the voicemail box.
- Updated At: The time and date of the last update.
- Updated By: The name of the user who updated the voicemail.
To listen to the voicemail, click the record in the Total Duration column. In the pop-up window, click the “Play/Pause” button to start or stop the record accordingly. To download the record, click the “Download” button.
Note: The Two Factor Authentication feature should be set for the voicemail playback.
Read instructions on how to set up Two Factor Authentication in the following Knowledge Base article.
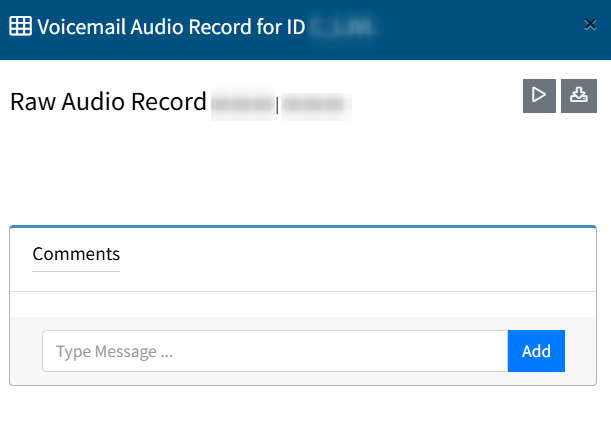
To add the comment to the voicemail, enter the text in the “Comments” block and click the “Add” button. To remove the comment, click the “x” button next to it.
To edit the voicemail's status, click the “Edit” button in the Action column, select the status (New, Listened, Email Sent) in the corresponding field in the pop-up window, and click the “Update” button to apply the changes.
General
The General tab provides operators with a quick overview of their personal profile and system-related settings. This information helps ensure that all operator details, such as skills, departments, caller IDs, and time zones, are correctly configured for call handling and workflow accuracy.
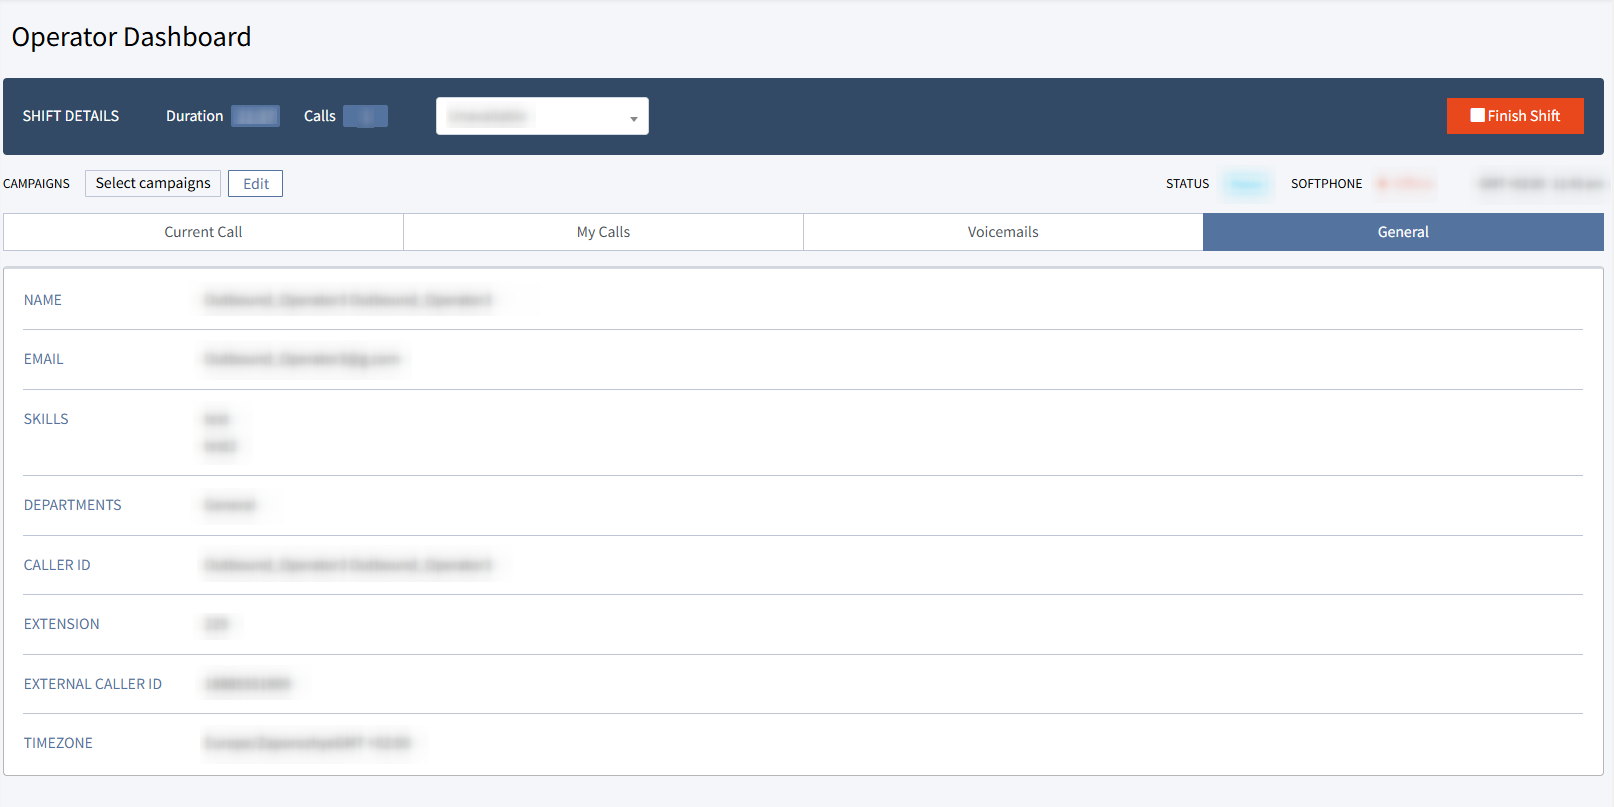
The General tab contains the following information:
- Name: The operator’s full name as registered in the system.
- Email: The operator’s email address.
- Skills: A list of skills assigned to the operator, which may determine call routing or campaign eligibility.
- Departments: The department(s) the operator belongs to.
- Caller ID: The name of the operator displayed when the operator places calls.
- Extension: The internal extension number of the operator (only for internal calls between the operators in the system).
- External Caller ID: The caller ID (the phone number) shown to external recipients during outbound calls (configured by admins).
- Timezone: The operator’s assigned time zone, used for call scheduling, reporting, and timestamp accuracy.
This section is view-only for operators; configuration changes must be made by system administrators or managers.