The Present & Do Not Present Lists feature allows you to create Present or Do Not Present Lists and use them to filter leads based on the list of set parameters on the Buyer, Product, and Campaign levels.
Present and Do Not Present Lists (PL/DNPL) are applied to the Product field and contain a list of values for this field that the system will only accept or filter out based on them. When processing a lead, the system will compare the value sent in the set Product field with the list of values in the PL/DNPL. For PL, the system will only accept leads with the values added to the PL. For DNPL, the system will filter out leads if there is a match with DNPL.
To manage and configure lists, go to the Client Management > Setup > Present & Do Not Present Lists section.
The section contains the following tabs:
Present & Do Not Present Lists
The “Present & Do Not Present Lists” tab allows you to create new Present or Do Not Present Lists, and edit, manage, and delete the existing ones. You can set the values for the corresponding lists by adding them manually or using the importing options and managing API access configurations.
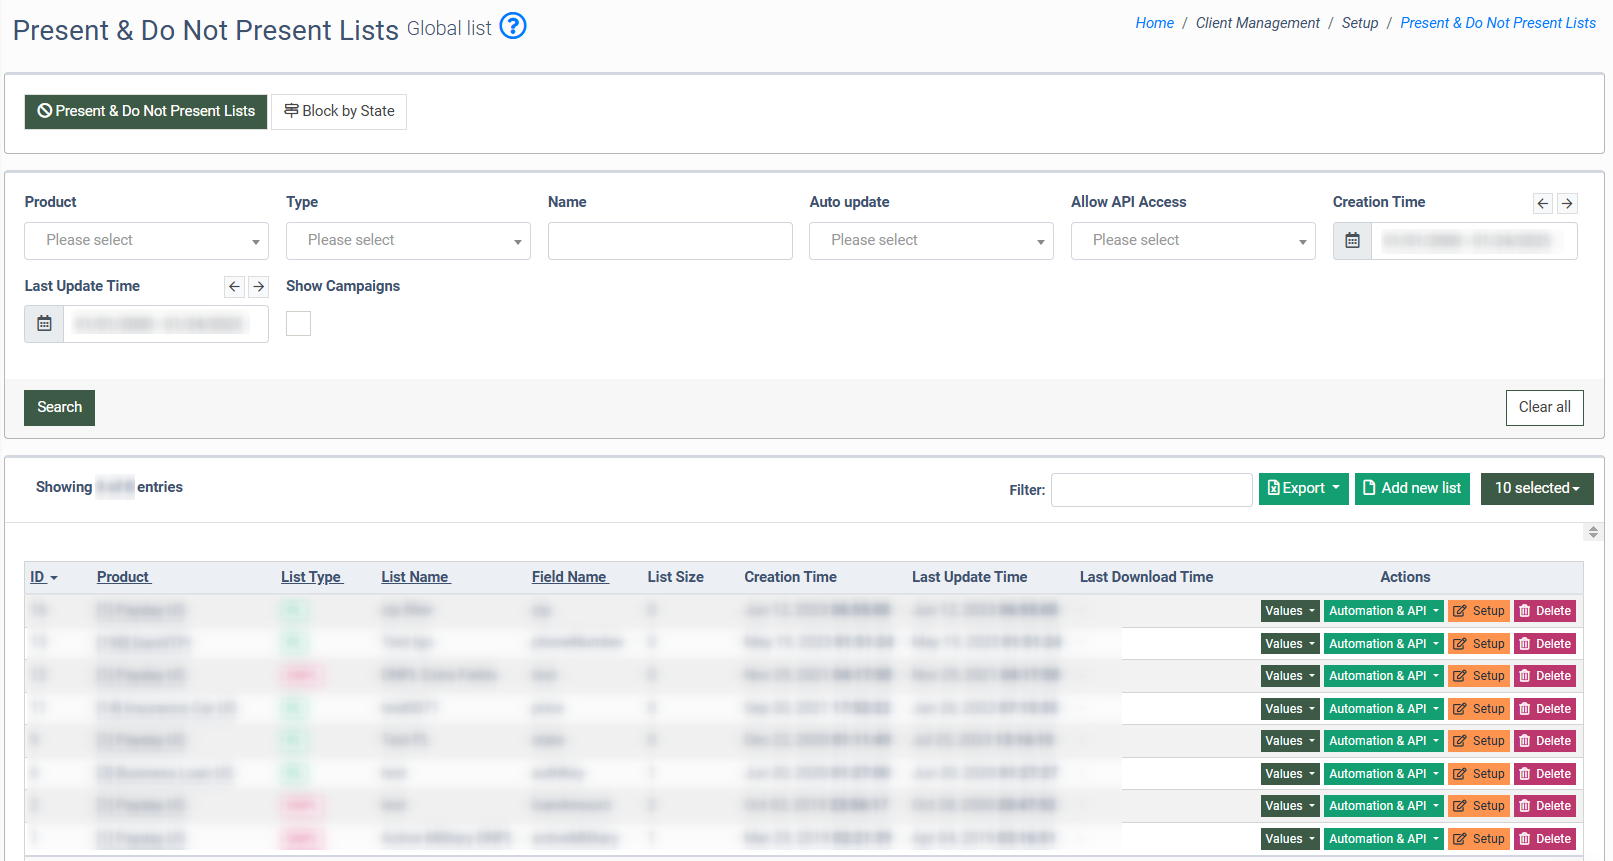
The Present & Do Not Present Lists tab contains the following information:
- ID: The unique identification number of the list.
- Product: The name of the Product.
- List Type: The type of the PL/DNPL list.
- List Name: The name of the PL/DNPL list.
- Field Name: The name of the field that is used as a filter.
- List Size: The number of values for the selected field.
- Auto-Update Frequency: The Auto-download (auto-update) setting frequency (in hours). This setting determines the timeframe for automatic update of the values that are stored in the particular list. New values will be downloaded from another system and uploaded to our system with the auto-update.
- Allow API Access: The setting for the API access availability (Yes/No). The API Access allows you to create, view, and delete values from a particular PL/DNPL list by using the API.
- Creation Time: The date and time of the list creation.
- Last Update Time: The date and time of the last update of the list.
- Last Download Time: The date and time of the last auto-download action.
- Campaigns: The list of Campaigns that use the current PL/DNPL list. To view the list of related campaigns, click the “Show campaigns” button. Note: Check the “Show Campaign” box in the filters section to view this column.
You can narrow down the search results by using the following filters:
- Product: Select the Product.
- Type: Select the type of the list.
- Name: Enter the name of the list.
- Auto update: Select if the auto-update is enabled for the list.
- Allow API Access: Select if the API access is enabled for the list.
- Creation Time: Select the time range for the list creation.
- Last Update Time: Select the time range for the last update of the list.
- Show Campaigns: Check the box to display Campaigns for the record.
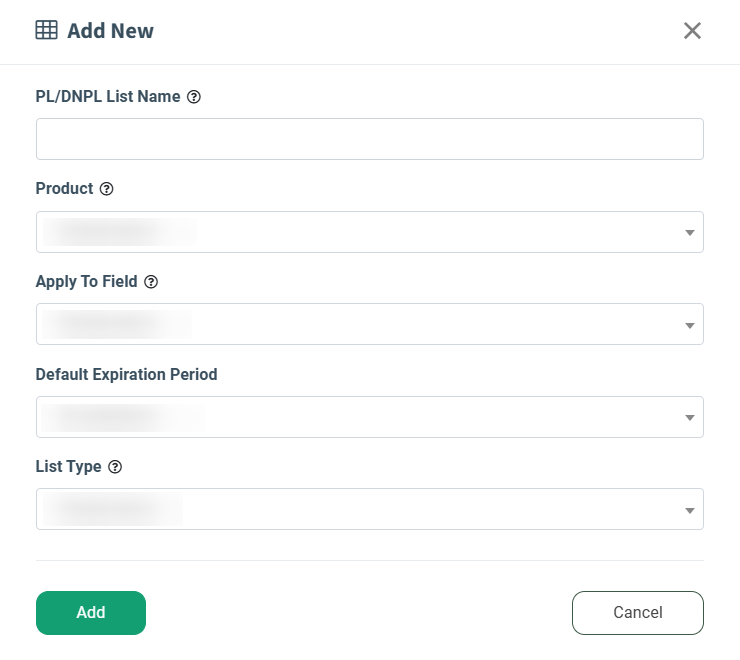
To add a new PL/DNPL list, click the “Add new list” button and fill in the following fields in the “Add New” pop-up window:
- PL/DNPL List Name: Enter the name of the list.
- Product: Select the name of the Product.
- Apply To Field: Select the field that will be used as a filter.
- Default Expiration Period: Select the default expiration period for the PL/DNPL list (No expiration / 1 minute / 5 minutes / 10 minutes / 30 minutes / 1 hour / 8 hours / 1 day / 7 days / 30 days / 90 days / 180 days / 1 year).
- List Type: Select the type of the list (PL/DNPL).
Click the “Add” button to proceed.
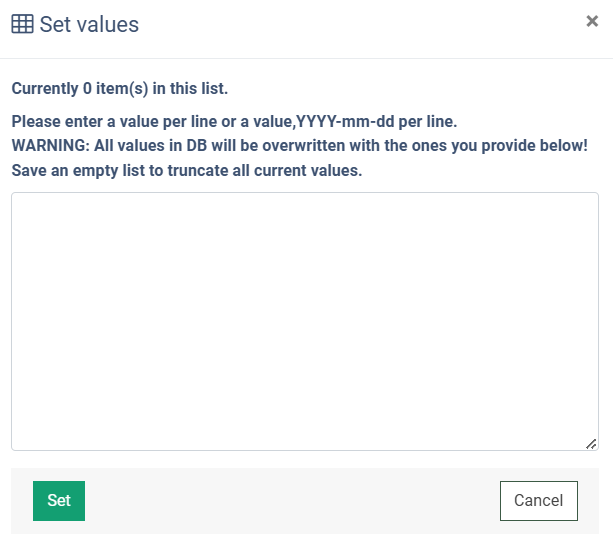
To add and configure the values of the field for PL/DNPL, click the “Values” button in the “Actions” column and choose the option from the drop-down list:
- Set values: Select the option to configure values from the existing list.
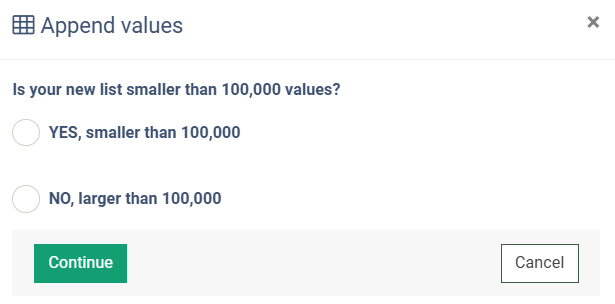
Note: You can edit and delete values from the list if your list is smaller than 100,000 values. If your list is larger than 100,000 values, you can upload new data from the file, and it will override the current list values.

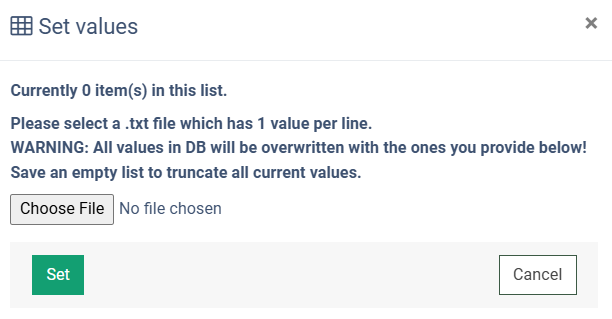
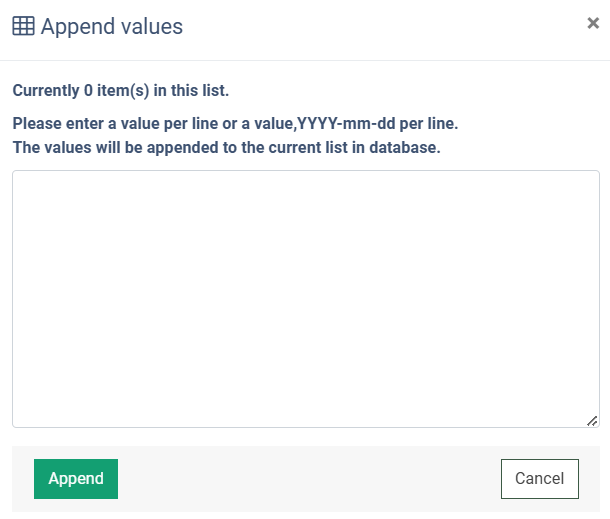
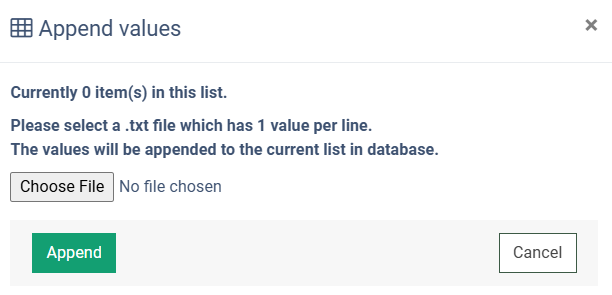
- Append values: Select the option to manually add values to the list or upload values from a file. To upload values from the file, select the “NO, larger than 100,000” option and click the “Continue” button to proceed.
- Edit values: Select the option to be redirected to the page to add and edit values.

This section contains the following information:
- Value: The name of the value.
- Created Date: The date of creation.
- Expiration Date: The date of expiration.
To narrow down the search results, enter the name of the value into the “Search for a Value” filter field.
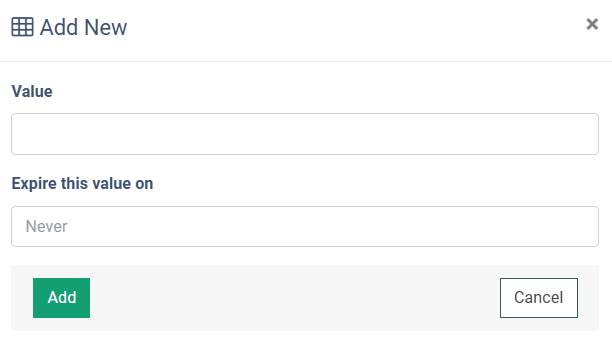
To add a new value, click the “Add new value” button and fill in the following fields:
- Value: Enter the value of the field that the system will use to filter leads.
- Expire this value on: Select the expiration date of this filter.
Click the “Add” button to complete the action.
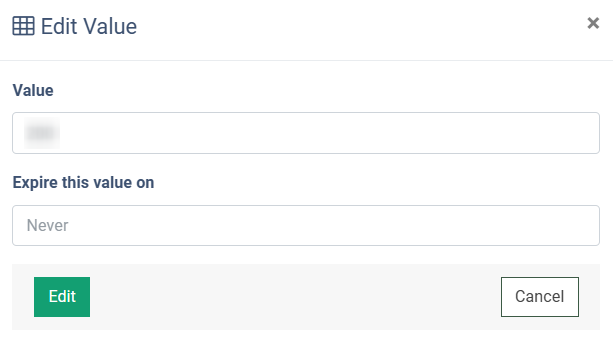
To edit the value, click the “Edit Value” button in the “Action” column. Change the value and expiration date in the “Edit Value” pop-up window and confirm the changes by clicking the “Edit” button.
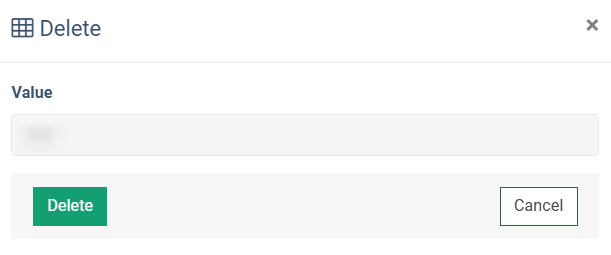
To delete the value from the list, click the “Delete” button in the “Action” column. Confirm the deletion operation by clicking the “Delete” button in the “Delete” pop-up window.
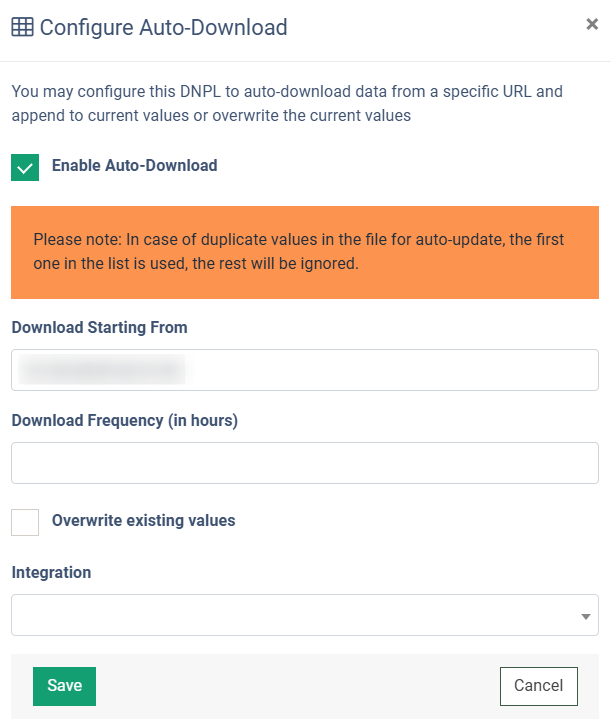
To configure the “Automation & API,” click the corresponding button in the “Actions” column and choose the option from the drop-down list:
- Configure Auto-Download: This option allows setting up the auto-download. You may configure the PL/DNPL to auto-download data from a specific URL and append it to the current values or overwrite the current values. Check the box in the “Enable Auto-Download” field, and fill in the following fields in the “Configure Auto Download” pop-up window:
- Download Starting From: Select the date and time of the first download starting.
- Download Frequency (in hours): Enter the frequency of the data downloading in hours.
- Overwrite existing values: Check the box to enable the current existing values overwriting.
- Integration: Select the corresponding integration for the data uploading. Note that the integration can be enabled on demand. If you need to enable the particular integration, please contact your account manager.
Click the “Save” button to complete the settings.
The example of the usage: The client has the server where the particular email addresses are stored. These values to this list can be added automatically or manually, and this process is constant. The client needs to have these emails added to the corresponding PL or DNPL list on our side. To reduce the complexity of this action, along with the manual data input to our system, the Auto-Download feature can be installed, which allows the user to download and update the corresponding list with freshly added emails automatically.
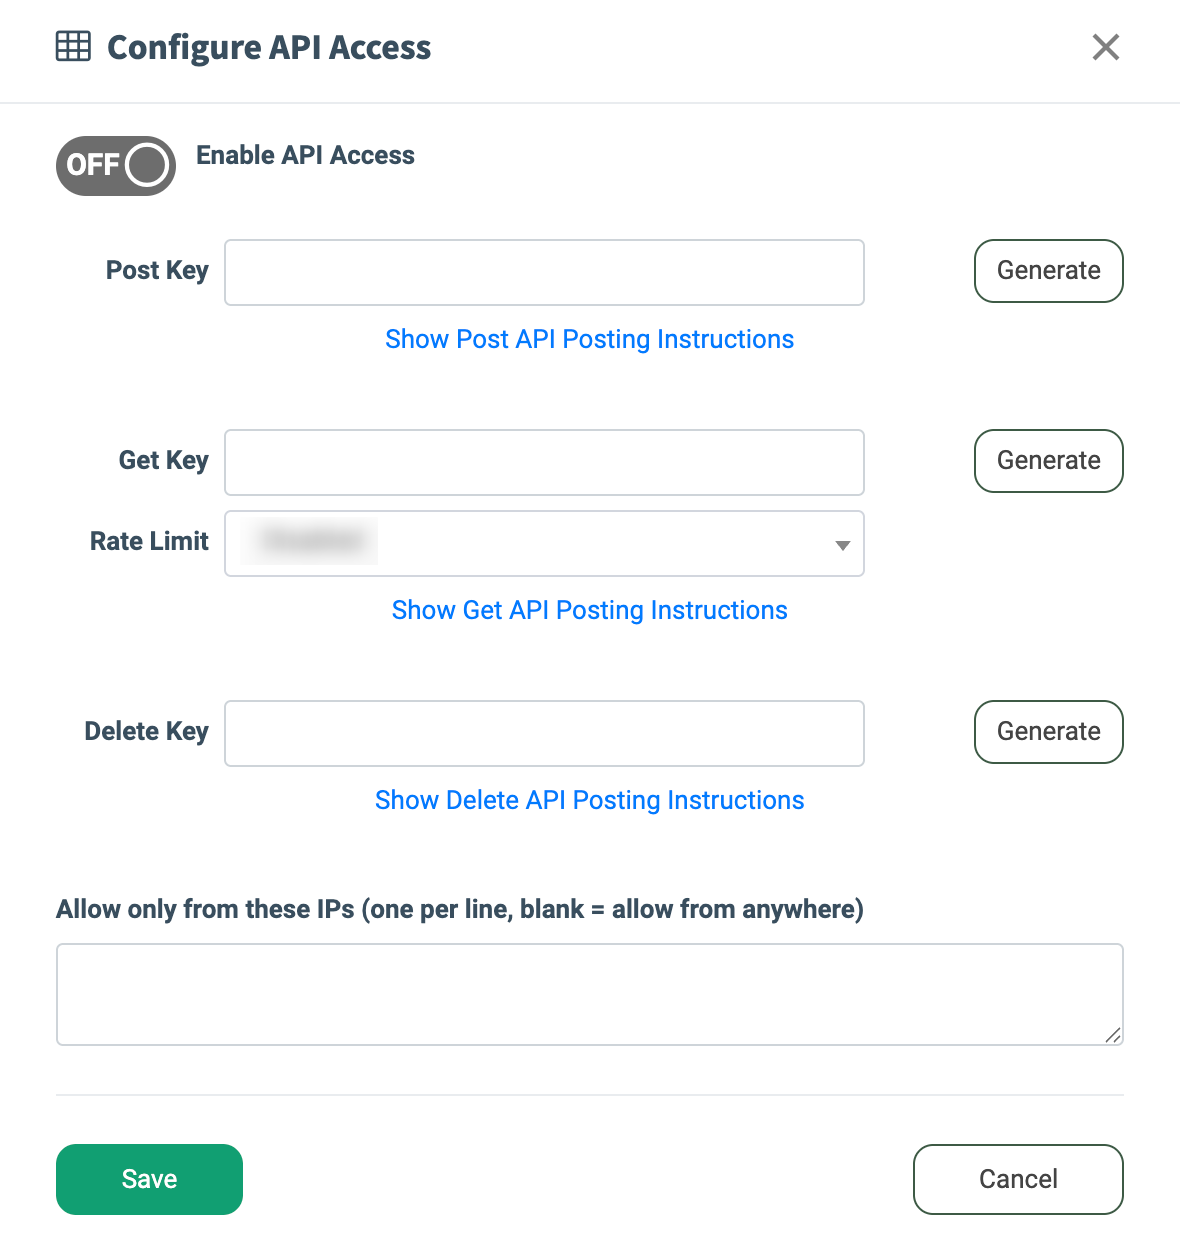
- Configure API Access: This option allows you to set up the API Access. Switch the toggle to the left side to enable API Access, and click the “Generate” button to generate an API key for the POST, GET, and DELETE requests. Set the limitation for the number of requests in the “Rate Limiter” field. Enter IPs to allow access only from the particular IP list in the “Allow only from these IPs” field. Click the “Save” button to save the progress. To view the details, including the format and response examples, click the “Show API Posting Instructions” button.
The example of the usage: The manager of the client, that don’t have direct access to our system, can manage the corresponding PL or DNPL lists by using the provided API access. Available options to view, add, edit, or delete the values from the list.
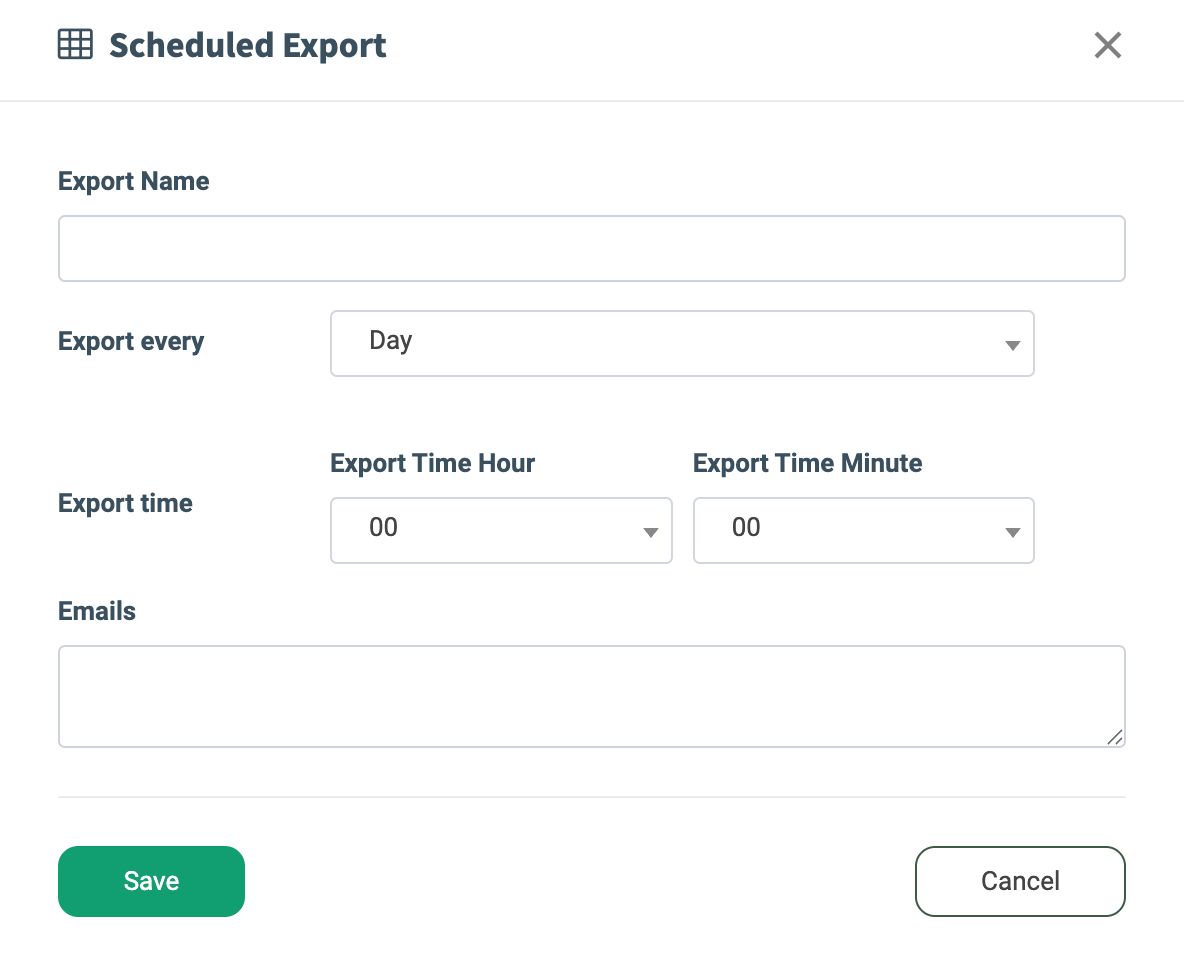
- Scheduled Export: This option allows you to automatically export Present List (PL) or Do Not Present List (DNPL) data at defined intervals.
Usage Example:
Scheduled exports are ideal for maintaining up-to-date suppression data across systems. For example, you can configure a daily DNPL export that is automatically sent to your CRM or external partners, ensuring that restricted or previously contacted leads are consistently excluded from future Campaigns without requiring manual updates.
Fill in the following information in the pop-up window to create a scheduled export:
-
-
Export Name: Enter a name for the export schedule. This name will be used to identify the export in reports and logs.
-
Export every: Select the scheduled export frequency (Day / Week / Month) and specify the applicable days.
-
Export time: Set the exact time (hours and minutes) when the export should be generated.
-
Emails: Enter one or more email addresses that will receive a notification once the export is completed, including a download link to the file.
Click the “Save” button to confirm.
-
To configure PL/DNPL list settings, click the “Setup” button in the “Actions” column. Fill in the required fields in the “Setup” pop-up window, and click the “Edit” button to complete the changes.

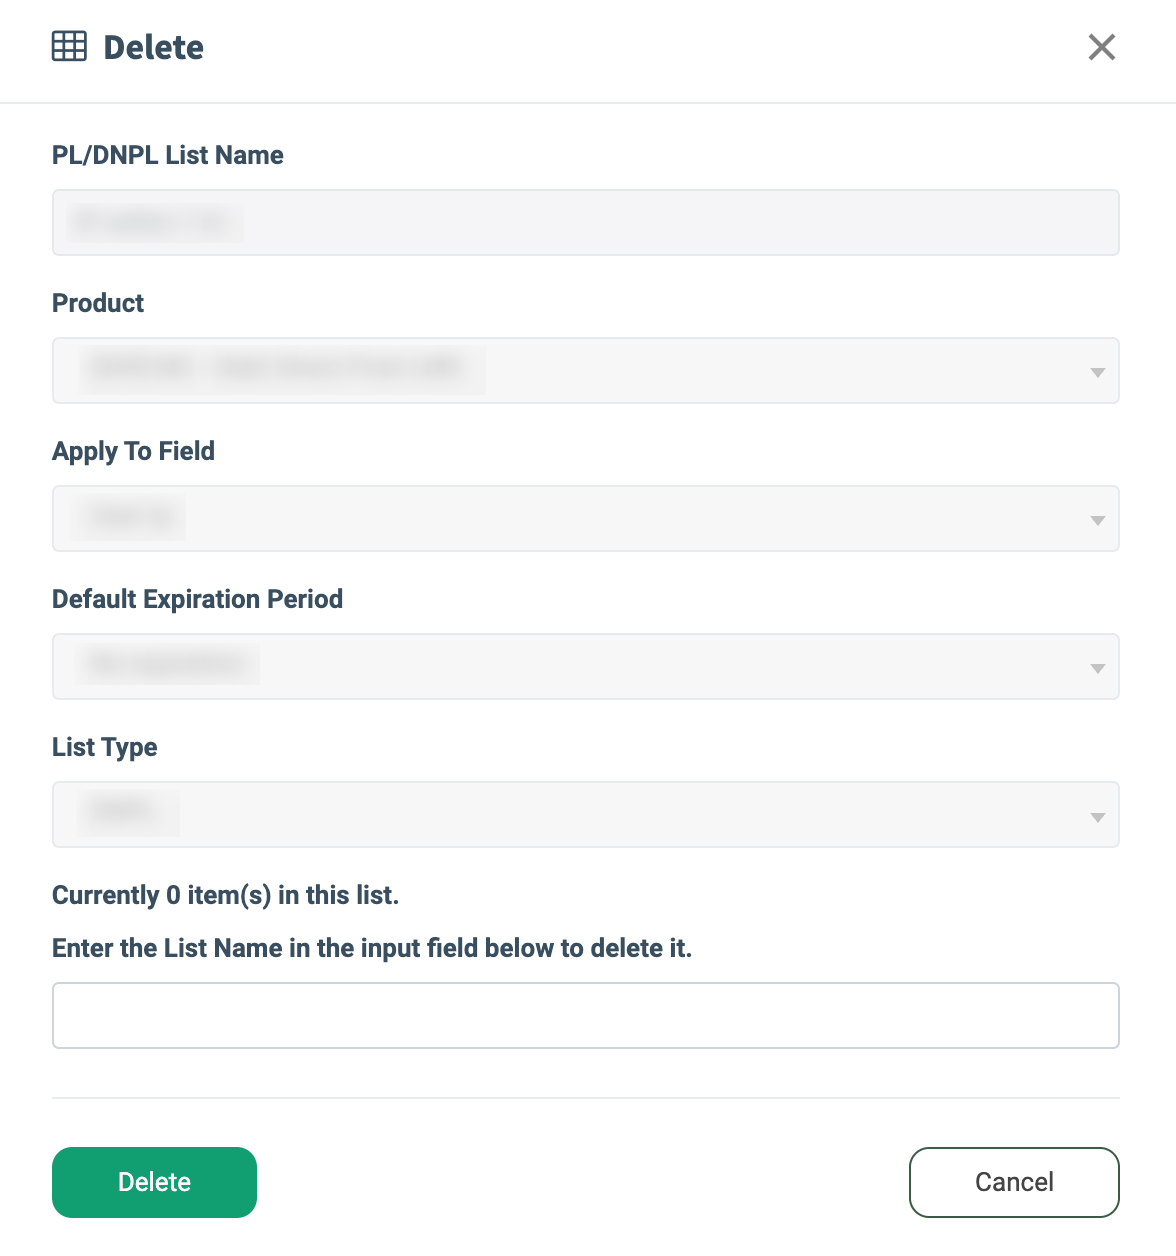
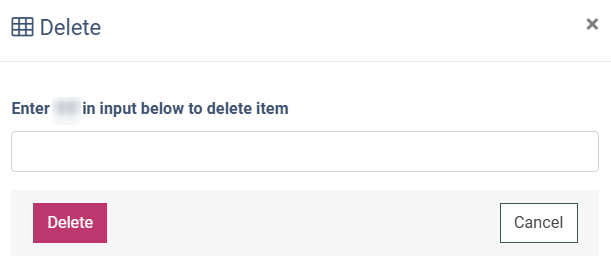
To remove the list, click the “Delete” button in the “Actions” column and enter the name of the list into the corresponding field to confirm your intention. Click the “Delete” button to finish.
Block by State
The “Block by State” tab allows you to set rules to block leads from particular states for all Product Campaigns. The set rule considers a full block for posting leads from the particular state and has a higher priority than the corresponding settings for the PL/DNPL lists.
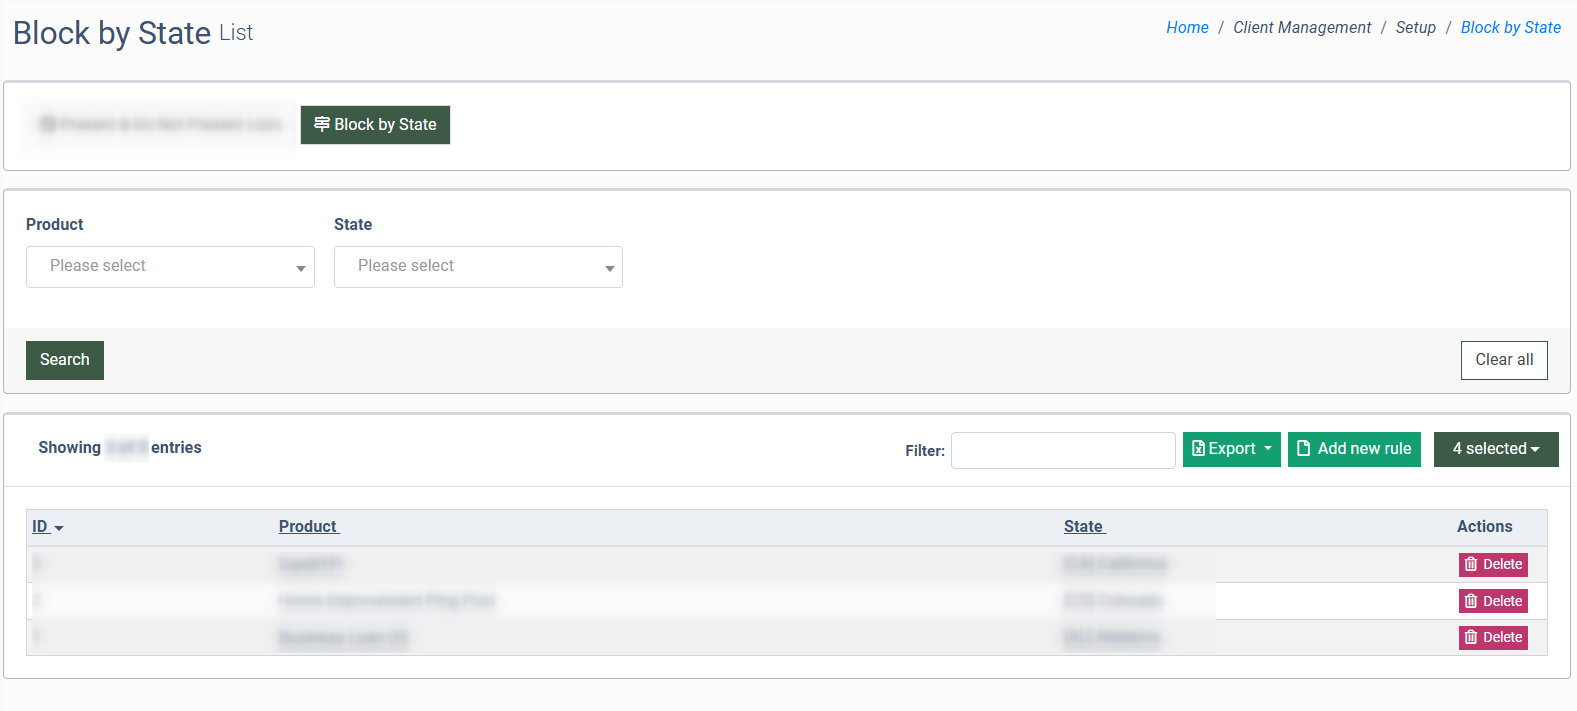
You can narrow down the search results by using the following filters:
- Product: Select the particular Product.
- State: Select the corresponding state.
The list of rules contains the following information:
- ID: The unique identification number of the rule.
- Product: The name of the Product.
- State: The name and code of the state.
To add a new rule, click the “Add new rule” button and fill in the following fields in the “Add New” pop-up window:
- Product: Select the particular Product.
- State: Select the corresponding state.
Click the “Save” button to complete the action.
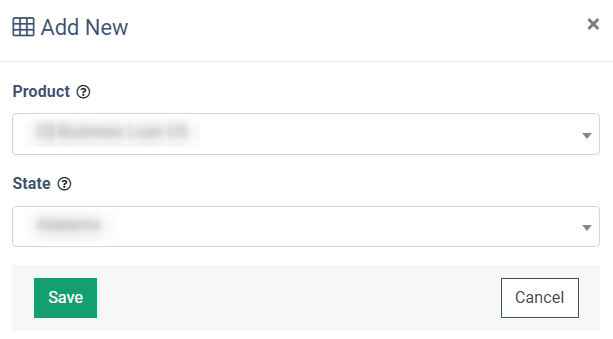
As soon as a rule is created, all leads from the selected state will not be posted to any Campaign for the selected Product.
To delete the rule from the system, click the “Delete” button in the “Action” column, and confirm the deletion operation by entering the corresponding text in the provided field and clicking the “Delete” button.
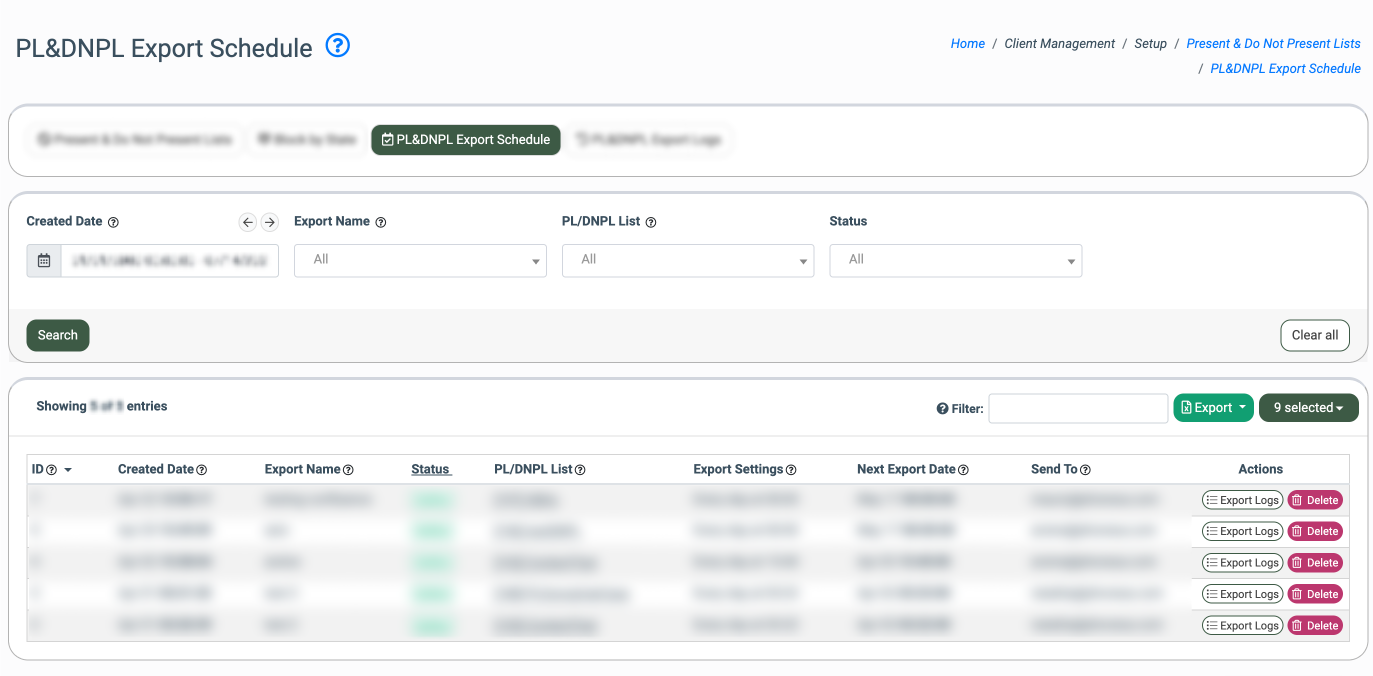
PL&DNPL Export Schedule
The “PL&DNPL Export Schedule” report allows you to monitor and manage all scheduled exports of Present and Do Not Present List data. From this tab, you can review existing schedules and remove those that are no longer needed.
Usage Example:
Scheduled exports are useful when you need to synchronize PL/DNPL data with external systems regularly. For example, you can set up a daily export of your DNPL and automatically share it with a partner or internal compliance system to ensure restricted leads are consistently filtered across platforms.
Use the following filters to narrow down the search results:
- Created Date: Select a date range for the scheduled export creation date.
- Export Name: Select a specific scheduled export from the list.
- PL/DNPL List: Select the PL or DNPL list that is included in the export.
- Status: Select the current status of the export (Active, Deleted).
The report contains the following information:
- ID: The identification number of the scheduled export.
- Created Date: The date and time when the export was created.
- Export Name: The name of the export.
- Status: The current status of the export (Active, Deleted).
- PL/DNPL List: The PL or DNPL list included in the export.
- Export Settings: The configured export frequency.
- Next Export Date: The next expected export date.
- Send To: The list of recipients.
To view the log details about the particular export, click the “Export Logs” button. You will be redirected to the "PL&DNPL Export Logs" tab, where the logs will be filtered out according to the export name, pre-selected in the “Export Name” filter field.
Click the “Delete” button in the “Actions” column to remove the scheduled export.
The information about the deleted export logs will be available in the "PL&DNPL Export Logs" if the “Deleted” option in the “Status” filter field is selected.
PL&DNPL Export Logs
The "PL&DNPL Export Logs" report allows you to track the execution and status of scheduled PL and DNPL exports. Use this tab to verify whether exports were completed successfully and to download generated files.
Usage Example:
This report is useful for monitoring export reliability and troubleshooting issues. For example, if a partner reports missing suppression data, you can quickly check whether the export was completed successfully or failed, and download the file for verification or resend.
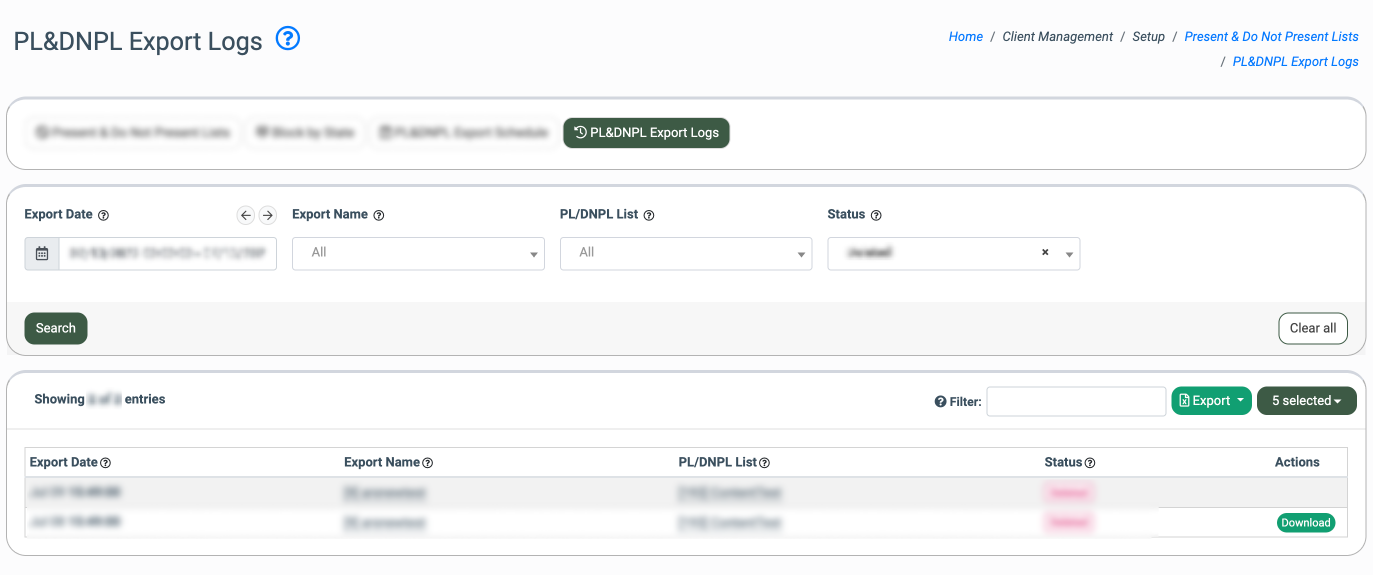
Use the following filters to narrow down the search results:
- Export Date: Select a date range for when the export was executed.
- Export Name: Select the export from the list.
- PL/DNPL List: Select the PL or DNPL list included in the export.
- Status: Select the current status of the export (Pending, Processing, Completed, Failed, Completed empty, Deleted).
The report contains the following information:
- Export Date: The date and time when the export was executed.
- Export Name: The name of the export.
- PL/DNPL List: The PL or DNPL list included in the export.
- Status: The current export status (Pending, Processing, Completed, Failed, Completed empty, Deleted).
Click the “Download” button in the “Actions” column to download the export file.