---
title: "Project Settings: LMS & Call Logic: Traffic Advanced Components"
description: Configure LMS and Call Logic advanced traffic distribution and routing flow, including PingTree rotation, bucket banks, redirect masking, lead limits, as well as additional caps, price-based system actions, duplicate tracking logic, and website widgets.
---
[Skip to content](https://support.phonexa.com/project-settings-lms-call-logic-traffic-advanced-components#main-content)
[](https://support.phonexa.com/?hsLang=en)
Open main navigation
Close main navigation
- [➜\]](https://phonexa.com/)
[➜\]](https://phonexa.com/?hsLang=en)
Phonexa Support Center
- There are no suggestions because the search field is empty.
1. [Knowledge Base](https://support.phonexa.com/?hsLang=en)
2. [General information](https://support.phonexa.com/general-information?hsLang=en)
3. [Project Customization](https://support.phonexa.com/general-information?hsLang=en#project-customization)
# Project Settings: LMS & Call Logic: Traffic Advanced Components
## Configure LMS and Call Logic advanced traffic distribution and routing flow, including PingTree rotation, bucket banks, redirect masking, lead limits, as well as additional caps, price-based system actions, duplicate tracking logic, and website widgets.
The Traffic Advanced Components subtab allows you to enable, disable, and configure supplemental LMS and Call Logic features related to traffic distribution via Ping Trees, redirect URL masking, cap and lead limitations, campaign and lead behavior management, advanced call tracking, website widgets, system notification frequency, and Contact Us module usage.
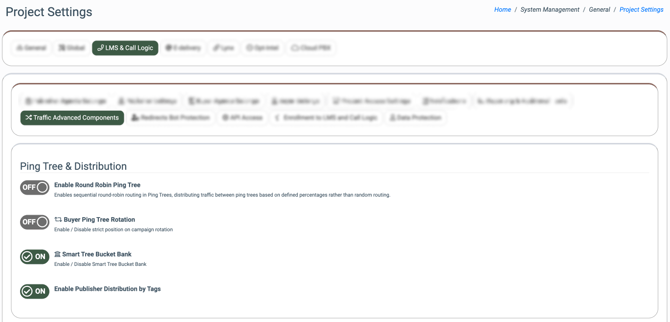
To view this tab, go to the **System Management \> General \> Project Settings** section, then select the **“LMS & Call Logic”** tab and the **“Traffic Advanced Components”** subtab.
- [**PingTree & Distribution**](https://support.phonexa.com/project-settings-lms-call-logic-traffic-advanced-components#PingTree_Distribution)
- [**Redirects**](https://support.phonexa.com/project-settings-lms-call-logic-traffic-advanced-components#Redirects)
- [**Caps & Lead Limits**](https://support.phonexa.com/project-settings-lms-call-logic-traffic-advanced-components#Caps_Lead_Limits)
- [**Campaign & Lead Behavior**](https://support.phonexa.com/project-settings-lms-call-logic-traffic-advanced-components#Campaign_Lead_Behavior)
- [**Tracking Tools**](https://support.phonexa.com/project-settings-lms-call-logic-traffic-advanced-components#Tracking_Tools)
- [**Website Widgets**](https://support.phonexa.com/project-settings-lms-call-logic-traffic-advanced-components#Website_Widgets)
- [**System Activity Notifications**](https://support.phonexa.com/project-settings-lms-call-logic-traffic-advanced-components#System_Activity_Notifications)
- [**Contact Us**](https://support.phonexa.com/project-settings-lms-call-logic-traffic-advanced-components#Contact_Us)
**[](https://support.phonexa.com/hubfs/zYra0gkOx3.png?hsLang=en)**
### PingTree & Distribution
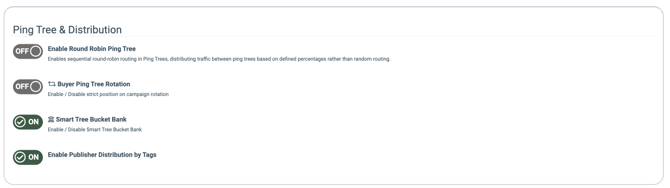
The **“Ping Tree & Distribution”** block allows you to configure advanced routing logic and traffic flow, including sequential round-robin routing, buyer rotation strategies, bucket bank thresholds, and publisher filtering by campaign tags.
[](https://support.phonexa.com/hubfs/0VxMD6zBb5.png?hsLang=en)
- **Enable Round Robin Ping Tree:** Switch the toggle to the “On” position to enable the sequential round-robin routing in Ping Trees, distributing traffic between ping trees based on defined percentages rather than random routing.
- **Buyer Ping Tree Rotation:** Switch the toggle to the “On” position to enable the buyer Ping Tree rotation feature. The **“Buyer Ping Tree Rotation”** option allows you to set a strict position for Campaigns’ rotation in a ping tree. The feature is available only for the **Priority** and **Weight** ping tree strategies of the **LMS** component. *Read more about this feature in the following Knowledge Base* [*article*](https://support.phonexa.com/buyer-ping-tree-rotation?hsLang=en)*.*
- **Smart Tree Bucket Bank:** Switch the toggle to the “On” position to enable the smart tree bucket bank feature. **Bucket Bank** allows you to accumulate a certain amount of money in the publisher’s balance. In the interface, the leads will appear with a reject status (though in reality, they could be sold and redirected), and only when the balance reaches the necessary amount, a sold status will appear. *Read more about the Bucket Bank feature in the following Knowledge Base* [*article*](https://support.phonexa.com/bucket-bank?hsLang=en)*.*
- **Enable Publisher Distribution by Tags:** Switch the toggle to the “On” position to enable the ability to filter Publisher traffic by Campaign Tags. *Read more in the Knowledge Base* [*article*](https://support.phonexa.com/publisher-configuration-advanced?hsLang=en).
### Redirects
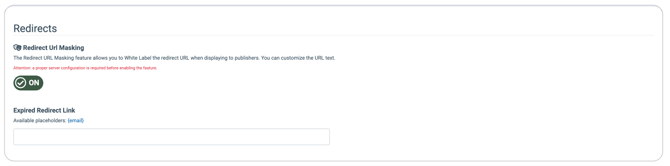
The **“Redirects”** block allows you to manage lead redirection behavior by masking redirect URLs for white-labeling purposes and specifying fallback links for expired redirects.
[](https://support.phonexa.com/hubfs/LGbVWplMxy.png?hsLang=en)
- **Redirect Url Masking:** Switch the toggle to the “On” position to enable the redirect URL masking feature. The Redirect URL Masking feature allows you to white-label the redirect URL when displaying it to publishers. You can customize the URL text.
- **Expired Redirect Link:** Enter the expired redirect URL. When the redirect link from the lead body expires and the **“Expired Redirect Link”** field is specified, the new redirect link will be displayed.
### Caps & Lead Limits
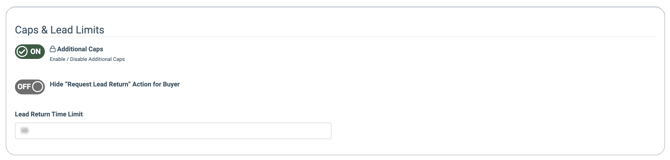
The **“Caps & Lead Limits”** block allows you to establish specific campaign capacity limitations, such as weekly or monthly cap limits, and configure strict parameters for buyer lead returns, including acceptable timeframes and action visibility.
[](https://support.phonexa.com/hubfs/XgxK4vzjrG.png?hsLang=en)
The following settings are available:
- **Additional Caps:** Switch the toggle to the “On” position to enable the additional caps feature. The **“Additional Caps”** feature allows you to manage and set up additional settings for the Campaign’s caps. The option allows you to configure a weekly and monthly cap limitation. *Read more about the Additional Caps feature in the following Knowledge Base* [*article*](https://support.phonexa.com/additional-caps?hsLang=en)*.*
- **Hide “Request Lead Return” Action for Buyer:** Switch the toggle to the “On” position to hide the option for the Lead Return in the Buyer’s Lead Details report for all system users that are related to the Buyer, except the Buyer Agent. *Read more about the Lead Return option in the following Knowledge Base* [*article*](https://support.phonexa.com/lead-return-option?hsLang=en)*.*
- **Lead Return Time Limit:** Enter a value between 1 and 90 days. This feature allows you to set and manage the maximum lead return period. Once configured, the lead return option for the purchased leads will only be available for the specified period. *Read more about this feature in the following Knowledge Base* [*article*](https://support.phonexa.com/lead-return-time-limit?hsLang=en)*.*
### Campaign & Lead Behavior
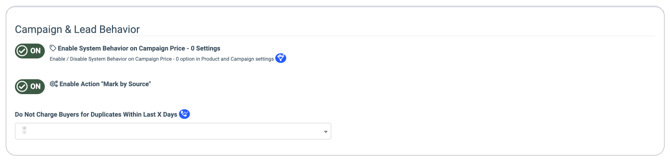
The **“Campaign & Lead Behavior”** block allows you to define automated system actions based on lead criteria, such as handling zero-price campaigns, marking leads by traffic source, and setting custom billing logic for duplicate leads.
[](https://support.phonexa.com/hubfs/oEQLp5zmQJ.png?hsLang=en)
- **Enable System Behavior on Campaign Price - 0 Settings:** Switch the toggle to the **“ON”** position to enable the System Behavior on Campaign Price - 0 option in Product and Campaign settings. This feature applies to Campaigns with a minimum price of 0 and determines the lead status when it's posted to the Buyer. *Read more information about this feature in the following Knowledge Base* [*article*](https://support.phonexa.com/mark-lead-status-as-sold-if-the-campaign-price-is-0-feature#mark-lead-status-as-sold)*.*
- **Enable Action "Mark by Source":** Switch the toggle to the “On” position to enable the **“Mark by Source”** action for iClear. This action allows you to mark the lead with the selected source for reporting. This action can be set in the **“Actions”** tab of the Advanced Rules Configuration settings. *Read more about this feature in the following Knowledge Base* [*article*](https://support.phonexa.com/fraud-and-anomaly-iclear?hsLang=en)*.*
- **Do Not Charge Buyers For Duplicates Within Last X Days:** Select the option from the drop-down list to apply no charges to the Buyers for duplicates for 0 — 30 days. Select the **‘Disabled”** option to disable that feature. *Note: This feature is available only for the Call Logic component. Read more information about this feature in the following Knowledge Base* [*article*](https://support.phonexa.com/do-not-charge-buyers-for-duplicates?hsLang=en)*.*
### Tracking Tools
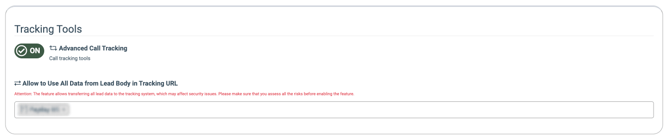
The **“Tracking Tools”** block allows you to enable advanced call tracking widgets for detailed analytics and configure security permissions for transferring comprehensive lead body data into tracking URLs.
[](https://support.phonexa.com/hubfs/WYrnWgk0QN.png?hsLang=en)
- **Advanced Call Tracking:** Switch the toggle to the “On” position to enable the Advanced Call Tracking feature that allows you to add and customize widgets on your website, to receive and track your calls while obtaining detailed analytics for further analysis.
- **Allow to Use All Data from Lead Body in Tracking URL:** Select the Products from the drop-down list to allow usage of all data from the lead body in the tracking URL. ***Attention:*** *The feature allows transferring all lead data to the tracking system, which may affect security. Please make sure that you assess all the risks before enabling the feature.*
### Website Widgets
The **“Website Widgets”** block allows you to implement supplemental features directly into your public-facing website, including team lists, event schedulers, and custom pages.
[](https://support.phonexa.com/hubfs/apQZgyYJbY.png?hsLang=en)
- **Website Widgets:** Switch the toggle to the “On” position to enable the website widgets. This option allows you to easily add advanced features to your public-facing website: Team list, Event Scheduler, and Pages. *Read more about the Team section in the following Knowledge Base* [*article*](https://support.phonexa.com/team?hsLang=en)*. Read more about the Event Scheduler section in the following Knowledge Base* [*article*](https://support.phonexa.com/event-schedule?hsLang=en)*. Read more about the Pages section in the following Knowledge Base* [*article*](https://support.phonexa.com/pages?hsLang=en)*.*
### System Activity Notifications
The **“System Activity Notifications”** block allows you to define the exact frequency at which automated system activity reports and alerts are generated.
[](https://support.phonexa.com/hubfs/JPbR9ojNQw.png?hsLang=en)
- **System Activity Notifications Frequency:** Select an option between 1 minute and 7 days to enable the system activity notifications feature. The notification about the system activity is considered for the application of the ongoing setting. *Read more information about the System Activity report in the following Knowledge Base* [*article*](https://support.phonexa.com/system-activity?hsLang=en)*.*
### Contact Us
The **“Contact Us”** block allows you to set up your “Contact Us” form. The Contact Us form allows the client to set this form on their own website, and it can be used as the email relay.
*Read more about the Contact Us form in the following Knowledge Base* [*article*](https://support.phonexa.com/contact-us-page?hsLang=en)*.*
[](https://support.phonexa.com/hubfs/5ArWLpkqQ9.png?hsLang=en)
The **“Contact Us”** block contains the following fields:
- **ReCaptcha V3:** Switch the toggle to the “On” position to enable the ReCaptcha feature.
*Note: The ReCaptcha feature allows you to protect your “Contact Us” forms from spam.*
- **Deny Requests Without Referrer:** Switch the toggle to the “On” position to deny requests via your “Contact Us” form without the referrer. The referrer is an HTTP header sent by the user's browser indicating the specific web page where the form was submitted. Requiring this header ensures that the client is interacting with your actual website, helping to block direct submissions from automated spam bots.
- [General information](https://support.phonexa.com/general-information?hsLang=en#main-content)
- [Account Settings](https://support.phonexa.com/general-information?hsLang=en#account-settings)
- [Security Settings](https://support.phonexa.com/general-information?hsLang=en#security-settings)
- [Users](https://support.phonexa.com/general-information?hsLang=en#users)
- [System Customization](https://support.phonexa.com/general-information?hsLang=en#system-customization)
- [Project Customization](https://support.phonexa.com/general-information?hsLang=en#project-customization)
- [Product Customization](https://support.phonexa.com/general-information?hsLang=en#product-customization)
- [System Management](https://support.phonexa.com/general-information?hsLang=en#system-management)
- [Support](https://support.phonexa.com/general-information?hsLang=en#support)
- [LMS Sync & Call Logic](https://support.phonexa.com/lms-sync-call-logic?hsLang=en#main-content)
- [Extra Features](https://support.phonexa.com/lms-sync-call-logic?hsLang=en#extra-features)
- [Publisher Configuration](https://support.phonexa.com/lms-sync-call-logic?hsLang=en#publisher-configuration)
- [Client Management](https://support.phonexa.com/lms-sync-call-logic?hsLang=en#client-management)
- [System Logs](https://support.phonexa.com/lms-sync-call-logic?hsLang=en#system-logs)
- [Documents And References](https://support.phonexa.com/lms-sync-call-logic?hsLang=en#documents-and-references)
- [Reports and Analytics](https://support.phonexa.com/lms-sync-call-logic?hsLang=en#reports-and-analytics)
- [Publisher management](https://support.phonexa.com/lms-sync-call-logic?hsLang=en#publisher-management)
- [Call Logic Customization](https://support.phonexa.com/lms-sync-call-logic?hsLang=en#call-logic-customization)
- [Campaign Configuration](https://support.phonexa.com/lms-sync-call-logic?hsLang=en#campaign-configuration)
- [Feed CMS](https://support.phonexa.com/lms-sync-call-logic?hsLang=en#feed-cms)
- [Event Tracking](https://support.phonexa.com/lms-sync-call-logic?hsLang=en#event-tracking)
- [iClear](https://support.phonexa.com/lms-sync-call-logic?hsLang=en#iclear)
- [E-Delivery](https://support.phonexa.com/e-delivery?hsLang=en#main-content)
- [List Management](https://support.phonexa.com/e-delivery?hsLang=en#list-management)
- [Email Campaigns](https://support.phonexa.com/e-delivery?hsLang=en#email-campaigns)
- [SMS Campaigns](https://support.phonexa.com/e-delivery?hsLang=en#sms-campaigns)
- [Reports](https://support.phonexa.com/e-delivery?hsLang=en#reports)
- [Suppression Management](https://support.phonexa.com/e-delivery?hsLang=en#suppression-management)
- [Books360](https://support.phonexa.com/books360?hsLang=en#main-content)
- [Books 360 Integration](https://support.phonexa.com/books360?hsLang=en#books-360-integration)
- [Vendor Management](https://support.phonexa.com/books360?hsLang=en#vendor-management)
- [Account](https://support.phonexa.com/books360?hsLang=en#account)
- [Customer Management](https://support.phonexa.com/books360?hsLang=en#customer-management)
- [Opt-Intel](https://support.phonexa.com/opt-intel?hsLang=en#main-content)
- [List Management](https://support.phonexa.com/opt-intel?hsLang=en#list-management)
- [All Reports](https://support.phonexa.com/opt-intel?hsLang=en#all-reports)
- [Mailers](https://support.phonexa.com/opt-intel?hsLang=en#mailers)
- [Campaigns](https://support.phonexa.com/opt-intel?hsLang=en#campaigns)
- [System Management](https://support.phonexa.com/opt-intel?hsLang=en#system-management)
- [HitMetrix](https://support.phonexa.com/hitmetrix?hsLang=en#main-content)
- [Analytics](https://support.phonexa.com/hitmetrix?hsLang=en#analytics)
- [Heatmaps](https://support.phonexa.com/hitmetrix?hsLang=en#heatmaps)
- [System Management](https://support.phonexa.com/hitmetrix?hsLang=en#system-management)
- [Lynx](https://support.phonexa.com/lynx?hsLang=en#main-content)
- [Offers](https://support.phonexa.com/lynx?hsLang=en#offers)
- [LYNX Reports](https://support.phonexa.com/lynx?hsLang=en#lynx-reports)
- [Advertisers](https://support.phonexa.com/lynx?hsLang=en#advertisers)
- [Affiliates](https://support.phonexa.com/lynx?hsLang=en#affiliates)
- [Account Settings](https://support.phonexa.com/lynx?hsLang=en#account-settings)
- [Cloud PBX](https://support.phonexa.com/cloud-pbx?hsLang=en)
[](https://phonexa.com/?hsLang=en)
Phonexa Knowledge Base
Copyright © 2026, Phonexa