To view the Project settings for the Lynx, go to the System Management > General > Project Settings > Lynx section.
The “Lynx” page contains the following tabs:
Application
The “Application” tab allows you to configure general network settings and submit your network application. These settings define how your network is presented to users and control key system behaviors.
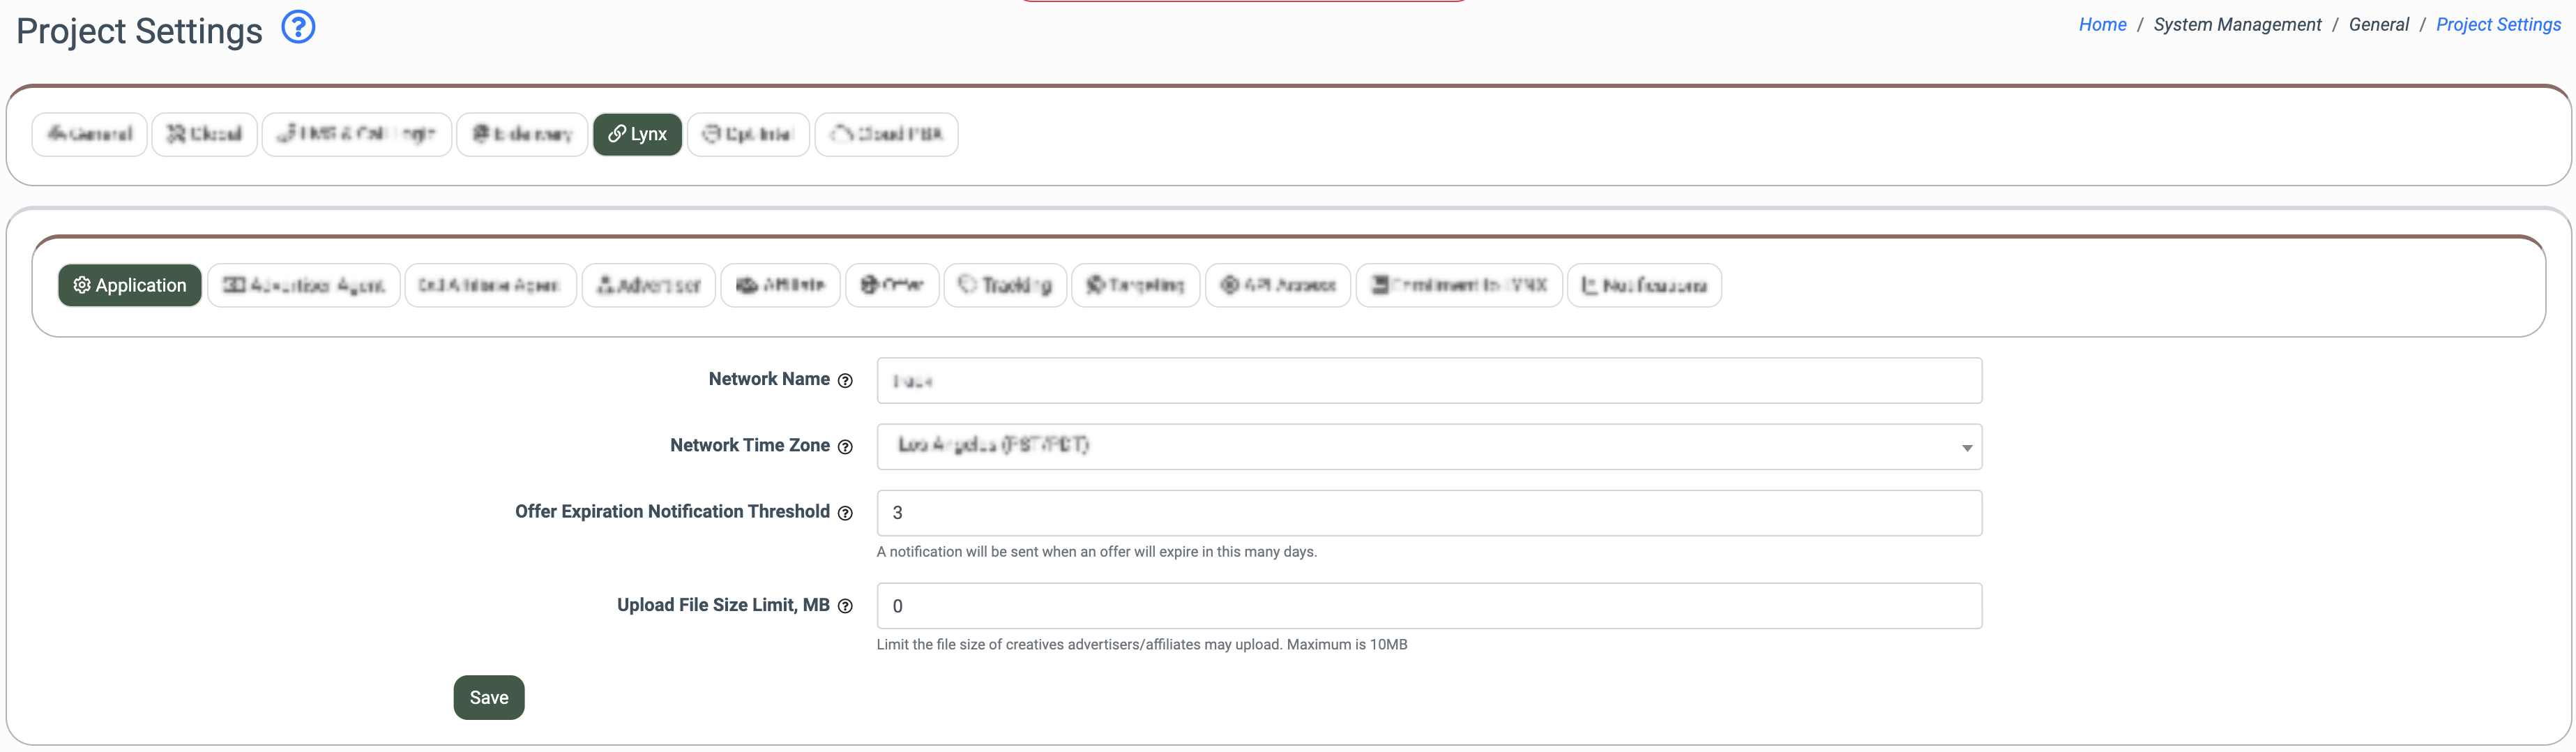
Fill in the following fields:
- Network Name: Enter the name of your network. This name is visible to both Advertisers and Affiliates and is used across the entire platform, including emails, notifications, and the application header.
- Network Time Zone: Select the time zone for your network. This setting determines how timestamps are displayed in reports and across the system.
Note: Changing the time zone may affect how historical and future data is reported. - Offer Expiration Notification Threshold: Specify the number of days prior to an offer’s expiration date when a notification should be sent. By default, notifications are triggered 3 days before the offer expires.
- Upload File Size Limit, MB: Define the maximum allowed file size for uploads within the system. This applies to assets such as creatives uploaded by Advertisers or Affiliates.
Note: The maximum allowed file size is 10 MB.
Click the “Save” button to confirm.
Advertiser Agent
The Advertiser Agent tab allows you to configure how Advertiser Agents are assigned and how their earnings are calculated. These settings define the default agent behavior for newly registered Advertisers and control commission logic.

Fill in the following fields:
- Earning Method: Select how the Advertiser Agent’s earnings are calculated:
- Disabled: No earnings are applied.
- Revenue * Earning Percent: Earnings are calculated as a percentage of total revenue.
- (Revenue - Payout) * Earning Percent: Earnings are calculated as a percentage of net revenue (revenue minus payout).
- Default Earning Percent: Specify the default percentage (%) used to calculate the Advertiser Agent’s earnings.
- Default Advertiser Agent: Select the agent who will be assigned by default to Advertisers.
- Method Of Advertiser Agent Assignment: Select how agents are assigned to newly registered Advertisers:
- Default Agent: Assigns the agent selected in the “Default Advertiser Agent” field.
- Random: Assigns an agent randomly from the available list.
- Rotation with Weight: Assigns agents based on their configured weight (set in Employees (Lynx) → View → Agent Weight), prioritizing agents with higher values.
Click the “Save” button to confirm.
Affiliate Agent
The “Affiliate Agent” tab allows you to configure how Affiliate Agents are assigned and how their earnings are calculated. These settings define the default agent behavior for newly registered Advertisers and control commission logic.
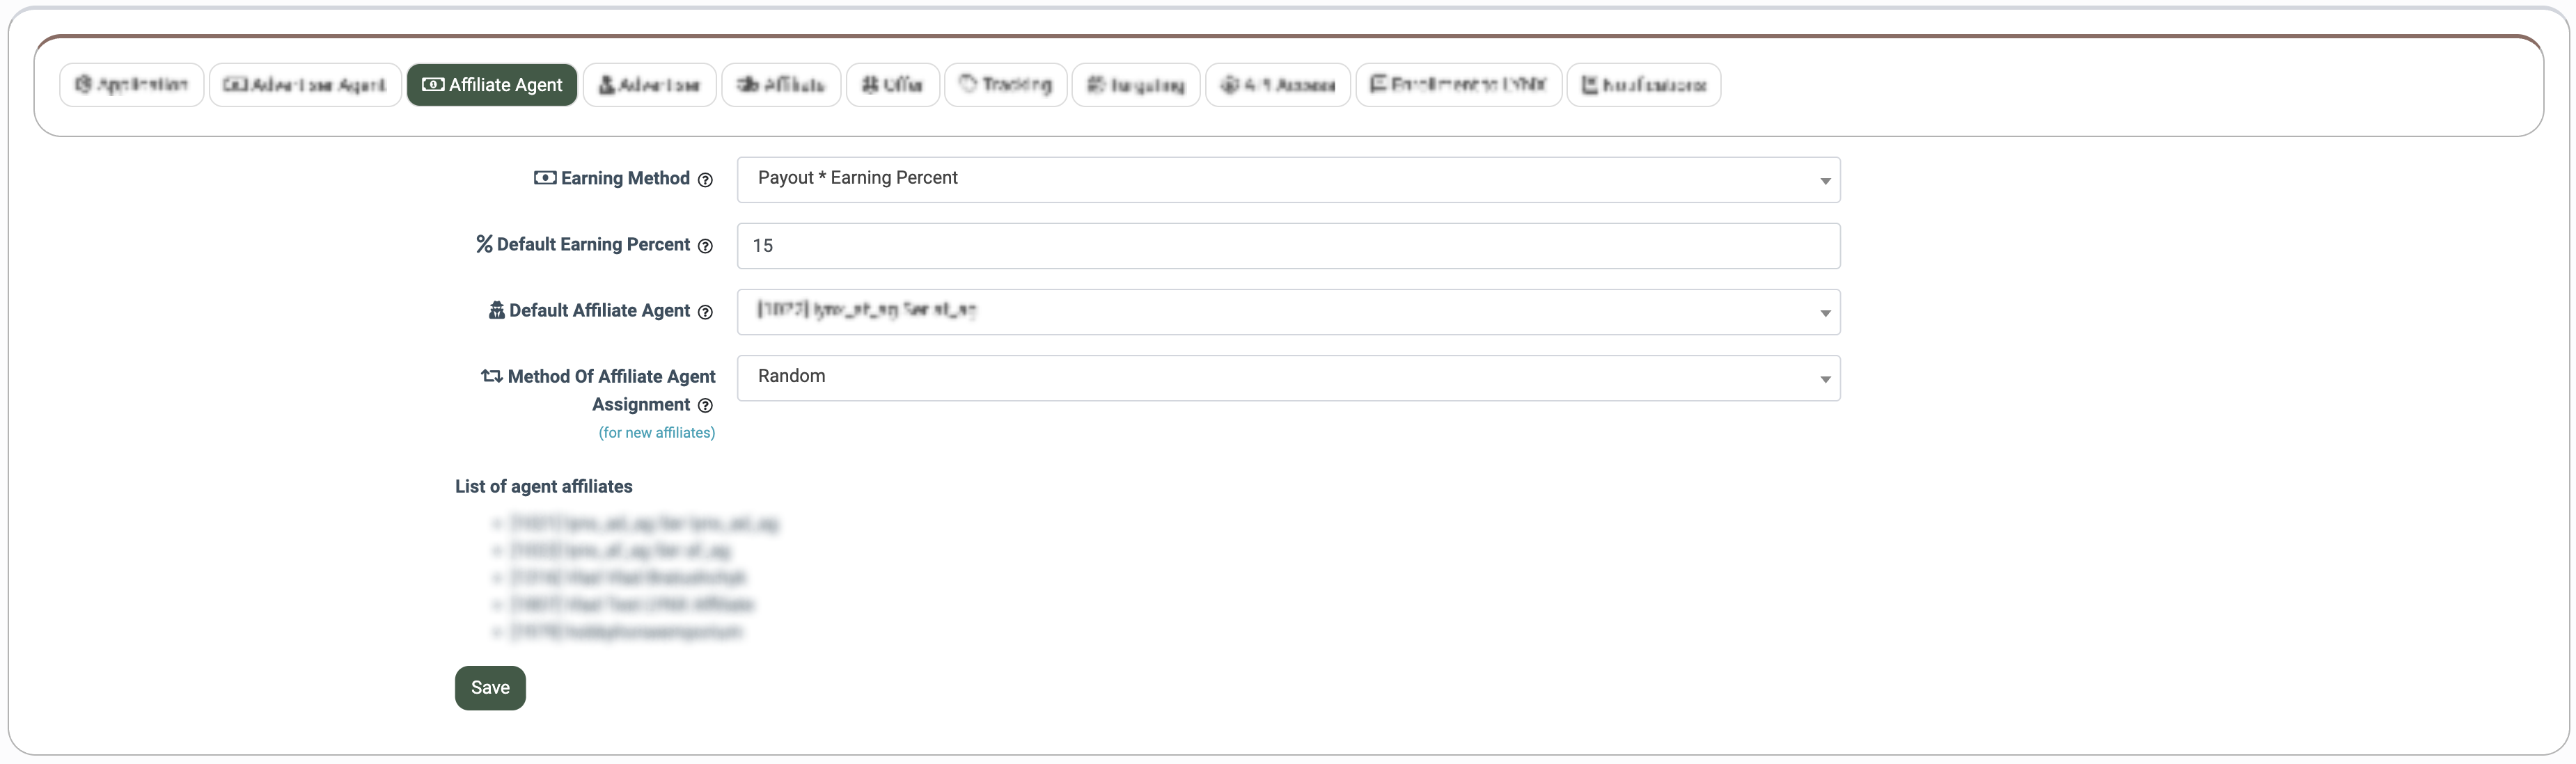
Fill in the following fields:
- Earning Method: Select how the Affiliate Agent’s earnings are calculated:
- Disabled: No earnings are applied.
- Revenue * Earning Percent: Earnings are calculated as a percentage of total revenue.
- (Revenue - Payout) * Earning Percent: Earnings are calculated as a percentage of net revenue (revenue minus payout).
- Default Earning Percent: Specify the default percentage (%) used to calculate the Affiliate Agent’s earnings.
- Default Advertiser Agent: Select the agent who will be assigned by default to Affiliates.
- Method Of Affiliate Agent Assignment: Select how agents are assigned to newly registered Advertisers:
- Default Agent: Assigns the agent selected in the “Default Affiliate Agent” field.
- Random: Assigns an agent randomly from the available list.
- Rotation with Weight: Assigns agents based on their configured weight (set in Employees (Lynx) → View → Agent Weight), prioritizing agents with higher values.
Click the “Save” button to confirm.
Advertiser
The “Advertiser” tab allows you to configure how Advertiser account applications are processed and how security, approvals, and limits are managed within the system.
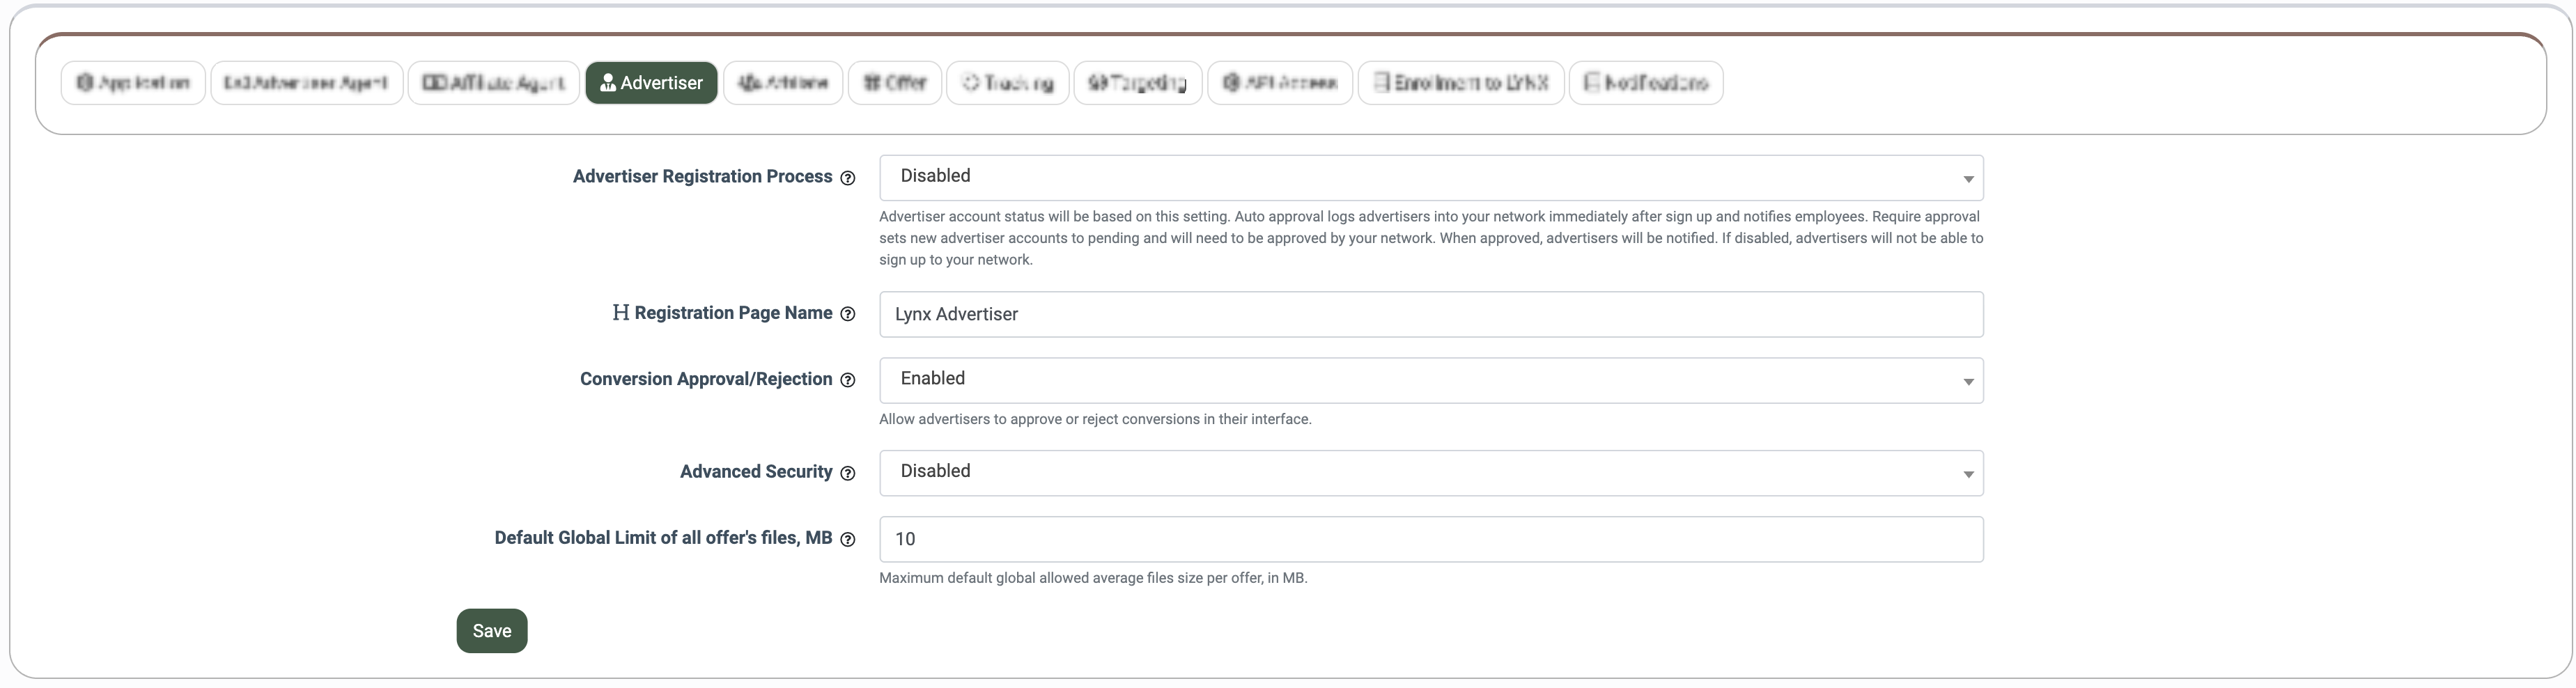
To set up the Advertisers Registration Process, fill in the following fields:
- Advertiser Registration Process: Select how new Advertiser accounts should be processed upon registration. Choose one of the following options:
- Auto Approve: Automatically approve new Advertiser registrations.
- Required Approve: Create the account in “Pending” status and require manual approval.
- Disabled: Disable Advertiser registration in the system.
- Registration Page Name: Enter the name of the registration page used for Advertiser signup.
- Conversion Approval/Rejection: Enable or disable manual approval and rejection of conversions by Advertisers in the system.
- Advanced Security: Enable or disable an additional security layer for postback validation. When enabled, each conversion is authenticated using a unique token assigned to each Advertiser, helping prevent fraudulent or unauthorized postback requests.
- Default Global Limit of all offer's files, MB: Enter the maximum allowed file size (in MB) for files uploaded to offer settings across the system.
Click the “Save” button to confirm.
Affiliate
The "Affiliate" tab allows you to configure how Affiliate account applications are processed and how affiliates access registration, reporting, and postback settings.
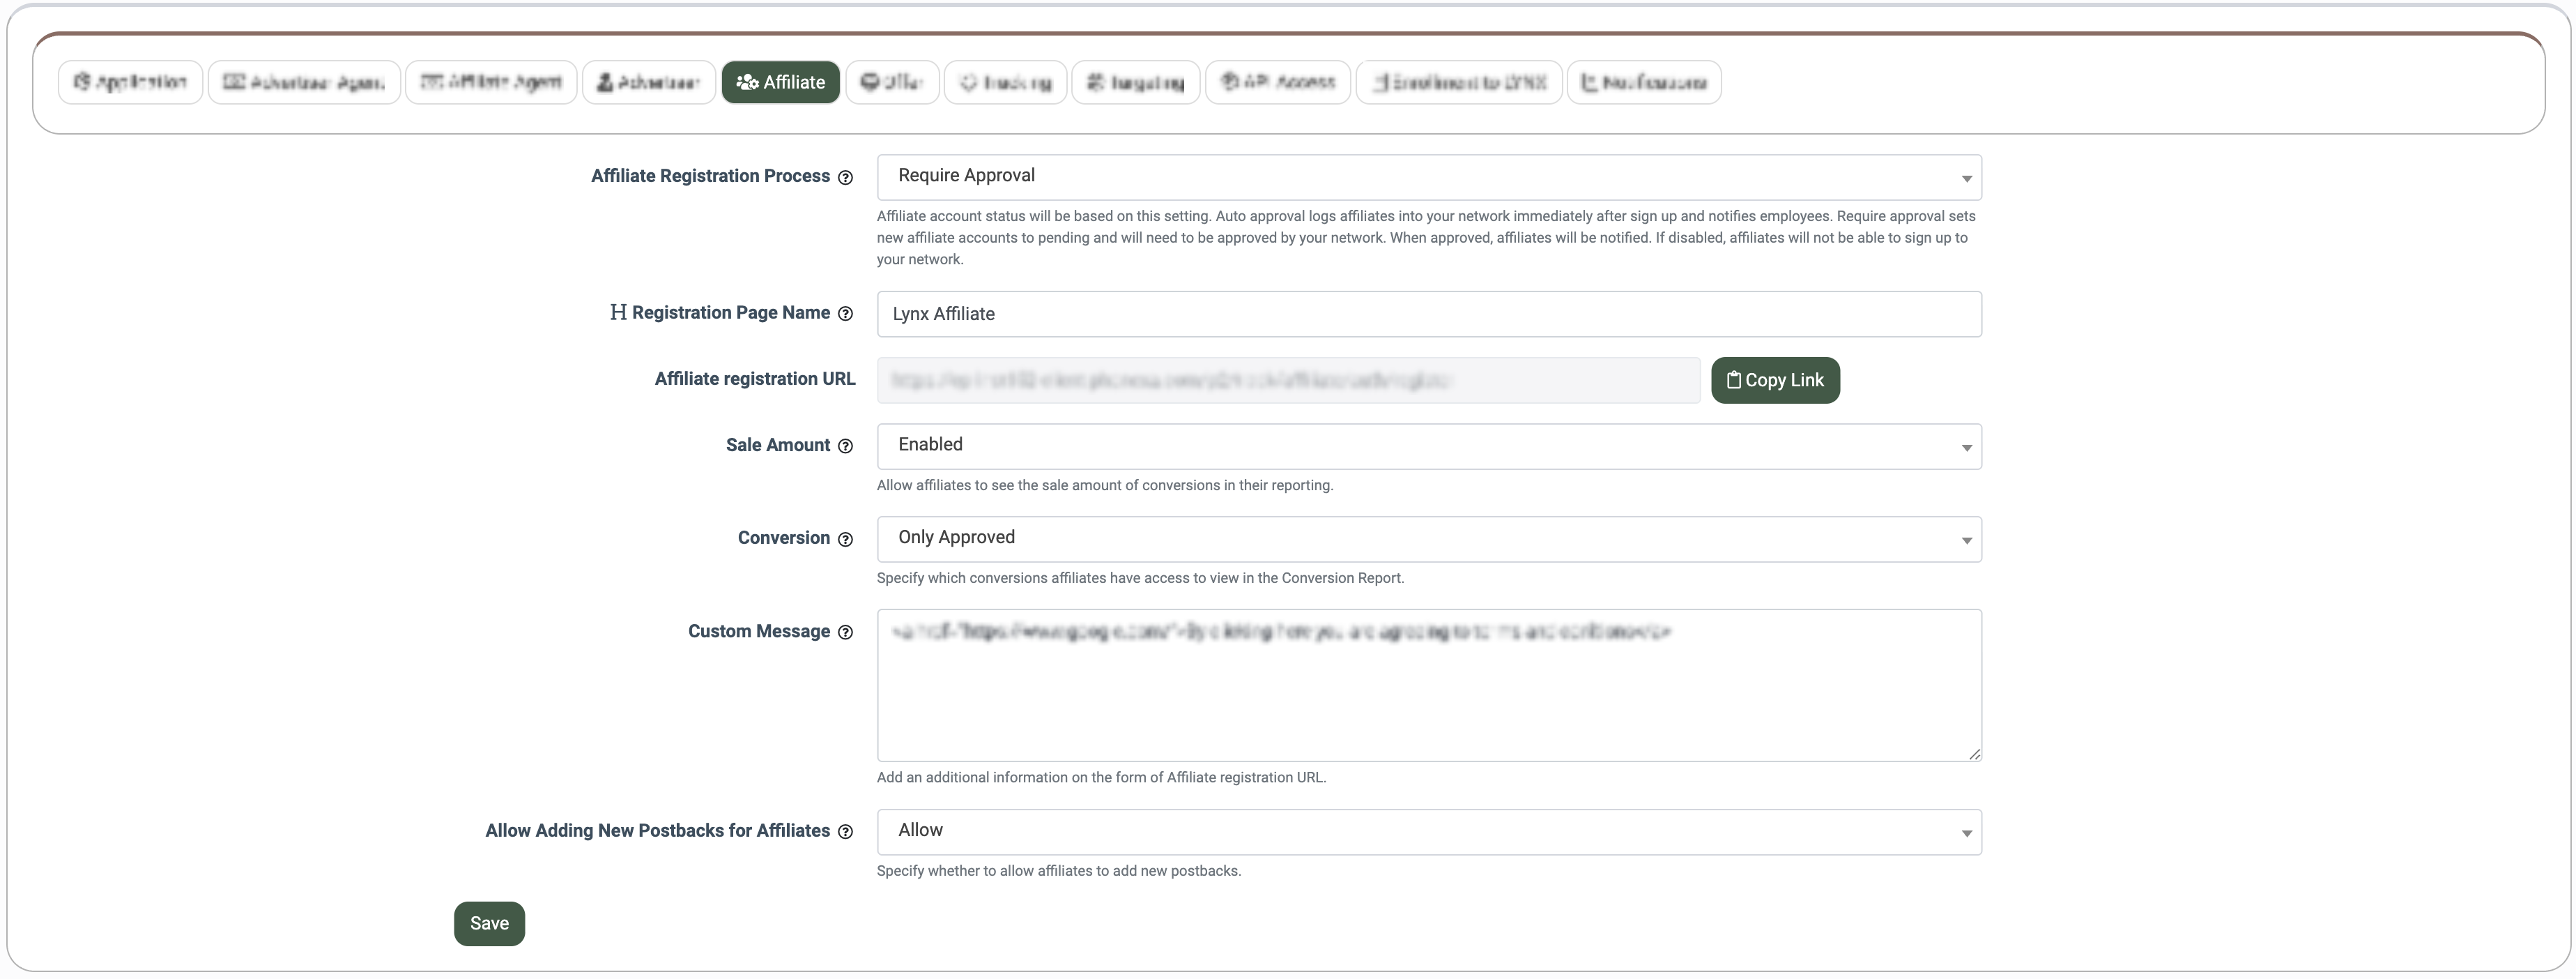
To set up the Affiliates Registration Process, fill in the following fields:
- Affiliate Registration Process: Select how new Affiliate accounts should be processed upon registration. Choose one of the following options:
- Auto Approve: Automatically approve new Affiliate registrations.
- Required Approve: Create the account in “Pending” status and require manual approval.
- Disabled: Disable Affiliate registration in the system.
Note: The selected option determines the initial status of the Affiliate account.
- Registration Page Name: Enter the name of the registration page used for Affiliate signup.
- Affiliate registration URL: Click the “Copy Link” button to copy the registration page URL.
- Sale Amount: Enable or disable visibility of sale amounts in Affiliate reports. When enabled, Affiliates can view the sale amount for conversions in their reporting.
- Conversion: Define which conversions are visible to affiliates in the Conversion Report. Available options:
- Only Approved: Show only approved conversions.
- Approved / Pending: Show approved and pending conversions.
- All: Show all conversions regardless of status.
- Custom message: Enter a custom message that will be displayed on the Affiliate registration URL page. This can be used to provide additional instructions or information for applicants.
- Allow Adding New Postbacks for Affiliates: Define whether affiliates are allowed to create new postbacks in the system. Available options:
- Allow: Affiliates can add new postbacks (default option).
- Allow only for Senior Affiliates: Only senior affiliates can add postbacks.
- Do not allow: Disable the ability to add new postbacks.
Note: If the “Do not allow” option is selected, the “Add Postback” button will be hidden from Affiliates. Existing postbacks will remain visible and available for configuration.
Click the “Save” button to confirm.
Offer
The “Offer” tab allows you to configure offer visibility, targeting, access control, caps, and the conversion approval period.
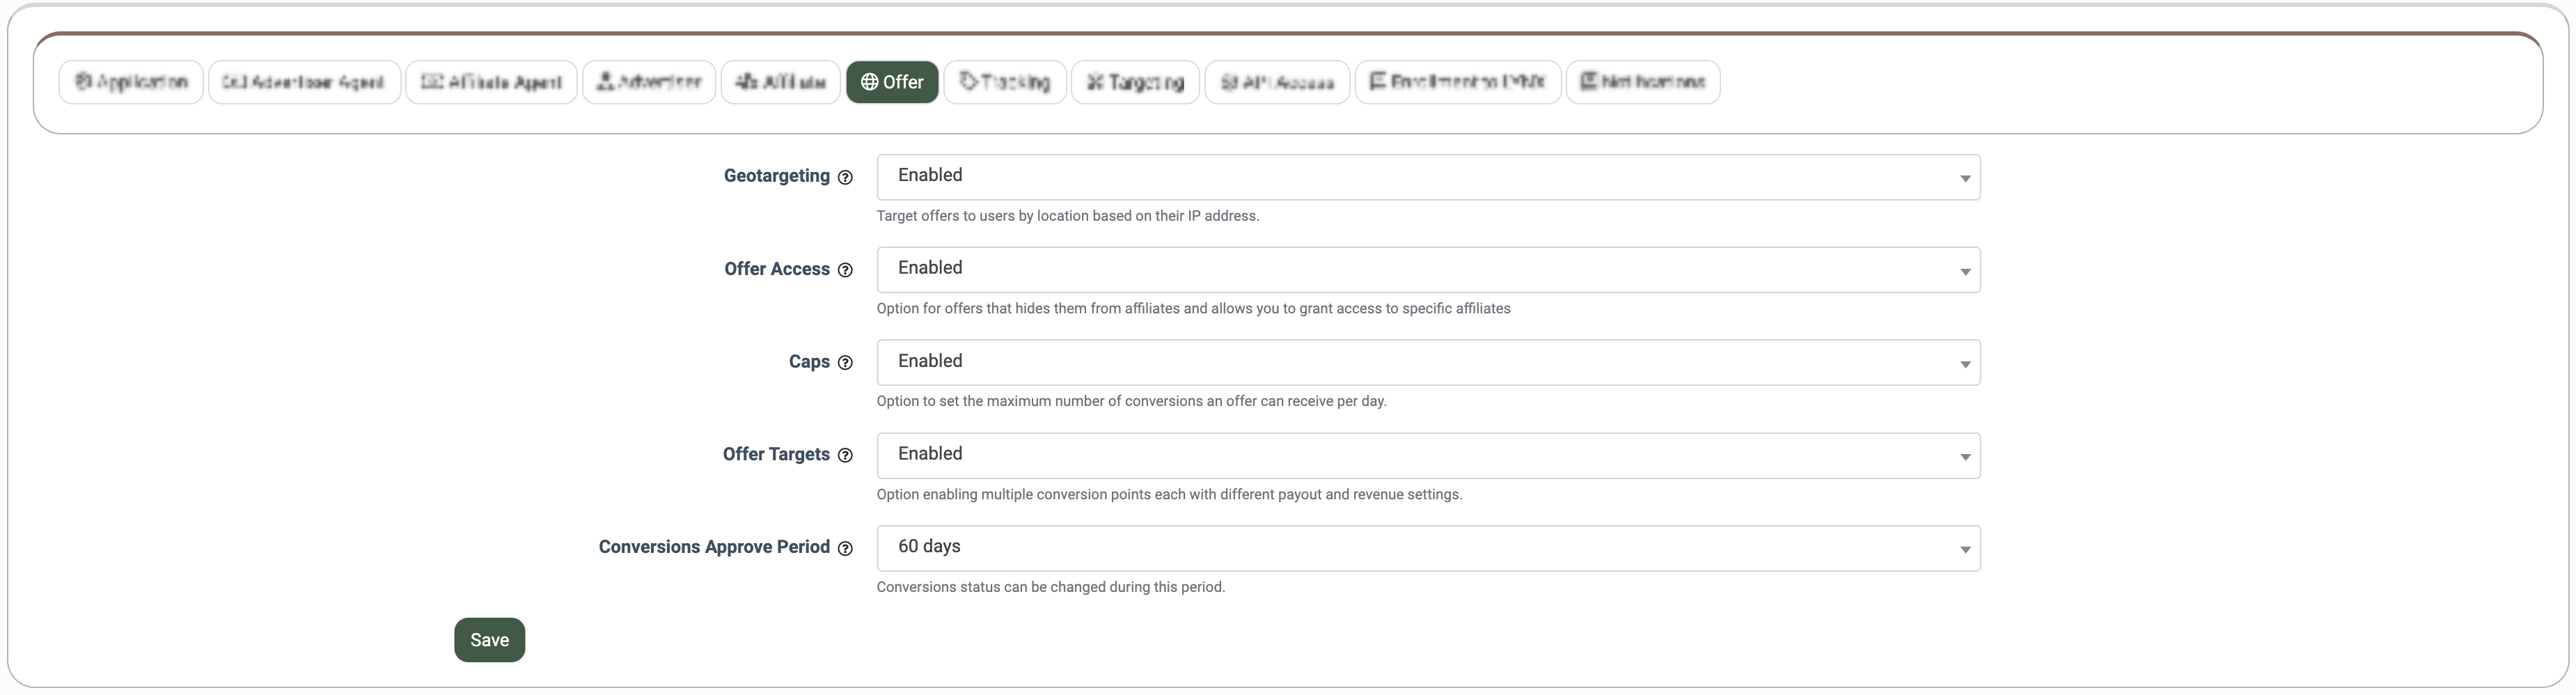
To manage Offer settings, fill in the following fields:
- Geotargeting: Enable or disable location-based targeting for offers. When enabled, offers are displayed to users based on their IP address location.
- Offer Access: Enable or disable restricted access to offers. When enabled, offers are hidden from Affiliates by default, and access must be granted manually to selected Affiliates.
- Caps: Enable or disable daily conversion limits for offers. When enabled, you can define the maximum number of conversions an offer can receive per day.
- Offer Targets: Enable or disable multiple conversion targets for a single offer. When enabled, each target can have its own payout and revenue configuration.
- Conversions Approve Period: Define the time period during which a conversion status can be modified before it becomes final.
Click the “Save” button to confirm.
Tracking
The “Tracking” tab allows you to manage tracking behavior, postback configuration, and conversion handling within the system.
Fill in the following fields to configure:
- Default Redirect URL: Enable or disable the default redirect URL fallback behavior. When enabled, traffic will be redirected to a specified URL if no valid offer URLs are available.
- URL: Enter the default redirect URL used when no valid offer destination is available.
- Conversion Referrals: Enable or disable referral validation for conversions. When enabled, only conversions with valid referral URLs will be approved.
- Postback Conversion Amount: Enable or disable passing payout and revenue values through the postback request. When enabled, you can include payout or revenue values directly in the conversion postback URL using the following parameters:
- Payout=: Overrides payout settings.
- Revenue=: Overrides revenue settings.
Note: Any values passed in the postback override the existing system payout and revenue configuration.
- Postback Conversion Status: Enable or disable setting conversion status via postback requests. When enabled, the conversion status can be defined directly in the postback URL using:
- Status=approved
- Status=pending
- Status=rejected
Note: Status passed via postback overrides system and anti-fraud status rules.
- Search Bots: Enable or disable access for search engine bots to tracking links. When enabled, bots are allowed to access tracking URLs as regular users. When disabled, bot traffic will be blocked.
Click the “Save” button to confirm.
Targeting
The “Targeting” tab allows you to enable and configure the Anura fraud detection service at the project level. By specifying your Anura credentials, you enable the system to analyze incoming traffic and assign fraud scores using Anura’s detection engine.
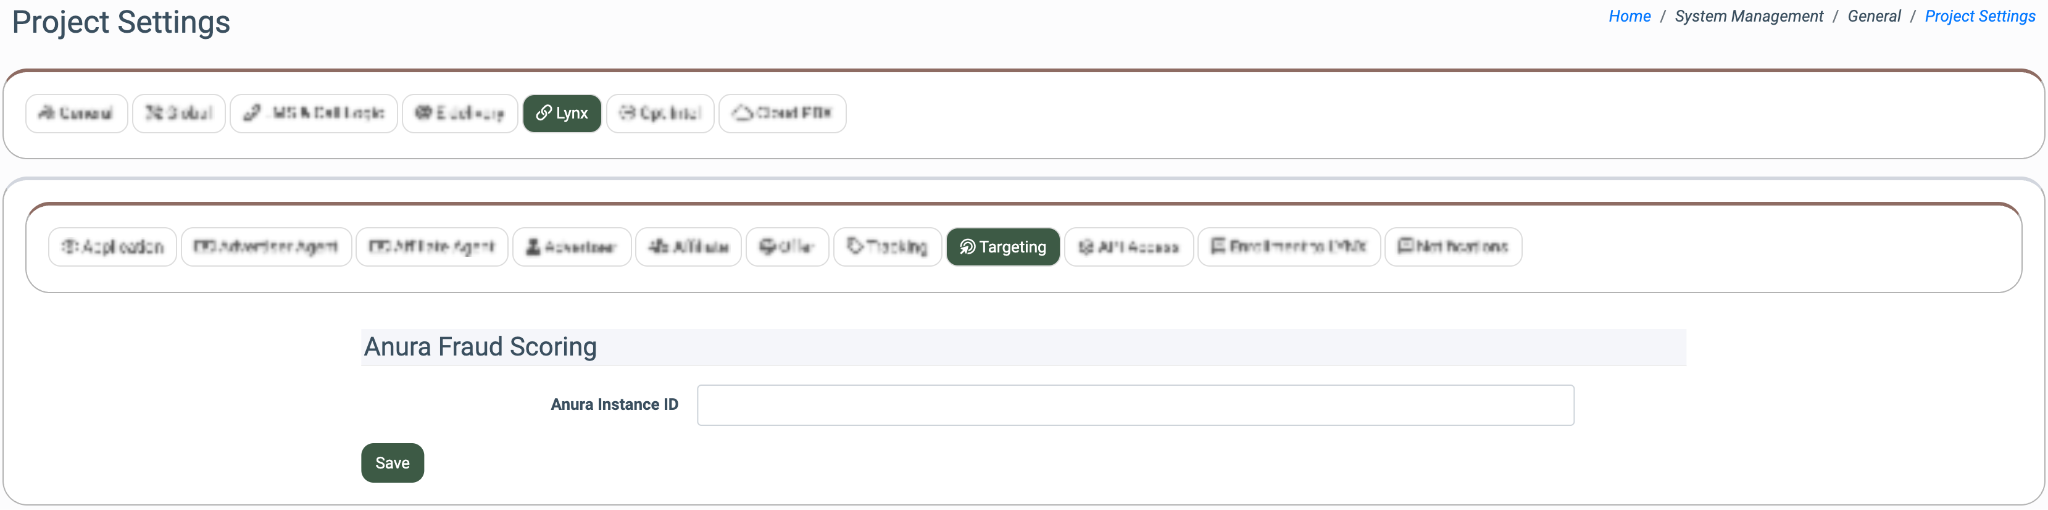
Fill in the following information to enable the service:
- Anura Instance ID: Enter your Anura Instance ID provided by Anura.
Click the “Save” button to confirm.
Note: The Anura Fraud Scoring third-party service is a paid feature that must be enabled through the System Management > System Subscriptions section in advance.
Once configured, Anura scoring becomes available for use in targeting rules, allowing you to filter or reject suspicious traffic based on its fraud assessment at the Offer Configuration level. Read more about the Targeting tab for the Offer Configuration in this Knowledge Base article.
API Access
The “API Access” tab allows you to configure secure access to project reporting data via API. It enables external systems (e.g., dashboards, internal tools, or wall panels) to retrieve key performance metrics such as Leads, Clicks, Conversions, and Revenue in real time. Using this functionality, you can generate API credentials and construct request URLs to extract data from available Summary Reports (Performance Report, Conversion Status Report, Conversion Report, Clicks Report, Performance Exam).
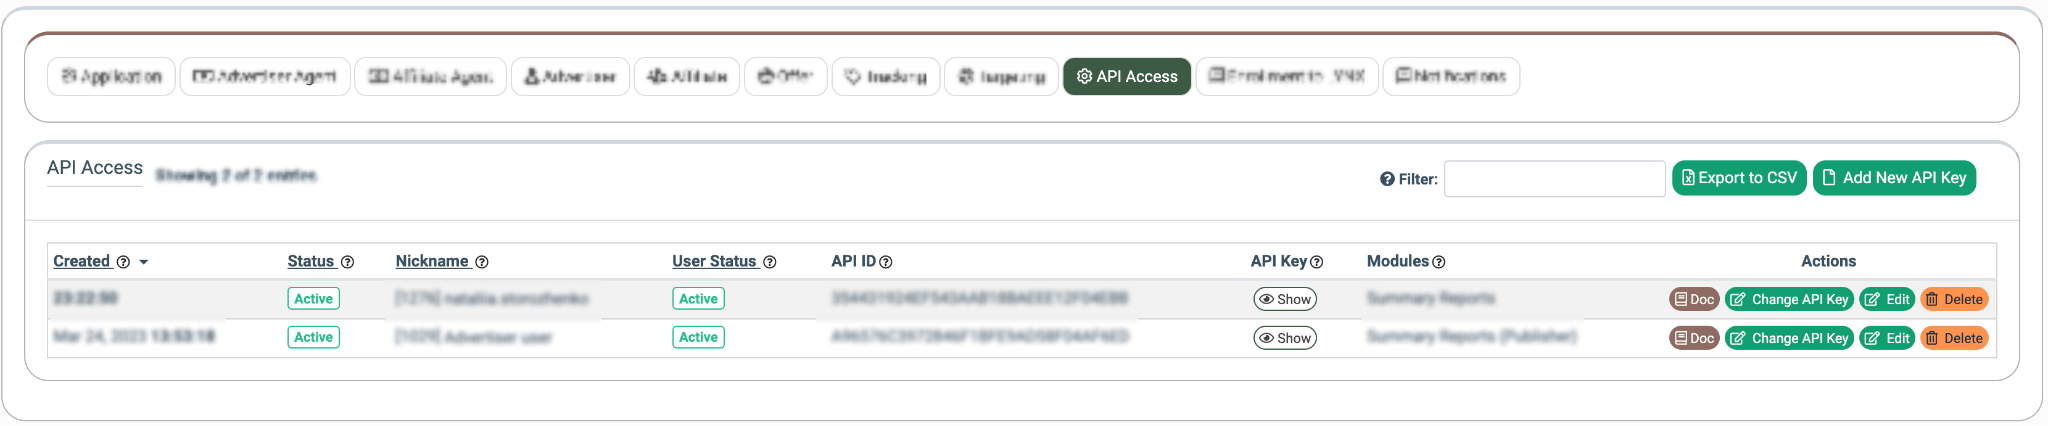
The list of API keys contains the following information:
- Created: The date and time the key was created.
- Status: The current status of the API key.
- Nickname: The name of the user associated with the key.
- User Status: The status of the user in the system.
- API ID: The unique API identifier.
- API Key: The API key used for authentication (click Show to display).
- Modules: The reports accessible via this key (Summary Reports).
To provide new API access, click the “Add New API Key” button and complete the following fields:
- Nickname: Select a user to associate with the API key.
- Categories: Select the reports available for data extraction.
Click the “Add” button to confirm.

To view the API request structure and parameters, click the “Doc” button in the “Actions” column.
To generate a new API key instead of the existing one, click the “Change API Key” button in the “Actions” column.
To edit the existing access, click the “Edit” button in the “Actions” column. Fill in the following fields in the pop-up window:
- Categories: Select accessible report types.
- Status: Select the user access status (Active, Disabled).
Click the “Update” button to confirm.

Click the “Delete” button in the “Actions” column to remove the access.
Enrollment to Lynx
The "Enrollment to Lynx" tab allows LMS & Call Logic Publishers to automatically register on the Lynx platform as Lynx Affiliates.
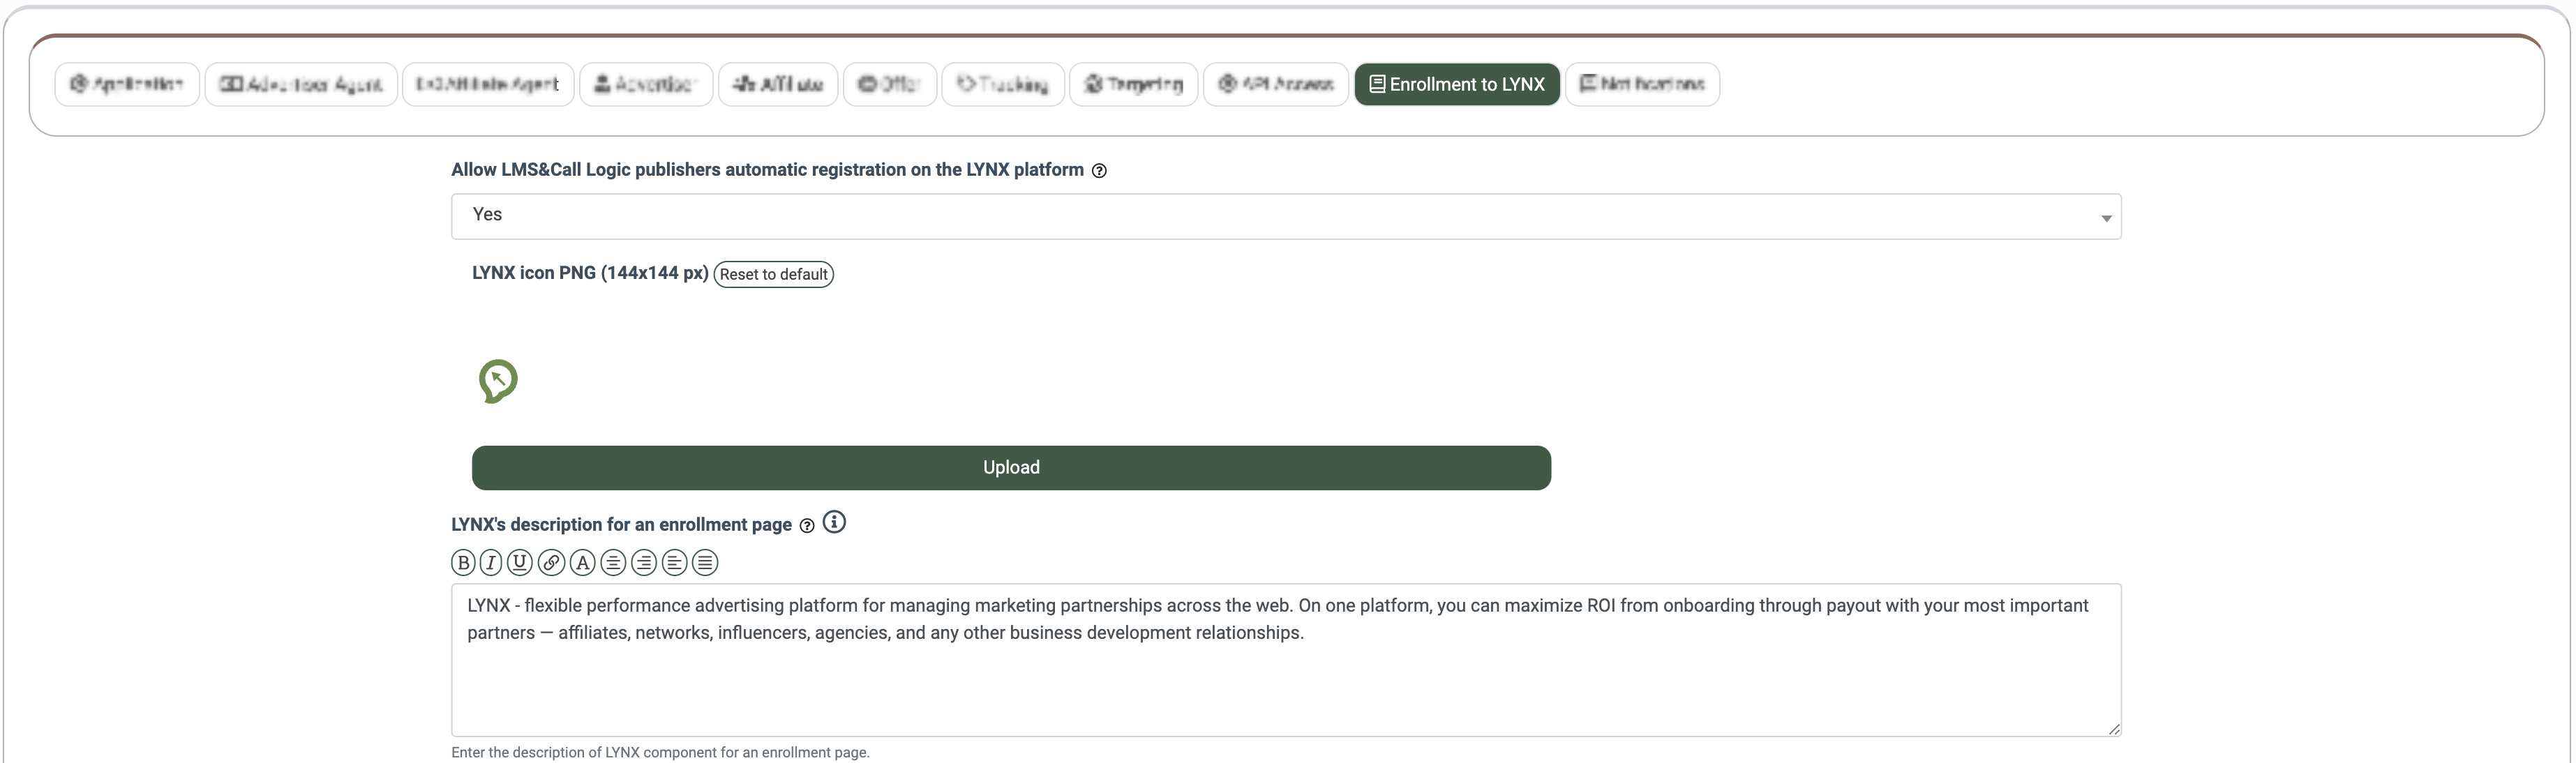
Select the “Yes” option in the “Allow LMS&Call Logic publishers automatic registration on the LYNX platform” field to enable the feature and fill in the following field:
- LYNX icon PNG (144x144 px): Upload a custom icon for Lynx in PNG format by clicking “Upload”, or click “Reset to default” to restore the default icon.
- LYNX's description for an enrollment page: Enter the description of the Lynx component displayed on the enrollment page. You can customize the formatting using HTML tags. Click the BBCode list button next to the field to view available formatting options.
- Button text for an enrollment page: Enter the text that will be displayed on the enrollment button.
- Button icon for an enrollment page: Select an icon for the enrollment button from the drop-down list.
Click the “Save” button to confirm.
Notifications
The “Notifications” tab allows you to configure who will receive alerts when new Advertisers or Affiliates are registered in the system.
Fill in the following fields:
- New Advertiser: Select the user(s) who will be notified when a new Advertiser is registered.
- New Advertiser Emails: Enter additional email address(es) to receive notifications about new Advertiser registrations.
- New Affiliate: Select the user(s) who will be notified when a new Affiliate is registered.
- New Affiliate Emails: Enter additional email address(es) to receive notifications about new Affiliate registrations.
Click the “Save” button to confirm.