The Exclusive Campaigns tab allows you to assign one or more specific Campaigns to a Publisher so that the Publisher’s traffic is posted only to those Campaigns.
Additionally, in this tab, you can specify a Buyer, and all their Campaigns for a lead's Product will be added to the Exclusive Campaigns if they have an "Active" status.
Note: If a lead does not meet the Campaign’s criteria based on the applied settings, it will be rejected instead of being redirected to other Buyers.
Use case: A Publisher has a long-term relationship with a particular Buyer and wants to ensure that all traffic they send is routed only to that Buyer’s Campaigns, without being distributed to other Buyers.
To access the Exclusive Campaigns tab, go to the Publisher Management > Publishers section, select the Publisher from the list, and click the “View” button in the “Actions” column. On the Publisher Configuration page, select the “Exclusive Campaigns” tab.
-1.png?hsLang=en)
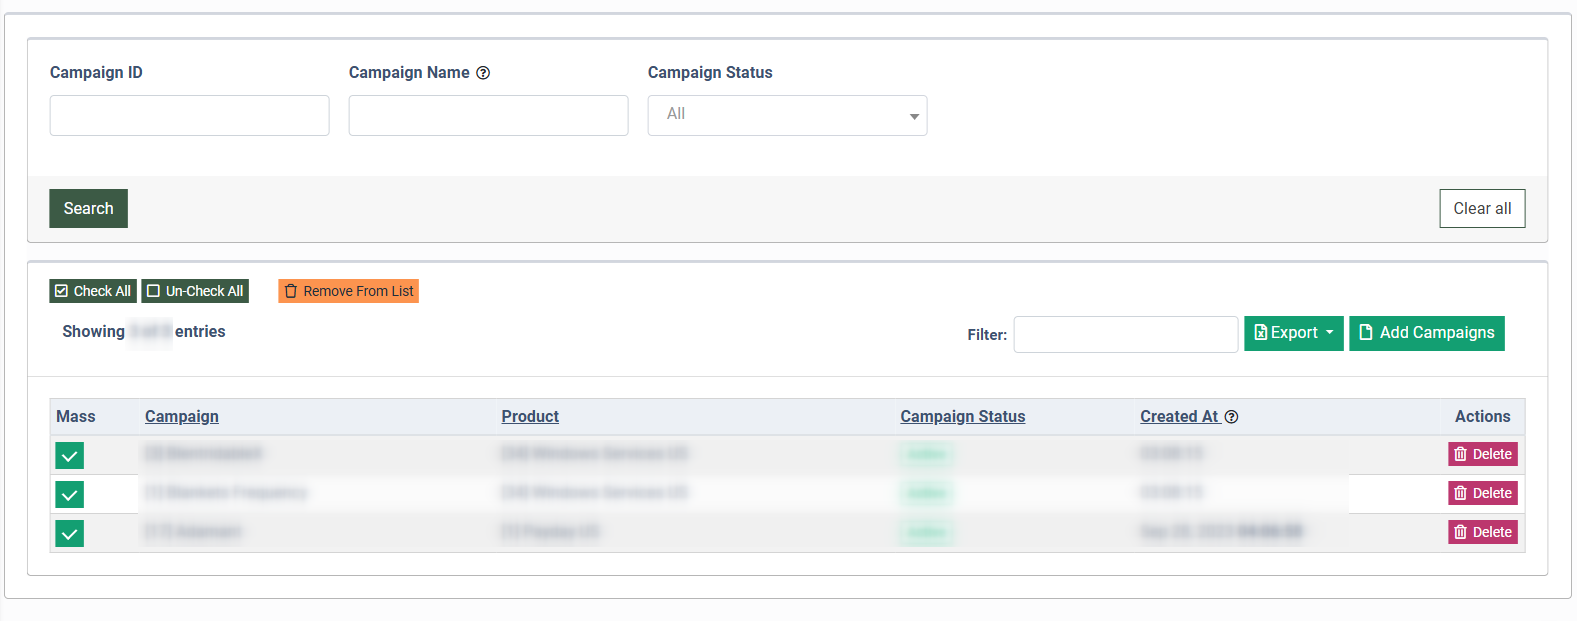
The list of Publisher’s exclusive Campaigns contains the following information:
- Mass: Check the boxes for several Campaigns removal at the same time.
- Campaign: The name of the Campaign along with its unique identification number. Note: The value in this column will be replaced with an asterisk for added Buyers. When you add the Buyer to the exclusive Campaigns tab, the system will automatically add all his Campaigns for the corresponding Product with an “Active” status.
- Campaign Tags: The tags of the Campaign.
- Buyer: The name and identification number of the Buyer.
- Buyer Tags: The tags of the Buyer.
- Campaign Status: The ongoing status of the Campaign.
- Created At: The date and time the Campaign was assigned to the Publisher.
You can narrow down the search results by using the following filters:
- Campaign ID: Enter the unique identification number of the Campaign.
- Campaign Name: Enter the name of the Campaign.
- Buyer: Select the name of the Buyer.
- Campaign Status: Select the ongoing status of the Campaign.
- Campaign Tags: Select the Campaign Tag(s).
- Buyer Tags: Select the Buyer Tag(s).
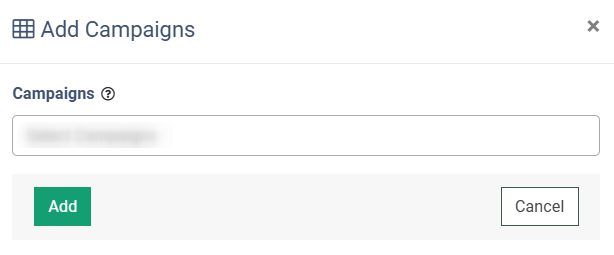
To assign an exclusive Campaign to the Publisher, click the “Add Campaigns” button. Select one or more Campaigns in the pop-up window and click the “Add” button to complete the action.
Note: Posting to the Silent Campaigns follows a standard process, even if these Campaigns are added to exclusive ones.
To assign all Buyer Campaigns for the corresponding Product to the Publisher at once, click the “Add Buyer” button. Select a Buyer in the pop-up window and click the “Add” button to proceed.
-1.png?width=688&height=270&name=unnamed%20(17)-1.png)
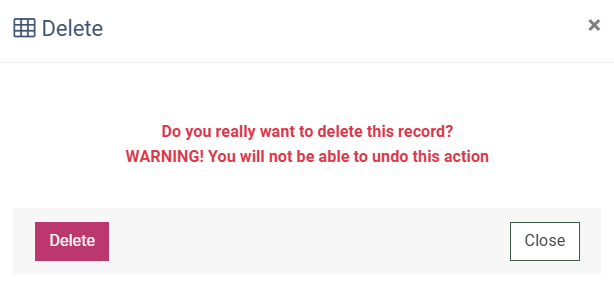
To unassign a specific Campaign from the publisher, select the Campaign from the list and click the “Delete” button in the “Actions” column. Confirm the action in the pop-up window by clicking the “Delete” button.
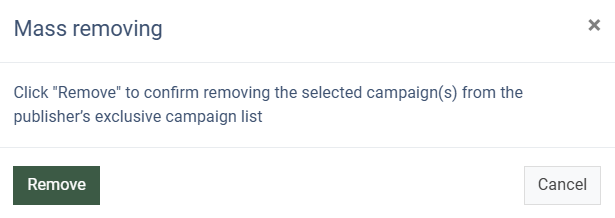
To unassign several campaigns at the same time, click the “Check All” button. Check the boxes for the required campaigns and click the “Remove From List” button. To unmark campaigns, click the “Uncheck All” button.
In the “Mass removing” pop-up window, click the “Remove” button to complete the action.