Publisher Lead Disposition
Find out how to create Lead QC reports and narrow down the results in our detailed guide to Publisher Lead Disposition.
The Publisher Lead QC Reports section allows you to create a report that will contain randomly selected leads grouped by specified parameters for further quality analysis. You can also view and manage previously created reports.
The Publisher Lead QC Reports section allows you to create a report that will contain randomly selected leads grouped by specified parameters for further quality analysis. You can also view and manage previously created reports. To view the reports, go to the Analytics and Optimization > Manual Control > Publisher Lead QC Reports section.

The Publisher Lead QC Reports list contains the following information:
-
ID - the unique identification number of the Lead QC Report.
-
Author - the name of the user who created the Lead QC Report.
-
Report Name - the name of the Lead QC Report.
-
Status - the status of the report. (Aborted, Deleted, Error, Pending, Processing, Success).
-
Date Range - the specified time frame for the system to select leads for the report.
-
Product - the name of the Product.
-
Details - additional parameters of the report: Publisher's system name, the collection Mode (Percent, Number of Leads), Mode Value. (“Mode” and “Mode Value” are always displayed, and other parameters are displayed only if the value is set).
-
Created - the date and time of the report creation.
You can narrow down the search results by using the following filters:
-
Created At - select the date range for the report.
-
Product - select the Product.
-
Author - select the user who had created the Lead QC Report.
-
Status - select the status of the Lead QC Report.
Reports are processed in the order they are created. When one report you created is in 'Processing' status, all reports created afterwards will be in 'Pending' status. It can take up to an hour to process a report.

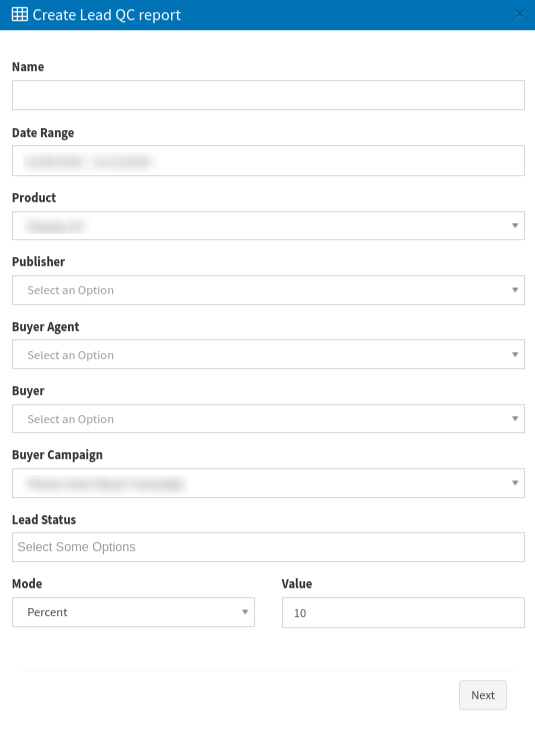
To create a new report, click the “Create Lead QC report” button and fill the following fields in the “Create Lead QC report” pop-up window:
-
Name - enter the name of the report.
-
Date Range - select the time frame for the system to select leads for the report.
-
Product - select the Product.
-
Publisher - select the Publisher.
-
Buyer Agent - select the Buyer Agent (optional).
-
Buyer - select the Buyer (optional). (Dependent on the Buyer Agent selected in the ‘Buyer Agent” field).
-
Buyer Campaign - select the Campaign (optional). (Available only when the Buyer is selected).
-
Lead Status - select the status of the leads. (Sold or Rejected).
-
Mode - select an option to define how leads are selected for the report. Select the “Percent” mode to define the percentage (any value from 1 to 100) of leads to be selected for the report. Select the “Number of Leads” mode to define the number of the leads (any value from 1 to 1000) to be selected for the report.
-
Value - enter the value for the Mode option.
Click the “Next” button to continue the creation of the report.

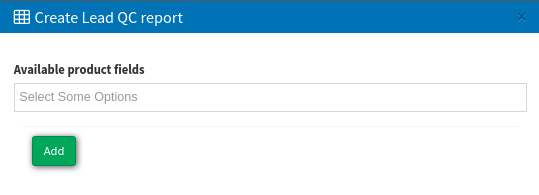
In the “Available product fields” drop-down list, select the product fields you want to be included in the “View” pop-up window and click the “Add” button to create the report.
Depending on the report status the following action buttons are visible:
-
For the Success status - the view, edit, delete buttons.
-
For the Processing status - the abort button.
-
For the Pending status - the edit, abort buttons.
-
For the Error status - no action buttons.
-
For the Delete status - the restore button.
-
For the Aborted status - no action buttons.
Click the “Edit” button to open the “Edit” pop-up window, where you can modify the name of the report and edit parameters.
Click the “Abort” button to stop the processing of the report. (The report cannot be restored later).
Click the “Delete” button to delete the generated report. (Can be restored later).
Click the “Restore” button to restore the deleted report.
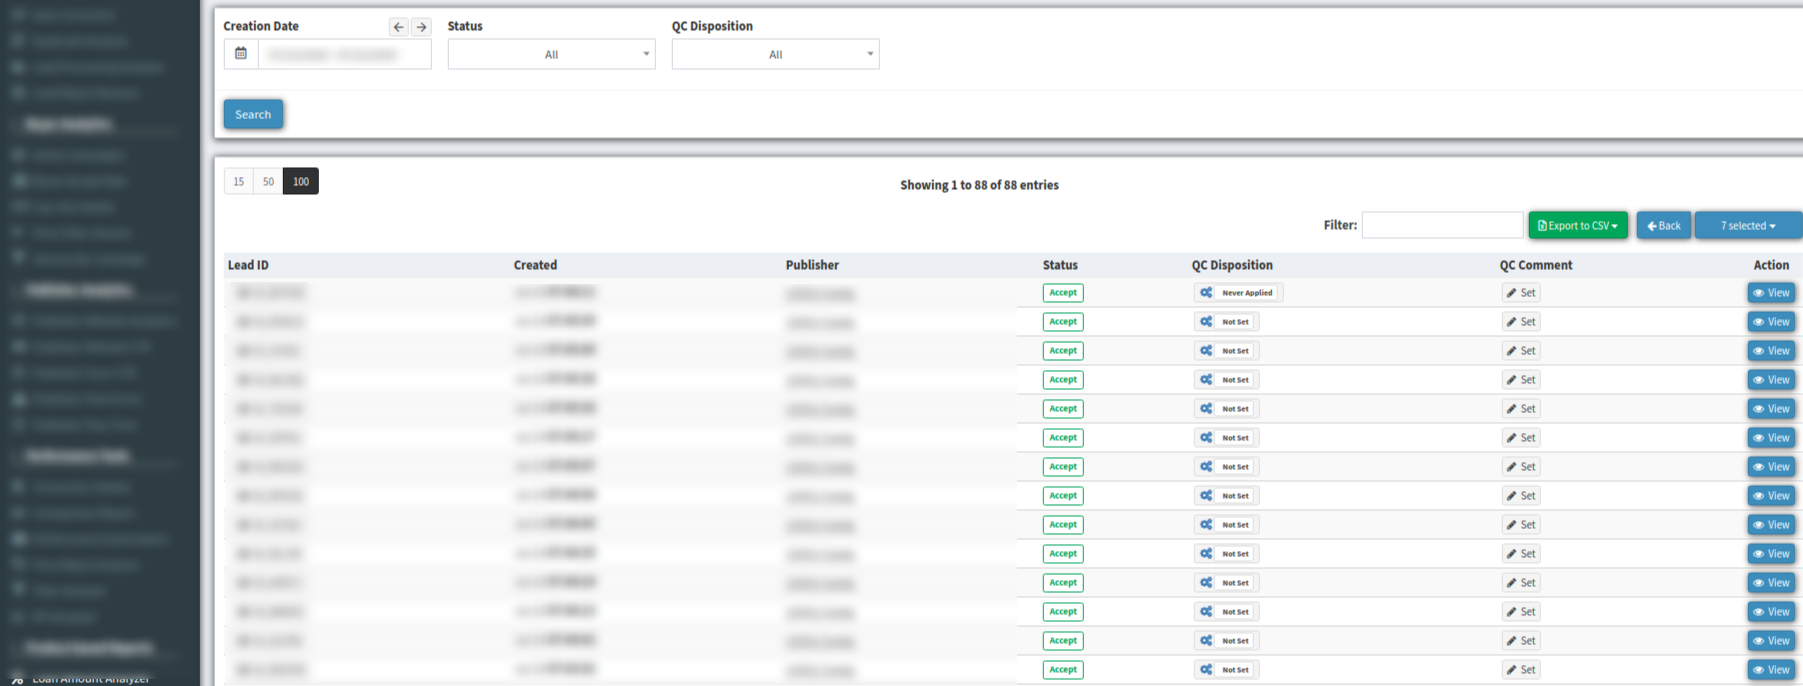
Click the “View” button to open the report and view the list of selected leads. To go back to the Lead QC Report list, click the “Back”

button.
The report contains the following information:
-
Lead ID - the unique identification number of the lead.
-
Created - the date and time of the lead creation.
-
Publisher - the name of the Publisher.
-
Status - the status of the lead.
-
QC Disposition - the quality status of the lead after the lead check. You can select one of the following options to reflect the quality of the lead (Good, Bad, Check Later).
-
QC Comment - you can leave a comment to the selected lead.
You can narrow down the results by using the following filters:
-
Creation Date.
-
Status.
-
QC Disposition (Good, Bad, Check Later).
To view the detailed information about the lead, click the “View” button in the “Action” column.

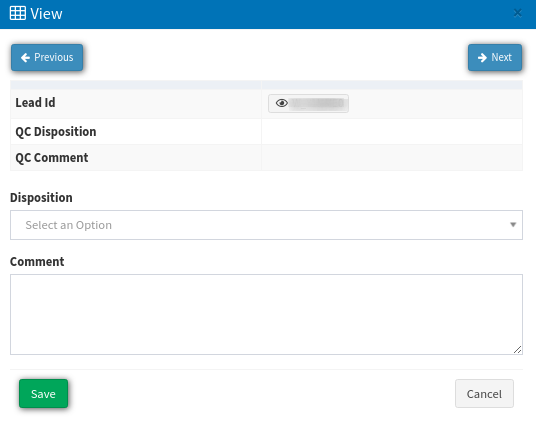
In the “View” pop-up window you can add a QC Comment in the “Comment” field, select a “Disposition” for this lead (Good, Bad, Check Later), and view additional information about the lead. Also, you can go to the next or to the previous lead from the list by clicking the “Next” and “Previous” buttons in the upper corners of the pop-up window.