Publisher Source
Here is everything you need to know about a tracking identifier for web or call traffic called Publisher Source.
How to pass the source through the web traffic?
How to pass the source through the call traffic?
Where I can find the list of sources?
How to manage multiple sources?
How to add restrictions to the Publisher source?
Publisher Source is a tracking identifier for web or call traffic. The source can be used for the “Fire a Pixel” option, to pass additional parameters in the URL, or for analytical purposes.
For call traffic, the source is automatically identified based on the phone number the lead called.
How to pass the source through the web traffic?
For web traffic, it can be sent via URL or passed by the source parameter in the API request. Here you can post either a website address or an affiliate source (subID) as the source parameter. If a source was not specified, a default source (Default) will be generated. The website address needs to be passed in the following format, e.g.,https://phonexa.com. The SubID can be any alphanumeric symbol in any format.
The source cannot be a unique identifier. If you need to transfer your unique identifier with a lead into the system, you can use the ClickID parameter.
Note: The system subscription package determines the number of sources available per publisher. This limitation can be checked at phonexa.com/pricing.
The source/clickid can be passed using the source=1234&clickid=1234, which are case-sensitive parameters. To pass the source to the page with the form and the website’s main page, the "param_store.js" script should be set up on the website.
To find the script, go to the Publisher management > JS Form section, select the form from the list and click the "Settings" button. On the JS Form Edit page, click the “Advanced Options” button to open the block with code data and instructions (the "Params tracking code” string).
Read more about passing source information through the Buyer Integration in the Knowledge Base article.
Go to the Publisher Management > Setup > Publisher Products API section and select a specific Product to get more information on passing a source in the API request.

Below is an example API request with the source parameter:

How to pass the source through the call traffic?
For call traffic, a source is generated for every call by default. The Publisher’s phone number that the call came through the system is identified as the source name.
Where I can find the list of sources?
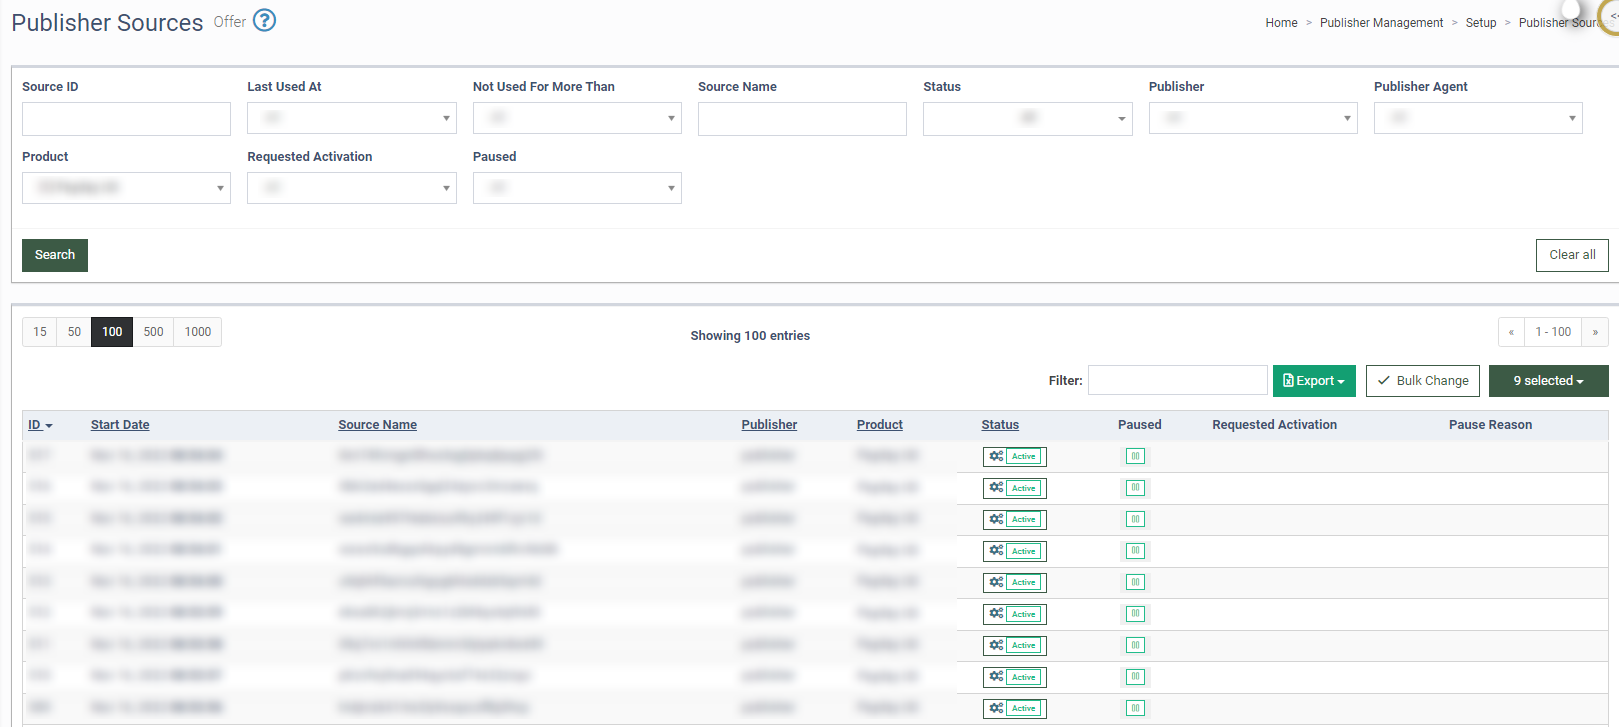
To view the list of sources, go to the Publisher Management > Setup > Publisher Sources section.

The list contains the following information:
-
ID: The unique identification number of the Internal Publisher source.
-
Start Date: The date and time when the source started posting traffic.
-
Source Name: The name of the Publisher source visible to the Buyer.
-
Publisher: The name of the Publisher in the system.
-
Product: The name of the corresponding Product.
-
Status: The status of the source (Active / Disabled).
-
Paused: The pause settings of the source (Active / Paused).
-
Requested Activation: The activation request comment.
-
Pause Reason: The pause status comment.
You can narrow down the search results by using the following filters:
-
Source ID: Enter the unique identification number of the internal Publisher source.
-
Last Used At: Select the time range for the last usage of the source (Week / Two Weeks / Month / Three Months / Six Months / Year).
-
Source Name: Enter the name of the Publisher source.
-
Not Used For More Than: Select the minimum period of time during which the source was not used (Week / Two Weeks / Month / Three Months / Six Months / Year).
-
Status: Select the status (Active / Deleted / Disabled / Paused / Test).
-
Publisher: Select the Publisher.
-
Publisher Agent: Select the Publisher Agent.
-
Product: Select the Product.
-
Requested Activation: Select if an activation for the source has been requested (Yes / No).
-
Paused: Select if the source is paused (Active / Paused).
How to manage multiple sources?
To select multiple sources, click the “Bulk Change” button, and check the boxes for the sources you want to manage.
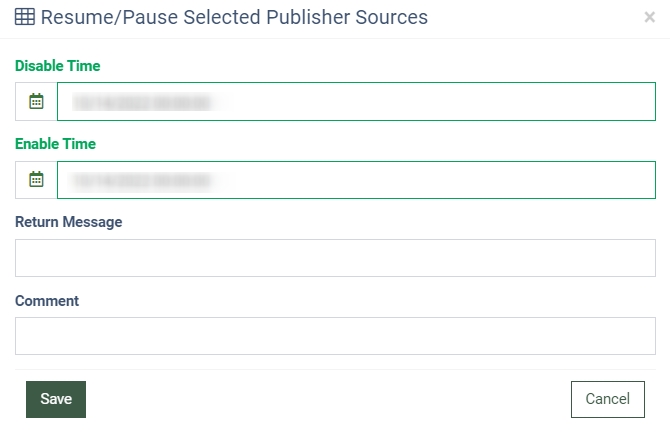
To pause selected sources, click the “Play” icon. Select the start and finish date for the pause period, fill in the “Return Message” and “Comment” fields, and click the “Save” button in the “Resume/Pause Selected Users” pop-up window.

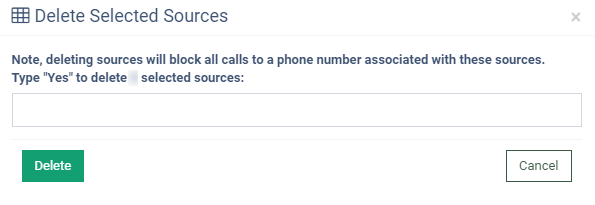
To delete selected sources, click the “Bucket” icon, type “Yes” in the “Type “Yes” to delete selected sources;” field, and click the “Delete” button in the pop-up window.

To delete selected sources in the Call Logic, click the “Bucket” icon, type the “Yes” value in the “Type “Yes” to delete selected sources;” field, and click the “Delete” button in the “Delete Selected Sources” pop-up window.

Note: Deleting sources in the Call Logic will block all calls to a phone number associated with these sources.
The source may be used as a filter in the reports throughout the system, including the Lead Details and Performance Summary (Group by Source tab) reports.
How to add restrictions to the Publisher source?
To add restrictions to the Publisher source, go to the Campaign Setup > Filter by Pubs tab. Read more about the Filter by Pubs tab in our Knowledge Base article.
To check the Publisher source restrictions, go to the Analytics and Optimization > Buyer Analytics > Sources By Campaign tab.
Read more about the Sources by Campaign tab in our Knowledge Base article.