Queue
A queue is a virtual line or holding point where incoming calls are held until an operator is available. You can select from a variety of call queuing options that can be customized to meet specific needs.
Queue List section
The Queue section allows you to view the operator queue list, where you can create a new queue or manage an existing one. A queue is a line of callers waiting to be routed to an available operator. To view the list of the queues, go to the PBX Management > Setup > Queues section.
The list of queues contains the following information:
- ID: The unique identification number of the queue.
- Name: The name of the queue.
- Status: The current status of the queue.
- Description: A brief description of the queue.
- Operators: The number of operators added to the queue.
- Extension: The internal extension of the queue.
- Department: The name of the related department.
- Created: The date of the queue creation.
You can narrow down the search results by using the following filters:
- ID: Enter the unique identification number of the queue.
- Created: Select the date range of the queue creation.
- Status: Select the current status of the queue (Active, Disabled).
- Name: Enter the name of the queue.
- Extension: Enter the internal extension of the queue.
- Department: Select the related department.
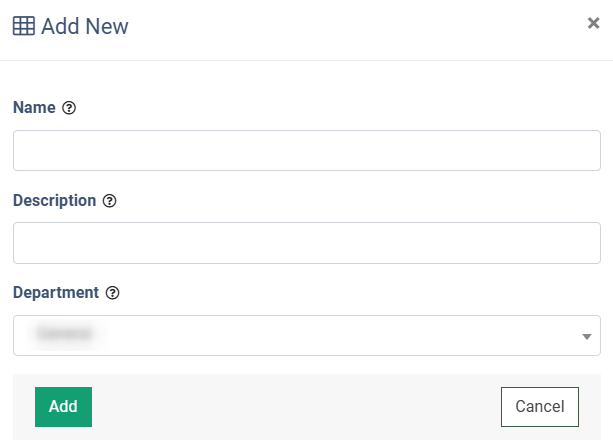
To create a new queue, click the “Add New Record” button and fill in the following fields in the “Add New” pop-up window:
- Name: Enter the name of the queue.
- Description: Enter a brief description of the queue.
- Department: Select the related department.
Click the “Add” button to complete the action.

To manage the queue settings, click the “Configure” button in the “Actions” column.
To remove the queue from the list, click the “Delete” button in the “Actions” column.
Queue Сonfiguration
The Queue Setup section allows you to manage and configure the settings of the queue, including general settings, routing, and operators related to the queue. It contains the following tabs:
General Settings
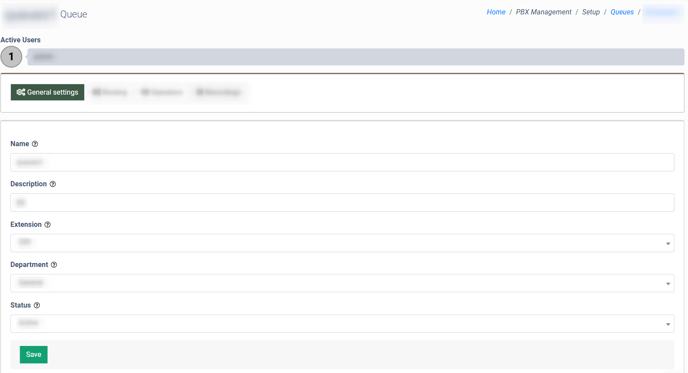
The “General settings” tab allows you to edit the general settings of the queue.

The following general settings are available:
- Name: Enter the name of the queue.
- Description: Enter a brief description of the queue.
- Extension: Select the internal extension of the queue.
- Department: Select the department that is attached to the queue.
- Call Recording: Select the current status of the call recording option (Active, Disabled). Note: this setting has a higher priority at the queue level. If the Call Recording option is enabled for the queue but disabled for the operator, the call will still be recorded. If the Call Recording option is disabled for the queue but enabled for the operator, the call will be recorded if the call is answered by that particular operator.
- Status: Select the current status of the queue (Active, Disabled).
Click the “Save” button to complete the settings.
Routing
The “Routing” tab allows you to configure and manage the call routing for the Queue.
The following routing settings are available:
- Routing Method: Select the routing strategy that will be applied for the queue (Linear, Random, Ringall, Round robin).
- Linear: The strategy for linear call distribution in the predefined order.
- For example, if Operator 1, Operator 2, Operator 3, and Operator 4 are added to the queue with the “Linear'' strategy, and a client calls the queue, the call will be first transferred to Operator 1. If Operator 1 does not answer the call, and the value in the “Ring Duration” field is already reached, the call will then go to Operator 2. If Operator 2 also does not pick up the phone, or the time limit in the “Ring Duration” is reached, the call will then go to Operator 3, and so on. If Operator 3 answers the call, the workflow of the queue will be finished. In case, if all operators attached to the queue do not pick up the phone and the sum of the values in the “Ring Duration” field is less than the value in the “Timeout'' field, the call will be transferred to Operator 1, Operator 2, etc.
- Random: The strategy for call distribution in a random order.
- For example, if Operator 1, Operator 2, Operator 3, and Operator 4 are added to the queue with the “Random” strategy, when a call is transferred to the particular queue, it will be redirected to an Operator in a random order. If the first Operator will not pick up the phone, the call will be transferred to another Operator randomly. This process will continue until the call is answered or the value in the “Timeout” field is reached.
- Ringall: The strategy for call distribution to all operators attached to the queue at the same time.
- For example, if Operator 1, Operator 2, Operator 3, and Operator 4 are added to the queue with the “Ringall” strategy, the call will be transferred to every Operator in the queue, and the dialing process will continue until one of the operators picks up the phone or the value in the “Timeout” field is reached.
- Round robin: The strategy for call distribution giving an equal opportunity to pick up the call to every operator attached to the queue, similar to the “Linear”.
- For example, if Operator 1, Operator 2, Operator 3, and Operator 4 are added to the queue with the “Round robin” strategy, and the queue receives a call, it will first be redirected to Operator 1. If Operator 1 does not pick up the phone and the value in the “Ring Duration” field is reached, the call will be transferred to Operator 2. If Operator 2 picks up the phone and receives the call, the next call in the queue will be first transferred to Operator 3 (the operator next in line after the last operator who picked up the phone). If neither Operator 3 nor Operator 4 pick up the phone and the value in the “Timeout” field is not reached, the call will be transferred to Operator 1, and so on.
- Linear: The strategy for linear call distribution in the predefined order.
- Timeout: Enter the timeout for the queue.
- Ring Duration: Enter the duration of the dialing process for the operator.
Click the “Save” button to complete the settings.
Operators
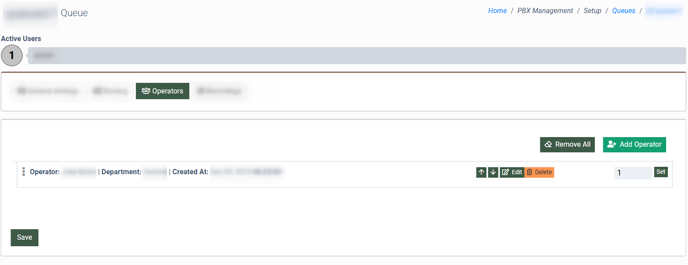
The “Operators” tab allows you to configure and manage the operator’s settings that are attached to the particular queue.

To add an operator to the Queue, click the “Add Operator” button and fill in the following fields in the “Add Operator” pop-up window:
- Operator: Select the operator that you would like to add to the queue.
- Routing Method: Select the method of the routing (Default, Sip Trunk, External Phone).
- Default: The call will be transferred to the SIP phone of the operator directly.
- Sip Trunk: The call will be transferred to another PBX system via the Trunk.
- Sip trunk: Select the Sip Trunk.
- Trunk number: Enter the Trunk number.
- External Phone: The call will be transferred to the external phone number (outside the system).
- External Phone Number: Enter the external phone number.
Click the “Add” button to complete the action.
To manage the routing settings for the operator that is already added to the queue, click the “Edit” button in the corresponding row. You can change the following settings in the “Edit” pop-up window:
- Operator: Select the operator that you would like to add to the queue.
- Routing Method: Select the method of the routing (Default, Sip Trunk, External Phone). Complete the settings according to the selected Routing Method.
Click the “Save” button to complete the changes.
Three options for operators’ order management are available:
- Use the arrow up/arrow down buttons to move the option through the list.
- Enter the number that represents the order in the chain in the corresponding field of the record.
- Move the record through the list by using the drag and drop option (the three dots element at the beginning of the record).
To remove the operator from the Queue, click the “Delete” button in the corresponding row.
To remove all operators from the queue, click the “Remove All” button, and click the “Yes, remove” button in the “Remove All” pop-up window to complete the removal process.
Recordings
The “Recordings” tab allows you to configure and manage the call recording settings that are applied to the particular queue.
The following settings are available:
- Numerical Data Redaction: To turn on or turn off this feature select the “Enabled” or “Disabled” options respectively. To use the settings applied on the Call Group level, select the “Use Call Group Setting” option.
- Keyword Search: To turn on or turn off this feature select the “Enabled” or “Disabled” options respectively. To use the settings applied on the Call Group level, select the “Use Call Group Setting” option.
- Call Recording: Select the call recording option for the ongoing queue (Use Call Group Setting, Disabled, Enabled). Note: The priority of the ongoing call recording settings applied on the queue level is higher than the one set on the Call Group level.
Click the “Save” button to complete the settings.


