Set the Event Tracking
To set up the transmission of events to Google Analytics 4, the event tracking feature on the Product, Publisher, or Campaign level should be configured.
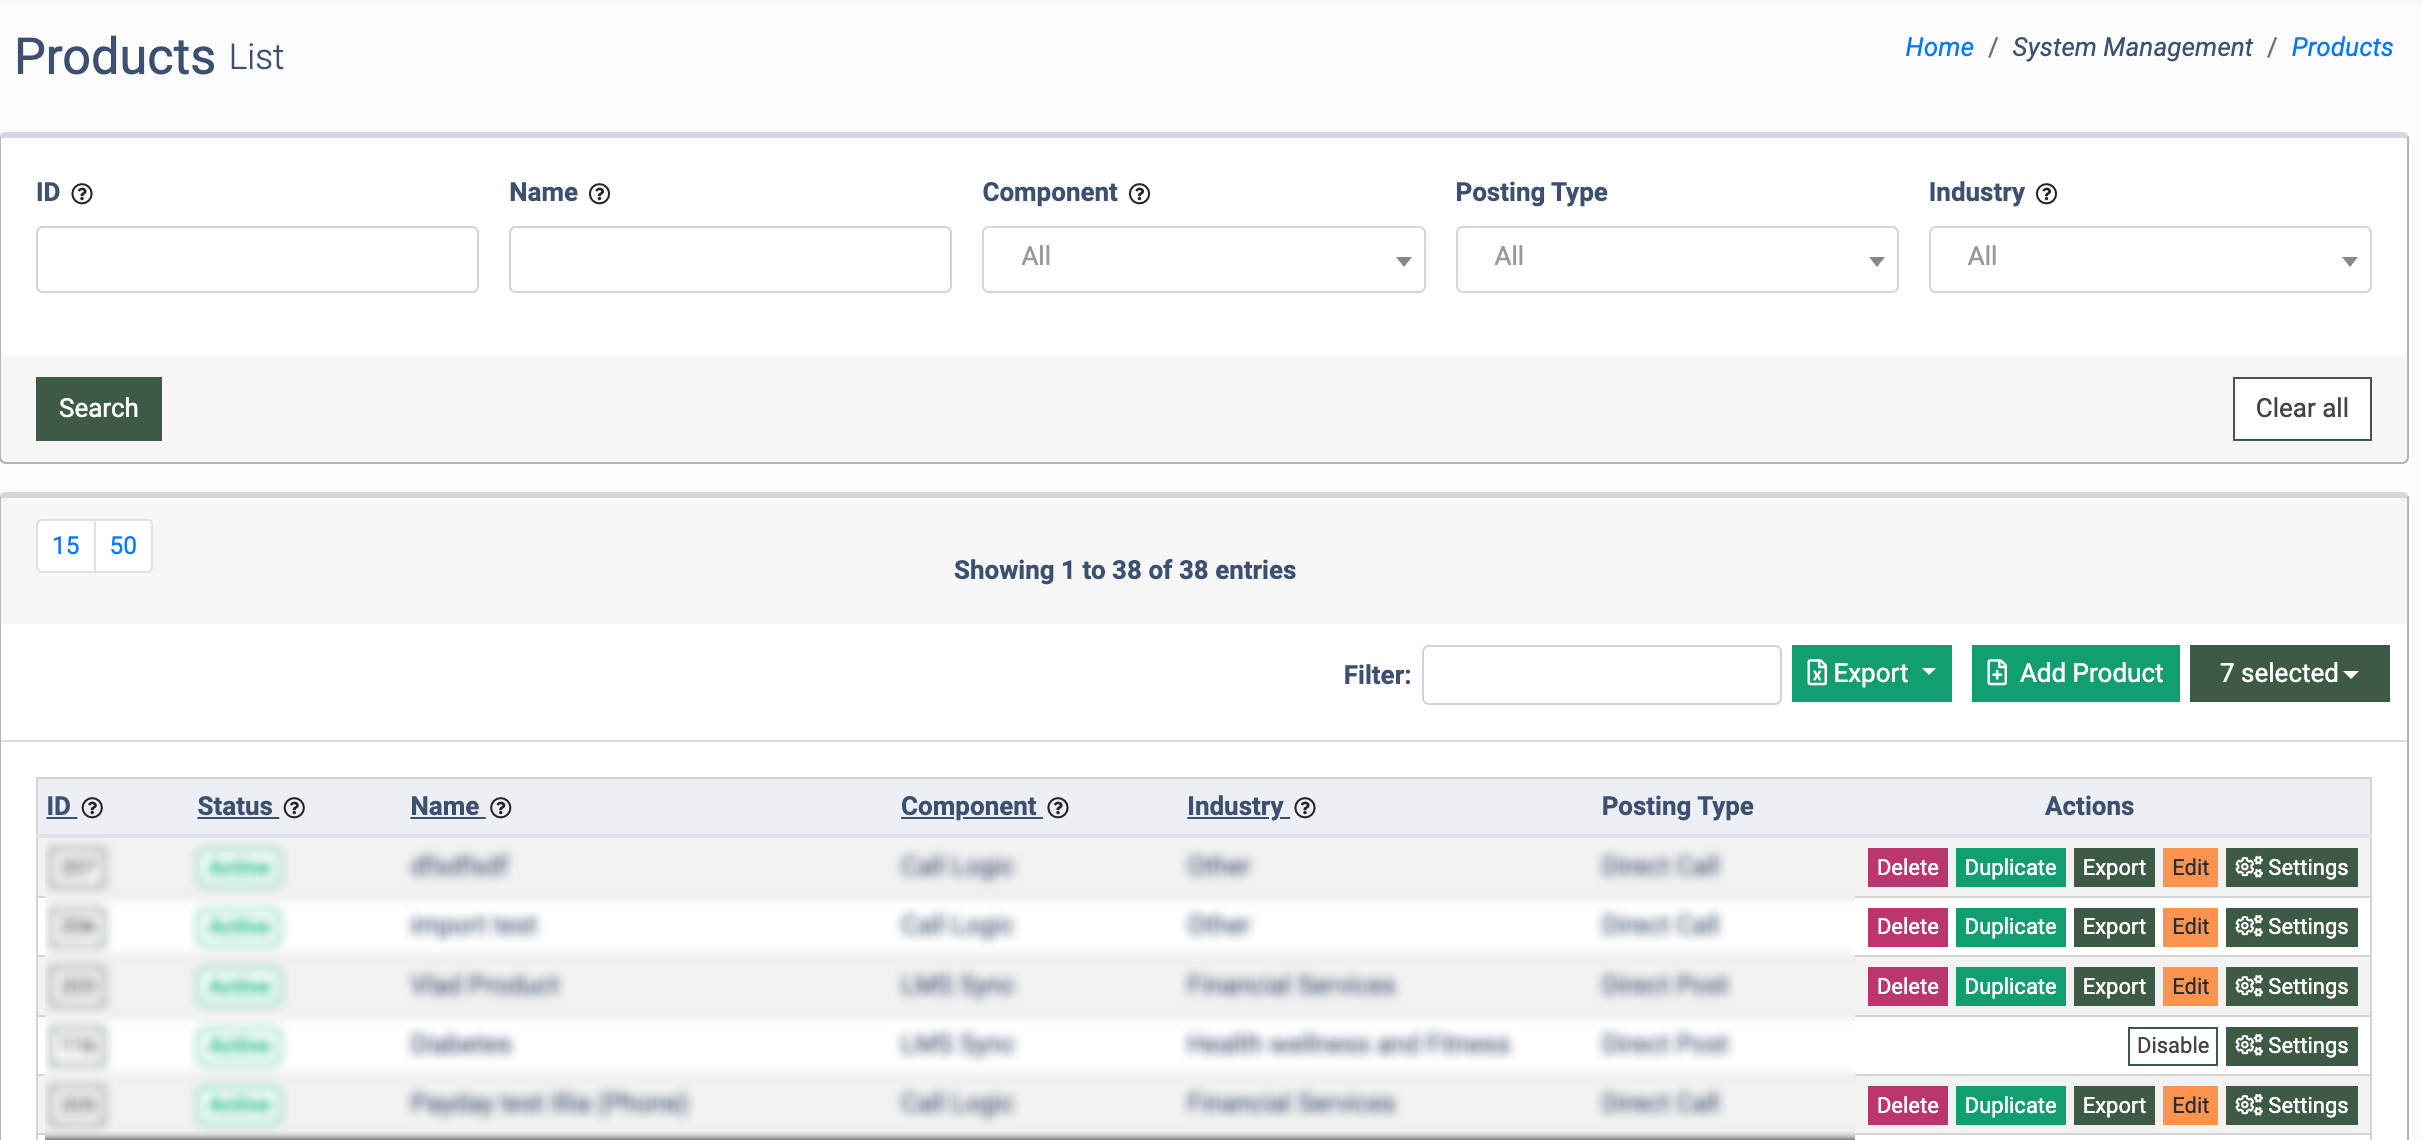
To set and configure the event tracking for the Product, go to the System Management > Products section, select the Product from the list, and click the “Settings” button in the “Actions” column.
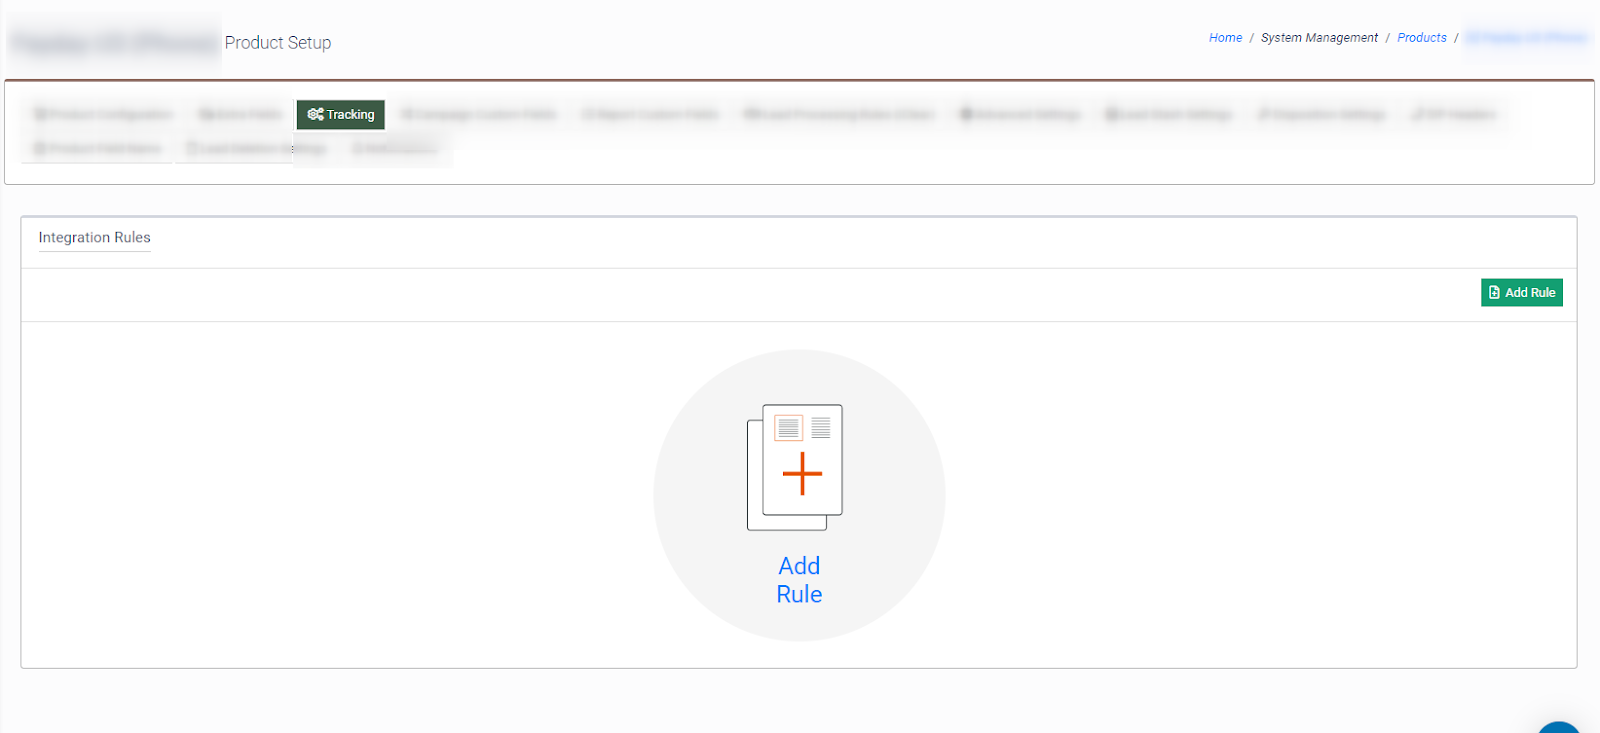
To add the event tracking rule, select the “Tracking” tab in the Product Setup section and click the “Add Rule” button.
Select the corresponding trigger in the “Trigger” field of the “Add Rule” pop-up window.
-1.png?width=688&height=245&name=pasted%20image%200%20(1)-1.png)
Note: The event tracking rule for Google Analytics 4 can be set only for the following options in the “Trigger” field:
- [LMS] Lead Sold
- [LMS] Lead Rejected
- [LMS] Post Reject (for Ping-Post products only).
- [Call Logic] Lead Sold
- [Call Logic] Lead Rejected
- [LMS] Lead Offer Received
Select the “Google Analytics” option in the “Action” field.
.png?width=688&height=327&name=pasted%20image%200%20(2).png)
Click the “Next” button to proceed with the event tracking setup.
Read more about Event Tracking configuration on the Publisher’s and Campaign’s level in the Knowledge Base article.
Fill in the following fields in the “Add Rule” pop-up window, depending on the selection made in the “Trigger” field:
- If the “[Call Logic] Lead Sold” option is selected:
- Publisher: Select the Publisher.
- Channel: Select the Publisher’s Channel.
- Call Tracking Pool: Select the Call Tracking pull.
- Buyer: Select the Buyer.
- Campaign: Select the Campaign.
- Pingtree: Select the Pingtree
- Price restrictions: Select the option for the price restriction processing (Price is greater than 0, Price is greater than a certain value, Price is greater than or equal to a certain value, Price is lower than a certain value, Price is lower than or equal to a certain value).
- Min Price: Enter the minimum price value to trigger the rule by the price range (available only for the “Price range inclusive” value in the “Price Restrictions” field).
- Max Price: Enter the maximum price value to trigger the rule by the price range (available only for the “Price range inclusive” value in the “Price Restrictions” field).
-2.png?hsLang=en)
- If the “[LMS] Lead Sold” option is selected:
- Method: Select the posting method (POST/FORM).
- Publisher: Select the Publisher.
- Publisher Exclude: Select the Publisher to exclude from the rule.
- Channel: Select the Publisher’s Channel.
- Channel Exclude: Select the Publisher Channel to exclude from the rule.
- Source: Select the Publisher Source.
- Source Exclude: Select the Source to exclude from the rule.
- Buyer: Select the Buyer.
- Campaign: Select the Campaign.
- Price Restrictions: Select the Price restrictions (Price is greater than 0, Price is greater than a certain value, Price is greater than or equal to a certain value, Price is lower than a certain value, Price is lower than or equal to a certain value, Price range inclusive). Note: The “Price range inclusive” value is available only for the “Lead Sold” and “Campaign Sold” triggers.
- Price Restriction Value: Enter the price value.
- Min Price: Enter the minimum price value to trigger the rule by the price range (available only for the “Price range inclusive” value in the “Price Restrictions” field).
- Max Price: Enter the maximum price value to trigger the rule by the price range (available only for the “Price range inclusive” value in the “Price Restrictions” field).
-1.png?hsLang=en)
- If the “[Call Logic] Lead Rejected” option is selected:
-
- Publisher: Select the Publisher.
- Channel: Select the Publisher’s Channel.
- Call Tracking Pool: Select the Call Tracking pool.
- Pingtree: Select the Pingtree.
-1.png?hsLang=en)
- If the “[LMS] Lead Rejected” option is selected:
- Method: Select the posting method (POST/FORM).
- Publisher: Select the Publisher.
- Publisher Exclude: Select the Publisher to exclude from the rule.
- Channel: Select the Publisher’s Channel.
- Channel Exclude: Select the Publisher Channel to exclude from the rule.
- Source: Select the Source.
- Pingtree: Select the Pingtree.
-2.png?hsLang=en)
- If the “[LMS] Post Reject (for Ping-Post products only)” option is selected:
- Method: Select the posting method (POST/FORM).
- Publisher: Select the Publisher.
- Publisher Exclude: Select the Publisher to exclude from the rule.
- Channel: Select the Publisher’s Channel.
- Channel Exclude: Select the Publisher Channel to exclude from the rule.
- Source: Select the Source.
- Source Exclude: Select the Source to exclude from the rule.
- Pingtree: Select the Pingtree.
-2.png?hsLang=en)
- If the “[LMS] Lead Offer Received” option is selected:
- Method: Select the posting method (POST/FORM).
- Publisher: Select the Publisher.
- Publisher Exclude: Select the Publisher to exclude from the rule.
- Channel: Select the Publisher’s Channel.
- Channel Exclude: Select the Publisher Channel to exclude from the rule.
- Source: Select the Publisher Source.
- Source Exclude: Select the Source to exclude from the rule.
- Buyer: Select the Buyer.
- Campaign: Select the Campaign.
- Pingtree: Select the Pingtree.
- Price restrictions: Select the option for the price restriction processing (Price is greater than 0, Price is greater than a certain value, Price is greater than or equal to a certain value, Price is lower than a certain value, Price is lower than or equal to a certain value).
- Price Restriction Value: Enter the value for the price restriction processing.
-2.png?hsLang=en) Fill in the following fields in the “Action Settings / Google Analytics” block on the “Add Rule” pop-up window:
Fill in the following fields in the “Action Settings / Google Analytics” block on the “Add Rule” pop-up window:
- Secret Key: Enter the secret key value. Check on how to obtain this value in the Configure and obtain the Secret Key section of this instruction.
- Measurement ID: Enter the Measurement ID value. Check on how to obtain this value in the Obtaining the Measurement ID section of this instruction.
- Client ID: Enter the Client ID value. This value should be entered by using the {% tPar_* %} placeholder. For the Call Logic, the format for the placeholder is the following: {% tpoolGA4ClientId %}. Check more details about the Client ID value in the Client ID value section.
- Email Address: Enter the placeholder for the email address to be sent along with the event.
- Phone Number: Enter the placeholder for the phone number to be sent along with the event.
- Currency: Select the corresponding currency for sending data (USD, EURO, GBP).
- Event Name: Enter the name of the event that will be sent to Google Analytics 4.
- Event Value: Select the value of the conversion for the event. You can select the corresponding placeholder from the list above. To view the list of available placeholders, click the “Show available placeholders” link.
Click the “Save rule” button to complete the process.
-2.png?hsLang=en) Check the following steps below to obtain the data for filling in the fields described above.
Check the following steps below to obtain the data for filling in the fields described above.
Configure and obtain the Secret Key
Follow the steps on how to create and/or obtain the Secret Key value from Google Analytics 4.
- Sign in to your Google Analytics account
- Click "Admin" in the left-hand menu.
.png?width=320&height=819&name=pasted%20image%200%20(8).png)
- In the Admin section, select and click the "Data Streams" option in the “Property” column.
.png?width=688&height=340&name=pasted%20image%200%20(9).png)
- Select the web data stream for which you want to send data from the list and click the “Arrow” button.
.png?width=688&height=288&name=pasted%20image%200%20(10).png)
- In the “Web stream details” window, select and click the “Arrow” button in the "Measurement Protocol API secrets" option of the “Events” block.
.png?width=688&height=430&name=pasted%20image%200%20(11).png)
- To create a new API secret record, click the “Create” button in the "API secrets" block of the “Measurement Protocol API secrets” window.
.png?width=688&height=169&name=pasted%20image%200%20(12).png)
Enter the name of the record in the “Nickname” field of the “Create new API secret” window.
Click the “Create” button to complete the action.
.png?width=688&height=212&name=pasted%20image%200%20(13).png)
The created API secret record will be displayed in the "API secrets" block of the “Measurement Protocol API secrets” window.
.png?width=688&height=169&name=pasted%20image%200%20(14).png)
To copy the value of the “Secret value” field, select the corresponding record and click the “Copy” button.
This value should be entered in the “Secret Key” field in the “Action Settings / Google Analytics” block on the “Add Rule” pop-up window.
.png?width=688&height=569&name=pasted%20image%200%20(15).png)
Obtaining the Measurement ID
Follow the steps to obtain the Measurement ID value from Google Analytics 4.
- Sign in to your Google Analytics account.
- Click "Admin" in the left-hand menu.
.png?width=320&height=819&name=pasted%20image%200%20(16).png)
- In the Admin section, select and click the "Data Streams" option in the “Property” column.
.png?width=688&height=340&name=pasted%20image%200%20(17).png)
- Select the corresponding data stream with the web, app, or app+web type from the list, and click the “Arrow” button.
.png?width=688&height=288&name=pasted%20image%200%20(18).png)
The Measurement ID value begins with "G-" and it’s placed in the “MEASUREMENT ID” field in the “Stream details” block of the “Web stream details” window.
.png?width=688&height=409&name=pasted%20image%200%20(19).png)
To copy this value, click the “Copy” button.
Note: This value should be copied fully, including the “G-” part.
This value should be entered in the “Measurement ID” field in the “Action Settings / Google Analytics” block on the “Add Rule” pop-up window.
.png?width=688&height=569&name=pasted%20image%200%20(20).png)
The Client ID value
The Client ID needs to be passed into the system alongside the lead or via Call Tracking Pool if you're using Call Logic. The Client ID is a unique identifier generated by Google Analytics 4 for each client visiting your website. It should be in the following format: XXXXXXXXXX.YYYYYYYYYY.