In the “SIP Trunking” section, you can create, use, and manage a virtual communication channel (Trunk).
SIP Trunking (Session Initiation Protocol Trunking) is a technology that allows users to make and receive calls over the Internet instead of using traditional phone lines. It connects your PBX (Private Branch Exchange) directly to the telephone network via the internet, replacing costly physical lines with a flexible, scalable digital solution. In other words, a SIP trunk is the internet-based connection (a virtual phone line) between your PBX and the public telephone network, enabling inbound and outbound calls.
With SIP Trunking, you can reduce telephony costs, simplify infrastructure, and easily scale the number of concurrent calls to match demand since each virtual number can have an unlimited number of channels (Trunks). This means lower costs for local, long-distance, and international calls and the ability to expand operations without installing new lines or hardware.
The SIP Trunk allows you to connect any quantity of phone numbers instead of redirecting to real numbers. Since each virtual number can have an unlimited number of channels, each number can have numerous simultaneous conversations.
From the Phonexa side, we are providing only the SIP Trunk entity with the corresponding credentials. Additional settings should be performed by the Tech Team and specialists from the client's side.
To set up trunks through the Call Logic platform, go to the System Management > General > SIP Trunking section.
How to Manage Phone Numbers Linked to Trunks
The “SIP Trunks” List section contains two tabs:
The “SIP Trunks” tab
The “SIP Trunks” tab contains the list of all SIP Trunks created and available in the system.
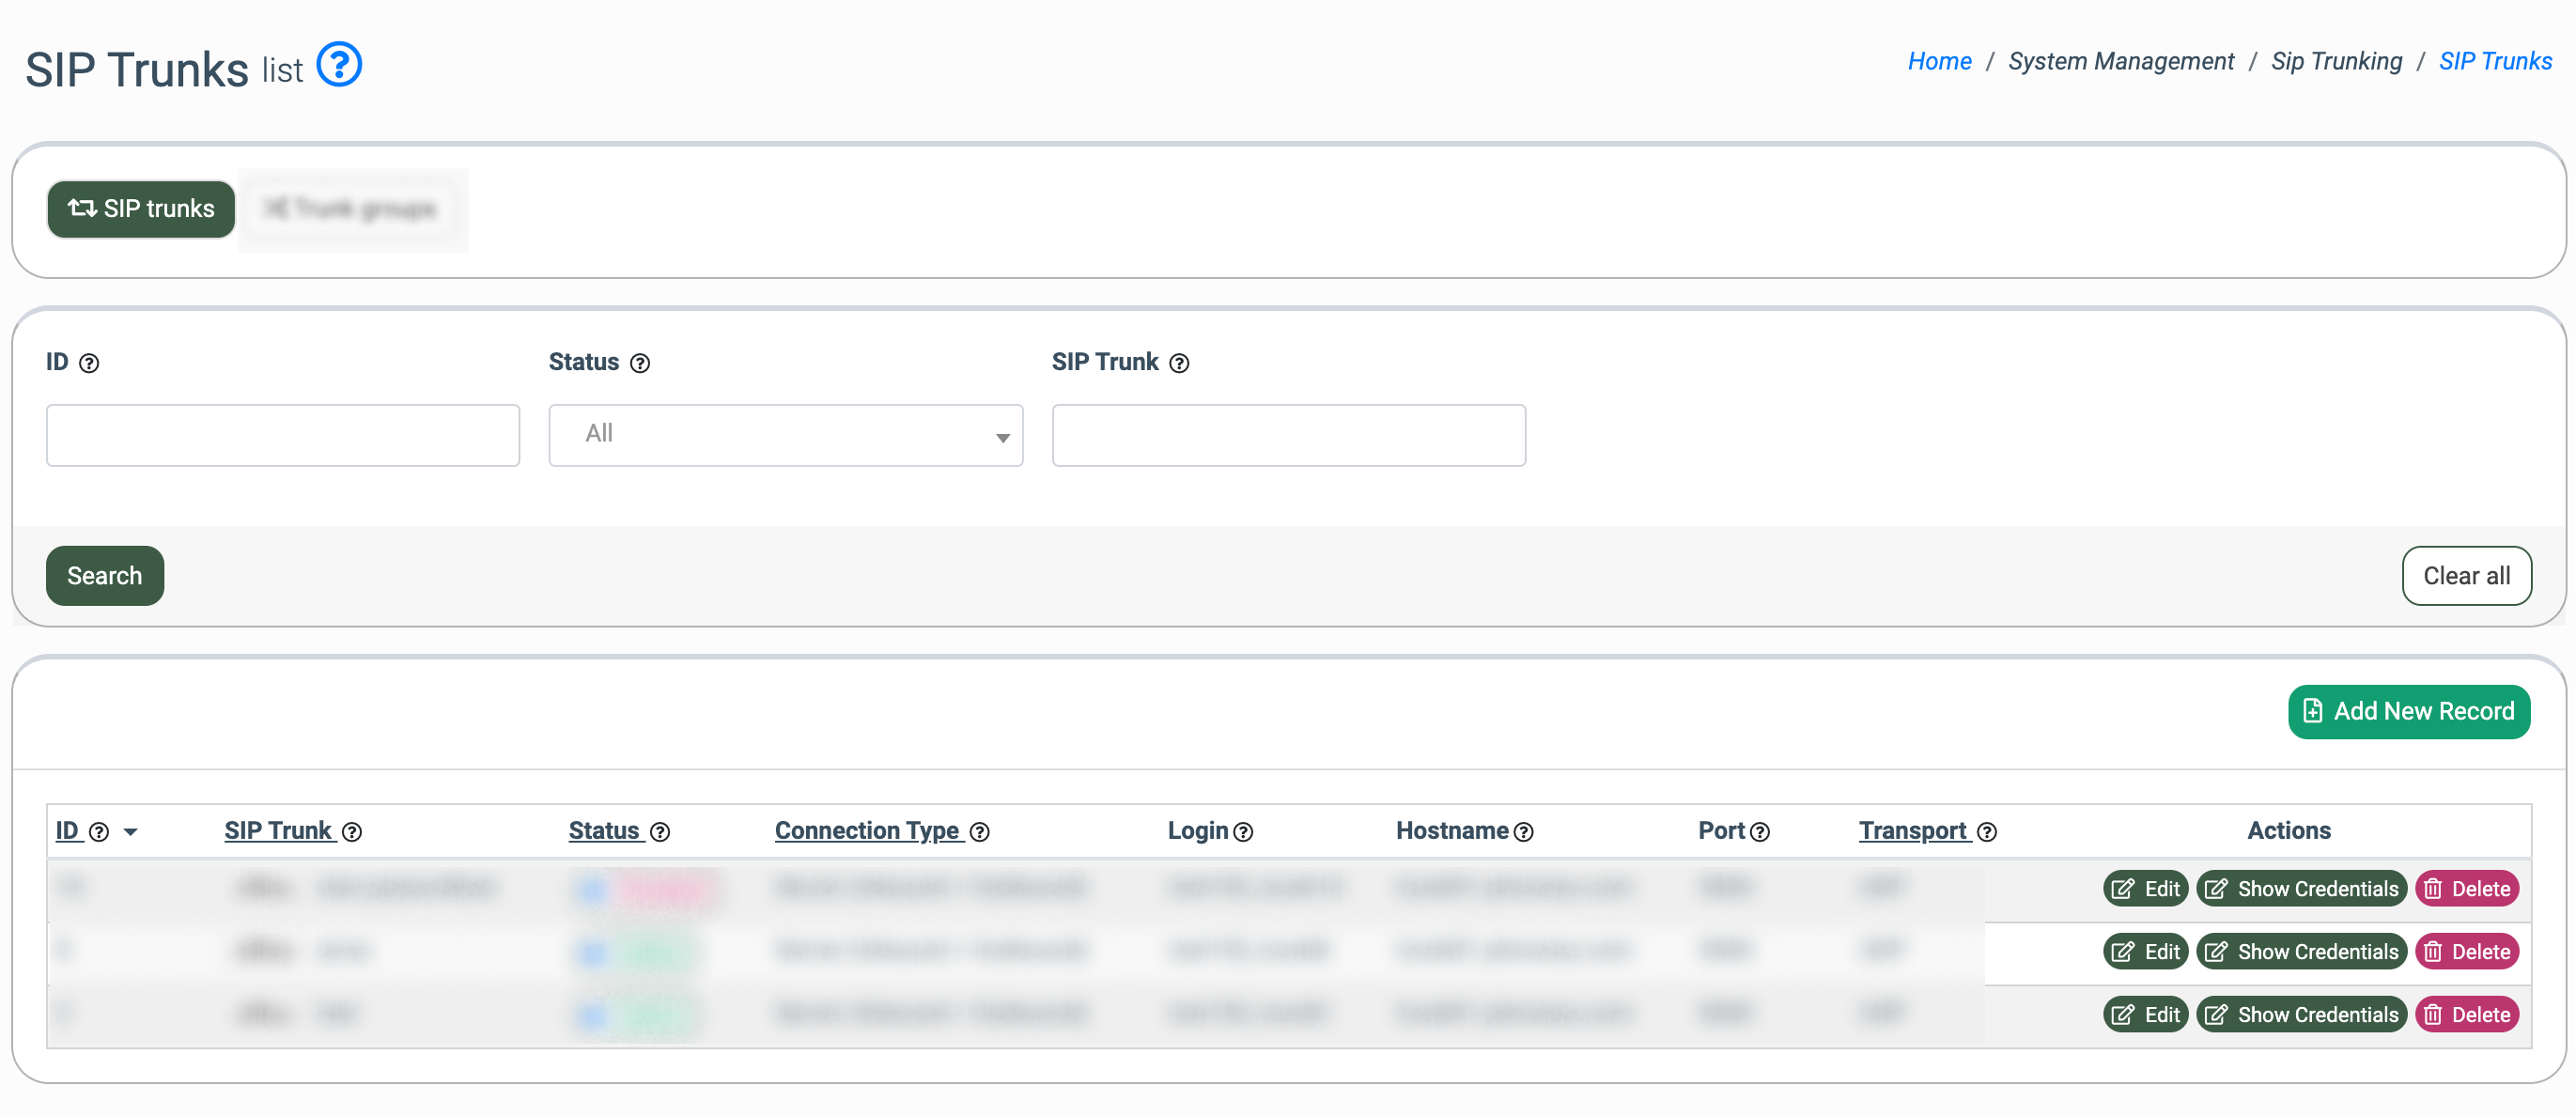
You can narrow down the search results by using the following filters:
- ID: Enter the unique identification number of the SIP Trunk.
- Status: Select the ongoing status of the SIP Trunk (Active, Disabled).
- SIP Trunk: Enter the name of the SIP Trunk.
The SIP Trunks list contains the following information:
- ID: The unique identification number of the SIP Trunk.
- SIP Trunk: The name of the SIP Trunk, along with the ongoing activity status (online, offline).
- Status: The ongoing status of the SIP Trunk (Active, Disabled). To change the status of the SIP Trunk, click the “Status” button in this column, select the corresponding option in the “Status” field, and click the “Save” button to complete the action.
- Connection Type: The connection type that is set for the SIP Trunk.
- Login: The username or login ID assigned by the SIP provider, used for authentication.
- Hostname: The name of the SIP Trunk host.
- Port: The network port used for SIP communication. The default SIP port is 5060 unless the SIP provider specifies otherwise.
- Transport: The protocol (UDP, TCP) used for transmitting SIP signaling between the Call Logic and the SIP provider.
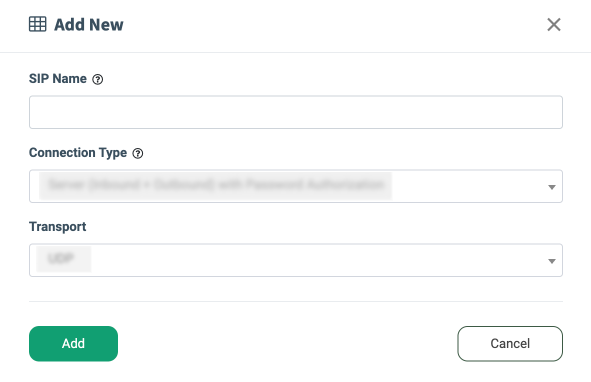
To create a new SIP Trunk, click the “Add New Record” button and fill in the following fields in the “Add New” pop-up window:
- SIP Name: Enter the name of the SIP Trunk.
- Connection Type: Select the connection type for the SIP Trunk Server (Server (Inbound + Outbound) with Password Authorization, Server (Inbound + Outbound) with IP Authorization, Client (Outbound Only) with Password Authorization, Client (Outbound Only) with IP Authorization). Depending on the selected option, the following fields are available:
- For the “Server (Inbound + Outbound) with IP Authorization” option:
- Authorized IP: Enter the IP address that will be authorized for the SIP Trunk usage.
- For the “Client (Outbound Only) with Password Authorization” option:
- SIP Login: Enter the username or login assigned by the SIP provider, used for authentication.
- SIP Password: Enter the password assigned by the SIP provider, used for authentication.
- SIP Host: Enter the name of the SIP Trunk host.
- SIP Port: Enter the network port used for SIP communication.
- For the “Client (Outbound Only) with IP Authorization” option:
- SIP Host: Enter the name of the SIP Trunk host.
- SIP Port: Enter the network port used for SIP communication.
- For the “Server (Inbound + Outbound) with IP Authorization” option:
- Transport: Select the protocol used for transmitting SIP signaling between the Call Logic and the SIP provider (UDP, TCP).
Click the “Add” button to complete the action.
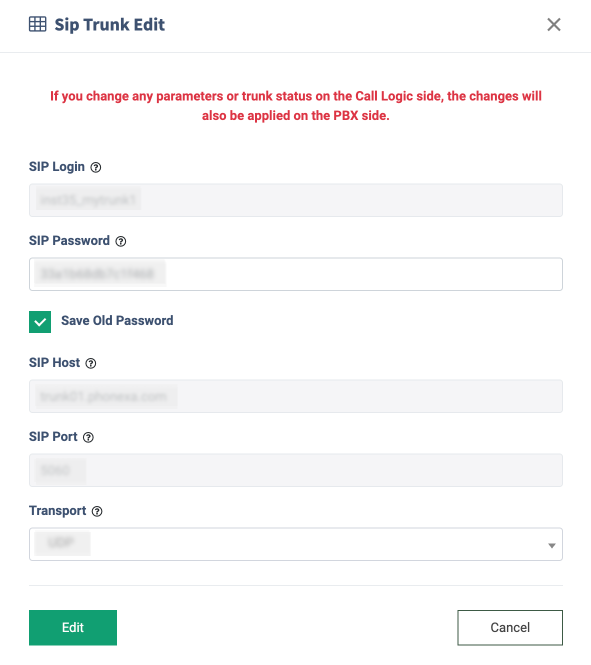
To edit the existing Trunk record, click the “Edit” button in the “Actions” column.
The following settings and information are available in the “Sip Trunk Edit” pop-up window:
- SIP Login: The SIP Trunk record login.
- SIP Password: The password associated with your SIP Login, required for authentication, and generated automatically.
- Save Old Password: Check the box to save the old password for the SIP Trunk.
- Authorized IP: Enter the IP address that will be authorized for the SIP Trunk usage.
- SIP Host: The name of the SIP Trunk host.
- Transport: The name of the protocol that is used for the SIP message transmission
- SIP Port: The number of the SIP Trunk port.
- Transport: Select the protocol used for transmitting SIP signaling between the Call Logic and the SIP provider.
Click the “Edit” button to complete the changes.
Note: The availability of the settings changes depends on the set connection type.
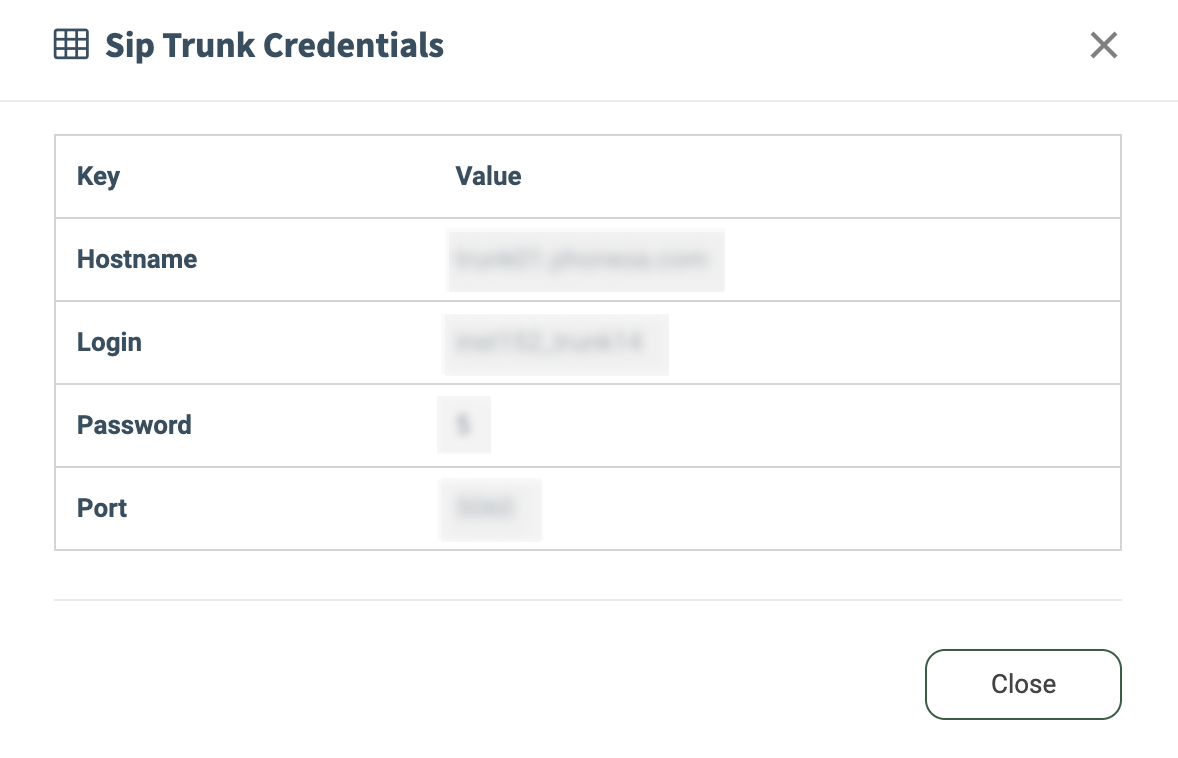
To view the connection settings, click the “Show Credentials” button in the “Actions” column, and the following data will appear in the “Sip Trunk Credentials” pop-up window:
- Key: The name of the available values (Hostname, Login, Password, Port, Authorized IP).
- Value: The value of the corresponding field.
Click the “Close” button to close the ongoing pop-up window.
Note: The set of Key field values depends on the set connection type.
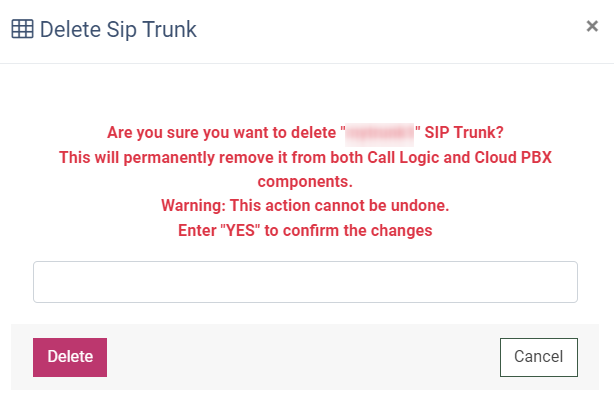
To delete the SIP Trunk from the list, click the “Delete” button in the “Actions” column. Confirm the deletion operation by entering the “Yes” value in the field of the “Delete Sip Trunk” pop-up window and clicking the “Delete” button to complete the action.
The “Trunk groups” tab
The “Trunk groups” tab allows you to create a SIP Trunks group for load balancing. Trunk groups allow the distribution of outgoing calls among several servers of the client. For example, the client has several agents who are placed in call centers that are located in different cities. To group the calls and distribute them evenly between agents of those two call centers, the SIP Trunk group can be used.
A trunk group combines several trunks through which you can make outgoing calls. One trunk group cannot have more than five trunks at the same time.

You can narrow down the search results by using the following filters:
- ID: Enter the unique identification number of the SIP Trunk group.
- Group name: Enter the name of the SIP Trunk group.
- Call strategy: Select the related call strategy (Ring all, Linear, Round Robin).
- Status: Select the ongoing status of the SIP Trunk group (Active, Disabled).
The Trunk Groups list contains the following information:
- ID: The unique identification number of the SIP Trunk group.
- Group name: The name of the SIP Trunk group.
- Call strategy: The selected call strategy (Ring all, Linear, Round Robin).
- Trunks: The list of SIP Trunks in this group. To view the list of all SIP Trunks attached to the group, click the down arrow button.
- Status: The ongoing status for the SIP Trunk group (Active, Disabled).
- Created: The date and time of the SIP Trunk group creation.
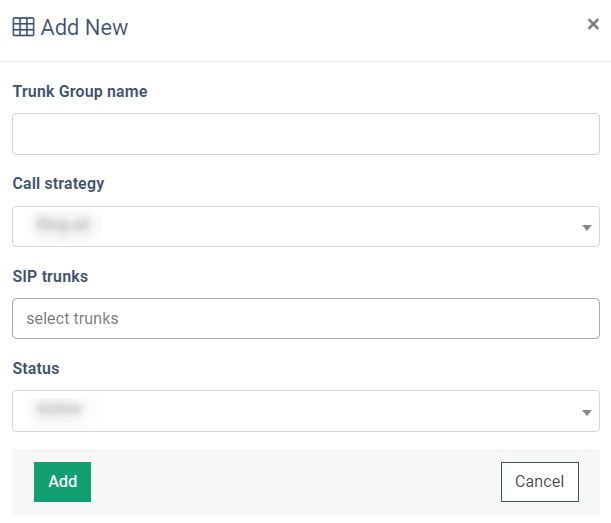
To create a new SIP Trunk group, click the “Add New Record” button and fill in the following fields in the “Add New” pop-up window:
- Trunk Group name: Enter the name of a new trunk group.
- Call strategy: Select the call strategy for the SIP Trunk group (Ring all, Linear, Round Robin).
- If the “Ring all” strategy is selected, the call will be initiated simultaneously to all Trunks in the group. The call will go on until one of the Trunks answers the call or the timeout expires.
- If the “Linear” strategy is selected, the call will be initiated to each Trunk in turn during the timeout until one of the Trunks picks up the phone or the number of Trunks in the list ends.
- If the “Round Robin” strategy is selected, the strategy for call distribution gives an equal opportunity to pick up the call to every operator attached to the queue, similar to the “Linear”.
- SIP trunks: Select the related SIP Trunks.
- Status: Select the ongoing status of the SIP Trunk group (Active, Disabled).
Click the “Add” button to complete the action.
Note: Several Trunks can be placed on one server. One particular Trunk can be registered only on one client-server. You cannot register a particular Trunk on two or more servers.
To change the group’s settings, click the “Edit” button in the “Actions” column and change the following SIP Trunk group settings in the “Edit Group” pop-up window:
- Trunk Group name: Enter the new name of a trunk group.
- Call strategy: Change the call strategy for the SIP Trunk group (Ring all, Linear, Round Robin).
- SIP trunks: Change the list of the related SIP Trunks.
- Status: Change the ongoing status of the SIP Trunk group (Active, Disabled).
Click the “Save” button to complete the changes.

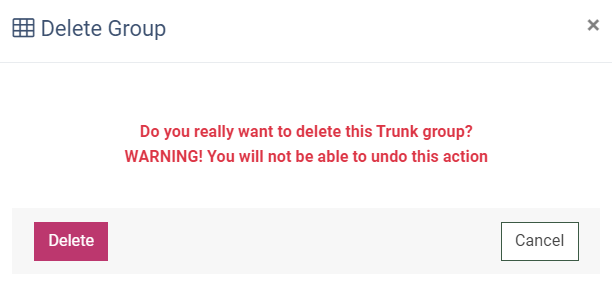
To delete the SIP Trunk group from the list, click the “Delete” button in the “Actions” column. Confirm the deletion operation by clicking the “Delete” button in the “Delete Group” pop-up window.
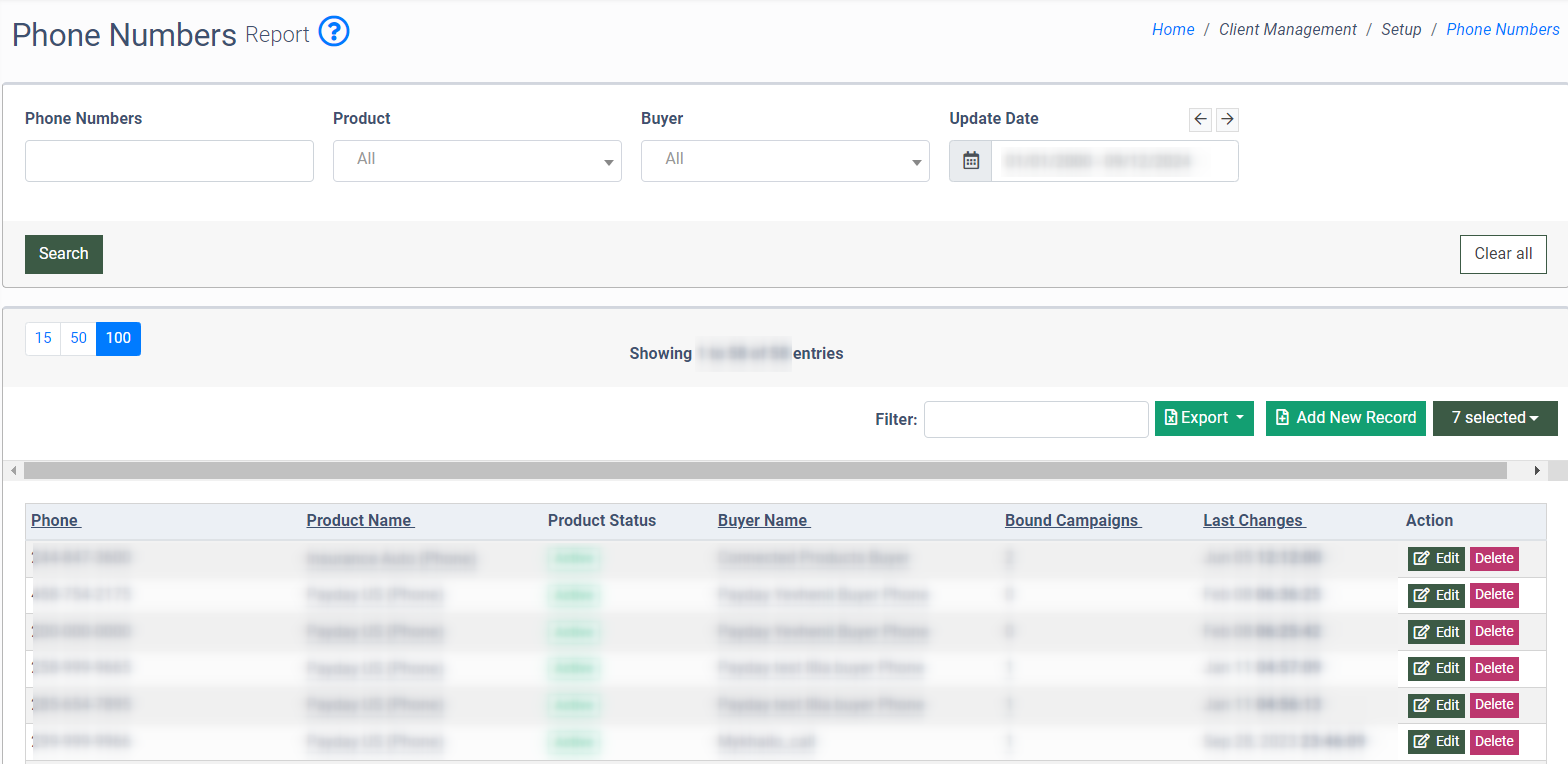
How to Manage Phone Numbers Linked to Trunks
You can manage phone numbers linked to trunks in the section where the Buyers’ Phone Numbers are stored.
To view the list of these phone numbers, go to the Client Management > Setup > Phone Numbers section.
Read more about the Phone Numbers section in the following Knowledge Base article.
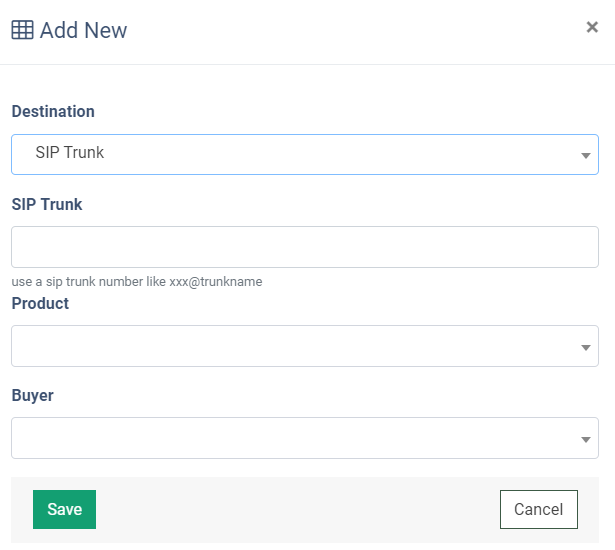
To add a new number, click the “Add New Record” button and fill in the following fields in the “Add New” pop-up window:
- Destination: Select the type of phone number according to the destination (External Phone Number, SIP Trunk).
- If the “External Phone Number” option is selected, enter the external phone number in the “External Phone Number” field. Note: You should use a valid international 11-digit phone number
- If the “SIP Trunk” option is selected, enter the SIP trunk number (example: xxx@trunkname, where “trunkname” is the name of the Trunk created on the System Management > General > SIP Trunking section) in the “SIP Trunk” field. The SIP trunk number consists of an active buyer phone number and the Trunk name.
- Product: Select the related Product.
- Buyer: Select the related Buyer.
Click the “Save” button to complete the action.