Use the Verification History Service to check whether a lead has already been verified in another Phonexa instance. Instead of performing a new verification, the system can reuse an existing valid verification record, helping reduce duplicate verification efforts, lower operational costs, and improve lead processing efficiency.
You will need to create API keys for system users who work with this service. The “API Lead for Verification” subtab allows you to create, view, and manage the API key credentials used by the Verification History Service. Read more in the Knowledge Base article.
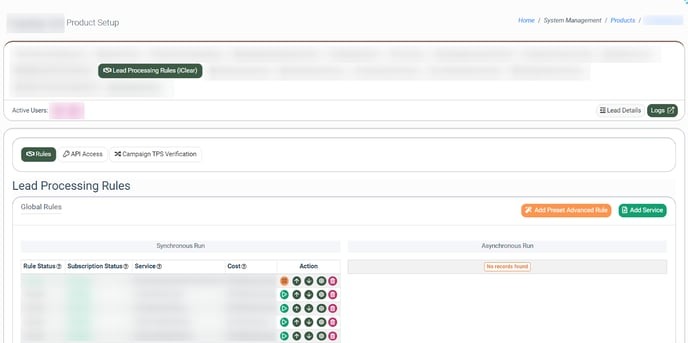
To enable this service, go to the Fraud and Anomaly > iClear > Lead Processing Rules section and select a Product from the drop-down list. Note: This service is available only on demand.

Once you select the Product, you’ll be automatically redirected to the Lead Processing Rules (iClear) sub-tab. You may also get there by selecting the System Management > Products section in the menu and clicking the “Settings” button for the corresponding product (Lead Processing Rules (iClear) sub-tab).
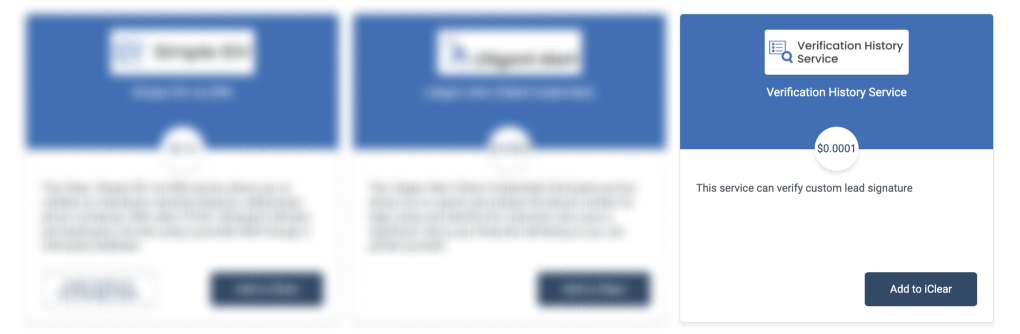
To configure this service, click the “Add Service” button in the Global Rules block. Navigate to the “Verification History Service” block and click the “Add to iClear” button.
Fill in the following fields:
- Execution Type:
- Select the "Synchronous" option to wait for the service outcome before processing a lead. This execution type is recommended for real-time lead filtration based on the service status.
- Select the "Asynchronous" option to make a simultaneous request and process a lead without waiting for the service outcome. This execution type is recommended for analytical purposes, not real-time lead filtration based on the service status.
- Select the “On-Demand” option to enable lead filtration when the “% of lead to lookup” is set as 0 (null).
- % of leads lookup: Set the percentage of leads to be checked through this service. Note: This field is available only for Synchronous and Asynchronous Execution types.
- Combined Rejection Logic: Select the rejection strategy for the rule (Reject if ANY check fails / Reject only if BOTH checks fail). Note: This setting is applied when both “Enable Signature Validation” and “Enable Local SMS Verification History” validation checks below are enabled.
- Enable Signature Validation: Select the option (Yes / No) to enable or disable the signature validation.
- Signature JSON format: Enter the signature JSON format, using the available placeholders below. This field determines the fields that you would like to hash, check, and store for verification. For example, {"email": "{%productField_email%}", "homePhone": "{%productField_homePhone%}", "ssn": "{%productField_ssn%}", "bankAccountNumber": "{%productField_bankAccountNumber%}"}
Note: To ensure successful lead verification check-up across multiple client instances, make sure that the exact same signature JSON format and logic are configured on all participating instances. If the formats do not match, the system will not be able to correctly hash and cross-reference the verification history in Phonexa's database. - Reject if Signature expired or missing: Set up the lead reject condition (Yes / No).
- Signature Lifetime (seconds): Enter the amount of time in seconds to determine how long ago the verification was. If the record was created earlier than the time specified in this field, the reject will be executed if the Reject if Signature expired or missing = Yes.
- Enable Local SMS Verification History: Select the option (Yes / No) to enable or disable the Local SMS Verification History.
- Select a field to retrieve Phone number: Select the field for the system to retrieve the lead phone number.
- Reject if record expired: Set up the lead reject condition if the record has expired (Yes / No).
- Additional SMS Code match: Select the (Yes / No) option to enable or disable the additional SMS code match. Set this option to Yes to have the system verify that the SMS code provided with the lead (via tPar) matches the code stored in the Phonexa database.
- tPar key for SMS code: Enter the tPar key for SMS code that contains the SMS verification code in the lead post. For example, if the lead is posted with tPar[verificationCode]=12345, you enter verificationCode in this field. Note: This field appears only when "Additional SMS Code match" = Yes.
The logic works as follows: When a lead is submitted, the system looks for a verified phone number record in the Phonexa Database for the corresponding Product.
If Additional SMS Code Match is enabled, the SMS code received in the specified tPar parameter is validated against the code stored in the database. If the codes do not match, and Reject if SMS Mismatch is enabled, the lead will not pass verification and will be rejected. - Reject if SMS mismatch: Set up the lead reject condition if the SMS code mismatch occurs (Yes / No).
The “Additional Run Settings” configuration block allows you to configure more options to determine at which stage you would prefer to run the service.
- Service run time: Select whether you would prefer to run the service before or after the leads are filtered out (After filtration / Before filtration).
Note: Please be aware that selecting this option may impact your invoice. Once this option is selected and no campaigns remain for the service to run, there will be no charges incurred. - Run service on (PingPost products only): Select one of the options to determine at which stage you would prefer to run the service for the Ping Post products (Ping / Post / Ping and Post).
- Run service on silent ping: Select “Yes” if you would like to run the service during the silent ping stage. Select “No” to exclude this option.
- No response service action: (The system runs a lookup service. In case the service did not get any response, you can select the preferred action.)
- Select the “Continue Processing” option if you want to continue processing leads when the service does not respond.
- Select the “Reject the Lead” option if you want to reject the lead when the service does not respond.
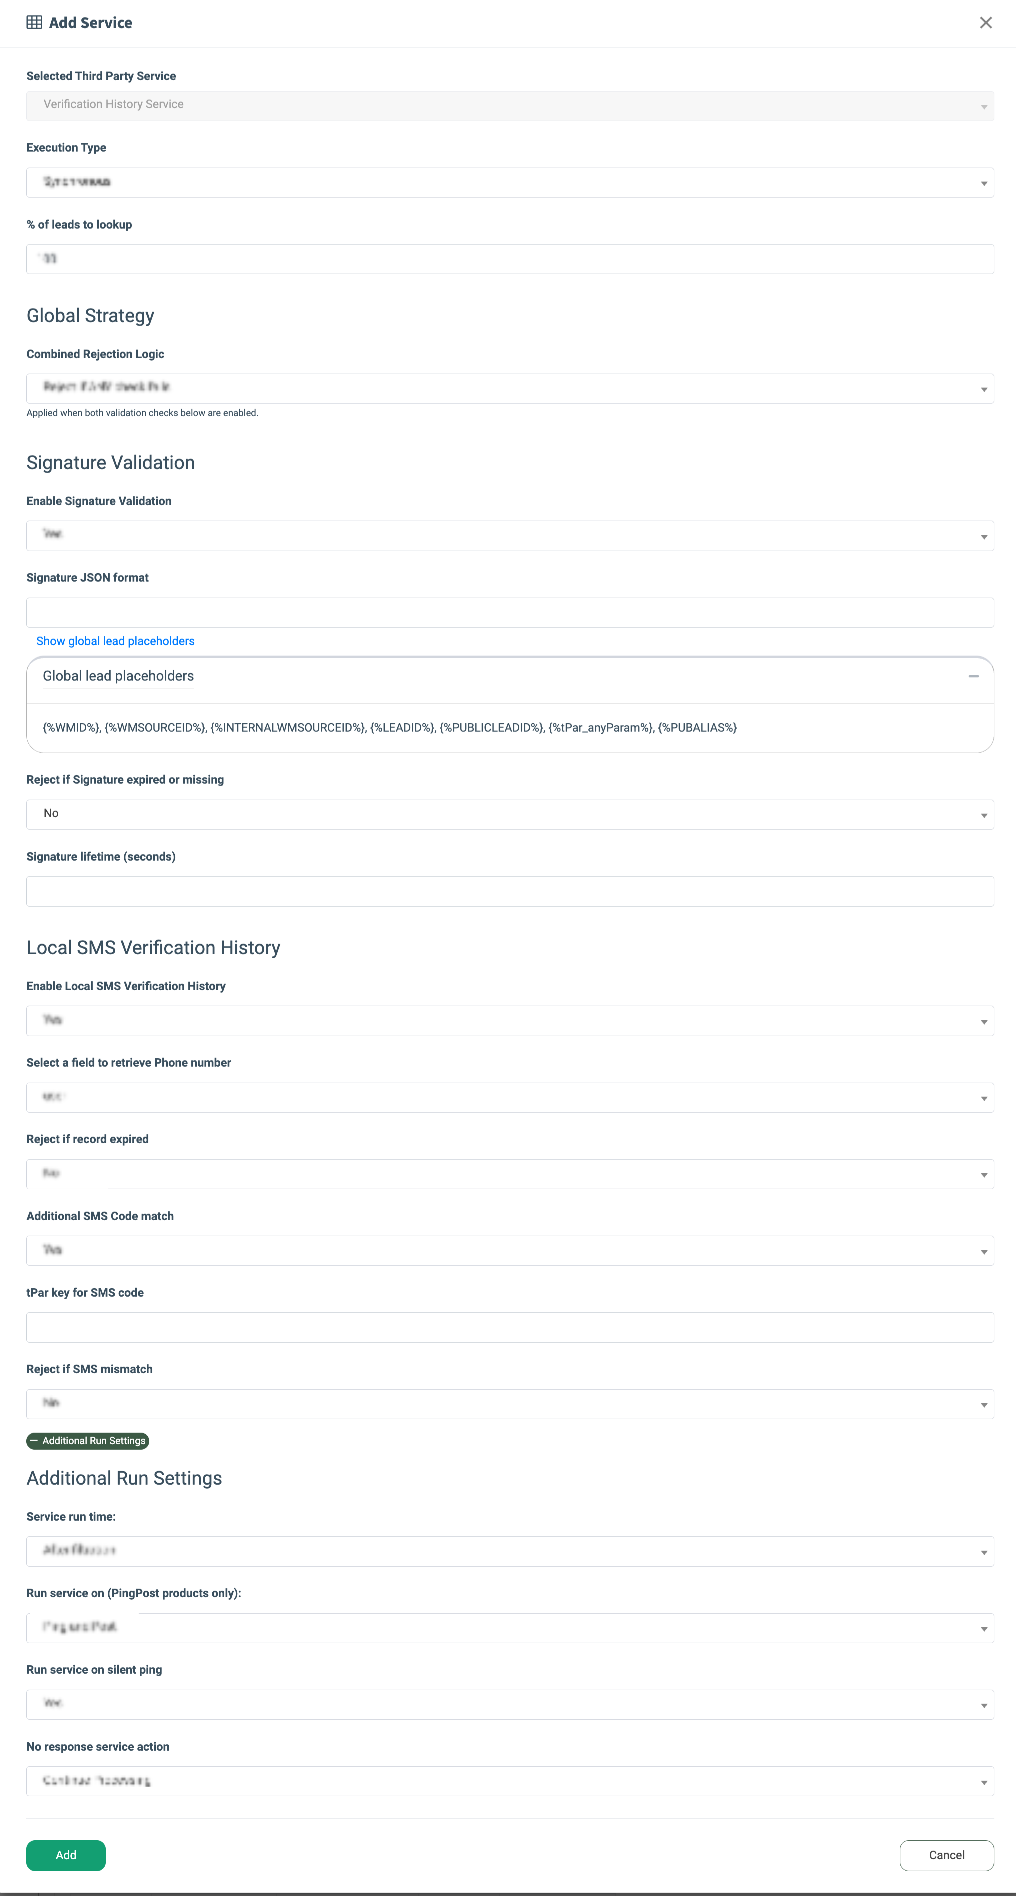
Click the “Add” button to confirm.
Then you will need to create and set up the Advanced rule for the lead verification status. Follow the instructions below.
To set up the lead verification rule, go to the System Management > Products section. Click the “Settings” button next to the corresponding Product, and select the “Lead Processing Rules (iClear)” tab.
 In the “Advanced Rules” block, click the “Create Rule” button.
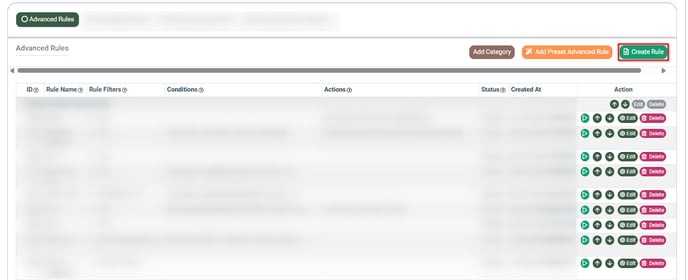 Fill in the required fields in the pop-up window:
- Rule Name: Enter the name of the rule.
- Publisher: Select the Publisher for which you want the rule to apply. Note: Leave empty to apply the rule to all Publishers.
- Publisher Channel: Select the Publisher Channel for which you want the rule to apply. Note: Leave empty to apply the rule to all Publisher Channels.
- Publisher Source: Select the Publisher Source for which you want the rule to apply. Note: Leave empty to apply the rule to all Publisher Sources.
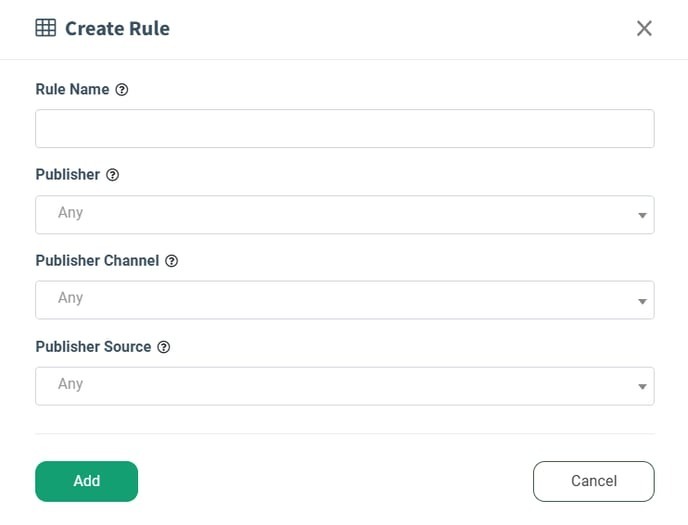
Click the “Add” button to finish.
To set up the rule, click the “Edit” button next to it.
In the “General” tab, select the “Active” option in the “Status” field, and select the “FORM” option in the “Select the Method (POST/FORM)” field.
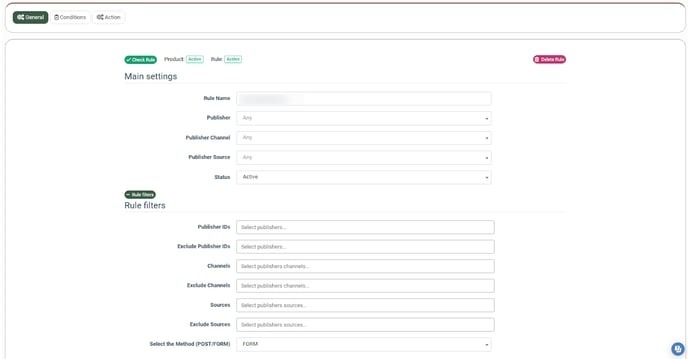
Click the “Save” button to apply changes.
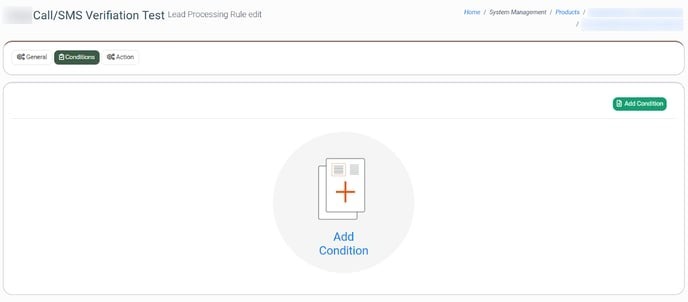
Select the “Conditions” tab, and click the “Add Condition” button. These conditions allow you to specify leads for SMS Verification.
For example, if you would like to set up SMS Verification for all Payday US leads, fill in the required fields in a pop-up window:
- Category: Select the “Generate Random Number (0-1000)” option.
- Condition: Select the “More or equal” option.
- Value: Enter the “0” value.
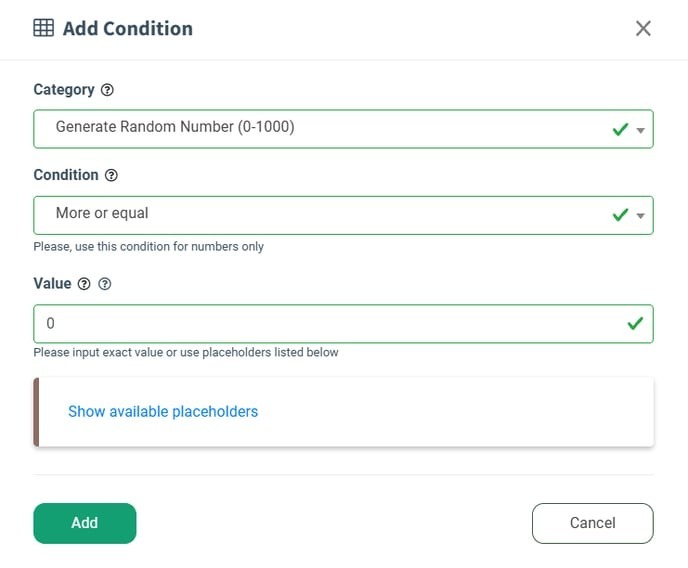
Click the “Add” button to finish.
Note: You can select other options to customize these conditions that suit your use case.
In the “Action” tab, you should add two separate actions that will be performed when the conditions from the previous step are met. Note: To access the “Pause Lead for Verification” action, you must contact your manager to have this option enabled.
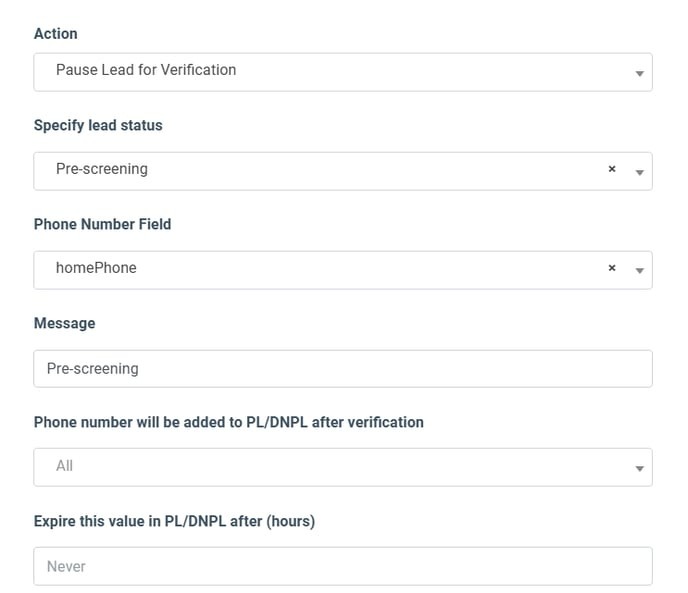
Action 1 “Pause Lead for Verification”: Click the “Add Action” button, and fill in the required fields in a pop-up window:
- Action: Select the “Pause Lead for Verification” option.
- Specify lead status: Select the “Pre-screening” option.
- Phone Number Field: Specify the phone number field name from the form to which the verification SMS would be sent. For example, select the “homePhone” option.
- Message: Enter the error text that will be displayed if the lead is set to the Screening status. For example, enter the “Pre-Screening” message.
Leave all other fields in this action with their default settings, and click the “Add” button to finish.
Action 2 “Add Lead Tag”: Click the “Add Action” button, and fill in the required fields in a pop-up window:
- Action: Select the “Lead Tags” option.
- Action Type: Select the “Add Tags” option.
- Lead Tags: Select the lead tag that will identify leads undergoing verification in your reports. Read more about Lead Tags in the Knowledge Base article.
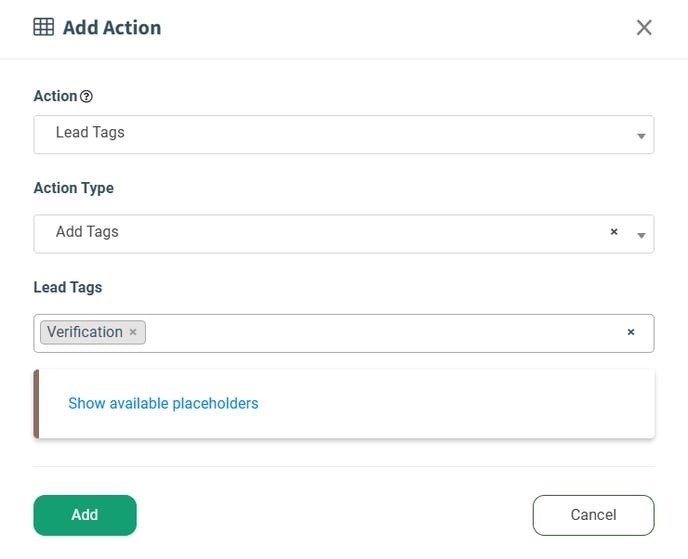
Click the “Add” button to finish.