Buyer List
Learn how to edit invoice settings, assign managers to buyers, and manage advanced Buyer’s settings in the Buyer List section.
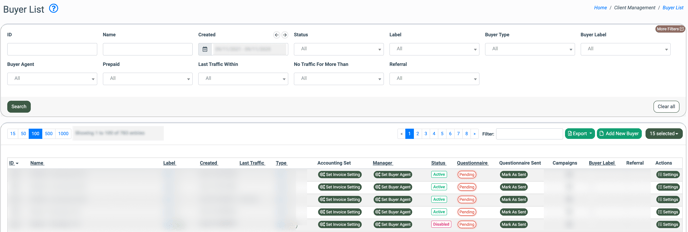
The "Buyer List" section contains the list of all buyers in the system and provides an overview of a buyer’s configuration settings. You can edit the invoice settings, assign a manager to a Buyer, and configure advanced Buyer settings.
To view the list, go to the Client Management > Buyer List.

You can narrow down the search results by using the following filters:
- ID: Enter the unique identification number of the Buyer.
- Name: Enter the name of the Buyer.
- Created: Select the specific date when the Buyer`s profile was created in the system.
- Status: Select the status of the Buyer (Active, Deleted, Disabled).
- Label: Select the system component in which the Buyer is registered.
- Buyer Type: Select the type assigned for the Buyer.
- Buyer Label: Select the special label attached to the Buyer`s profile.
- Buyer Agent: Select the name of the Buyer Agent.
- Prepaid: Select the special prepaid option for the work scheme of the Buyer (No, Yes).
- Last Traffic Within: Select the timeframe for the last traffic received by the Buyer (Week / Two Weeks / Month / Three Months / Six Months / Year).
- No Traffic For More Than: Select the timeframe during which there was no traffic coming to the Buyer (Week / Two Weeks / Month / Three Months / Six Months / Year).
- Referral: Select the referral user.
Click the “Search” button to generate a list.
The "Buyer List" page contains the following information:
- ID: The unique identification number of the Buyer.
- Name: The name of the Buyer.
- Label: The system component, which the Buyer is registered in (to change Buyer Label, click the icon of the Label in the record and select the new Label from the drop-down list in the “Change Label” pop-up window).
- Created: The specific date and time when the Buyer’s profile was created in the system.
- Last Traffic: The date and time when the Buyer last received the traffic.
- Type: The type assigned for the Buyer (to change Buyer Type, click the icon of the Type in the record and select the new Buyer Type from the drop-down list in the “Change Label” pop-up window).
- Accounting Set: Displays the Buyer’s invoice frequency and allows you to edit the invoice settings. Click the “Set Invoice Settings” button to open the “Accounting Settings” tab in the Buyer settings.
- Manager: Buyer’s manager (to assign a manager for the Buyer, click the “Set Buyer Agent” button and select the Personal Manager from the drop-down list).
- Status: The status of the Buyer (Active, Deleted, Disabled).
- Integration: The list of the enabled Buyer’s integrations.
- Questionnaire: Shows the progress of the Buyer’s questionnaire completion.
- Questionnaire Sent: The status of the questionnaire mailing.
- Balance: The current Buyer's balance.
- Campaigns: Click the icon in the record to open the list of the Buyer’s Campaigns.
- Buyer Label: The special label added to the Buyer’s profile.
- Referral: The referral user of the Buyer.
- Actions: Allows you to configure advanced Buyer’s settings. To open the Buyer’s Profile section, click the “Settings” button.
To send the Questionnaire to the Buyer, click the “Mark As Sent” button in the “Questionnaire” column, and fill in the following fields in the “Mark questionnaire as sent to buyer” pop-up window:
- Sent at: The date of email sending.
- Due date: The due date of the questionnaire.
- Email list: The list of emails for the questionnaire mailing.
- Email text: The text of the email that will be sent with the questionnaire.
- Send notification email to buyer: Check the box if you would like to send the email notification.
 Click the “Add” button to complete the action.
To create a new Buyer, click the “Add New Buyer” button and fill in the fields in the pop-up window. Read more about how to add a new Buyer to the system in the Knowledge Base article.