The "Phone/IVR" tab allows you to set up which phone number or IVR a lead will be transferred to if it is purchased by this Campaign. Call Logic supports two Campaign transfer types: Direct Transfer to Phone and Custom IVR.
To manage the settings, go to the Client Management > Setup > Campaigns section, select the Campaign, click the “Configure” button in the “Actions” column, and select the “Phone/IVR” tab.
Transfer Rule
Transfer Settings
.png?hsLang=en)
Transfer Rule
The "Transfer Rule" tab contains the following fields:
- Transfer type: Select the transfer type that determines where purchased leads are transferred.
- Select the Direct Transfer type for calls to be forwarded to the phone number specified in the Phone field.
- Select the Custom IVR type for calls to be transferred to the custom IVR that may contain additional questions or perform additional validation.
- Phone (for Direct Transfer): Select the phone number you want to transfer the purchased leads to.
Note: If you select the non-verified phone number, the system will require verification via text message. You are provided three attempts to enter the right code within 5 minutes. Otherwise, you will need to ask for a new code to be sent or provided via the call. - Name (for Custom IVR): Enter the name of the Custom IVR.
- Language (for Custom IVR): Select the language for data reduction.
- Recognition Type (for Custom IVR): Select the IVR recognition type (Keypad or Voice Recognition + Keypad).
- Numerical Data Redaction (for Direct Transfer): Call Logic users who utilize the Call Recording feature can set up numerical data reduction, such as phone number, ZIP code, credit card number, etc., from the audio recording of the conversation:
- Select the “Use Product Setting” option to apply the product settings the campaign is assigned to.
- Select the “Enabled” option to enable numerical data reduction for this campaign, regardless of the product settings.
- Select the “Disabled” option to disable numerical data reduction for this campaign, regardless of the product settings.
- Keyword Search (for Direct Transfer): Call Logic users who utilize the Call Recording feature can set up a keyword search that allows you to search for phrases or keywords in audio recordings:
- Select the “Use Product Setting” option to apply the product settings the campaign is assigned to.
- Select the “Enabled” option to enable keyword search for this campaign, regardless of the product settings.
- Select the “Disabled” option to disable keyword search for this campaign, regardless of the product settings.
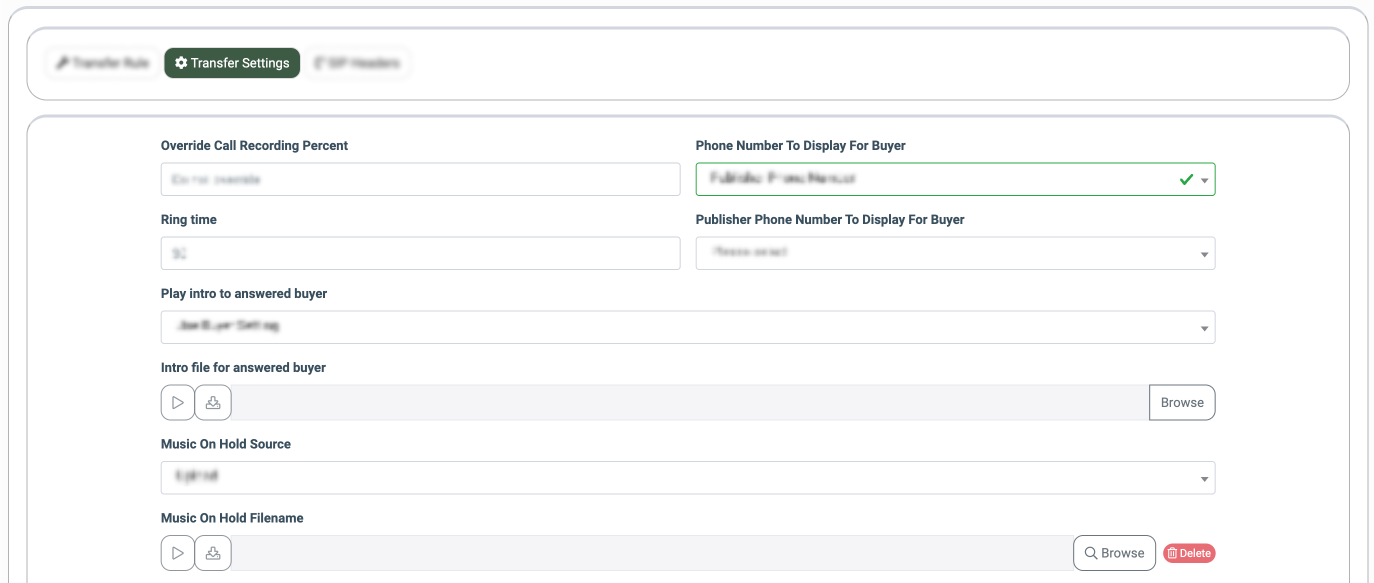
The "Transfer Settings" tab contains the following fields:
- Override Call Recording Percent: Set the percentage of the phone calls that will be recorded for this campaign.
- Phone Number To Display For Buyer: Select the “Consumer Phone Number” or “Publisher Phone Number” option to display the corresponding phone number when the call is transferred to the Buyer.
- Ring time: Enter how long the system should wait for a Buyer’s agent to pick up the incoming call. The default value is set to 30 seconds.
- Play intro to answered buyer: This field implements the ability to play audio to the buyer before connecting to the lead.
- Select the “Use Buyer Settings” option to apply specific Buyer settings.
- Select the “No” option not to play the intro.
- Select the “Yes” option to upload an audio file for the intro. Upload is available with the “Intro file for answered buyer" field that appears below.
- Intro file for answered buyer: Select the introduction file for the answered Buyer.
- Music On Hold Source: Select the source of the music on hold (Upload / Media Library).
- Music On Hold Filename: Select the file for the music on hold.
- Media Library File: Select the media library file for the music on hold.
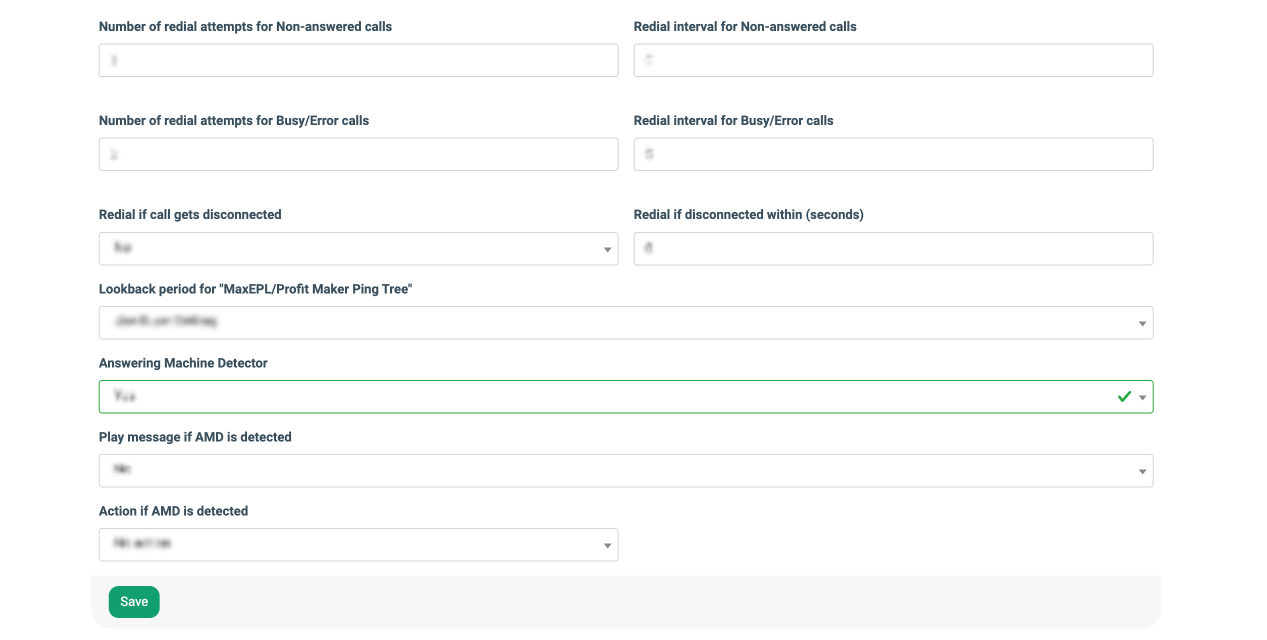
- Number of redial attempts for Non-answered calls: Enter the number of attempts the system will make to reach the Buyer if there is no response during the “Ring Time” period.
- Redial interval for Non-answered calls: Enter the duration of time between call attempts.
- Number of redial attempts for Busy/Error calls: Enter the number of attempts the system will make to reach a Buyer if a “Busy” signal was received (the call was dropped/the line is busy).
- Redial interval for Busy/Error calls: Enter the duration of time between call attempts if the system receives a “Busy” signal (the call was dropped/the line is busy).
- Redial if call gets disconnected: Select the “Yes” value to enable the feature that allows you to redial the same Buyer’s phone number (the “Phone” field) if the call duration was less than the specified value in the “Call duration less than” field.
- Redial if disconnected within (seconds): Enter the call duration time (1 to 3 seconds). If the current call duration is less than the specified value, the call will be redialed to the same Buyer’s phone number (the “Phone” field).
- Lookback period for "MaxEPL/Profit Maker Ping Tree": Select the lookback period for the "MaxEPL/Profit Maker Ping Tree" strategy application (Use Buyer Setting, Last 7 Days, Previous 7 Days, Same Day Last Month). The “Max EPL” strategy allows you to reach your maximum earnings per call. Calls are distributed to the Buyer who has the highest expected price. The “Profit Maker” strategy allows you to achieve overall maximum profitability for the campaigns with the least remaining distribution time. The Profit Maker compares a Campaign’s Highest Expected Price with the available caps and hours remaining to sell. Note that the “Use Buyer Setting” option will be applied by default. Read more about the setting application on the Buyer’s level in the following Knowledge Base article. Read more about the strategy workflow in the following Knowledge Base article. The example of the date consideration:
- For the “Last 7 Days” option: if today's date is 02/06/2026, the period for consideration is from 01/30/2026 to 02/06/2026 (the range is from 7 days ago through today).
- For the “Previous 7 Days” option: if today’s date is 02/06/2026, the period for consideration is from 01/23/2026 to 01/29/2026 (the range is from 14 days ago through 8 days ago).
- For the “Same Day Last Month” option: if today's date is 02/06/2026, the date consideration is 01/09/2026 (the date that was 4 weeks before today’s date).
- Answering Machine Detector: Select the “Yes” option to enable answering machine detection. The Answering Machine Detection r (AMD) is a telephony classification mechanism that analyzes post-answer audio to determine whether a caller was answered by a human or an answering machine/voicemail. By enabling this option, the system automatically detects machine-answered (non-human) calls transferred to the Buyer.
- Play message if AMD is detected: Select the “Yes” option to play the audio file message if the answering machine /voicemail is detected.
- AMD audio file message: Upload the audio file that will be played in case of the answering machine /voicemail detection.
- Action if AMD is detected: Select the action that will be performed in case of the answering machine/voicemail detection (No action, Buyer disconnect, Transfer, Set call timeout).
- “No action” - Continues call processing normally - no additional action will be performed.
- “Buyer disconnect” - Ends the call - the call will be disconnected from the Buyer (hangup) and finalized.
- “Transfer” - Routes the call to the specified destination - the call will be transferred to the selected Campaign.
- Campaign: Select the particular Campaign to which the call will be transferred.
- “Set call timeout” - Applies a timeout before ending the call - the call will be disconnected from the Buyer (hangup) and finalized when the set duration of call ringing time (the Buyer is found in the system, the call is redirected to the Buyer, but the Buyer has not picked up the phone yet) reaches the set timeout.
- Set call timeout: Enter the duration of call ringing time (the Buyer is found in the system, the call is redirected to the Buyer, but the Buyer has not picked up the phone yet), after which the call will be finalized. The duration range is from 6 to 300 seconds.
Click the “Save” button to apply changes.
Use Case
A publisher generates an inbound call and routes it to a Buyer. When the Buyer answers, the system uses Answering Machine Detection (AMD) to determine whether the call has been answered by a live person or by the Buyer's voicemail/answering machine.
If a voicemail or answering machine is detected, the system automatically follows the action configured in the “Action if AMD is detected” setting. Depending on the selected option, the call can continue processing, be disconnected, transferred to another campaign, or remain connected until the configured timeout is reached.
This feature helps prevent calls from being delivered to voicemail systems, improves call routing efficiency, and ensures inbound traffic is handled according to the Buyer's requirements.
The SIP Headers feature allows you to transfer different kinds of data between the Phonexa telephony server and the Buyer’s telephony server using the SIP protocol.
Read more about SIP Headers in the Knowledge Base article.