To access, go to the List Management > Contact Lists section.
.png?hsLang=en)
You can narrow down the search results by using the following filters:
- ID: Enter the identification number of the Contact List.
- Name: The name of the Contact list.
- Folder: Select the folder from the drop-down list.
- Tag: Select the tag.
- Status: Select the status of the Contact list (Draft, Ready To Send, In Progress, Deleted).
The contact lists block contains the following information:
- ID: The unique identification number of the Contact list.
- Name of the List: The name of the Contact list.
- Type: The contact list type (Storage / External)
- Deduplication Method: The list deduplication method (Email / Phone / Email and Phone, None).
- Description: Contact list description.
- Last Updated: The date when the list was last updated.
- Updated By: The name of the person who updated the list.
- Last Sent: The date when the list was last sent.
- Active Emails: The total number of active emails.
- Active Phone: The total number of active phone numbers.
- Total: The total number of Contacts.
- Tags: The list tag names.
- Status: Contact list status (Draft, Ready To Send, In Progress, Deleted).
- API: The Contact list API documentation. Click the “API Documentation” button to view the API Doc Info section and download it as a .pdf file.
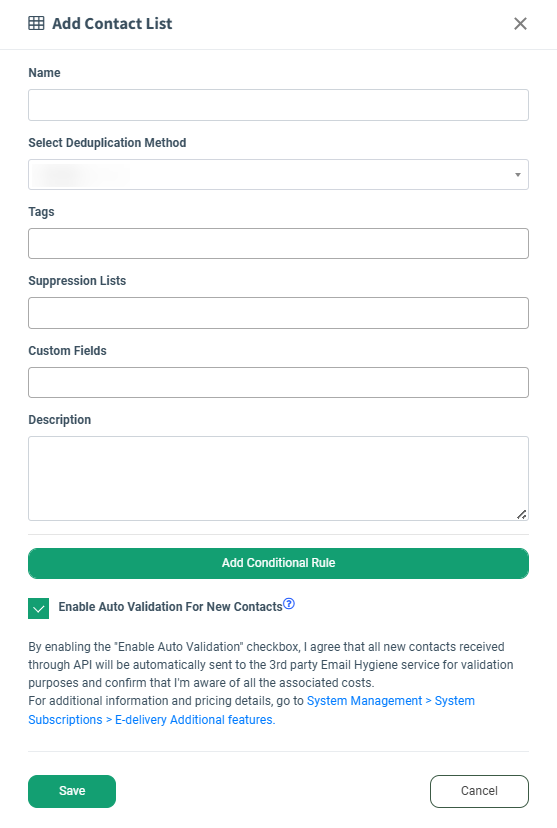
Click the “Add Contact List” button to create a new contact list and fill in the following fields in the pop-up window:
- Name: Enter the name of the contact list.
- Select Folder: Select the existing folder for the contact list.
- Create New Folder: Enter the name of a new folder.
- Select Deduplication Method: Select the list deduplication method (Email / Phone / Email and Phone).
- Custom Fields: Select the available custom field(s).
- Description: Enter the description for the contact list.
- Enable Auto Validation For New Contacts: Check the box to enable the Auto Validation feature and send all new contacts received through the API to the third-party Email Hygiene service for validation purposes.
Click the “Add Conditional Rule” to add more filters to the contact list by filling out the “Field”, “Comparison”, and “Value” fields.
Click the “Save” button to confirm.
Click the “Manage” button in the “Actions” column to be redirected to the List Management > All Contacts section. Read more about the All Contacts section in this Knowledge Base article.
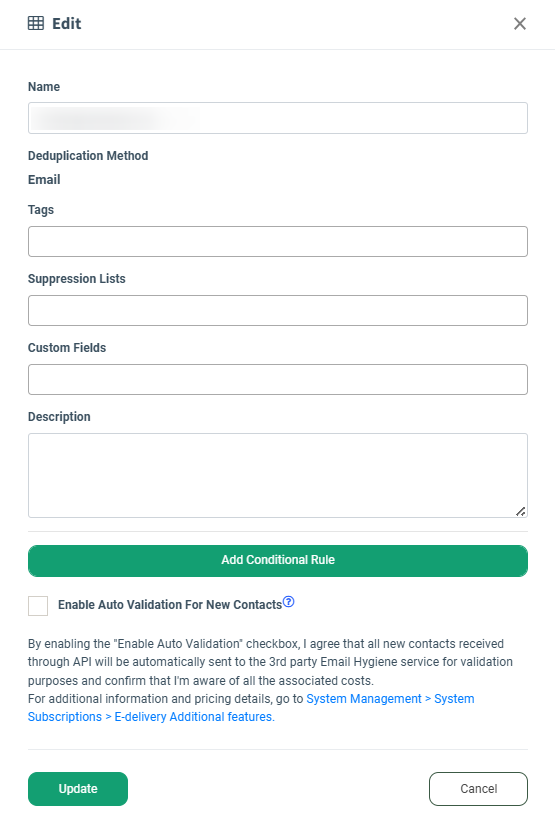
Click the “Edit” button in the “Actions” column to configure the data you have entered when adding the contact list. Make all of the necessary changes and click the “Update” button to confirm.
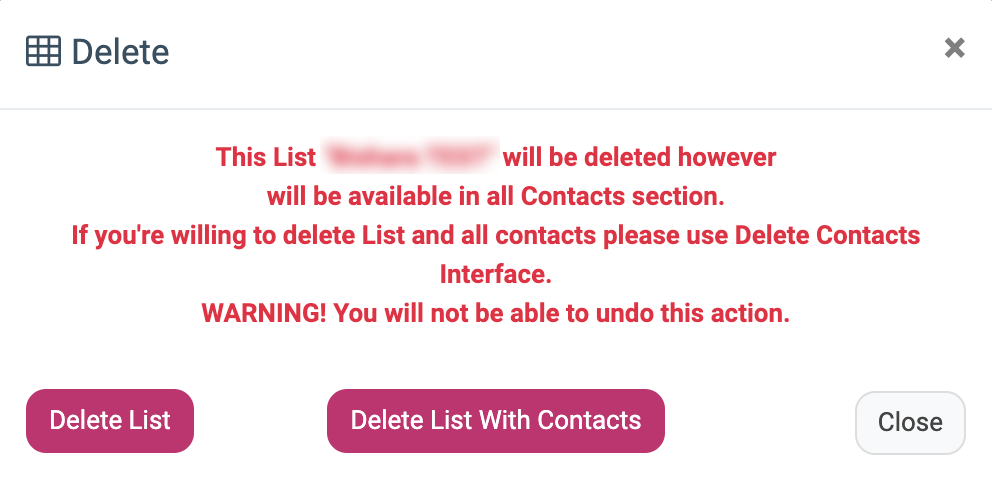
Click the “Delete” button in the “Actions” column to remove the list from the system. Click the “Delete List” to delete this list from the Contact List section (You can still find it in the All Contacts section).
Click the “Delete List With Contacts” button to delete the list from the system, including the “All Contacts” section.