Note: This feature currently works for LMS and Call Logic Products. The builder is compatible with Twig.
To access the Integration Builder, go to the Client Management > Setup > Integration Builder section.
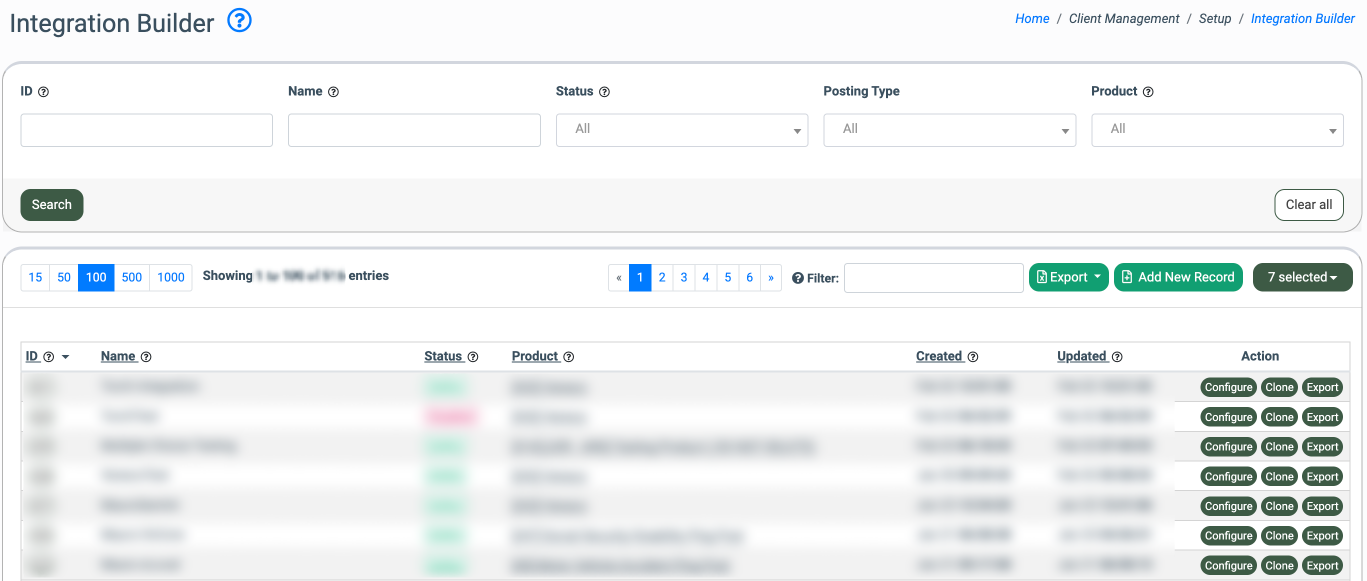
You can narrow down the search results by using the following filters:
- ID: Enter the unique identification number of the custom integration.
- Name: Enter the name of the integration.
- Status: Select the status of the integration (Active / Disabled).
- Product: Select the Product.
The Integration Builder list contains the following information:
- ID: The unique identification number of the custom integration.
- Name: The name of the integration.
- Status: The status of the integration (Active / Disabled).
- Posting Type: Select the type of leads posting (Direct Post, Ping-Post, Ping-Post Call, Smart, Smart Legs).
- Product: The name of the Product
- Created: The date and time when the integration was created.
- Updated: The date and time when the integration was last updated.
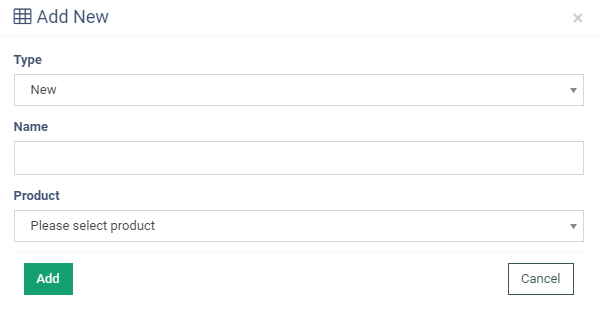
To create a new custom integration, click the “Add New Record” button and fill in the following fields in the pop-up window:
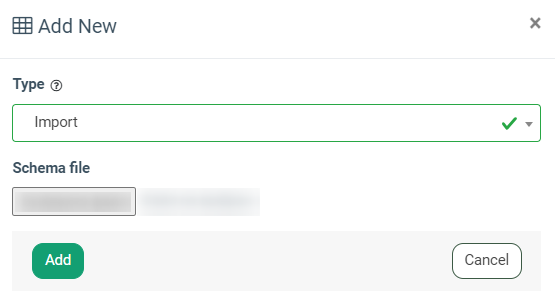
- Type: Select the type of integration (New / Import).
- Select the “New” option to create a new integration.
- Select the “Import” option to upload a file with custom integration created in Integration Builder in JSON format.
- Name: Enter the name of the integration.
- Product: Select the Product.
Click the “Add” button to create the integration.
To duplicate an existing integration, click the “Clone” button in the “Actions” column of the corresponding integration. Enter the name for the new integration in the pop-up window and click the “Clone” button to confirm.

To download the integration in JSON format, click the “Export” button in the “Actions” column of the corresponding integration.
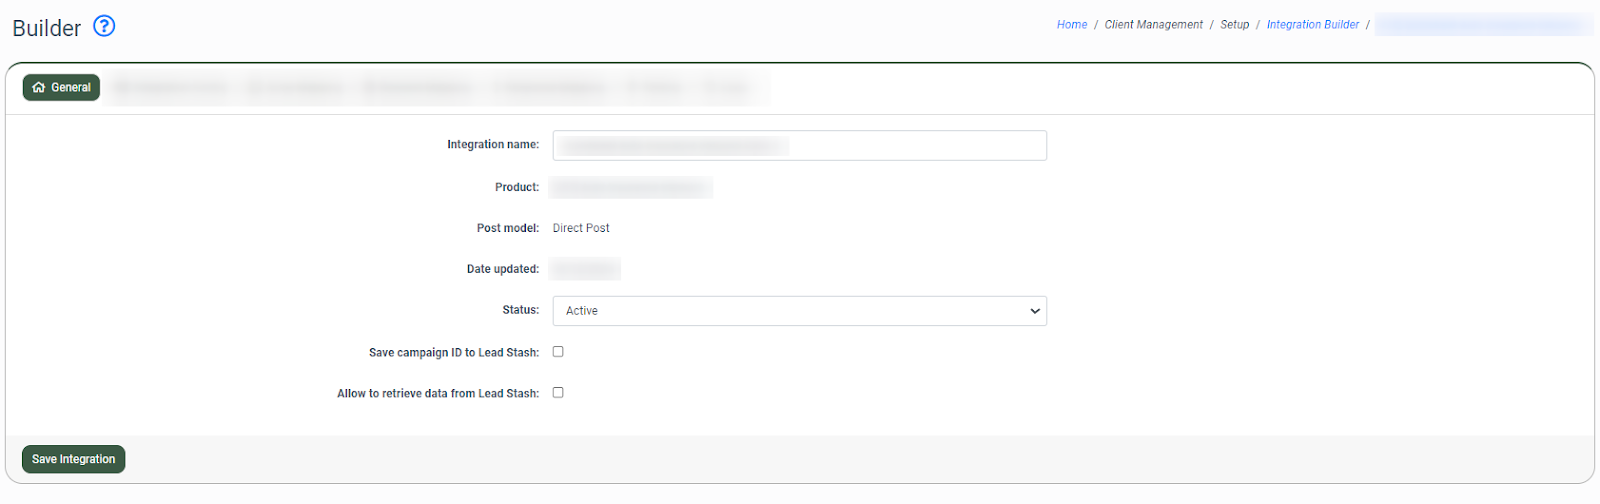
To configure the integration, click the “Configure” button in the “Actions” column of the corresponding integration, and the system will redirect you to the “Builder” setup page. Use the following tabs to configure or update the integration.
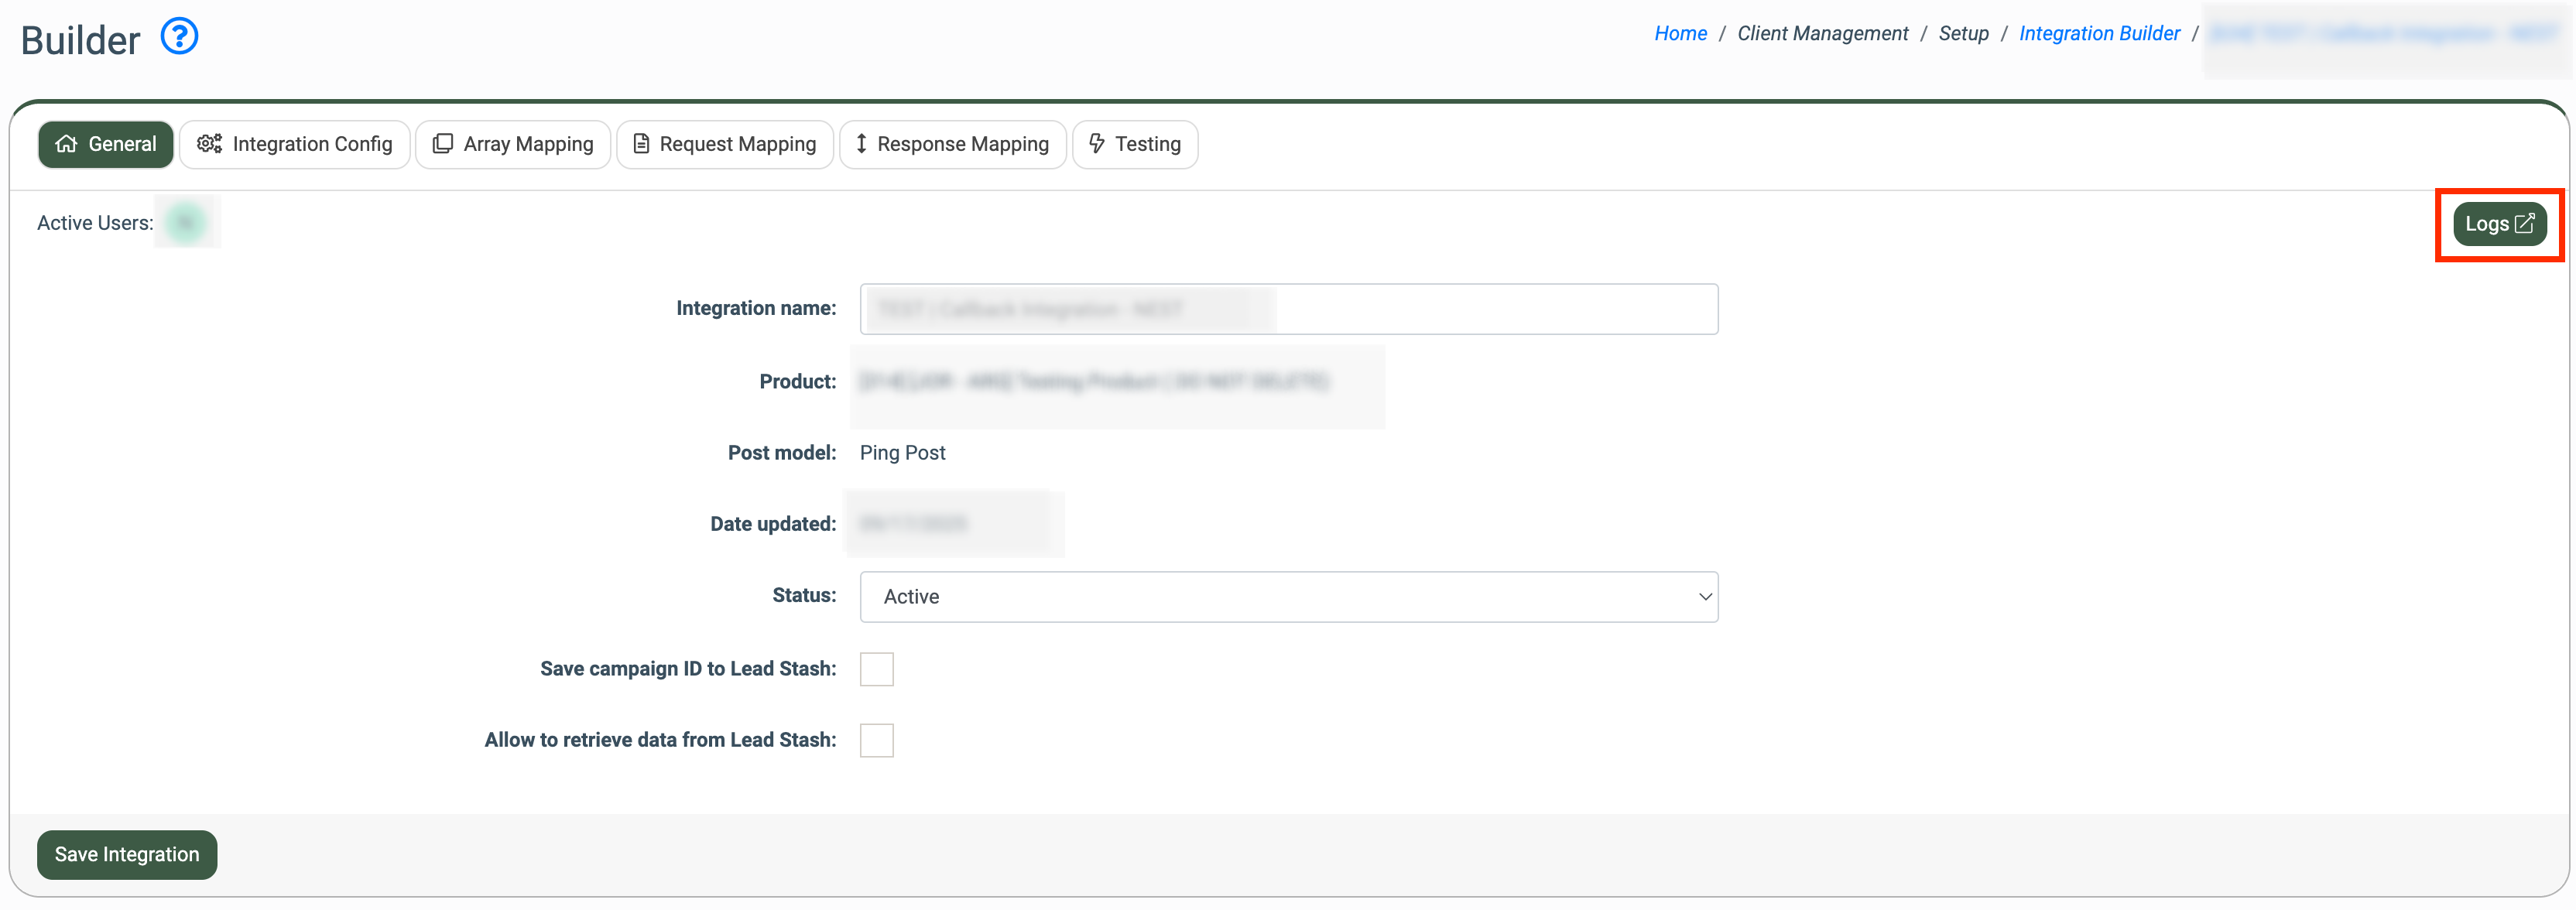
General Tab
The General tab allows you to view the general information about the integration and change its name and status.
- Integration Name: Enter the new name for the integration or leave it as it is.
- Product name: The name of the Product for which the integration was created.
- Post model: The type of the Product (i.e. direct or ping post).
- Date updated: The date and time of the last update of the integration.
- Status: The status of the integration (Active / Disabled).
- Save campaign ID to Lead Stash: Check this box to save the campaign ID to the Lead Stash (i.e. for Ping Post Calls flows).
- Allow to retrieve data from Lead Stash: Check the box to enable the possibility to pull data from the Lead Stash.
Click the “Save Integration” button to save changes.
Integration Config Tab
The Integration Config tab allows you to configure the integration parameters displayed via the “Integration” tab of the Campaign settings. For example, API credentials or other static and dynamic fields should be configured on this tab. The Integration Config tab contains the following settings:
- Ping Post Call: Switch the toggle to the “ON” position to activate the option to build integrations with the Ping Post Call functionality. The toggle enables adding a tracking pool feature to the config of the campaign as well as the duration to sell fields. The Ping Post Call feature allows you to sell a lead to an LMS Campaign. If the Ping Post Call integration is selected for the Campaign, the LMS lead can call the Buyer's Call Logic Campaign from the phone number specified in the LMS lead. There will also be a sale in the Call Logic component, which will use the same data specified in the LMS for the price in LMS.
- Smart Tree Leg: Switch the toggle to the “ON” position to activate the option to build integration with the Smart Tree Functionality. Each Buyer can return several legs to purchase a lead. On ping, the system collects all legs from buyers and then filters them by uniqueness.
- Variable Name: The name of the parameter. It should be unique and not match any existing parameter. Note: The variable name should be in camelCase.
- Label: The name of the parameter displayed on the “Integration” tab of the campaign.
- Type: Select the “String” option to set the field type as a string (allows letters, numbers, and special symbols). The “Select” option sets the field type with configurable values for selection (Value / Label).
- Required: Select the “True” option to set a required field. Select the “False” option to set a non-required field.
- To add more parameters, click the “Add new” button. After adding the fields, click “Save Integration.”
-Sep-09-2024-08-41-41-5968-AM.png?hsLang=en)
For the Call Logic integrations, there are default variables available that indicate the return call route expiration time:
- expireSeconds: The return call route expiration time in seconds.
- expireMinutes: The return call route expiration time in minutes.
- expireHours: The return call route expiration time in hours.
- expireDays: The return call route expiration time in days.
Note: The default call route expiration is set to 3 hours. If you do not configure the expiration time fields, the returned call will be routed to the same Campaign as the initial call. This follows direct Campaign routing, which bypasses most Campaign settings, including the duplication setting.

Array Mapping Tab
The “Array Mapping” tab allows you to configure the variable mapping that can be used in the Request mapping. The list contains all the variables available for the mapping based on the selected Product.
Use case: Suppose you have a solar product, and there are four options for roofShade - [NO_SHADE, A_LITTLE_SHADE, A_LOT_OF_SHADE, UNCERTAIN]. However, if the Buyer API has different values for this field - [No Shade, Some Shade, Full Sun, Uncertain], then you would need to create an array mapping because the values are different.
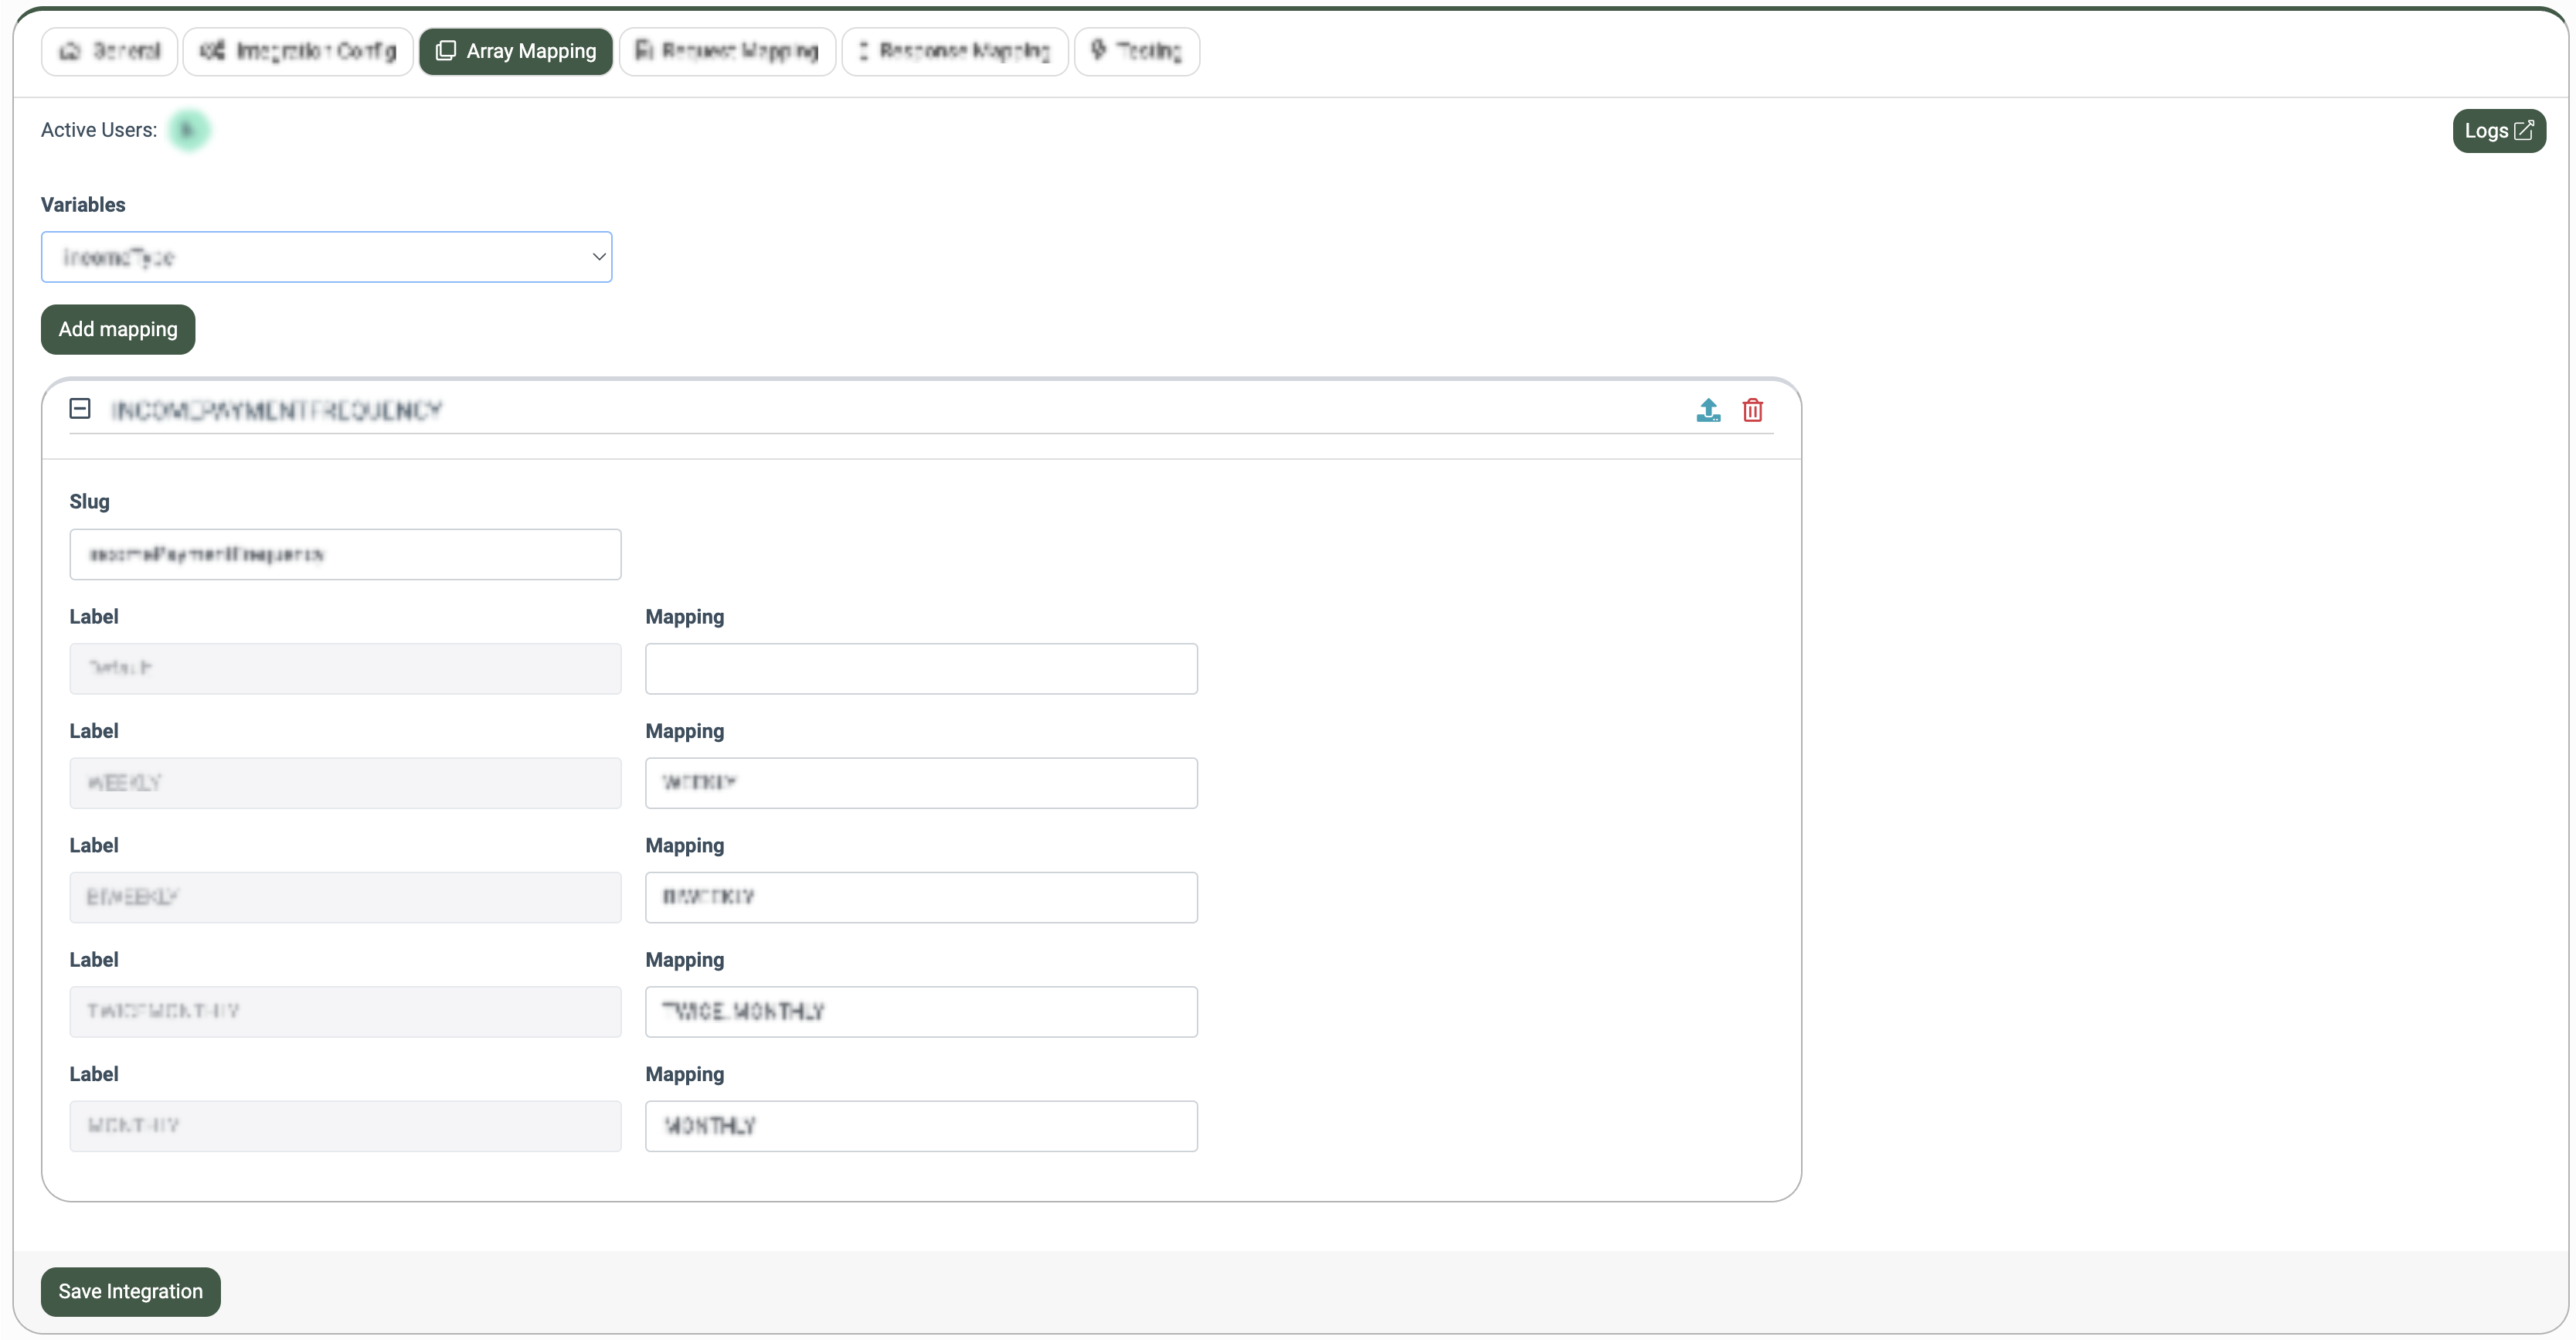
Select the variable from the drop-down list and click the “Add Mapping” button to edit the mapping for the selected variable.
Click the “+” button for the selected variable to display the mapping configuration block.
The configuration block contains the following setting fields:
- Slug: The name of the parameter. The name should be unique and is usually pulled from the Publisher Product API.
- Label: The parameter values pulled from the Publisher Product API.
- Mapping: The value that will be mapped to the Label value and sent in the request. Values are case-sensitive and should match buyer integration requirements.
Once the “Array Mapping” is configured, the variable will be available in the “Request Mapping” tab, for example: mapped('roofShade').
Request Mapping Tab
The “Request Mapping” tab contains the integration request settings and allows you to configure the request.
Switch the “Add PrePing” toggle to the “ON” position to activate the option to build integrations with the PrePing functionality, for example, if an integration requires OAuth. The “Request builder (PrePing)” block has a similar structure and is configured in the same way as the “Request builder (PING)” and “Request builder (POST)” block. Please see below for more details.
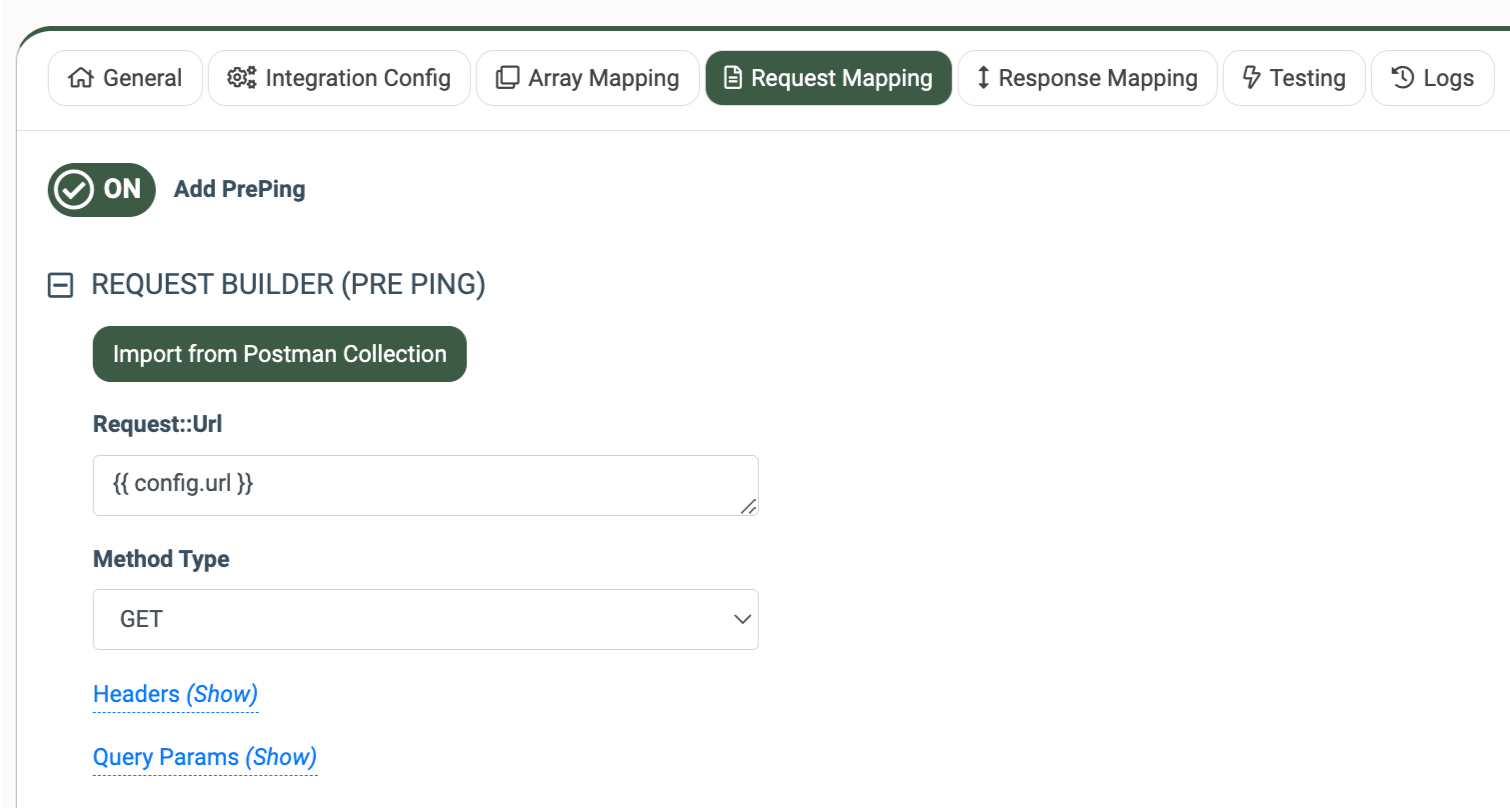
The “Request builder (Ping/Post)” block allows you to configure the following settings:
Note: The Ping block is available for Ping Post products only.
- Request::Url: The request URL. The default value corresponds to the variable added by default via the Integration Config tab.
- Method Type: Select the method type for the request.
- For the “GET” type, fill in the additional parameters of the request in the Headers and Query Params blocks.
- For the “PUT” type, choose the appropriate Data Type and enter additional parameters in the headers and request body.
- For the “PATCH” type, choose the appropriate Data Type and enter additional parameters in the headers and request body.
-
- For the “POST” type, choose the appropriate Data Type and enter additional parameters in the headers and request body.
- The “Fake Ping” option allows the Ping stage to always return with the sold status and continue to the Post stage. (Ping Post products only).
- Headers: If the integration requires headers (i.e. Content-Type), click the Headers (Show) hyperlink to enter the values.
- Data: This block refers to the actual payload or body of the request that contains the information being sent to the server.
- Query Params: This is typically for the GET method, where you would enter the field mapping. The value type of the fields is Key:Value.
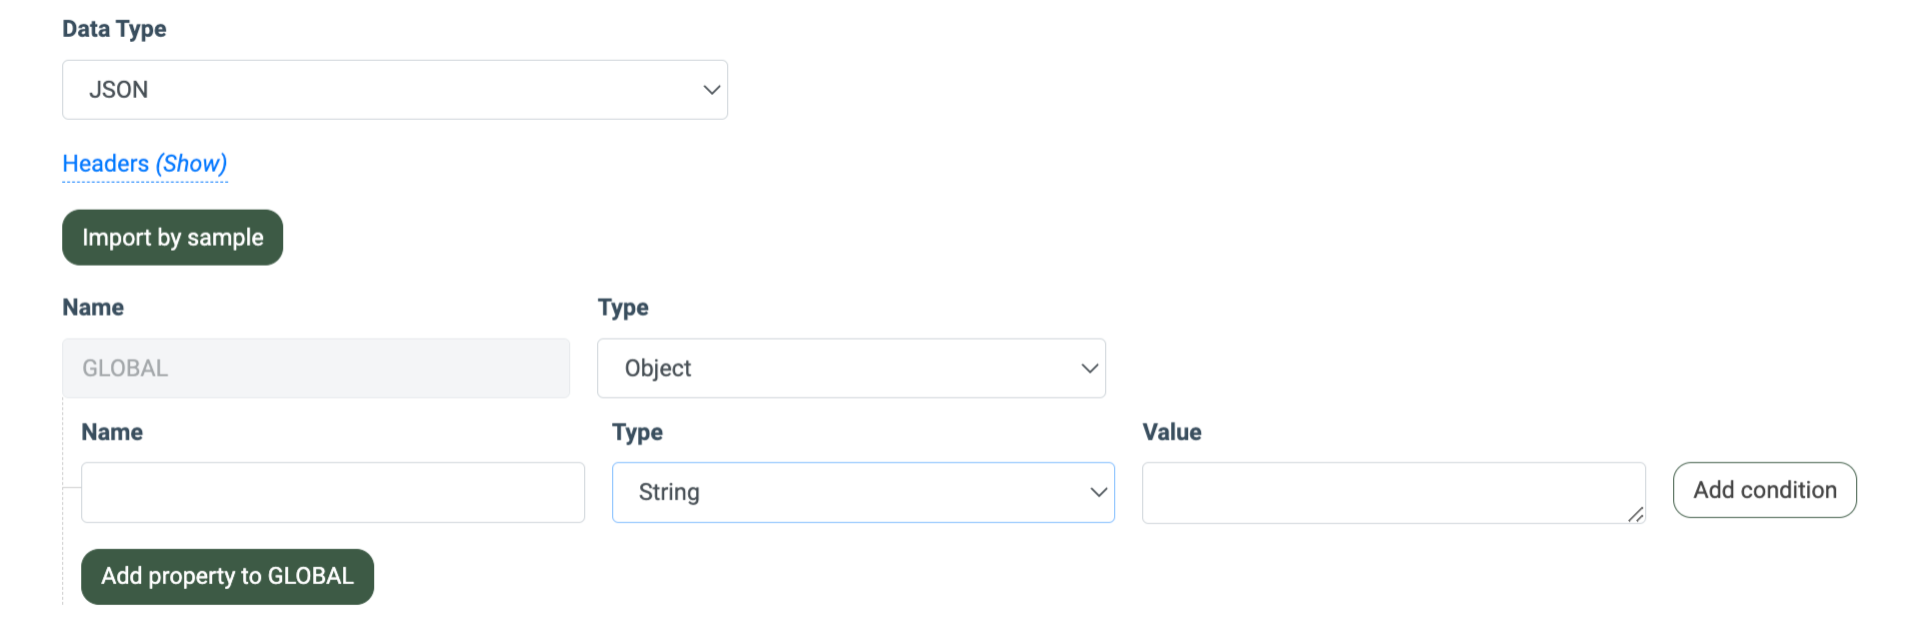
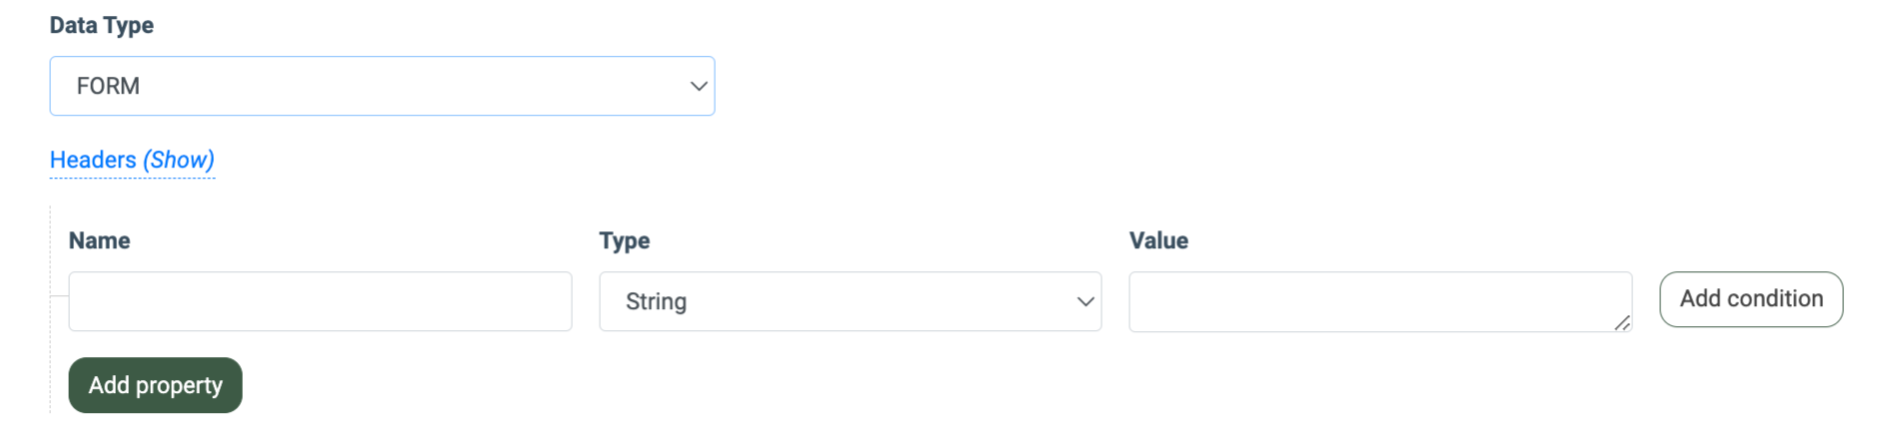
By choosing POST as a method type, select the data format for the request (XML, JSON, FORM, None) in the “Data Type” field. Depending on the selected data type (XML/JSON/FORM), there are different configuration settings available:
- The XML data type.
Click the “Import By Sample” button to import the XML sample of the request. In the pop-up window, paste the sample code and then click Fetch By Sample. The Builder will import the structure and field names, which are editable.
- If you do not have a sample to import, you can enter the fields manually:
- XML Encoding: Specify the XML encoding type (UTF-8, UTF-16, etc).
- Name: Enter the name of the parameter from the Buyer API documentation.
- Type: Select the data type (Object / String / Array / Boolean / Number / NULL / Legs Array).
- Value: Enter the variable from the list of available variables that will be used in the request. Start typing to see the suggestions. Please note that the value field supports Twig. If you need to hardcode a value, simply enter the value in this field.
Note: Depending on the field and API documentation, "Value" fields can be hardcoded, mapped, or passed from the config or lead.
- The JSON data type.
The configuration is similar to XML, you still have the same data types available for you to choose from (Object / Array / Boolean / String / Number / NULL / Legs Array).
- The FORM data type.
The configuration is more simplified and specifically designed for web form data, encoding values in name-value pairs.

The Request Mapping tab allows creating conditions using the “Condition” parameter. The “Condition” allows you to manage the parameters sent in the request. Please note that the “Condition” field supports Twig.
Example: We have a “driver” object, and we do not want to include the “driver1” object in the parameters if it doesn’t match the required age. Suppose the condition is < 18, then the request will not contain the parameters for the “driver1” object as it does not match the requirements. Therefore, if the condition is > 18, then the request will contain the object’s parameters.
You also have the option to import requests from the Postman Collections. To do so, click the “Import from Postman Collection” button in the preferable block. The following data is available for import - GET/POST method types, request URLs, Query Params, headers, and body (raw JSON/XML, form-data, x-www-form-urlencoded none). The builder supports Postman Collection v2/v2.1. In case there are multiple requests, a drop-down list will appear with all the requests, from which you can select only one. This option is available for all Product types, including Ping Post.-Aug-16-2024-08-02-28-6571-AM.png?hsLang=en)
Response Mapping Tab
The “Response Mapping” tab allows you to configure the response processing. The Response Mapping settings should be based on the response details provided in the integration documentation.
-Sep-09-2024-08-46-16-2187-AM.png?hsLang=en)
-Aug-16-2024-08-01-16-5119-AM.png?hsLang=en)
-4.png?hsLang=en)
Switching the “Smart Tree Leg” toggle to the “ON” position allows you to configure the processing of leg values in ping and post responses. The “Smart Tree” response block contains the following fields:
- Leg::Iterator: The parameter that determines legs.
- Iterator::Buyer Name: The parameter that determines the Buyer's name: The entry should begin with "leg," followed by a period, and then the parameter from the response that will be identified as "Buyer Name."
- Iterator::Price: The parameter by which the leg's price will be determined: The entry should begin with "leg," followed by a period, and then the parameter from the response that will be identified as "Price."
- Iterator::Buyer Hash: The parameter by which the hash of the buyer's name will be determined: The entry should begin with "leg," followed by a period, and then the parameter from the response that will be identified as "Buyer Hash."
- Iterator::Limit – the parameter by which the leg's limit will be determined: The entry should begin with "leg," followed by a period, and then the parameter from the response that will be identified as "Limit."
- AdditionalAttributes::[Name of the attribute]: The parameter by which the additional attributes will be determined: The entry should begin with "leg," followed by a period, and then the parameter from the response that will be identified as the corresponding value.
Note: The Additional Attributes in the PING Response Builder can differ depending on the “Additional Response Fields” tab setup on the Product level. This field only appears if you configure these fields on the Product level. Read more about the Additional Response Fields in the Knowledge Base article.
Switch the “Add PrePing” toggle to the “ON” position to activate the option to build integrations with the PrePing functionality, for example, if an integration requires OAuth. The “Response builder (PrePing)” block has a similar structure (only the “Success::Sign” and “Error::Reason” fields are available) and is configured in the same way as the “Response builder (PING)” and “Response builder (POST)” block. Please see below for more details.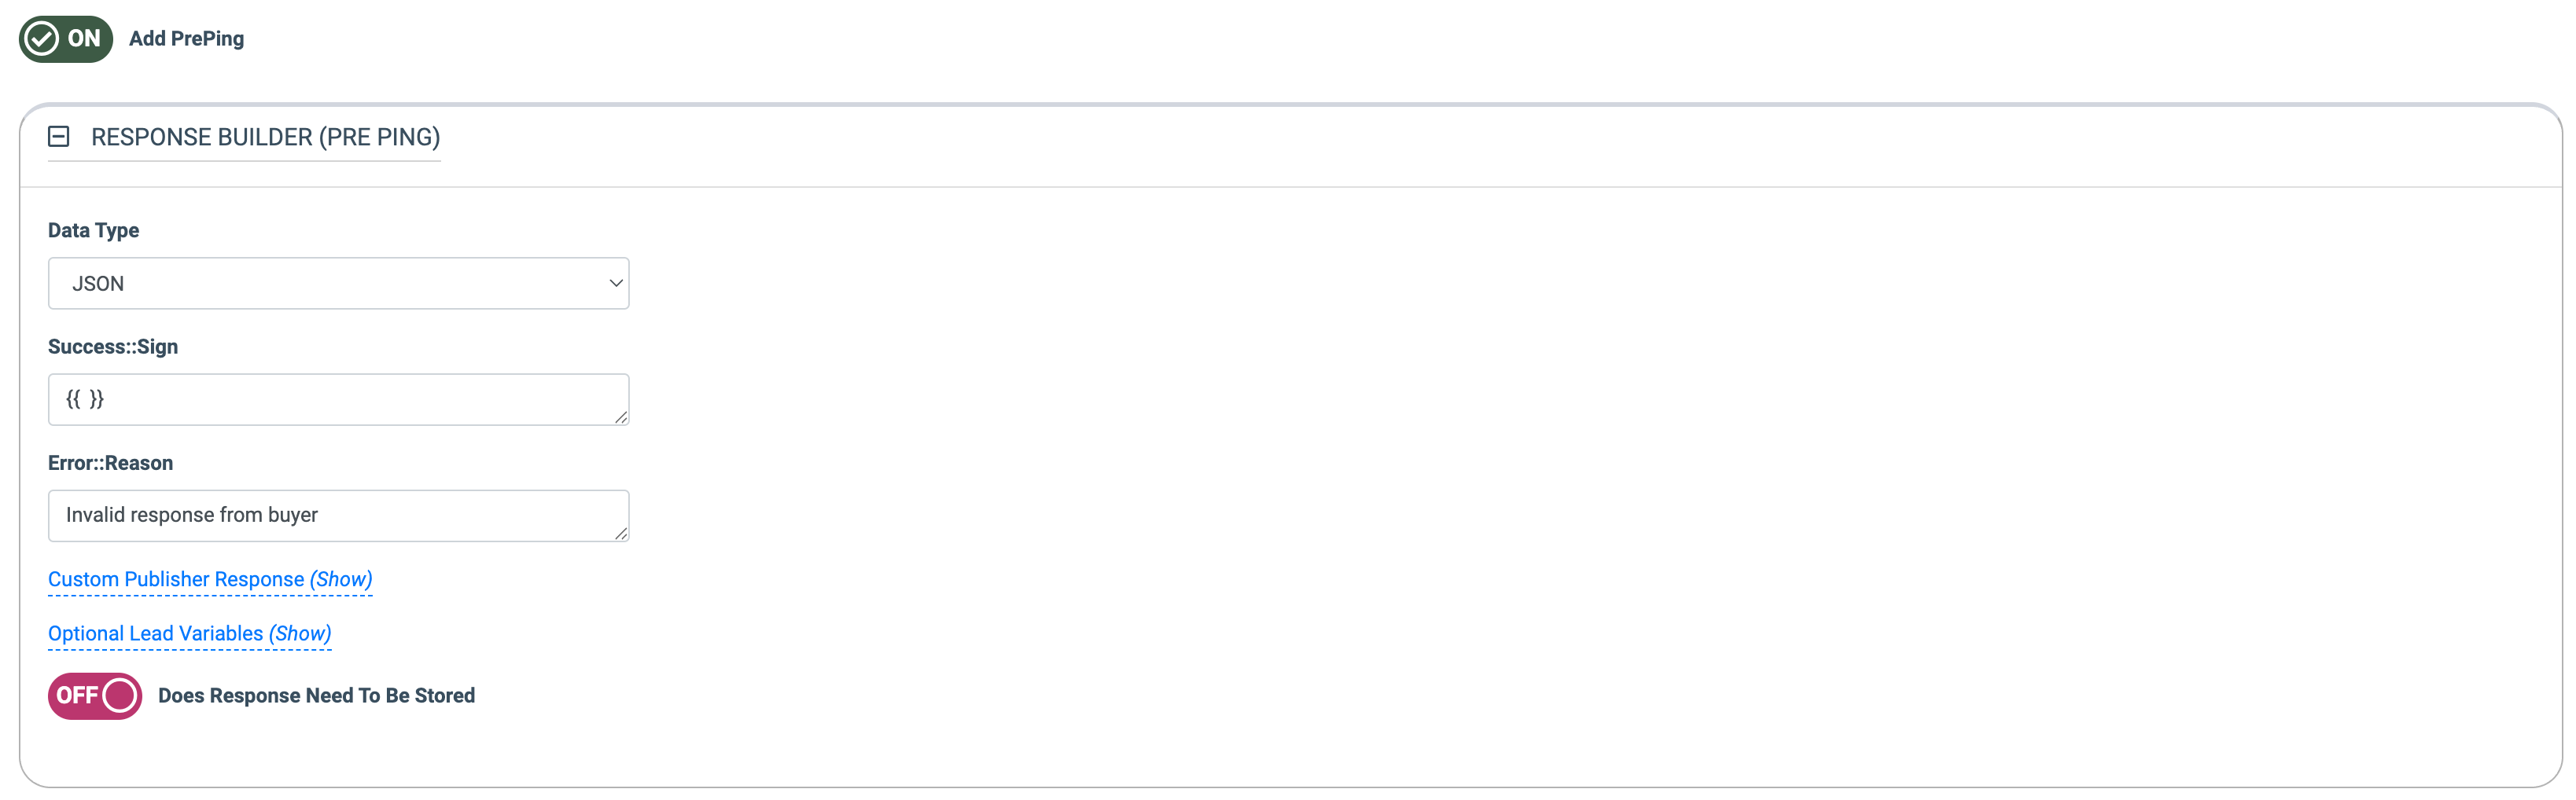
The PrePing, Ping, and Post response mapping blocks allow you to add Custom Publisher Responses. To specify the parameter you want to return to Publishers, expand the Custom Publisher Response block and fill in the following fields:
- Variable Name: Enter the parameter name.
- Expression: Enter the processed value.
- On Event: Specify the lead status eligible for the custom response:
- Select the “Global” option always to send the custom response regardless of the status.
- Select the “Campaign Accept” option to send the custom response only if the lead is accepted on the Ping. Note: This option is available only at the Ping Response Builder level.
- Select the “On Sold” option to send the custom response only if the final status of the lead is Sold. Note: This option is available only at the Post Response Builder level.
- Select the “On Reject” option to send the custom response only if the final status of the lead is Reject.
 Both PrePing and Ping response configuration blocks can process and reuse the values received in the response. To configure it, in the “Optional Lead Variables” block, fill in the variable name in the “Variable Name” field. Fill in the processed value in the “Expression” field.
  Note: The Response Builder setup might require some coding knowledge to analyze the response of the Buyer system.
You can also choose to store the PrePing response for later use. Switch the “Does Response Need To Be Stored” toggle to the “On” position to enable the option.
Example: We have a PrePing response to obtain a bearer token for the integration. In some cases, the Buyer does not want the token to be refreshed for every lead, but to use the same token for a specified period. 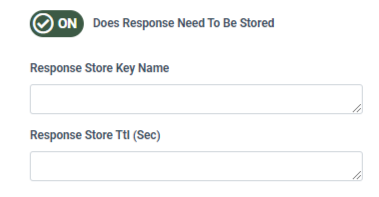
To set up the “Does Response Need To Be Stored” function, fill in the following fields:
- Response Store Key Name: The unique field name to store the received PrePing response.
- Response Store Ttl (in sec): The storage period (in seconds) of the received PrePing response.
There are use cases for Smart Tree Leg workflow when the Buyer does not answer with Price on Post, instead, he responds with Bid on Ping and then uses this Bid ID.
Switch the “Ignore Legs on POST” toggle to the “ON” position to hide the Smart Tree Leg settings on Post. This can be useful if you do not expect to receive legs on Post from the Buyer. In this case, the system will take a price from Bid on Ping. Note: this toggle is displayed only after enabling the Smart Tree Leg configuration toggle.
Switch the “Ignore Price on POST” toggle to the “ON” position to disable the Sold::Price setting on Post. This ensures the system would not mark leads with bids as “rejected”. Note: this toggle is displayed only after enabling the Smart Tree Leg configuration toggle.
To set up the response configuration for the rest of the configuration blocks, fill in the following fields:
- Data Type: Select the data processing format (XML / JSON / PLAIN).
- Sold::Sign: The condition that defines if the lead was sold.
- Sold::Price: The field that records the price (if received).
- Sold::RedirectUrl: The field for the redirect link (if received).
- Reject::Sign: The condition that defines if the lead was rejected. If the condition states the “is defined” option, all statuses will be processed as rejected.
- Reject::Reason: The field that records the reason for the reject.
- Error::Reason: The field that records the reasons for all other errors.
- Success::Sign: The condition that defines if the pre-ping was successful. (Available only via the PrePing configuration block for the Ping Post products).
- Accept::Sign: The condition that defines if the lead was accepted (Available only via the Ping configuration block for the Ping Post products).
- Accept::Price: The field that records the offer price (if received). (Available only via the Ping configuration block for the Ping Post products).
- Sell::Duration: This condition defines the call duration required to sell the lead to the Buyer. Usually, it turns out in the Buyer's response (Available only via the Ping Post Call configuration block).
- PhoneNumber::Campaign: The condition that defines the Campaign's phone number (Available only via the Ping Post Call configuration block).
- PhoneNumber::Lead: The condition that defines the phone number of the lead. To successfully sell the lead in the Call Logic component, the call must be initiated from the corresponding phone number(Available only via the Ping Post Call configuration block).
Switch the toggle to the “ON” position to activate the option to build integrations with the Ping Post Call functionality. The Ping Post Call feature allows you to sell a lead to an LMS Campaign. If the Ping Post Call integration is selected for the Campaign, the LMS lead can call the Buyer's Call Logic Campaign from the phone number specified in the LMS lead. There will also be a sale in the Call Logic component, which will use the same data specified in the LMS for the price in LMS.
Click the “Custom Publisher Response (Show) hyperlink to enter the values for the custom publisher response.
Click the “Lead Stash Variables to Save (Show) hyperlink to set up the variables that would be saved in the Lead Stash for reuse.
-Nov-15-2024-09-37-15-9791-AM.png?hsLang=en)
You can find the configured Response Mapping example via the screenshot below:
-Aug-16-2024-08-05-09-0977-AM.png?hsLang=en)
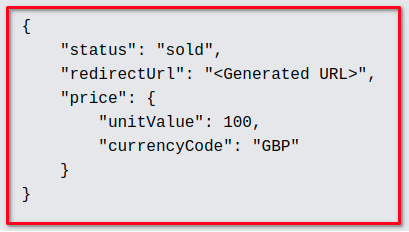
An example of a JSON response:
The “sold” status is displayed in the global object key “status” with the “sold” value. The “Sold::Sign” field depends on the received status (for example, if we set the response.status == “sold” value, it will define if the lead is sold or not.
For the “price” parameter, we put the value received in the response of the sold lead. As the “price” parameter is inside another object, we put the “response.price.unitValue” value.
For the “redirectUrl” - response.redirectUrl.
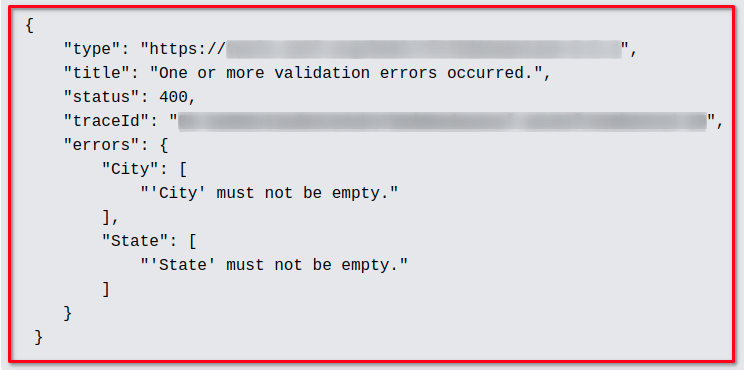
An example of a response to an invalid request:
If the lead is rejected, the “status” parameter displays the “400” value. There can also be other responses, including the authorization error or any other error, but the Response Builder provides an option only for the rejected status. That is why we put the “response.status is defined” value into the “Reject::Sign” field - which means that all the received statuses will be processed as rejected, except for the “sold” status as it already has a condition set up.
Then we set the “response.title” value for the “Reject::Reason” field.
 The response might not contain the price, redirectUrl, or errors in some cases. In this case, the corresponding fields should be left blank.
Testing Tab
The “Testing” tab allows you to emulate the test of the created integration. Performing a test on this tab will not send the lead, it is only testing to make sure the integration does not have any compilation errors.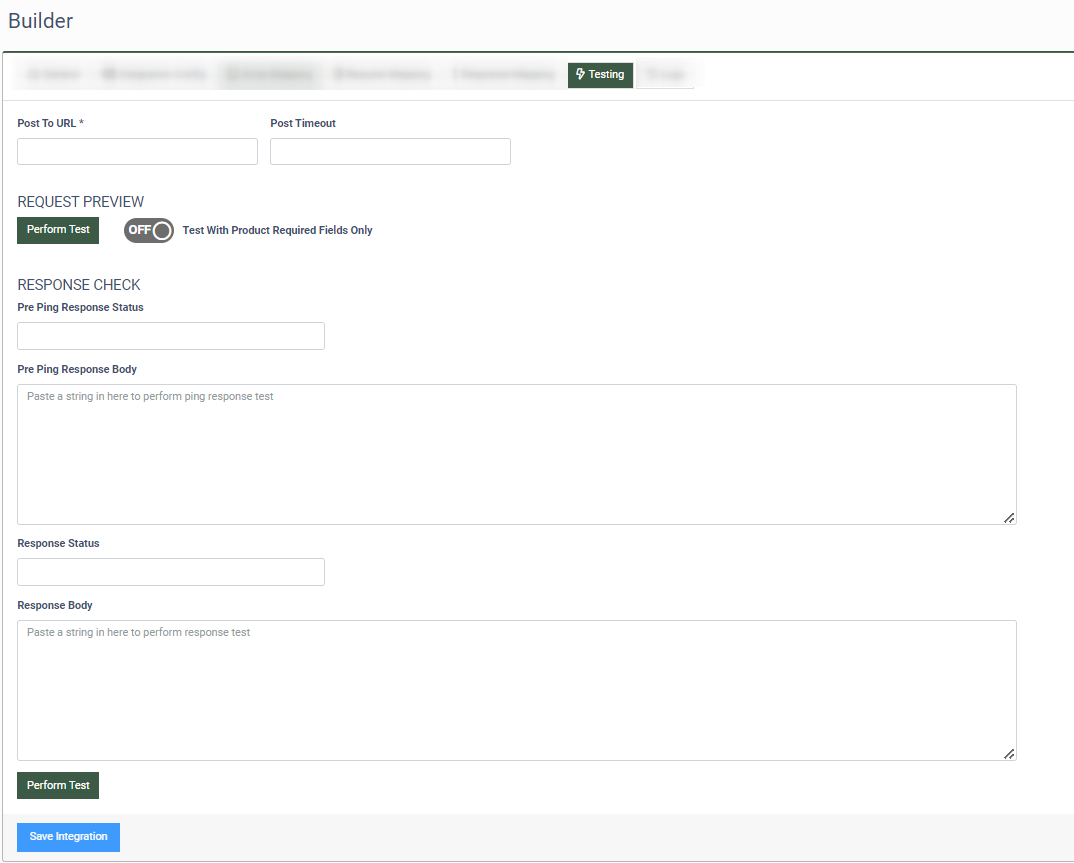
The tab contains the fields added to the “Integration Config” tab. To run the test, first, fill in those fields. Note: Only those fields defined as required must be filled in with dummy data. Optional fields can be left blank.
To check the correct sending of the Request, click the “Perform Test” button in the “Request Preview” block. The Request Test allows checking if the request is formatted correctly after Request Builder variables have been configured.
To check the correct Response processing, enter the data in JSON or XML format from your Integration Documentation and click the “Perform Test” button in the “Response Check” block.
Note: In order to test the response for the Ping Post products, you need to enter a response for both Ping and Post. The Ping response needs to result in a successful response for the test to proceed to the Post response test.
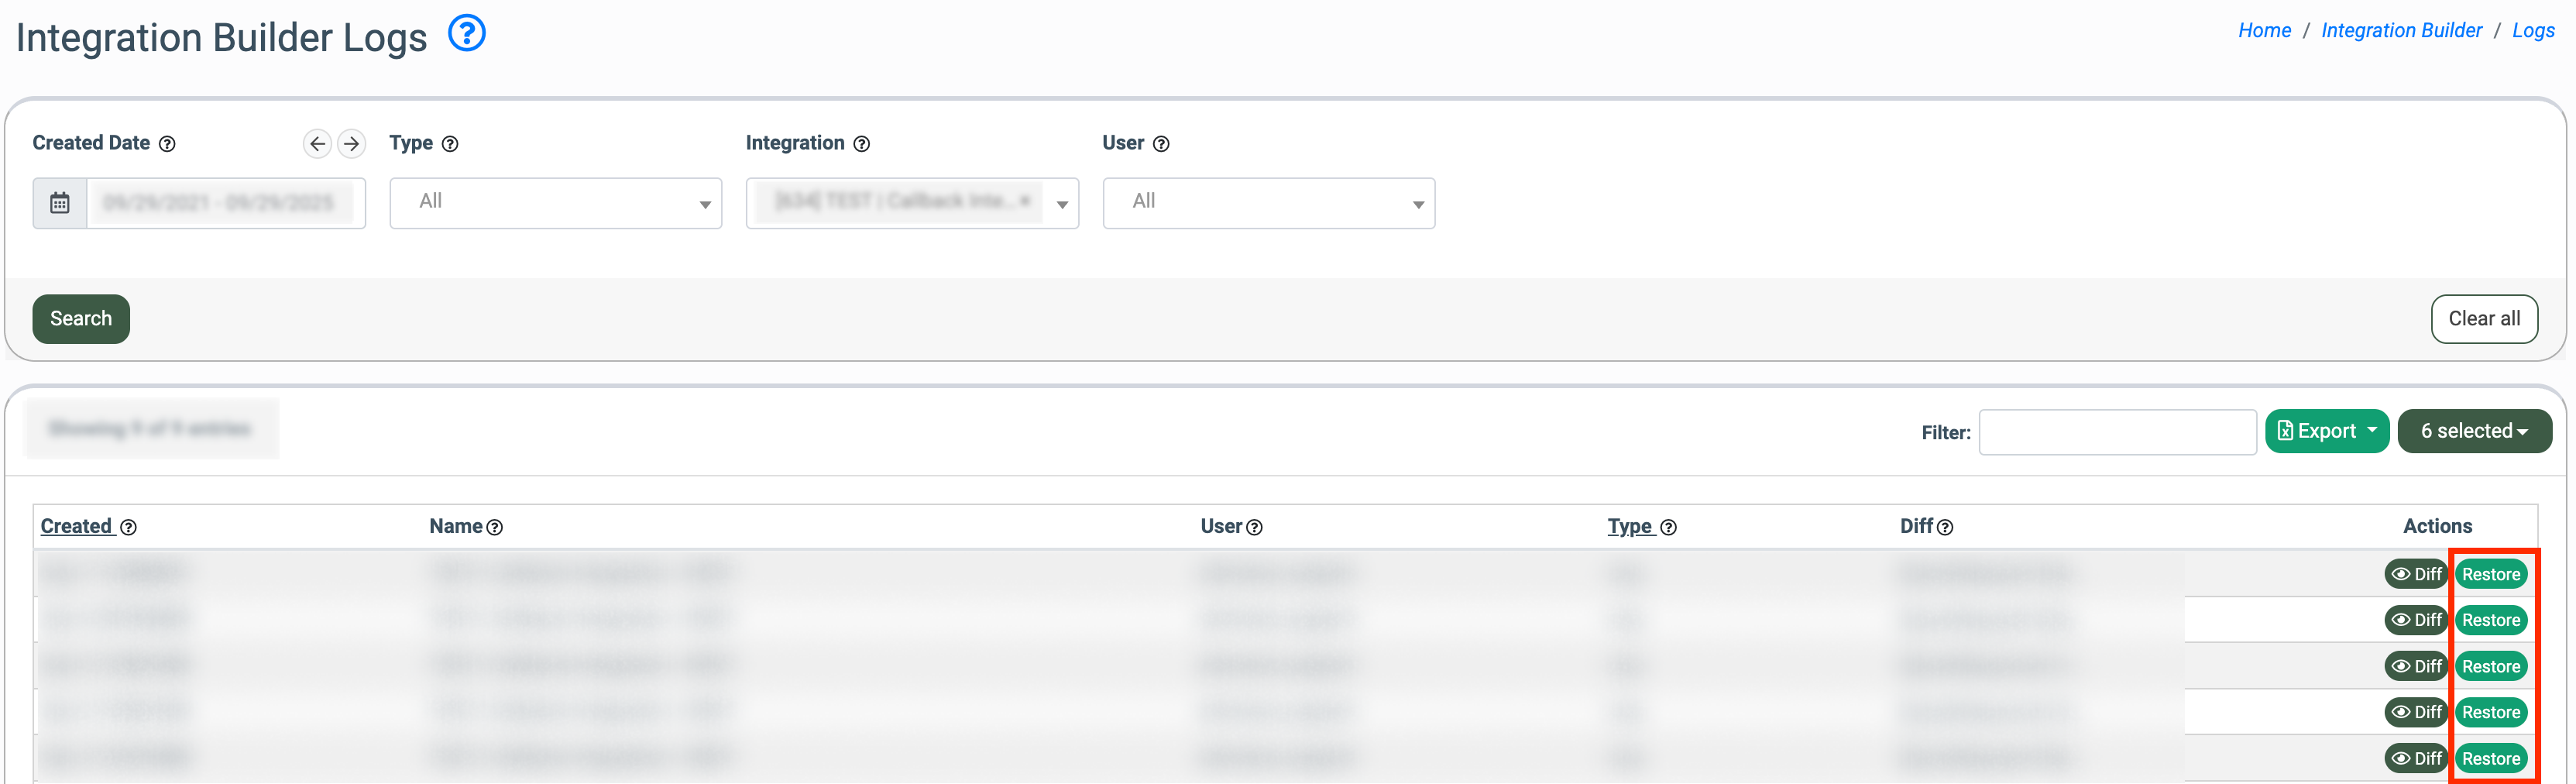
Integration Builder Logs
To view the changes and compare all the previous versions of the Integration Builder events stored in the system, click the “Logs” button.
You can narrow down the search results by using the following filters:
- Created Date: Select the creation date range.
- Type: Select the type (Log, Restore).
- Integration: Select the integration.
- User: Select the user.
The list of logs contains the following information:
- Created: The date and time when the integration builder event was created.
- Name: The name of the integration.
- User: The user who initiated the integration builder event.
- Type: The type of the integration builder event (Log, Restore).
- Diff: The version comparison.
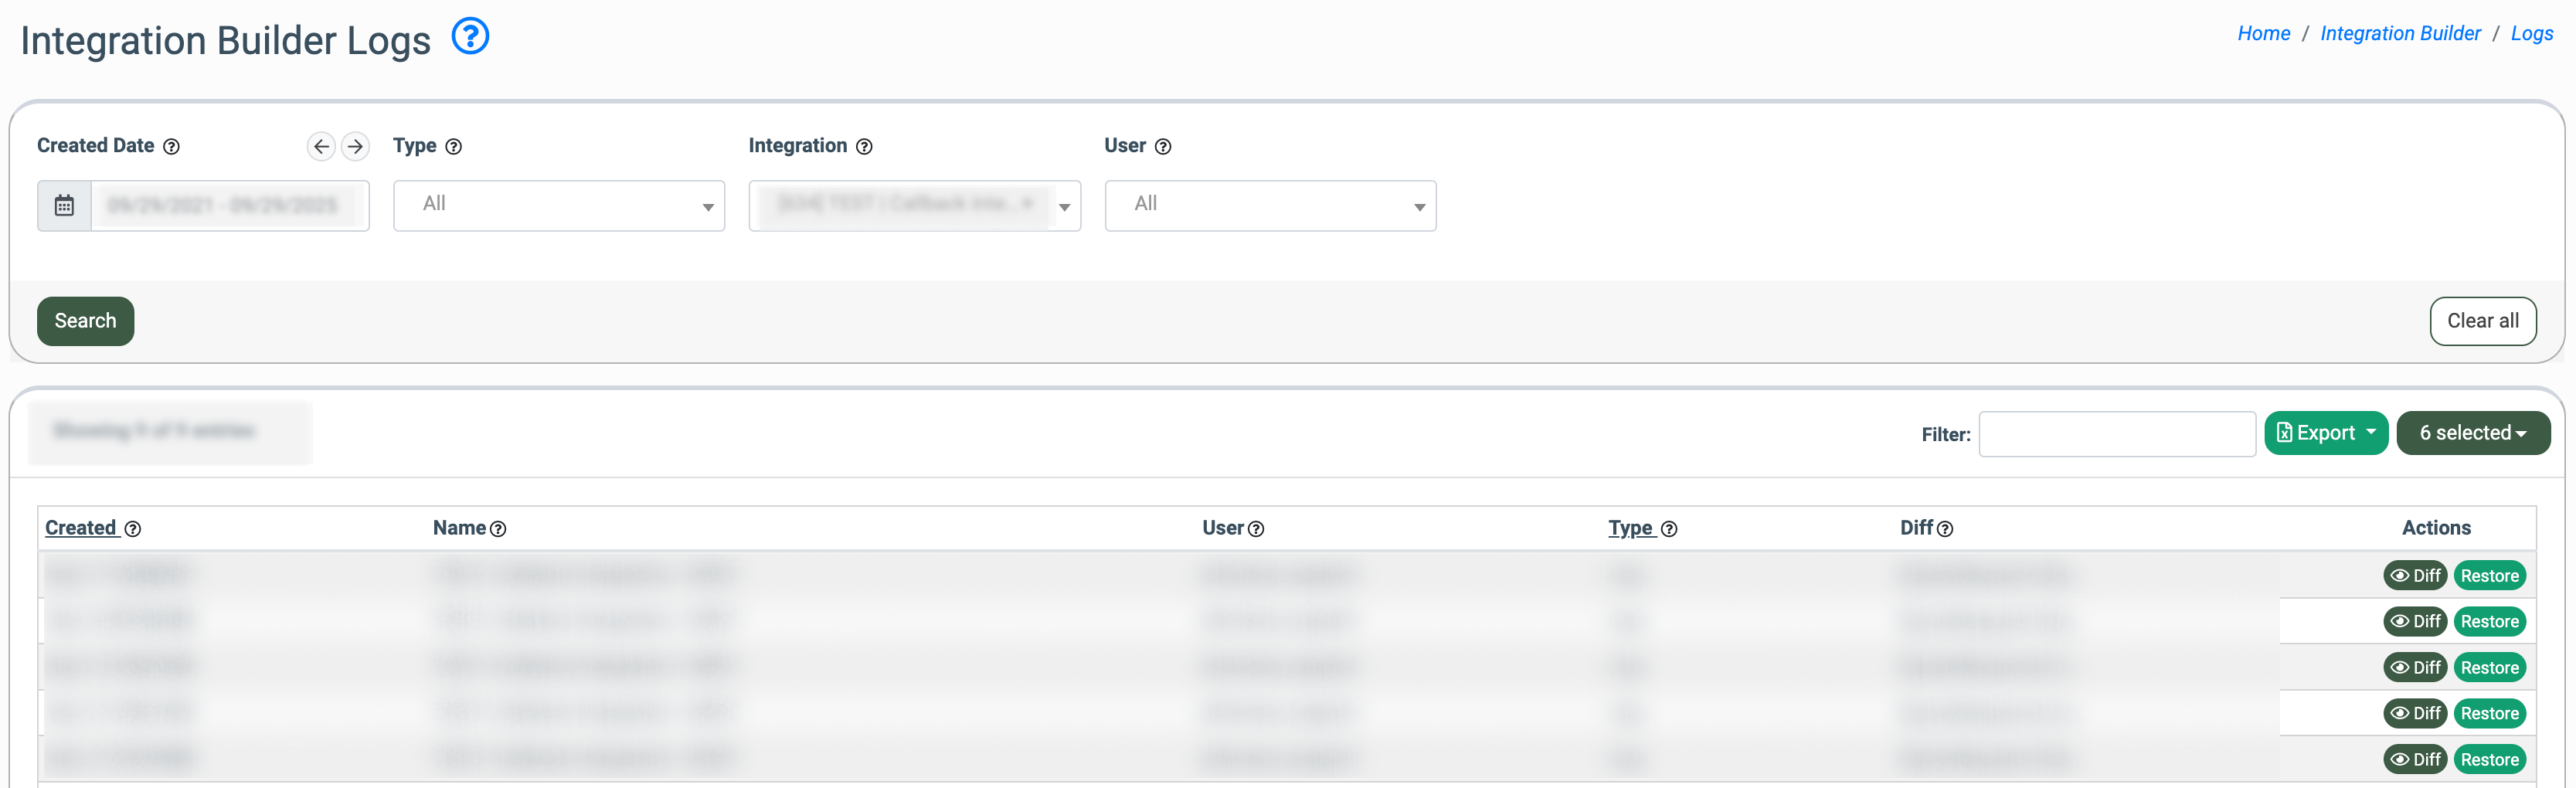
To compare the versions of the integration builder event, click the “Diff” button in the “Actions” column. The blocks will be loaded automatically. All changes are highlighted in red, and new records are highlighted in green.
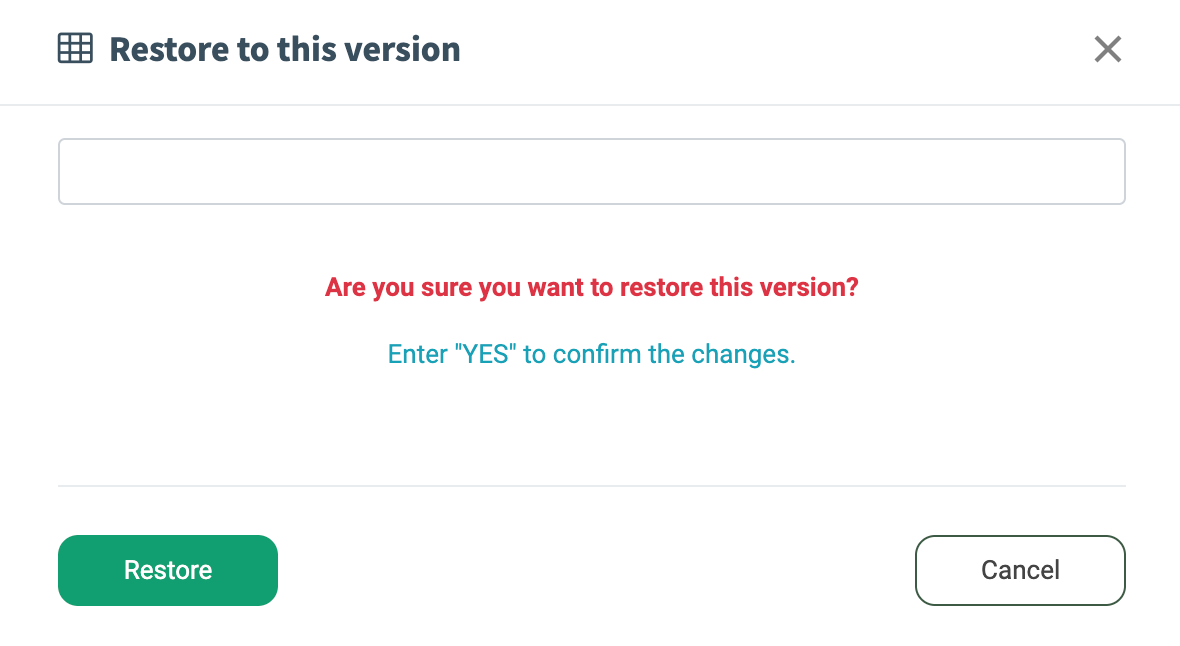
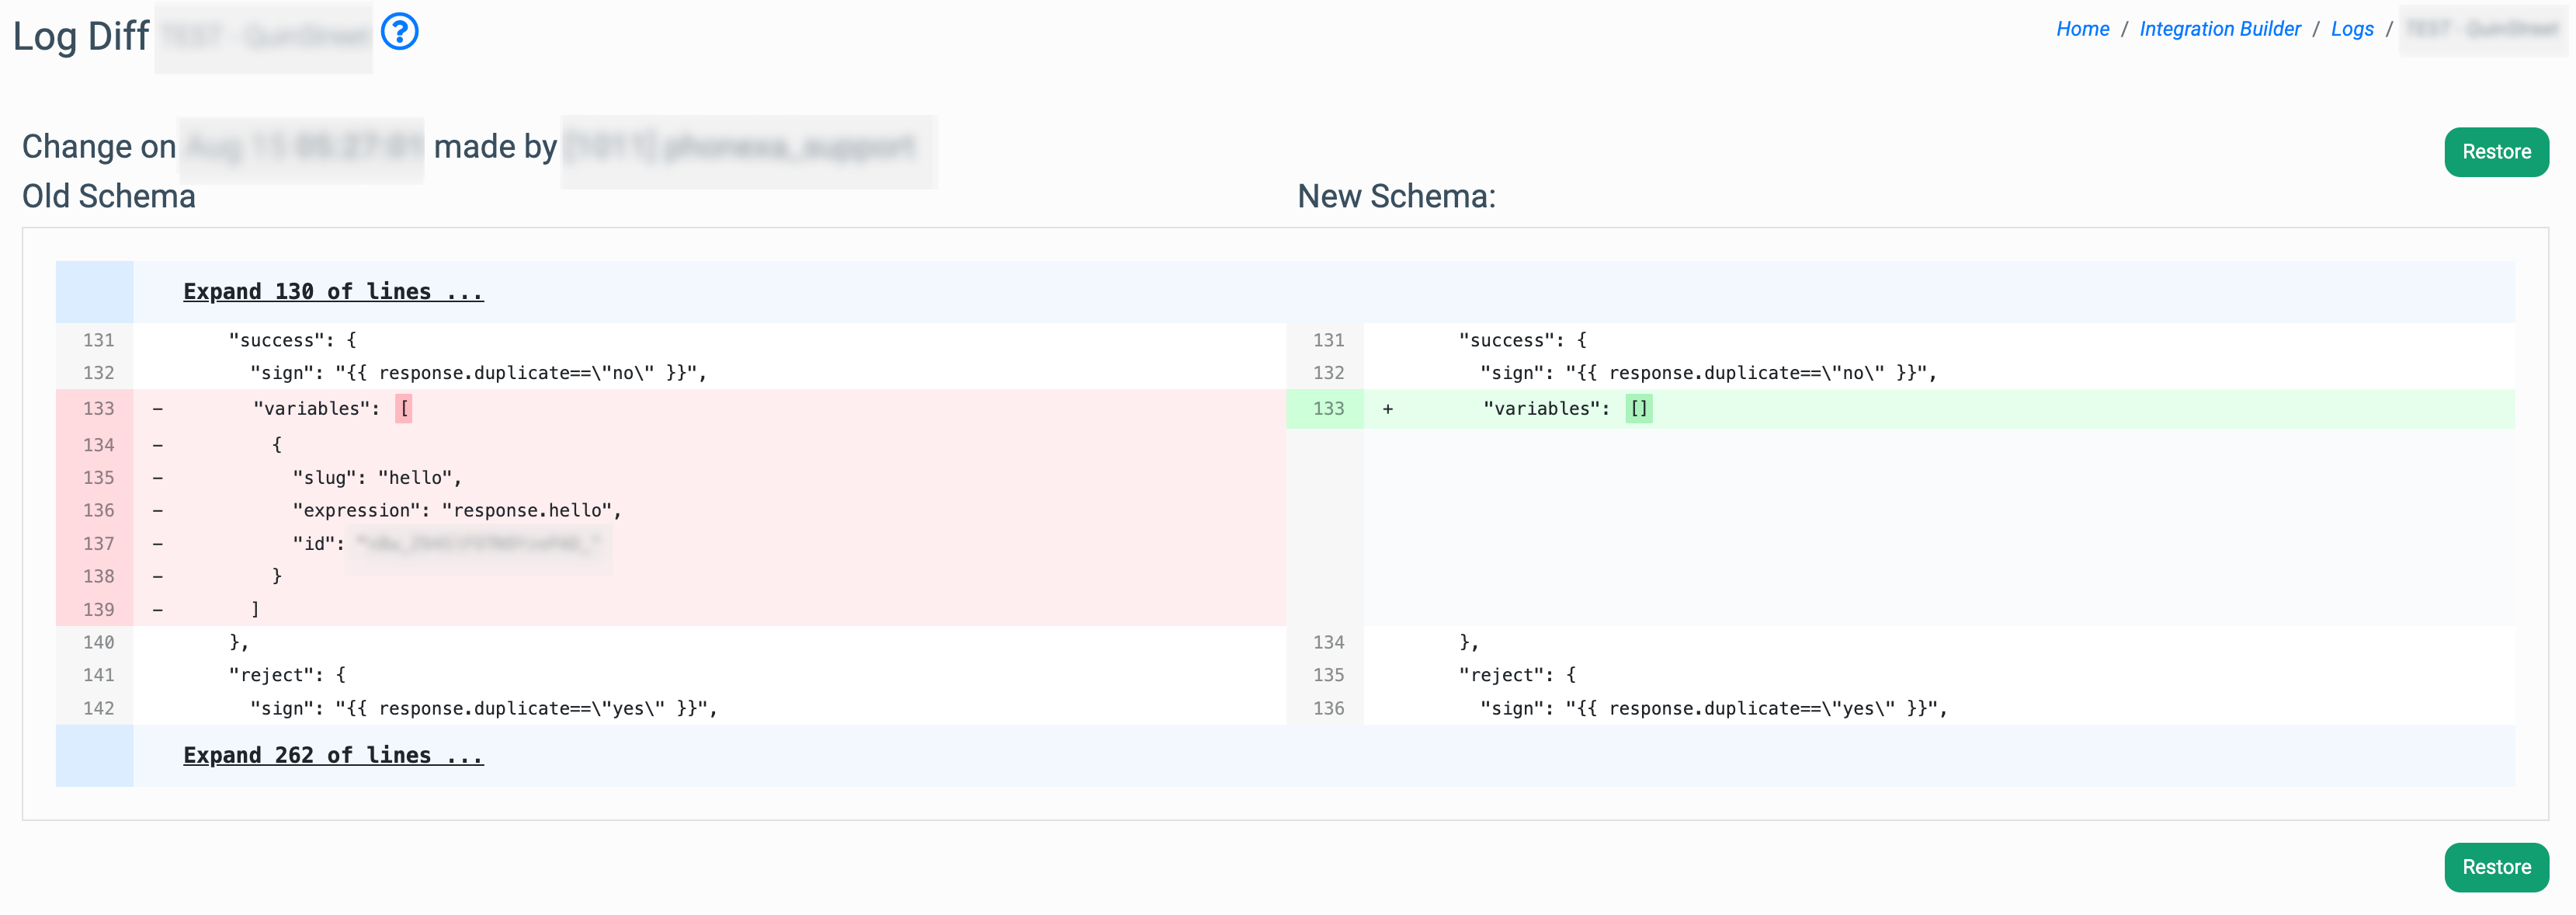 To restore the previously saved version of the integration builder event, click the “Restore” button. Also, the “Restore” button is available in the corresponding event in the “Actions” column.
 In the “Restore to this version” pop-up window, enter the word “YES” and click the “Restore” button to confirm the action.
 Note: Any changes made to the Integration Config fields will affect the running integration. After you apply the changes, you must review and update the integration settings of the previously set-up campaigns to ensure successful processing.