Lead Stash is an internal data storage system that allows you to store and access lead data.
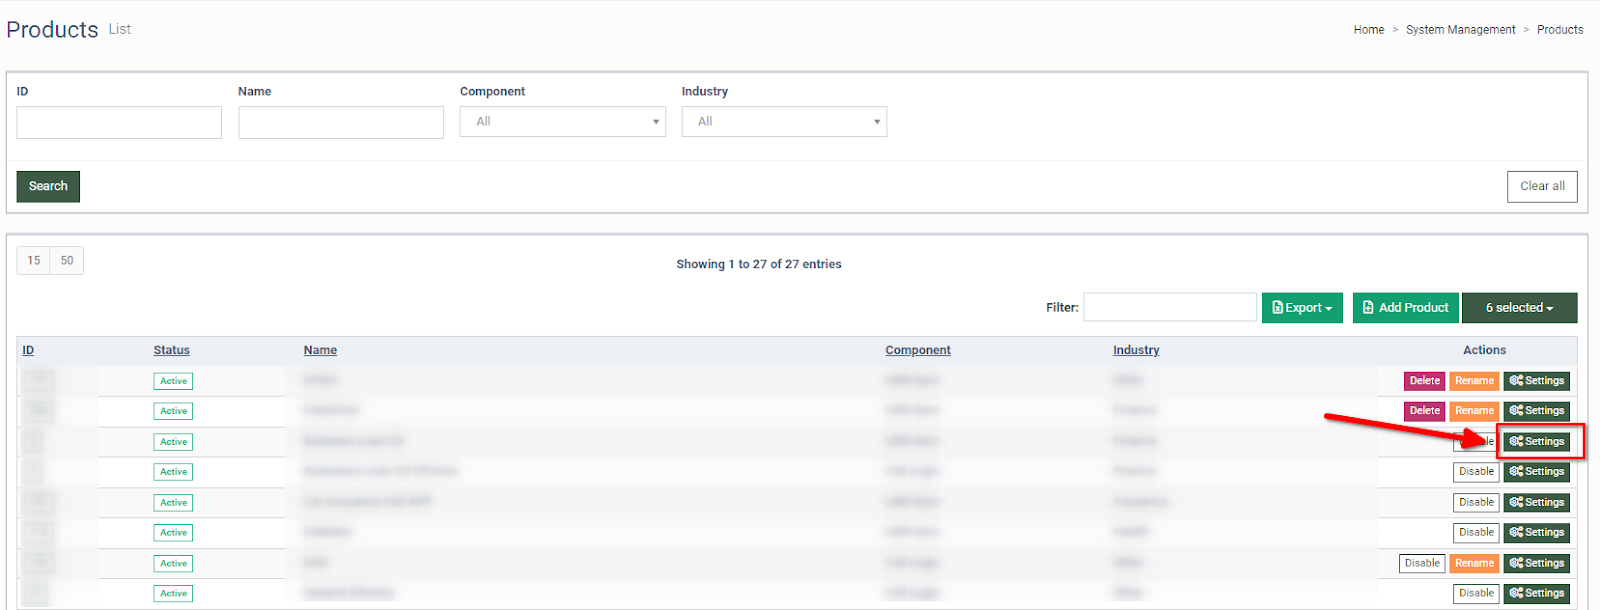
To configure Lead Stash settings, go to the System Management > Products section, choose the product, and click the “Settings” button in the “Action” column.
 On the Product setup page, go to the “Lead Stash Settings” tab. It contains four sub-tabs:
For preset Products, Lead Stash is usually not configured. If either “Email” or “Phone Number” fields exist in the Product, the system will show you the corresponding message.-2.png?hsLang=en)
Click the “Enable Lead Stash” button to generate an internal storage system for the corresponding Product.
Incoming Leads
The "Incoming Leads" sub-tab allows you to configure the Lead Stash for a Product.
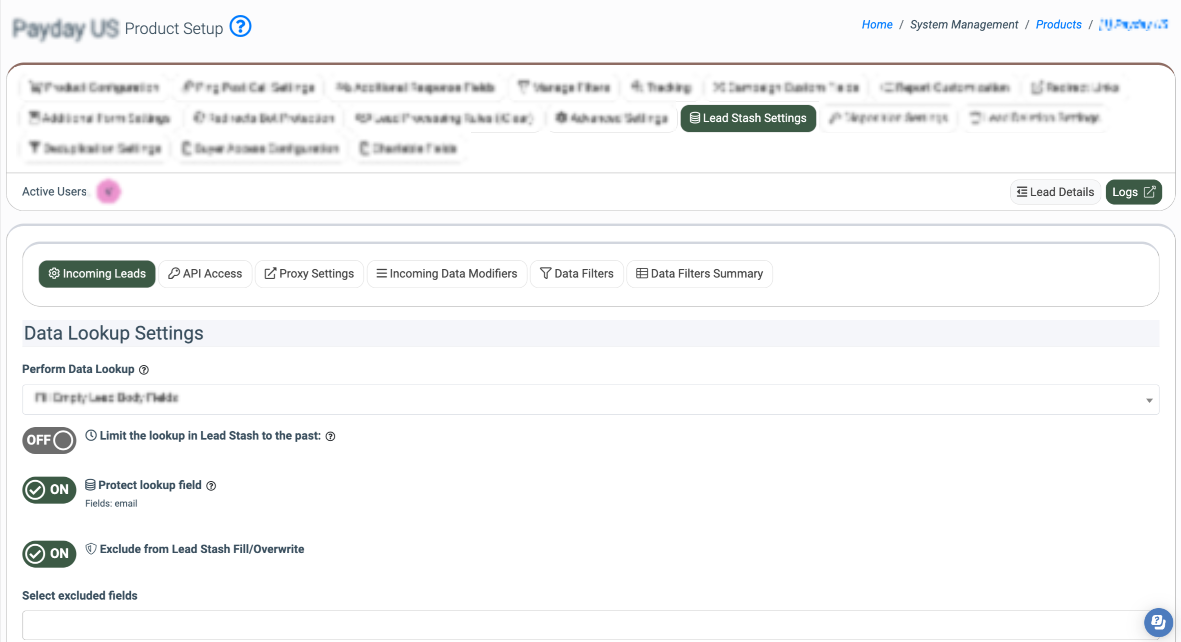
The Data Lookup Settings block contains the following options:
- Perform Data Lookup: Select the system behavior when the lead data is found and pulled from the Lead Stash:
- Disable: When disabled, it won’t allow you to pull data from the lead stash.
- Store Lead Stash Log Only: Pulls data from the lead stash and displays it in the Lead Info.
- Fill Empty Lead Data Fields: Pulls the lead data from the lead stash, compares it with the already posted data, and fills in the empty fields.
- Overwrite Lead Body: Rewrites the lead data with the data pulled from the lead stash.
- Limit the lookup in Lead Stash within the past: Switch the "ON/OFF" toggle to enable or disable the option to set the timeframe limitation for the data lookup in Lead Stash. Set the timeframe for the data lookup in the “Days”, “Hours”, and “Minutes” fields, respectively. For example, the set timeframe is 5 days, and the lookup processing found the data in the Lead Stash that was added or updated 7 days ago. In this case, the found data will not be considered for further processing according to the option selected in the “Perform Data Lookup” field.
- Protect lookup field: Switch the "ON/OFF" toggle to enable or disable the lookup field protection. If enabled, when replacing lead parameters with data from the lead stash (Perform Data Lookup = Overwrite Lead Body), key fields (Email for LMS, Phone for Call Logic products) will not be overwritten.
- Exclude from Lead Stash Fill/Overwrite: Switch the “ON/OFF” toggle to enable or disable the feature that allows you to specify a list of parameters that should not be updated from Lead Stash when a matching lead is found. Note: The toggle is visible only if the Perform Data Lookup is set to Overwrite Lead Body or Fill Empty Lead Data Fields.
For example, assume Lead Stash contains a lead with the email test@test.test, ZIP code 90210, and IP address 1.1.1.1.
If the Overwrite strategy is enabled and userIp is specified in the Exclude from Lead Stash setting, a new submission for the same email address with ZIP code 12345 and IP address 2.2.2.2 will be processed as follows:
The ZIP code will be overwritten with the value stored in Lead Stash and become 90210. However, the IP address will remain 2.2.2.2 because userIp is excluded from Lead Stash updates.
As a result, the lead will contain the email test@test.test, ZIP code 90210, and IP address 2.2.2.2. - Select excluded fields: Select the fields you want to exclude from the Lead Stash Fill/Overwrite.
- Look up in Lead Stash on Ping (for Ping-Post Products only): Select the (Yes / No / Only required fields) option to enable/disable the data lookup in the Lead Stash on the ping.
The Data Storage Settings block contains the following options:
- Store lead data in Lead Stash: Select the "Active" option to enable the lead data storing in the Lead Stash.
- Store lead data in Lead Stash only for these statuses: Select the lead status(es) of the leads (Sold / Reject / Test / New / Fraud Reject / Post Error / Pre-screening / Verifying / Offer Received) to store data in the Lead Stash.
- Store data in Lead Stash on Ping (for Ping-Post Products only): Select the (Yes / No / If Data Not Found) option to enable/disable data storing on Ping.
Click the “Save” button to apply settings.
API Access
The “API Access” sub-tab allows you to manage access to the Lead Stash through the API.
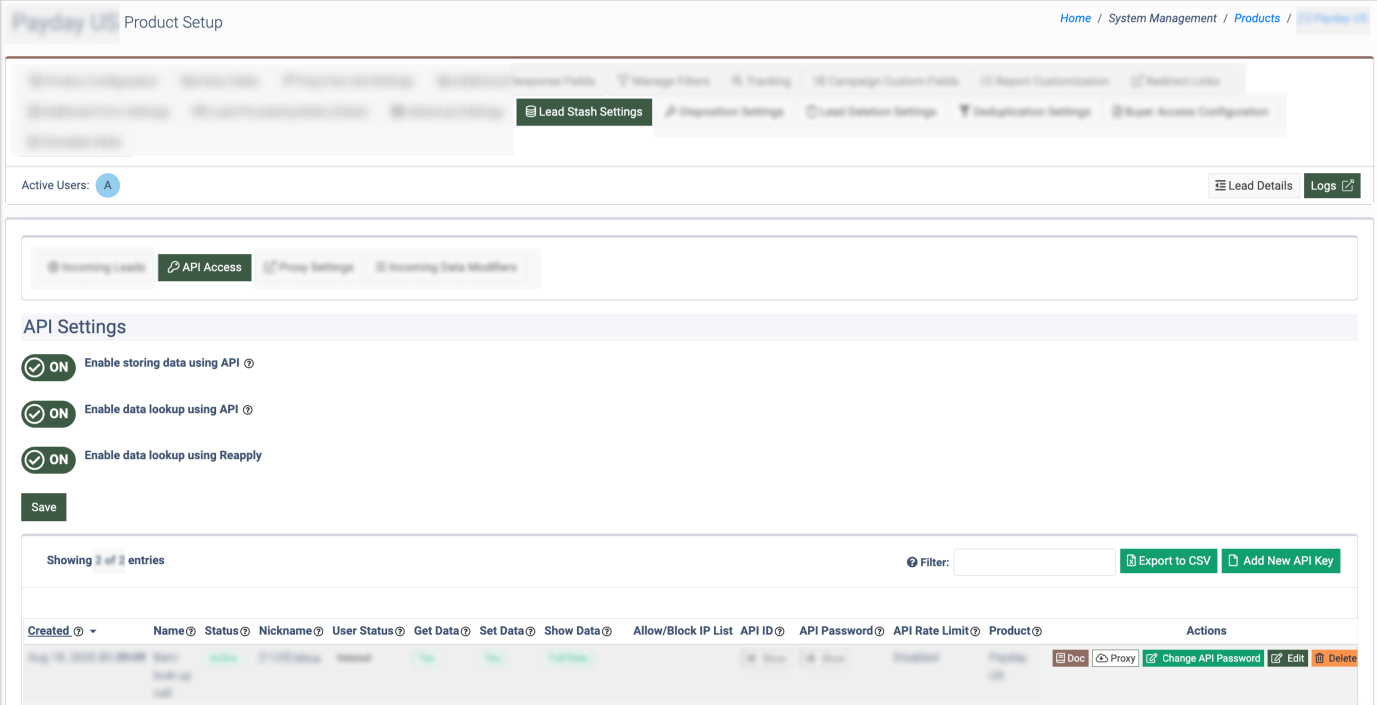
The API Settings block contains the following options:
- Enable storing data using API: Switch the toggle to the “ON” position to enable lead data recording to the Lead Stash through the API, and vice versa.
- Enable data lookup using API: Switch the toggle to the “ON” position to enable the lead data search and pull from the Lead Stash through the API, and vice versa.
- Enable data lookup using Reapply: Switch the toggle to the “ON” position to enable the lead data search and pull from the Lead Stash through the reapply, and vice versa. The Reapply feature allows the system to search for and retrieve existing customer data from Lead Stash using a specific search key (such as an email address or phone number) when a form or API post request is submitted. If a match is found, the form or request can be pre-filled with stored data, allowing customers to enter less information and simplify the completion process.
Click the “Save” button to complete the settings.
To generate a new API Key, click the “Add New API Key” button.
Note: If both options are disabled, you can not add the new keys or edit the existing ones (but you can still view the list of the keys).
If one option is disabled, the system will display the following message in the API documentation.
-Aug-28-2024-06-38-55-1403-AM.png?width=552&height=121&name=unnamed%20(3)-Aug-28-2024-06-38-55-1403-AM.png)
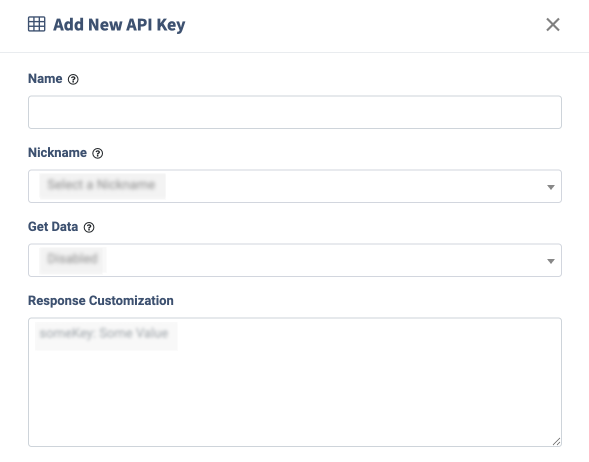
Then, fill in the following fields in the “Add New API Key” pop-up window:
- Name: Enter the API name.
- Nickname: Select the user who is generating an API Key. Note: The Lead Stash option is available only for registered users.
- Get Data: Select the type of access level to the Lead Stash data:
- Disabled: Do not provide access to the Lead Stash data.
- Full Data: Give access to all Lead Stash data.
- Part Data: Give access to all Lead Stash data except protected fields (protected fields are encrypted fields with sensitive data by default).
- Existence Check: Do not provide access to the Lead Stash data. Display only lead presence in the Lead Stash.
- Selected data points: Give access to the selected data from the Lead Stash.
- Data Points: Select the data from the Lead Stash to which the access will be provided.
- If the “Get Data” option is enabled (the “Full Data”, “Part Data”, “Existence Check”, or “Selected data points” options are selected):
- Limit the lookup in Lead Stash to the past: Switch the toggle to enable/disable the option to set the timeframe limitation for the data lookup in Lead Stash. Set the timeframe for the data lookup in the “Days”, “Hours”, and “Minutes” fields, respectively. For example, the set timeframe is 5 days, and the lookup processing found the data in the Lead Stash that was added or updated 7 days ago. In this case, the found data will not be considered for further processing.
- Response Customization: This option allows you to customize the response obtained from the Lead Stash API. You can modify the data type of the field response, set new values for the data fields, along with the possibility to use placeholders for the replacement of data in the response fields. Also, you can add new custom fields to the obtained response.
- Set Data: Enable/Disable data recording to the Lead Stash through the API.
- Active: Enable data recording.
- Disabled: Disable data recording.
- Rate Limit: Select the rate limit option for the record/pull data to/from the Lead Stash through the API. The rate limit option allows you to set the limitation for the number of requests (record/pull data to/from the Lead Stash) sent via API within a particular time range:
- Disabled: Disable the Rate Limit.
- High Rate - 5000/minute, 40000/10 minutes: number of requests per minute.
- Medium Rate - 2500/minute, 20000/10 minutes: number of requests per minute.
- Low Rate: - 1000/minute, 8000/10 minutes: number of requests per minute.
- Tiny Rate: - 100/minute, 800/10 minutes: number of requests per minute.
- Per minute: - 5/minute, 40/10 minutes: number of requests per minute.
- Allows IP List (comma separated): Enter the list of IP addresses for which API access will be provided. If the IP addresses are added to the Allow IP List, data obtained only from these IP addresses will be recorded in the Lead Stash. The same approach will be used for obtaining (pull up) data from the Lead Stash. Note: If the same IP address appears in the Allow and Block IP Lists simultaneously, the Block IP List will have a higher priority, and the data recording from this IP will be blocked, even if it's also added to the Allow IP List.
- Block IP List (comma separated): Enter the list of IP addresses for which API access will be blocked. If the IP addresses are added to the Block IP List, the data obtained from these IPs will not be recorded in the Lead Stash. The same approach will be used for obtaining (pull up) data from the Lead Stash. Note: If the same IP address appears in the Allow and Block IP Lists simultaneously, the Block IP List will have a higher priority, and the data recording from this IP will be blocked, even if it's also added to the Allow IP List.
Click the “Add” button to complete the action.

-Aug-28-2024-06-37-45-3660-AM.png?hsLang=en)
-Aug-28-2024-06-39-33-0120-AM.png?hsLang=en)
To check the API documentation, click the “Doc” button in the “Action” column.
To view the Proxy servers list, click the “Proxy” button in the “Action” column.
Click the “Change API password” button in the “Action” column to change the API password.
Click the “Edit” button in the “Action” column to edit the API key.
Click the “Delete” button in the “Action” column to delete the API key.
Proxy Settings
The “Proxy Settings” sub-tab allows you to configure how data is searched in the Lead Stash, add other Phonexa Lead Stash proxies, and set up the priority of the look-up.
-4.png?hsLang=en)
To add a new proxy, click the “Add New Proxy” button. Fill in the following fields in the pop-up window:
- Proxy Type: Select the proxy type (Phonexa Lead Stash / Data by Lead Id, PBX Lead Stash).
- Name: Enter the name of the proxy record.
- URL: Enter the proxy URL.
- API ID: Enter the API identifier.
- API Key: Enter the API key.
- Call Group ID: Enter the ID of the Call Group (available for the “PBX Lead Stash” integration).
- Mapping: Enter the mapping for fields that will be used for the integration (available for the “PBX Lead Stash” integration).
Click the “Add” button to save.
Read more information about the API configuration in the API Access article.
By default, the search is implemented only within the Lead Stash (self) of the product on which it is configured. To change the order of access to proxies, use the drag-and-drop function.
Click the “Edit” button to configure the proxy.
Click the “Delete” button to delete the proxy.
According to the set priority, if the lead was not found on the first lead stash (and in cases when no data was found in 10 seconds and API returned with an empty result), the search would continue on the next one.
Click the “Save” button to apply changes.
Incoming Data Modifiers
The “Incoming Data Modifiers” sub-tab allows you to add or remove country codes on phone numbers the system is going to put in the Lead Stash search keys.
-1.png?hsLang=en) The “Search Key Phone Number Normalizer” block contains the following options:
The “Search Key Phone Number Normalizer” block contains the following options:
- Status: Switch the toggle to the “On” position to enable this option.
- Fields to process: Select the name of the fields to process.
- Enabled for the following publishers only: Select the names of the Publishers for whom this option will be available.
Note: If that field is not empty, the modifier will be applied only to the leads of the selected Publishers. - Disabled for the following publishers: Select the names of the Publishers for whom this option will be disabled.
Note: If that field is not empty, the modifier will not be applied to the leads of the selected Publishers. - Country code: Select the country code.
- Strategy: Select the strategy (Save both combinations with and without country code / Add country code if not added / Remove country code if present).
Click the “Save” button to apply settings.
Data Filters
The Data Filters tab allows you to set rules that restrict data output from Lead Stash when specific field values do not meet the defined conditions. It displays a list of existing filters with options to add, edit, delete, or reorder them. This is especially useful when you want to restrict the exposure of sensitive or valuable lead information unless certain criteria are met. Note: This tab is enabled only on demand.
-1.png?hsLang=en)
The Lead Stash Filters block contains the following information:
- Status: The current status of the rule (Active / Paused).
- Name: The name of the rule.
- Run Type: The run type of the rule:
- Lead Processing: Runs when the lead is being processed.
- API: Runs on the API of the lead stash.
- Filter Type: The type of filter:
- iClear Service: This type of filter enables you to filter leads for which the system will provide or restrict data output from the Lead Stash. Use case: If a lead passes the selected iClear service but comes from Andorra, and the rule is configured to block Lead Stash output for leads from this country, the system will suppress the data. Note: The lead will still be processed; it just won’t have data pulled from the Lead Stash.
- PL/DNPL: This type of filter controls data output based on whether the lead is on a Present List or Do Not Present List (DNPL). You can choose to allow output depending on the list the lead matches. Use case: You may choose to output the Lead Stash data if the lead is on a Present List or Do Not Present List.
- Config: The configuration of the rule.
- Cost: The rule cost per ping.
To add a new PL/DNPL lead stash filter, click the “Add Filter” button, select the PL/DNPL Filter option, and fill in the required fields:
- Name: Enter the name of the rule.
- Product Field: Select the Product field.
- Product Field Manual: Enter the Product field manually.
- Value Modifiers: Select the value modifiers of the rule (Trim Spaces, Convert to integer, Lowercase, Uppercase).
- Run Type: Select the run type of the rule:
- Lead Processing: Runs when the lead is being processed.
- API: Runs on the API of the lead stash.
- PL/DNPL Type: Select the PL/DNPL type:
- Internal DNPL/PL: Allows you to select the PL/DNPL list from the instance.
- Phonexa DNPL/PL API: Allows you to select the Phonexa PL/DNPL (the system will offer you to enter the List ID and credentials in a pop-up window). Note: You should have the PL/DNPL list’s API access enabled.
- DNPL/PL List: Select the PL/DNPL list. Note: This field appears only for selected Internal DNPL/PL type.
- DNPL/PL List ID: Enter the DNPL/PL list identification number. Note: This field appears only for selected Internal Phonexa DNPL/PL API type.
- URL: Enter the web address of the list. Note: This field appears only for selected Internal Phonexa DNPL/PL API type.
- API Key: Enter the API key. Note: This field appears only for selected Internal Phonexa DNPL/PL API type.
- Timeout: Enter the timeout number in seconds. Note: This field appears only for selected Internal Phonexa DNPL/PL API type.
- Action on ping failure: Select the action on the ping failure (Do not get data / Get data). Note: This field appears only for selected Internal Phonexa DNPL/PL API type.
Click the “Add” button to finish.
-1.png?width=668&height=679&name=unnamed%20(65)-1.png)
To add a new iClear Service lead stash filter, click the “Add Filter” button, select the iClear Service Filter option, and fill in the required fields:
Select Third Party Service: Select the third-party service (Ip Scoring). Note: The IP Scoring third-party service allows you to perform real-time validation of the lead IP address and receive a fraud score based on 25 risk analysis data points. The service scores user data based on an IP address, device, email address, and phone number.
-1.png?width=668&height=363&name=unnamed%20(66)-1.png)
- Name: Enter the name of the rule.
- Run Type: Select the run type of the rule:
- Lead Processing: Runs when the lead is being processed.
- API: Runs on the API of the lead stash.
- Value Modifiers: Select the value modifiers of the rule (Trim Spaces, Convert to integer, Lowercase, Uppercase).
The rest of the fields may differ if you select another device; for the details, please refer to the corresponding iClear services articles.
.png?hsLang=en)
Click the “Add” button to finish.
To temporarily stop the rule, click the “Pause” button in the “Actions” column. Confirm your intention in the pop-up window.
-1.png?width=666&height=224&name=unnamed%20(68)-1.png)
To specify the rule launch order, click the top-pointed arrow button and the bottom-pointed arrow button. Click the “Save Order” button to apply changes.
To edit the rule, click the “Configure” button. In a pop-up window, click the “Edit” button to proceed.
.png?hsLang=en) To delete the rule, click the “Delete” button in the “Actions” column. Confirm your intention in the pop-up window.
To delete the rule, click the “Delete” button in the “Actions” column. Confirm your intention in the pop-up window.
.png?width=669&height=223&name=unnamed%20(70).png)
Data Filters Summary
The Data Filters Summary sub-tab allows you to view the Summary report on configured Data Filters. It displays the filter’s collected activity for a specific date, and how each configured data filter is performing within a Product. By using this report, you can track the effectiveness of your data filters, quickly identify if filters are working as intended, and troubleshoot issues such as filters not triggering or blocking too much/too little data. Note: This tab is displayed only if the “Data Filters” tab is available.-2.png?hsLang=en)
The “Data Filters Summary” report contains the following information:
- Date: The date when the data filter was triggered.
- Filter Name: The name of the data filter.
- Filter Type: The type of the data filter (PL/DNPL / iClear Service).
- Run Type: The run type of the data filter (Lead Processing / API / Reapply).
- Run Count: The number of times the data filter was triggered.
- Filtered: The number of times when data output was passed.
- Not Filtered: The number of times when data output was rejected.
The “Subtotal” row at the bottom of the table shows the summary number for each column.
You can narrow down the search results by using the following filters:
- Date: Select the date range when the data filter was triggered.
- Filter Name: Enter the name of the data filter.
- Filter Type: Select the type of the data filter (PL/DNPL / iClear Service).
- Run Type: Select the run type of the data filter (Lead Processing / API / Reapply).
Click the “Search” button to proceed.