Operators
The “Operators” tab displays information on approved operators and allows you to create, manage, and delete the operators.
To view the Operators list, go to the PBX Management > Setup > Operators section.
-Oct-15-2024-09-56-51-2593-AM.png?hsLang=en)
You can narrow down the search results by using the following filters:
- ID: Enter the unique identification number of the operator.
- Operator: Enter the name of the operator.
- Email: Enter the email of the operator.
- Status: Select the current status of the operator (Active, Deleted, Disabled).
- Extension: Enter the internal extension of the operator.
- Department: Select the related department.
- Queue: Select the related queue.
- Skill: Select the skill of the operator.
- Created: Select the date range of the user creation.
The list of the operators contains the following information:
- ID: The unique identification number of the operator.
- Login: The login of the operator.
- Operator: The full name of the operator with the current status (offline, online).
- Email: The email of the operator.
- Status: The current status of the operator (Active, Disabled).
- Extension: The internal extension of the operator.
- Skill: The skill of the operator.
- Department: The name of the related department.
- Queue: The name of the related queue.
- Created: The date of the operator’s creation.
Click the “Export” button to export all data to the “CSV” file.
Click the “Mass re-save” button to automatically re-save configurations for every queue. Note: Only users with the Developer system role can view this button.
Click the “Add New Record” button to create a new operator and fill in the following fields in the “Add New” pop-up window:
- If the “New User” option is selected:
- Login: Enter the login of the user.
- Email: Enter the email address of the user.
- First name: Enter the first name of the user.
- Last name: Enter the last name of the user.
- Department: Select the department of the user.
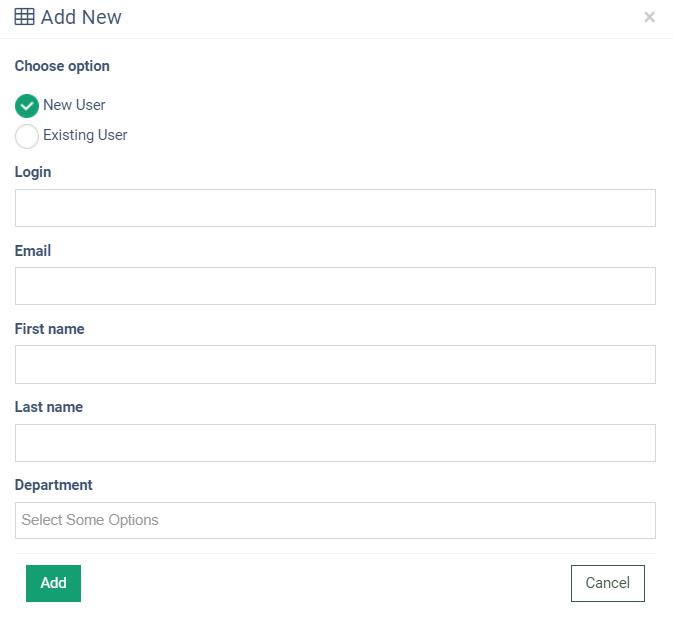
- If the Existing User option is selected:
- Assign To: Select the existing system user who does not have an operator account in the Cloud PBX system and would like to create one. Note: this option is available for the user with any role related to the Cloud PBX.
- Department: Enter/Select the department of the user.
-2.png?hsLang=en)
Click the “Add” button to complete the action.
To configure the Operator, click the “Configure” button in the “Actions” column or click on the ID of the corresponding user.
-Oct-15-2024-10-00-03-6117-AM.png?hsLang=en) Click the “Save” button to finish.
Click the “Save” button to finish.
To change the status of the operator, click the corresponding value in the “Status” column and select the new status of the Operator in a pop-up window.
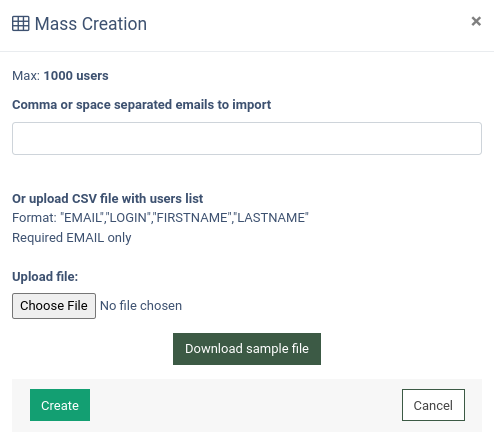
Click the “Mass Creation” button to create a bunch of operators in one operation. Fill in the following information in the pop-up window:
- To add operators manually, fill in the email addresses of the users in the “Comma or space separated emails to import” field. Click the “Create” button to complete the action.
- To import the list of the operators' email addresses from the CSV file, click the “Choose File” button in the “Upload File” field, select the file for the import, and click the “Create” button to complete the action.
Note: The data in the file should be in the exact format - "EMAIL", "LOGIN", "FIRSTNAME", "LASTNAME". The "EMAIL" field is required.
To view the sample of the file format, click the “Download sample file” button.
After creating an operator, it will be displayed in the “Unconfirmed Operators” tab.
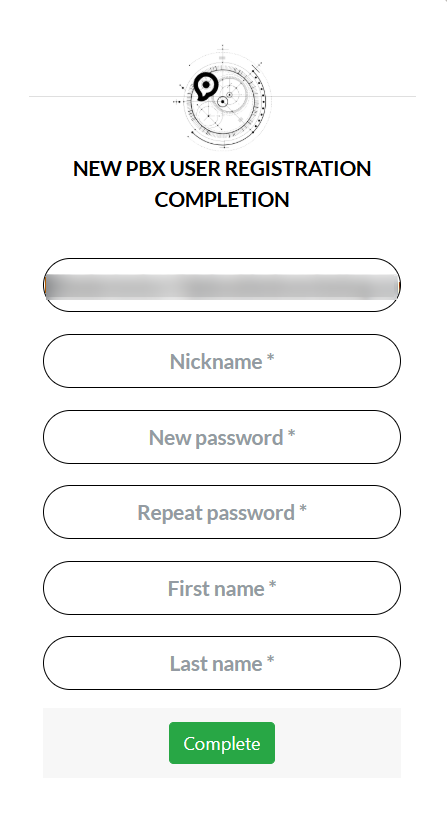
For the created operator the following steps should be performed for approval:
- The user should receive the email from the system and follow the provided link to access the approval form.
- The following form for the user’s approval will be displayed. The user should check and complete the form by filling out the required fields and clicking the “Complete” button to finish the operator’s registration. When the form is completed the new operator will be automatically displayed in the “Operators” tab.
To manage the operator’s settings, click the “Configure” button in the “Action” column. Read more about the Operator configuration page in this Knowledge Base article.
To remove the operator from the list, click the “Delete” button in the “Action” column.
To connect to the Operator`s Zoiper account, click the “Quick Connect” button in the “Action” column. To complete, scan the QR code. Note: To perform the action, the Zoiper app should be installed on your Android/iPhone mobile device.
To log in under the Operator`s role, click the “SuperLogin” button in the “Action” column. Click the “Click here to login” to confirm the action.
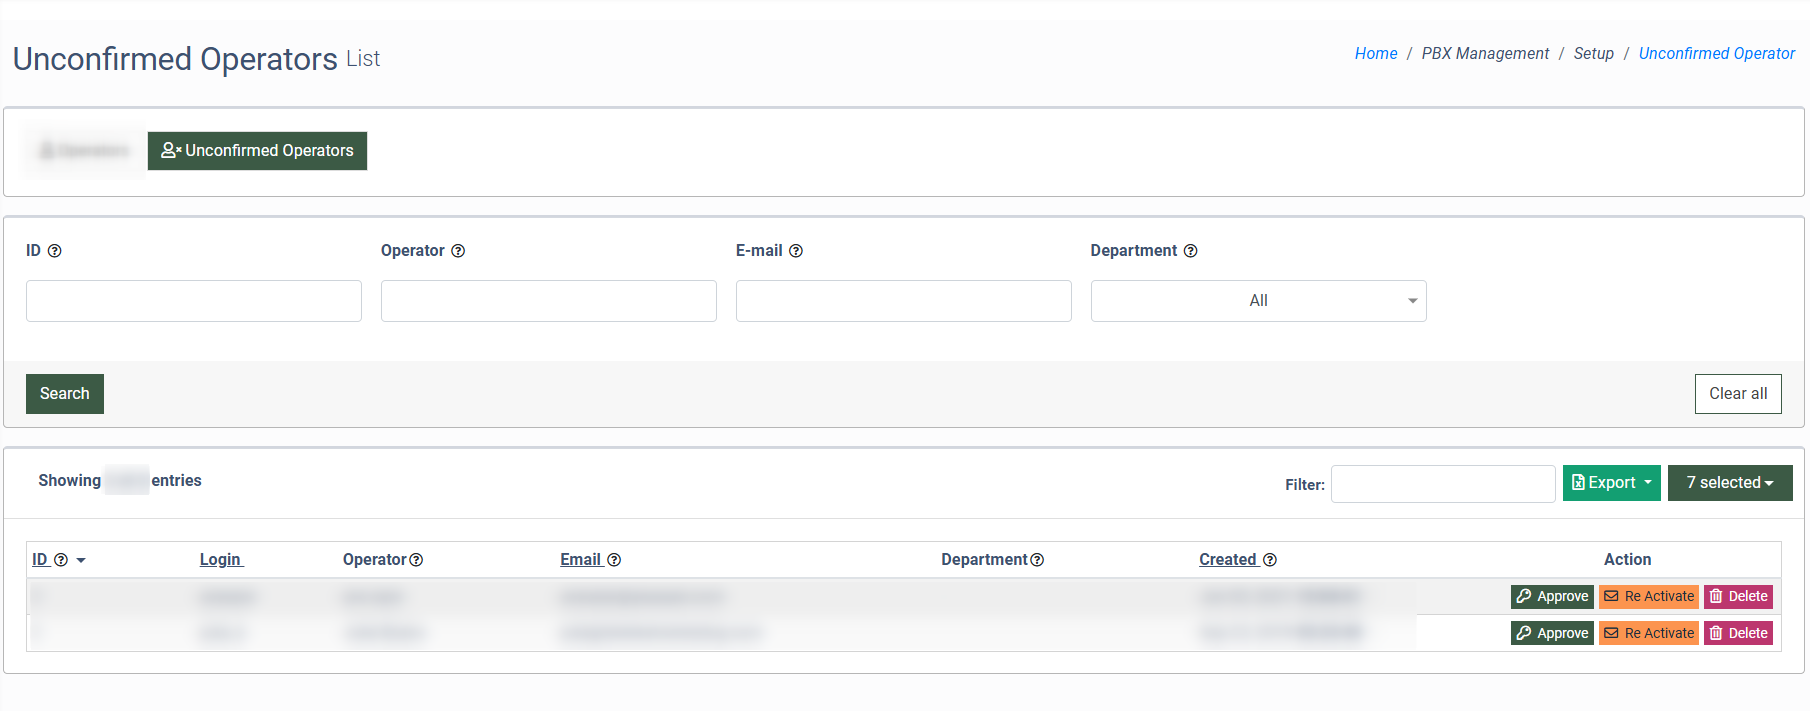
Unconfirmed Operators
The “Unconfirmed Operators” tab displays a list of the new operators that have been created and are waiting for approval.
The list of unconfirmed operators contains the following information:
- ID: The unique identification number of the unconfirmed operator.
- Login: The login of the unconfirmed user.
- Operator: The name of the unconfirmed operator.
- E-mail: The email address of the uninformed operator.
- Department: The name of the related department.
- Created: The date and time of the record creation.
You can narrow down the search results by using the following filters:
- ID: Enter the unique identification number of the unconfirmed operator.
- Operator: Enter the name of the unconfirmed operator.
- E-mail: Enter the email address of the uninformed operator.
- Department: Select the related department.
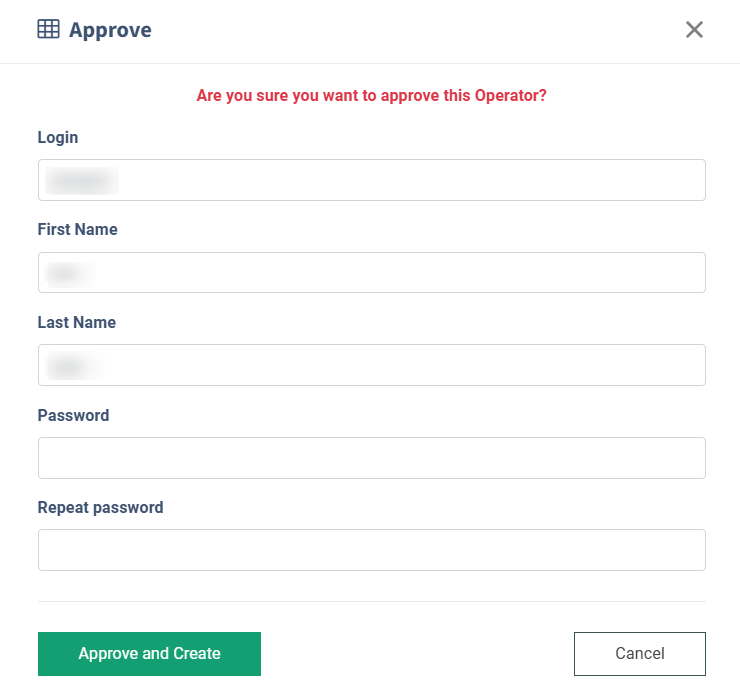
To complete the process of the unconfirmed operator approval, click the “Approve” button in the “Actions” column. Review the information about a new operator you would like to create and complete the approval operation by clicking the “Approve and Create” button in the “Approve” pop-up window.
The created operator will appear in the “Operators” tab.
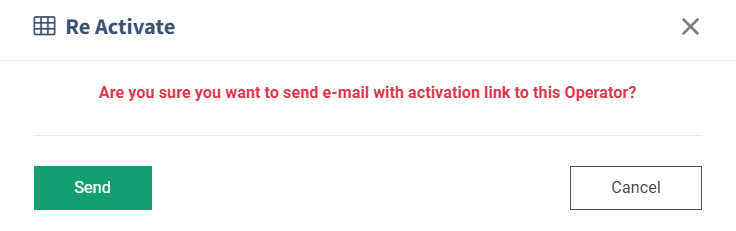
To send the account activation link to the unconfirmed operator, click the “Re Activate” button in the “Actions” column. Confirm the email resending operation by clicking the “Send” button in the “Re Activate” pop-up window.
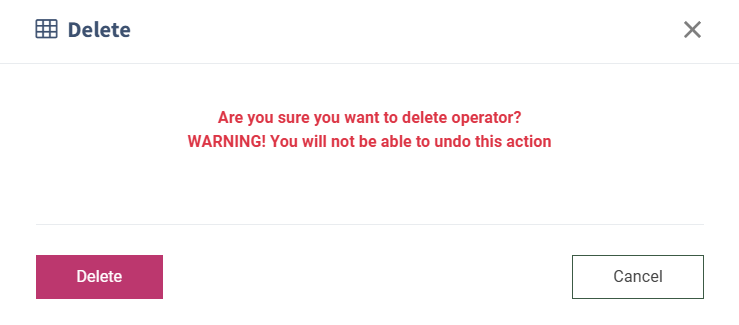
To remove the unconfirmed operator from the list, click the “Delete” button in the “Action” column. For completing the action click the “Delete” button in the “Delete” pop-up window.
Click the “Export” button to export all data to the “CSV” file.