To manage the settings of an operator, go to the PBX Management > Setup > Operators section, select the operator, and click the “Configure” button in the “Action” column.
The following sections can be configured:
General Settings
The “General Settings” tab allows you to manage the general settings of the operator.
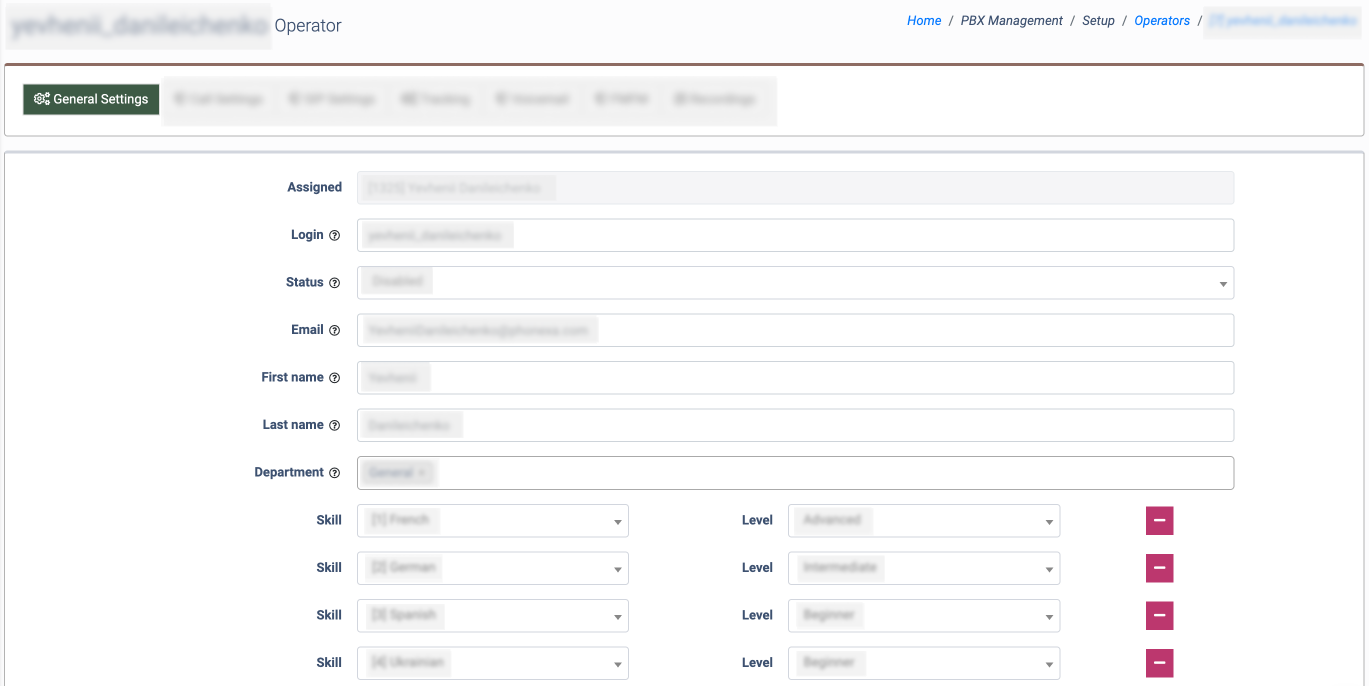
The following general settings are available:
- Assigned: The name of the system user with whom the operator is assigned.
- Login: Enter a login for the operator in the system.
- Status: Select the current status of the operator in the system (Active, Deleted, Disabled). Note: If you select the “Deleted” status for the Operator, the Operator will be deleted from the system.
- Email: The email address provided during the user’s registration.
- First name: Enter the first name of the operator.
- Last name: Enter the last name of the operator.
- Department: Select the related department. Note: At least one department should be selected.
- Skill: Select the skill.
- Level: Select the level for the assigned skill.
To assign a new skill for the operator, click the “Add Skill” button, then select the corresponding skill and its level.

Read more information about the Skills and Skill-based routing in the following Knowledge Base article.
Click the “Save” button to complete the settings.
Call Settings
The “Call Settings” tab allows you to manage call processing settings, such as the possibility to process internal and external calls, view the internal extension, edit the caller ID, and outbound caller ID.
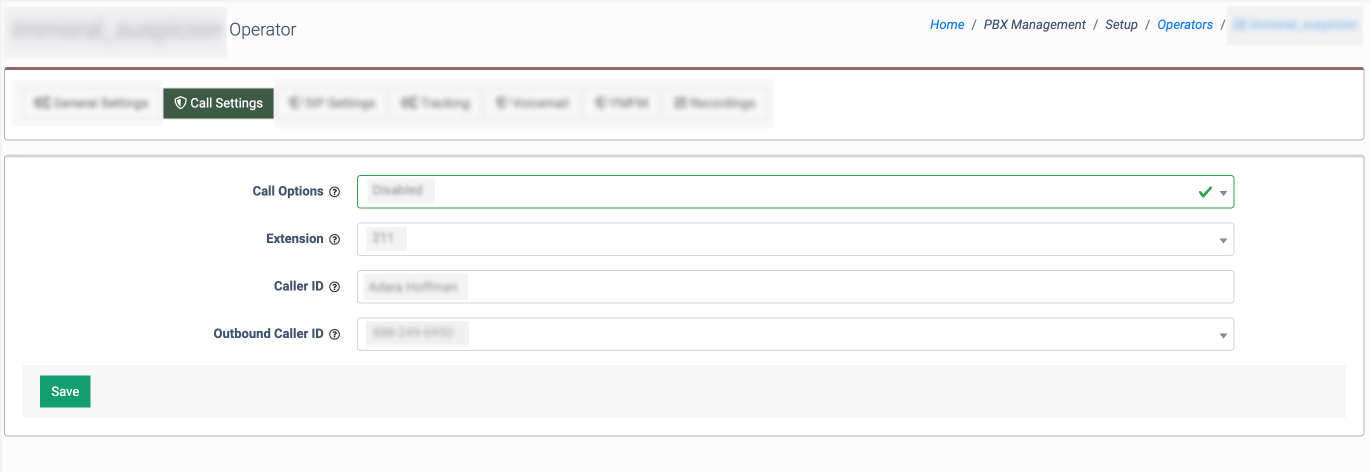
The following call settings are available:
- Call Options: Select the type of outgoing calls that can be initiated by the operator (All, Disabled, Internal). You can select one of the following options to assign the call options for the operator:
-
- All: An operator can contact both internal and external numbers.
- Disabled: An operator can’t initiate any outgoing calls. But it is possible to receive incoming calls.
- Internal: An operator can contact only internal numbers provided in the system.
- Extension: Select the internal extension number of the operator (only for the internal calls between the operators in the system).
- Caller ID: Enter the name of the operator for the outgoing internal calls.
The text or number is displayed on the receiving end of the SIP phone. The name of the operator is shown as a default option. - External Caller ID: Select the phone number for the external outgoing calls. The number is displayed on the receiving end of the dialed contact.
Click the “Save” button to complete the settings.
SIP Settings
The “SIP Settings” tab allows you to manage the SIP configuration. Read more about SIP Trunking in this Knowledge Base article.
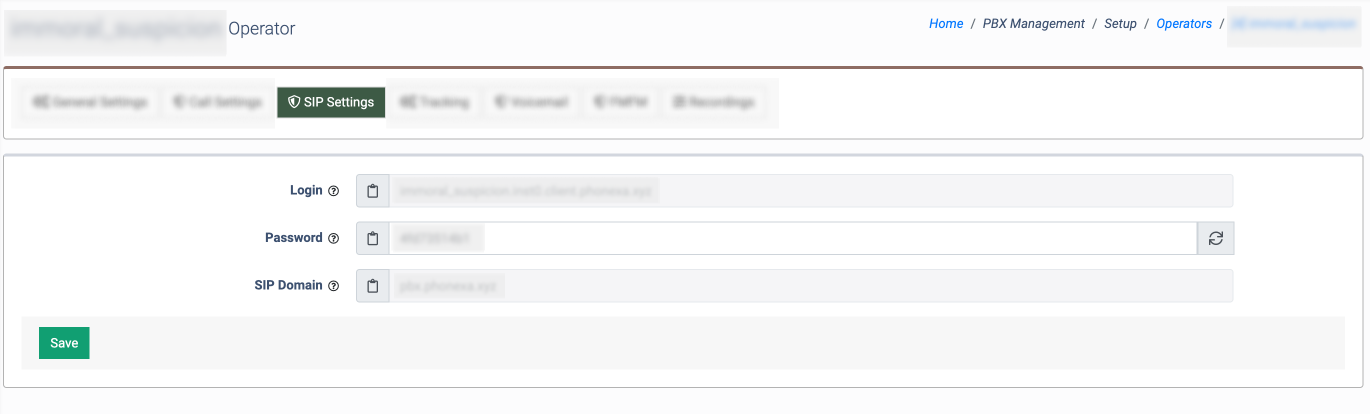
The following SIP settings are available:
- Login: The SIP Login of the operator used for the IP Phone authorization in Phonexa’s PBX. To copy the operator`s login to the clipboard, click the “Copy to clipboard” button.
- Password: The password used for the IP Phone authorization in Phonexa’s Cloud PBX. To copy the operator`s password to the clipboard, click the “Copy to clipboard” button. To generate a new password, click the “Refresh” button in the same tab.
- SIP Domain: The gateway for the IP Phone authorization in Phonexa’s PBX. To copy the domain to the clipboard, click the “Copy to clipboard” button.
Click the “Save” button to complete the settings.
Tracking
The “Tracking” tab allows you to monitor the various events in the system (e.g., inbound call, call ended, call transferred, etc.) and set the actions to be automatically triggered by them.
![]()
Read more information about the Event Tracking configuration for the Cloud PBX in the following Knowledge Base article.
Voicemail
The “Voicemail” tab allows you to manage the Voicemail settings. Read more about the Voicemals and Voicemail Summary Report in the following Knowledge Base article.
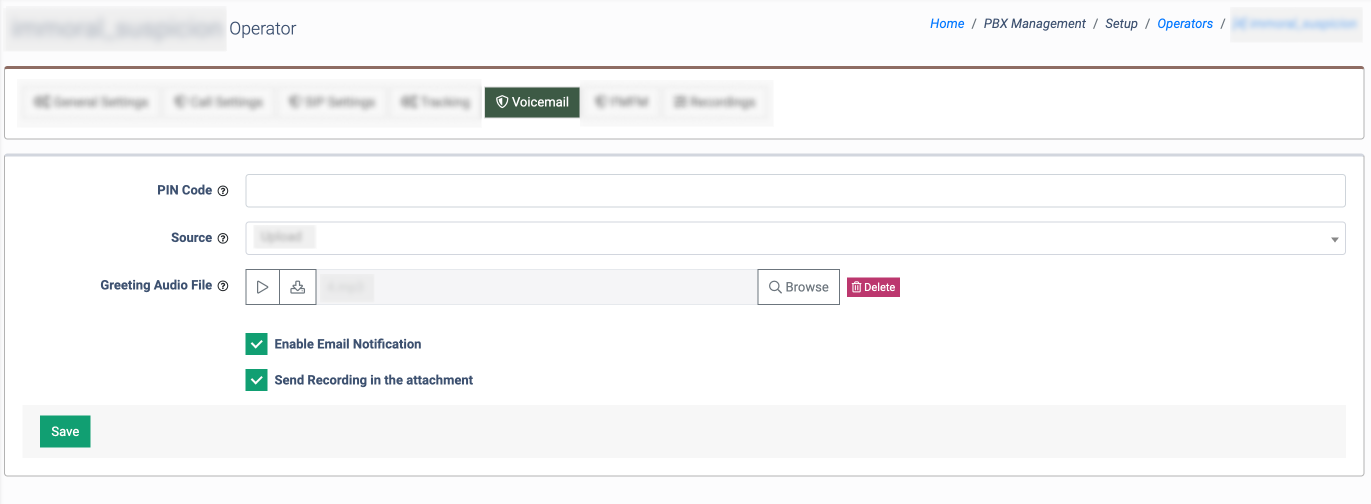
The following voicemail settings are available:
- PIN Code: Enter the pin code of the related voicemail. The pin code is required for accessing the voicemail box via a call from an external phone number. The user is dialing the specific phone number, entering the pin code, and getting access to the voicemail.
- Source: Select the source of the voicemail greeting file. You can upload the file from your PC using the “Upload” option, or select the file using the “Media library” option. Read more about the Audio Message Library for Cloud PBX in the following Knowledge Base article.
- Greeting Audio File: Select the audio for the voicemail greeting (if enabled). To play the uploaded audio file, click the “Play” button. To download the uploaded file, click the “Download” button. To remove the audio file, click the “Delete” button, and in the pop-up window, click the “Yes, delete” button to confirm.
To receive email notifications about new voicemail messages, check the “Enable Email notification” box.
To receive a voicemail via email as an attachment, check the “Send Recording in the attachment” box. This option will be displayed if the “Enable Email Notification” box is checked.
Click the “Save” button to complete the settings.
FMFM (Find Me Follow Me)
The “FMFM” tab allows you to configure the settings for the redirect option in case of the operator’s unavailability.
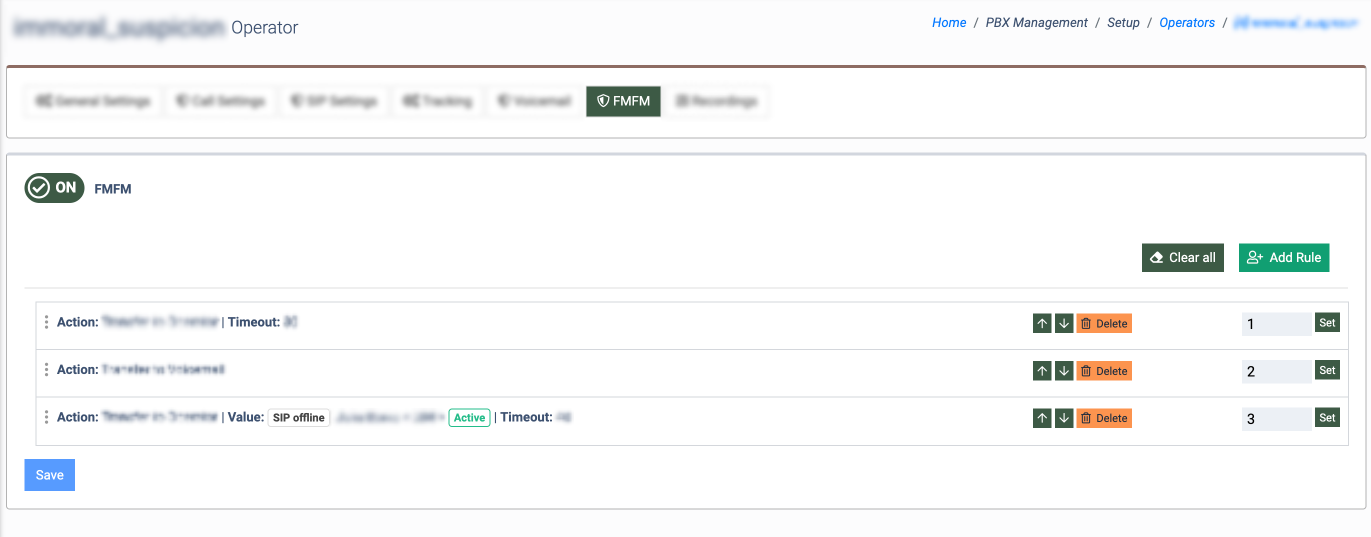
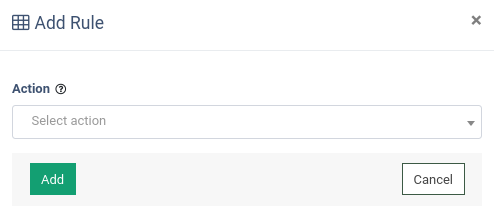
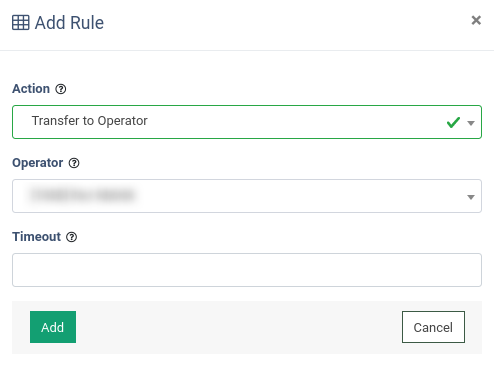
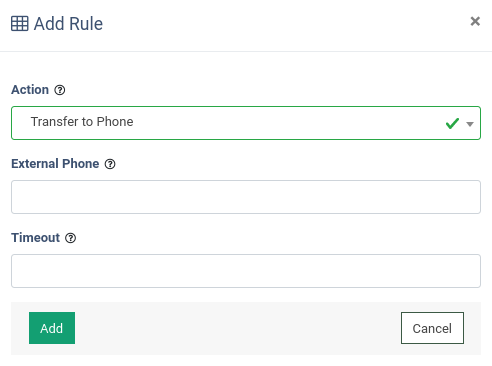
To add a new FMFM action, click the “Add Rule” button and fill out the following fields in the “Add Rule” pop-up window:
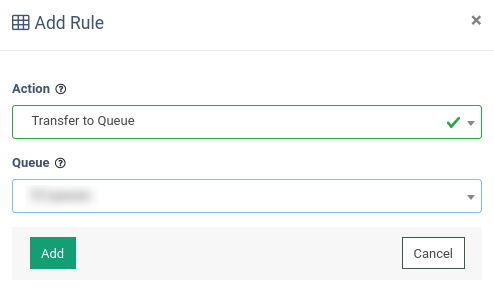
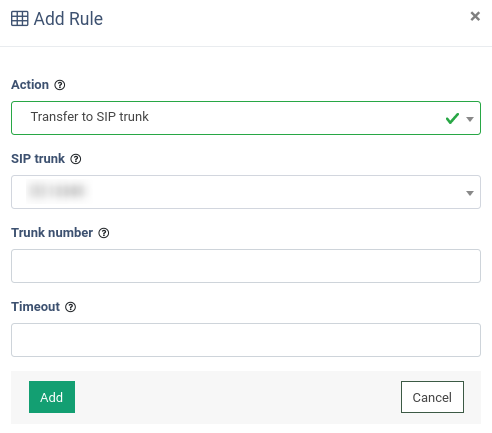
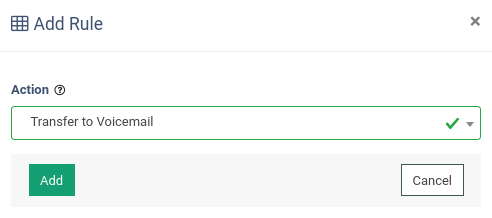
- Action: You can select the scenario of the call proceeding in the event of the operator’s unavailability:
- Transfer to Operator: The call will be transferred to the specific operator (the “Operator” field) after the timeout is reached (the “Timeout” field).
- Transfer to Phone: The call will be transferred to the specified external phone number (the “External Phone” field) after the timeout is reached (the “Timeout” field).
- Transfer to Queue: The call will be transferred to the calls’ queue (the “Queue” field). Read more about the Queue section in the following Knowledge Base article.
- Transfer to SIP trunk: The call will be transferred to the specified trunk (the “SIP trunk” field) under the particular trunk number (the “Trunk Number” field) after the timeout is reached (the “Timeout” field). Read more about the SIP Trunk option in this Knowledge Base article.
- Transfer to Voicemail: The call will be transferred to the operator’s voicemail.
Click the “Add” button to complete the action.
You can create and manage the chain of transfers in case of the operator’s unavailability.
Three options for FMFM order management are available:
- Use the arrow up/arrow down buttons to move the option through the list.
- Enter the number that represents the order in the chain in the corresponding field of the record.
- Move the record through the list by using the drag and drop option (the three dots element at the beginning of the record).

Note: An option to push the call forward after the voicemail is also available. For this, the caller should press the “#” button on the keypad of his phone.
To save the added FMFM settings, click the “Save” button.
To discard the FMFM settings, click the “Cancel” button.
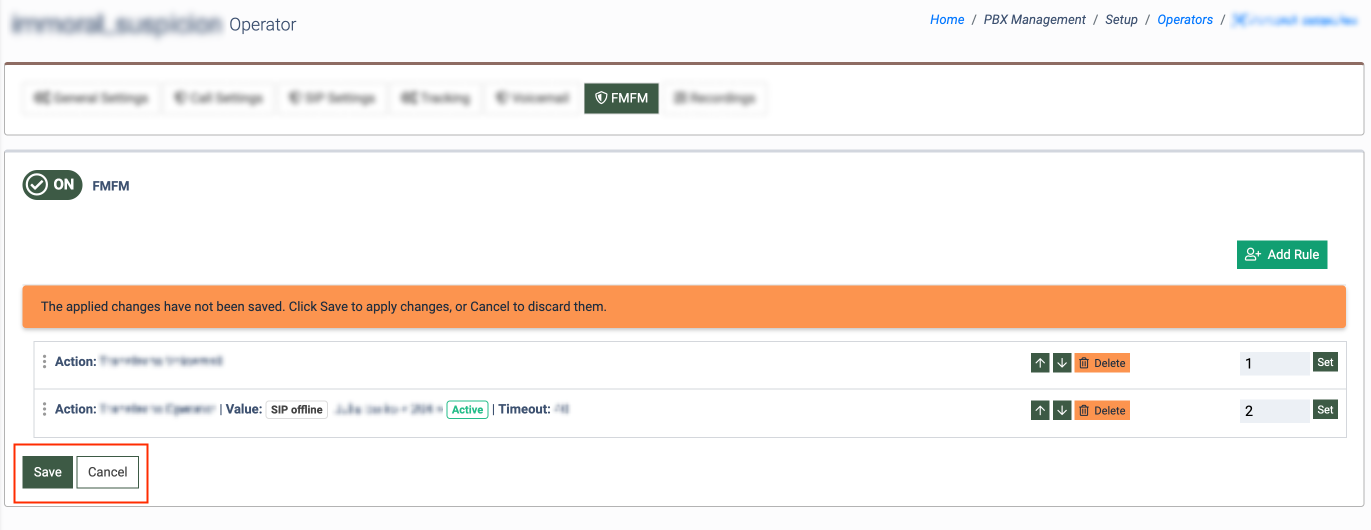
To delete the action from the FMFMF list, click the “Delete” button in the corresponding step.
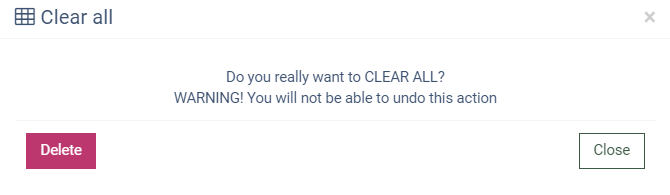
To delete the whole flow of the FMFM, click the “Clear All” button. Click the “Delete” button in the “Clear all” pop-up window to complete the action.
Recordings
The “Recordings” tab allows you to configure and manage the call recording settings that are applied to the particular Operator.
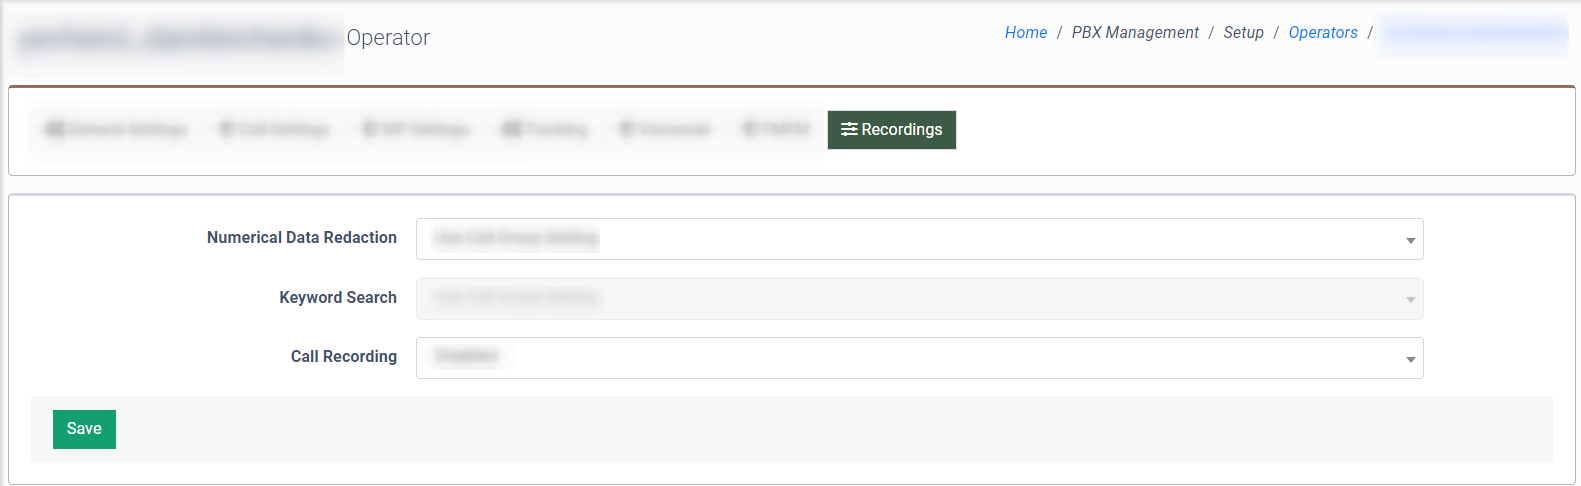
The following settings are available:
-
Numerical Data Redaction: Removes any numeric data, such as bank account, credit card, or social security numbers, from the audio recording or during the conversation. To turn on or turn off this feature, select the “Enabled” or “Disabled” option,s respectively. To use the settings applied on the Call Group level, select the “Use Call Group Setting” option.
-
Keyword Search: Searches for phrases or keywords in audio recordings. To turn on or turn off this feature, select the “Enabled” or “Disabled” options, respectively. To use the settings applied on the Call Group level, select the “Use Call Group Setting” option. Read more about the Keyword Search option in the following Knowledge Base article.
-
Call Recording: Select the call recording option for the ongoing operator (Use Call Group Setting, All, Disabled, Incoming, or Outgoing). Note: The priority of the ongoing call recording settings applied on the Operator’s level is higher than the one set on the Call Group level. The priority of the ongoing call recording settings applied on the related queue level is higher than the one set on the Operator’s level.
Click the “Save” button to complete the settings.