Use case: The instance owner or employee (whoever has an admin role) can add a block called "Add a Page as a Block" on the Component Dashboard. That means the admin can create a custom HTML page (on our Pages functionality) that will be displayed as a block on the desired component dashboard.
To access, go to the System Management > General > Pages section.
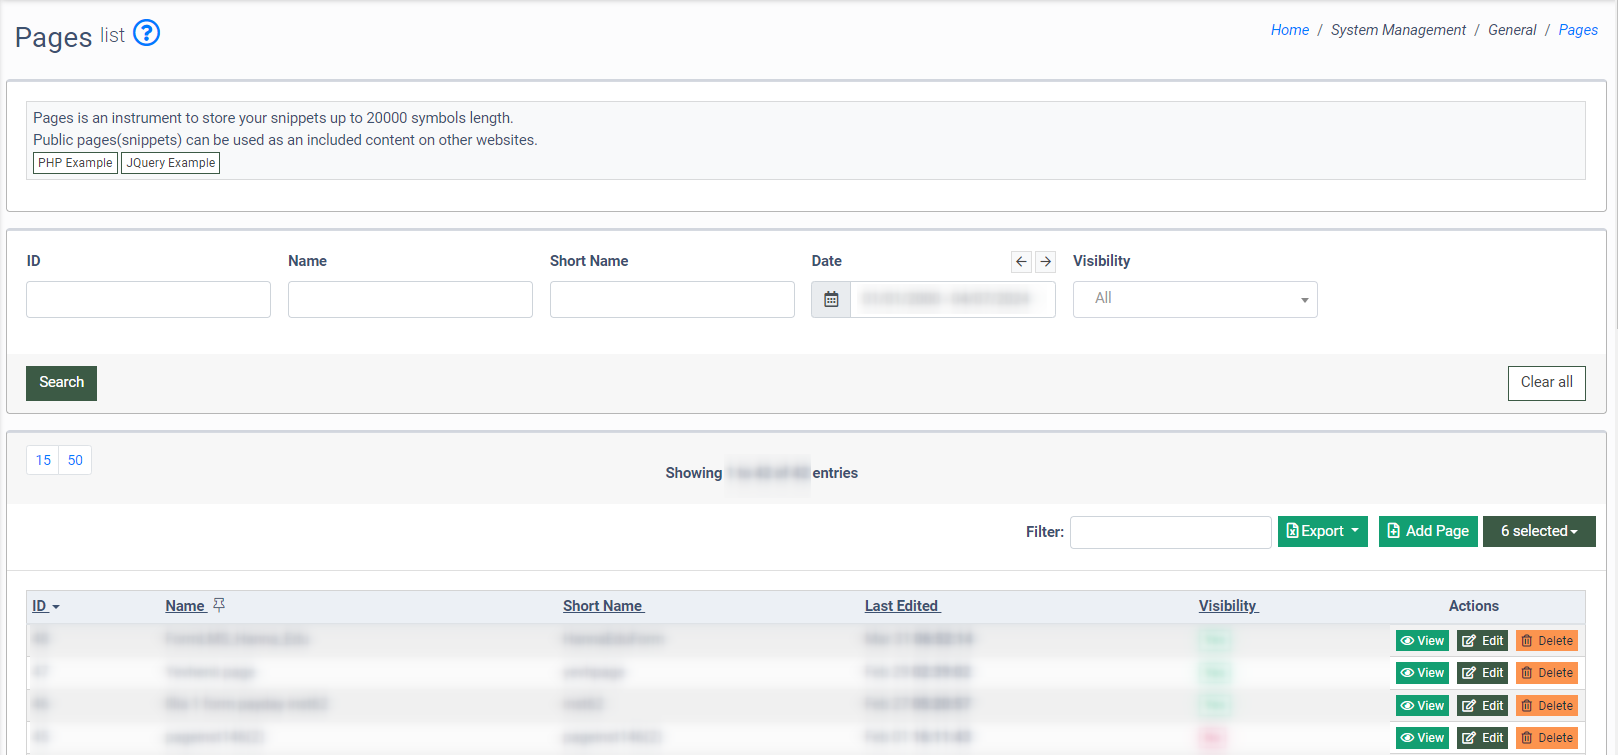
The Pages list contains the following information:
- ID: The unique identification number of the page.
- Name: The name of the page.
- Short Name: The short name of the page.
- Last Edited: The date when the page was modified last time.
- Visibility: The publicity level of the page (Yes / No).
You can narrow down the search results by using the following filters:
- ID: Enter the unique identification number of the page.
- Name: Enter the name of the page.
- Short Name: Enter the short name of the page.
- Date: Select the date when the page was modified last time.
- Visibility: Select the publicity level of the page.
To add a new page, click the “Add Page” button and fill in the following fields in the "Add Page" pop-up window:
- Name: Enter the name of the new page.
- Short Name: Enter the short name of the page.
- Content: Fill in the initial script of the page.
- Rate Limiter: Select the option for the rate limitation. This limitation is for the number of page openings and loading per particular time range.
- Low Volume (10 / minute, 50 / 10 minutes)
- Medium Volume (50 / minute, 250 / 10 minutes)
- High Volume (120 / minute, 600 / 10 minutes)
- Very High Volume (360 / minute, 1800 / 10 minutes)
To use the template for Publisher registration, click the “Publisher Registration Template” button, and the system will pre-fill the initial script of the page.
Note: Use the additional settings blocks below to set up the Publisher Registration Page.
-Oct-28-2024-10-58-44-9143-AM.png?hsLang=en)
To use the template for Buyer registration, click the “Buyer Registration Template” button, and the system will pre-fill the initial script of the page.
Note: Use the additional settings blocks below to set up the Publisher Registration Page.
-Oct-28-2024-10-59-45-5900-AM.png?hsLang=en)
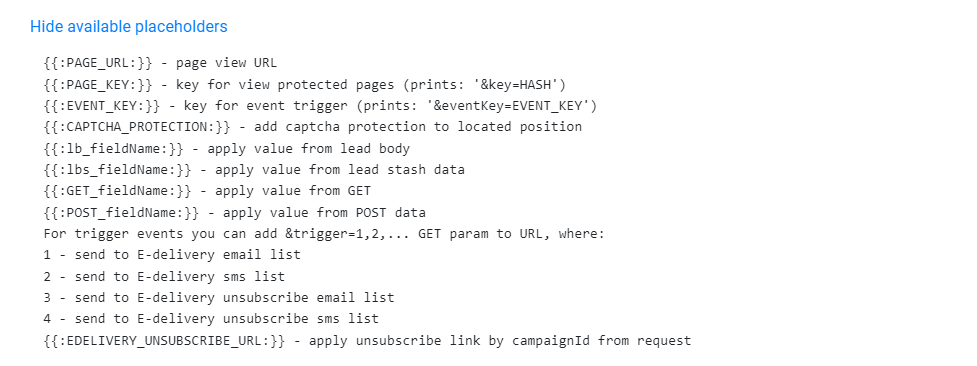
To show or hide the list of available placeholders, click the “Show available placeholders” or “Hide available placeholders” link. The list of available placeholders will be displayed in the drop-down window.
- Visibility: Select the publicity level of the page. Mark the checkbox to give all users access to the page using the direct link. If the checkbox is not marked, the page is accessible by the direct link and a key. The access key is generated automatically for this option. You can view the key in the URL of the page.
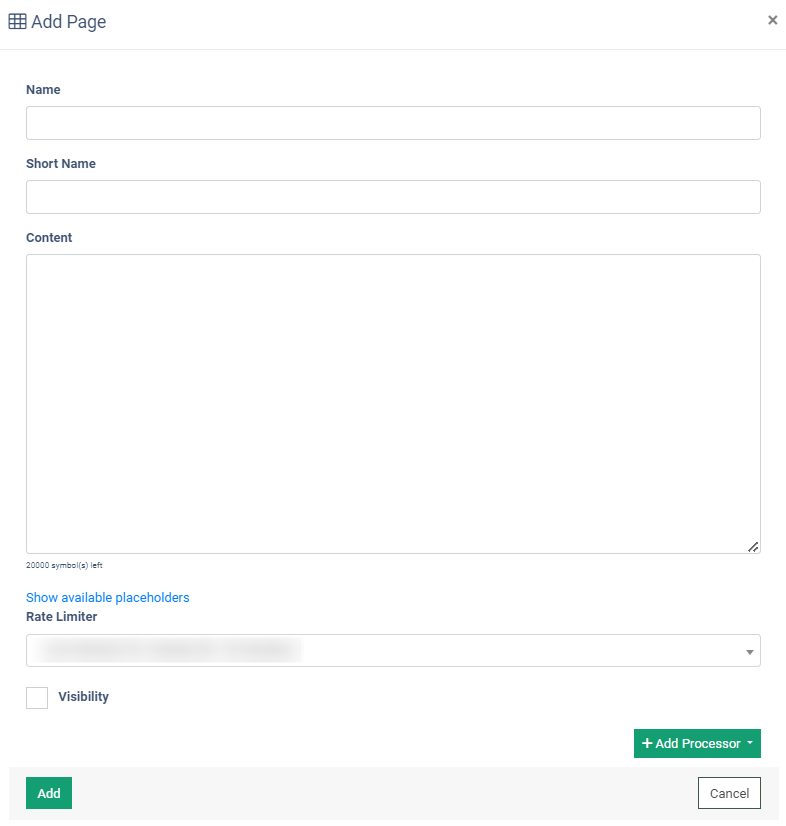
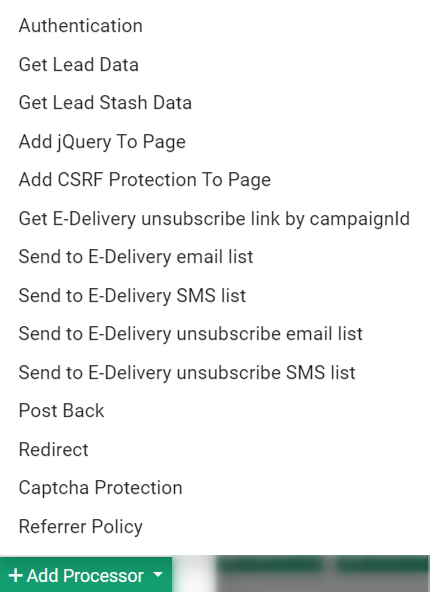
To add a specific processor for the page, click the “Add Processor” button and select the option from the list:
- Authentication: The processor allows you to set the page access password.It prevents anyone from accessing the page without entering the password.
- Get Lead Data: The processor enables access to lead body data through the parameter name along with the lead ID or redirect ID embedded in the page URL. It retrieves the lead data field from the database. By default, this data isn't displayed, but you can include it as a placeholder value on the page if you specify it accordingly (see "Show available placeholders").
- Get Lead Stash Data: The processor allows you to get the lead parameters from the Lead Stash by adding the bKey=keyName&bVal=value parameters to the URL of the page. It works together with the "Get Lead Data" processor, which retrieves data from the Lead Stash associated with the lead you've previously accessed. This functionality also introduces new placeholders, denoted as , which you can use to incorporate this data into your page content effortlessly.
- Add jQuery To Page: The processor lets you insert a script that activates the jQuery library right at the start of your page. You can learn more about jQuery and its capabilities on the website https://jquery.com/. This feature saves you from manually adding jQuery to your page, helping streamline your development process and reduce the amount of code you need to write.
- Add CSFR Protection to Page:The processor is specifically designed for registration pages, providing an essential layer of spam protection tailored for these pages.
- Get E-Delivery unsubscribe link by campaignId: The processor enables retrieval of the unsubscribe link for a contact's email that has been processed through an Email Campaign. It functions as described, using input parameters (campaignId and email) from the GET parameters (specifically, email and campaignId) to generate the correct unsubscribe E-Delivery link on the page.
- Send to E-Delivery email list: The processor retrieves the value of the email lead body field and sends it to the corresponding E-Delivery Contact List. It also adds the contact to E-Delivery lists. This functionality depends on the presence of data and the activation of the "Get Lead Data" processor.
- Send to E-Delivery SMS list: The processor enables you to fetch the value stored in the phone number lead body field and transfer it to the appropriate E-Delivery Contact List. It also includes the contact in E-Delivery lists. This feature operates only when the "Get Lead Data" processor is active and data is available.
- Send to E-Delivery unsubscribe email list: The processor lets you retrieve the email lead body field value and forward it to the corresponding E-Delivery Unsubscribe List. Additionally, it includes the contact in E-Delivery lists. This functionality is active when the "Get Lead Data" processor is operational and data is present.
- Send to E-Delivery unsubscribe SMS list: The processor allows you to get the value of the phone number lead body field and send it to the corresponding E-Delivery Unsubscribe List. The processor adds the contact to E-Delivery lists. This functionality is active when the "Get Lead Data" processor is operational and data is present
- Post Back: The processor allows you to send the post request to the particular URL when the page loading is completed. Simple post back. Supports (or at least should support) all the placeholders listed in the "Show available placeholders" section.
- Redirect: The processor allows you to make a redirect to the particular URL when the page loading is completed. The processor performs an unconditional redirect to another page. Supports placeholders and different redirect strategies. The redirect Strategy is needed to show/hide the source page of the redirect in different scenarios.
- Captcha Protection: The processor Is used only for registration pages. Adds the most useful layer of the spam-protection for registration pages.
- Refer Policy: The processor sets the Referrer Policy to the page. Specific cases that are usually used in "Redirect" scenarios.
Click the “Add” button to complete the action.
To review and check the existing page, click the “View” button in the “Action” column.
To manage the settings of the existing page, click the “Edit” button in the “Action” column.
To remove the page from the list, click the “Delete” button.
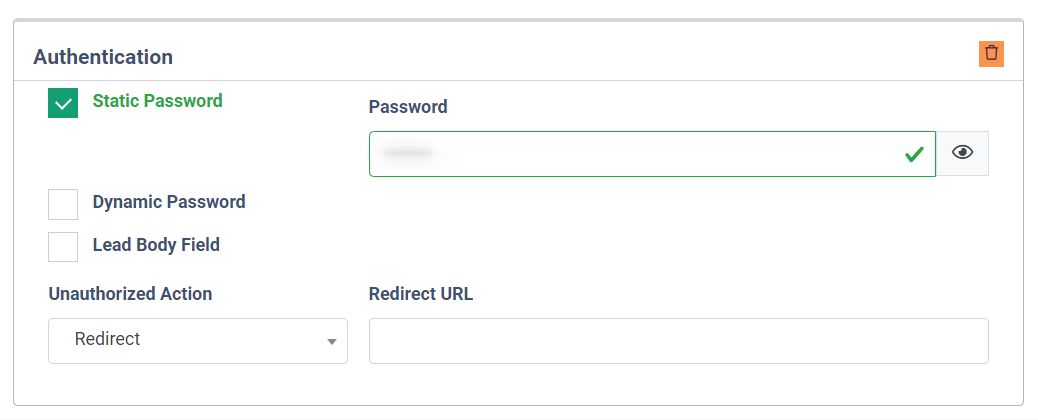
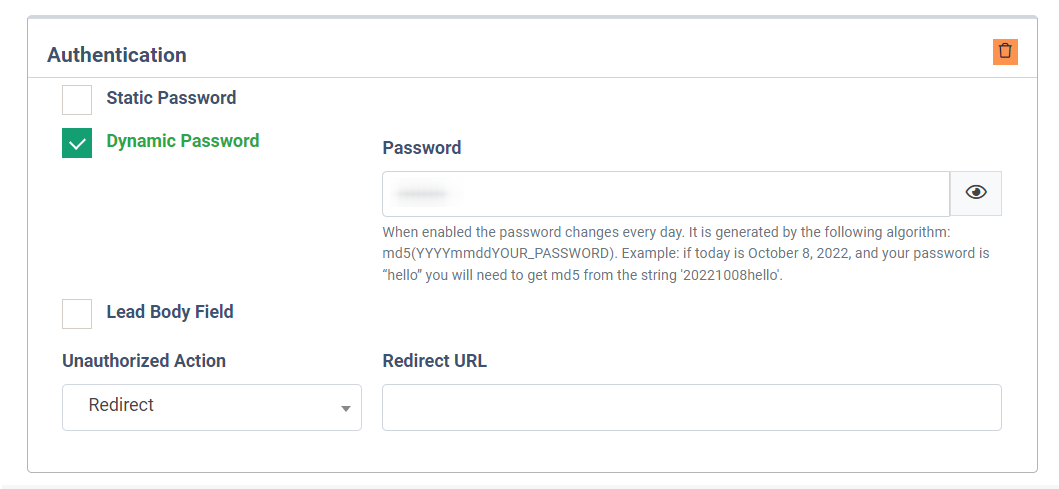
The “Authentication” processor
The “Authentication” processor allows you to set the page access password using one of the available algorithms. This processor prevents anyone from accessing the page without entering the password.
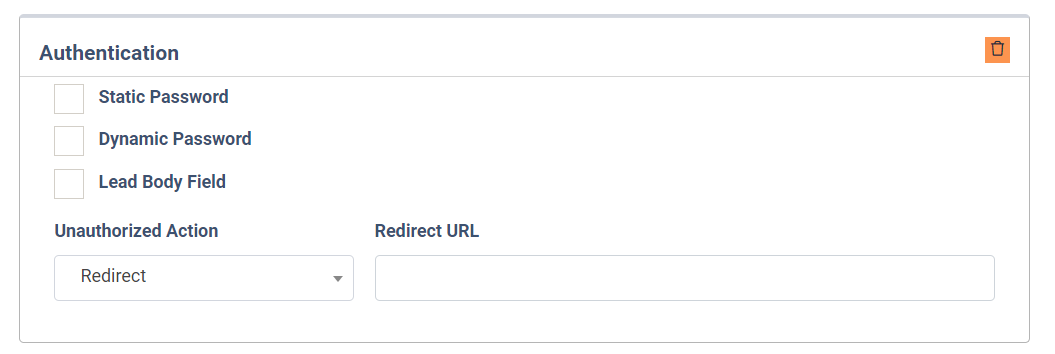
The following option for the password setup is available:
- Static Password: Enter the page access static predefined password in the “Password” field.
- Dynamic Password: Enter the password in the “Password” field that will be used as a base to generate passwords daily, according to the provided algorithm.
- Lead Body Field: Enter the name of the Lead Body field into the “Field Name” data field. The system will pull the value of the selected Lead Body field and use it as a page access password. To access the Lead Body field value, add the “Get Lead Data” processor with the corresponding settings. Сompares the "password" value to the actual lead body field value to ensure that this is actually the client who came to this page. Will properly work only if you add the "Get Lead Data" processor to the page with the "Get Lead Body Data" checkbox. The parameter for the lead data uploading should be added to the URL of the page as well (See example here: https://httpbin.org/page/view?id=127&leadId=W_*) .

- Unauthorized Action: Select the page processing option if the authorization time is exceeded or failed due to an incorrect password.
- Redirect: The user will be redirected to the particular URL.
- Redirect URL: Enter the URL to which the user will be redirected.
- Message: The page with the particular message will be displayed for the user.
- Message text: Enter the text of the message.

The “Get Lead Data” processor
The “Get Lead Data” processor allows you to get the lead body data by using the selected parameter combinations (parameter + lead ID / parameter + redirect ID) in the URL of the page. You can also use the lead parameters in other page sections (for example, getting lead data in the Content section).
The processor gets the lead data field from the DB. Does not output this data by default, but can be used in other processors or as the placeholder value on the page if you add this placeholder to it (see "Show available placeholders"). Example: if the field name is "email" - you'll need to add .
To make it work you need to specify "Get Param Name" and navigate to the page with this param (smth like "https://leads.domain.com/page/view?id=32&rid=LEADID_OR_REDIRECTID". LeadID or Redirect ID can be taken from the lead. To get those you'll need to set up the integration to send it to you or build your page into the "lead redirect" process. If "Get Lead Body Data" will only pull the "basic" lead parameters, such as a date, status, etc.

- Get Param Name: Enter the name of the parameter by which you would like to get the lead data.
- Get Lead Data By: Select the parameter that you will add to the URL of the page for getting the lead data (By Lead ID, By Redirect ID).
- Get Lead Body Data: Check the box to get full data from the lead body data section.
The “Get Lead Stash Data” processor
The “Get Lead Stash Data” processor allows you to get the lead parameters from the Lead Stash by adding the bKey=keyName&bVal=value parameters to the URL of the page. The search can be done by one key only, for example: email, cellPhone, emailPhoneHash, etc Placeholders with parameters should be defined in the following way: amount=, zip=. Works in pair with the "Get Lead Data" processor. Will pool lead stash data for the lead you got using the "Get Lead Data" processor. Adds more placeholders -

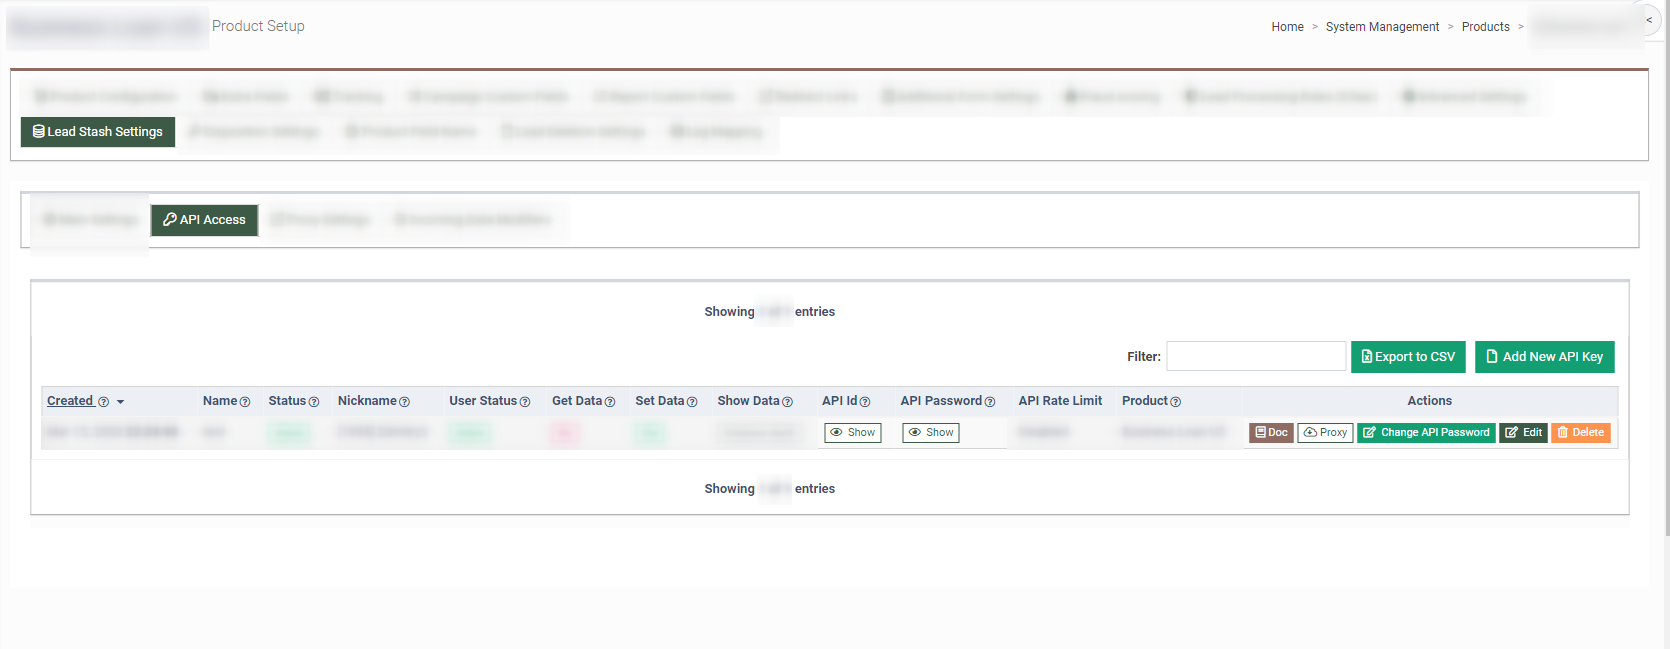
- API ID: Enter the API ID of the Lead Stash.
- API Password: Enter the API password for the Lead Stash.
You can get the API ID and Password from the Product Setup section. To view the corresponding information, go to the System Management > Products > Product Setup section. Select the “Lead Stash Settings” tab and go to the “API Access” subtab.
To get the API ID, click the “Show” button in the “API Id” field.
To get the App Password, click the “Show” button in the “API Password” field.
 The “Add jQuery To Page” processor
The “Add jQuery To Page” processor allows you to add a script for enabling the jQuery library at the beginning of the page. Once the processor is added, you can create scripts in the “Content” field using the jQuery library. Find the description of what is jQuery on the website https://jquery.com/ Use this feature to save some "Symbols" on the page and not to add them manually.
![]()
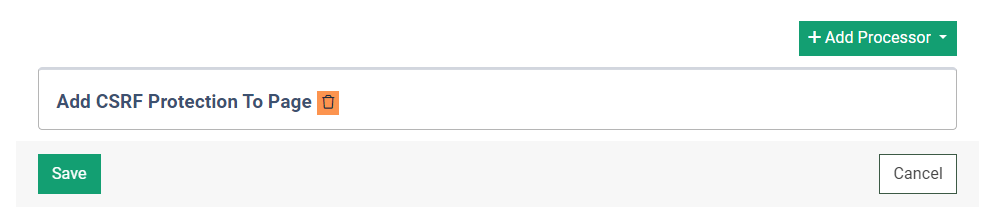
The “Add CSFR Protection to Page” processor
The “Add CSFR Protection to Page” processor is used only for registration pages. Adds the most useful layer of the spam-protection for registration pages.
The “Get E-Delivery unsubscribe link by campaignId” processor
The “Get E-Delivery unsubscribe link by campaignId” processor allows you to get the unsubscribe link for the existing contact email that has been processed through the Email Campaign. The unsubscribe link can be obtained by using the email address and campaign ID. For proper processing the placeholder should be added to the Content of the Page.
Input parameters (campaignId & email) for unsubscribe are taken from GET params - email & campaignId. Is needed to form the correct unsubscribe E-Delivery link on the page.
![]()
The “Send to E-Delivery email list” processor
The “Send to E-Delivery email list” processor allows you to get the value of the email lead body field and send it to the corresponding E-Delivery Contact List. The processor adds the contact to E-Delivery lists. Works only if the "Get Lead Data" processor is on and there is data.
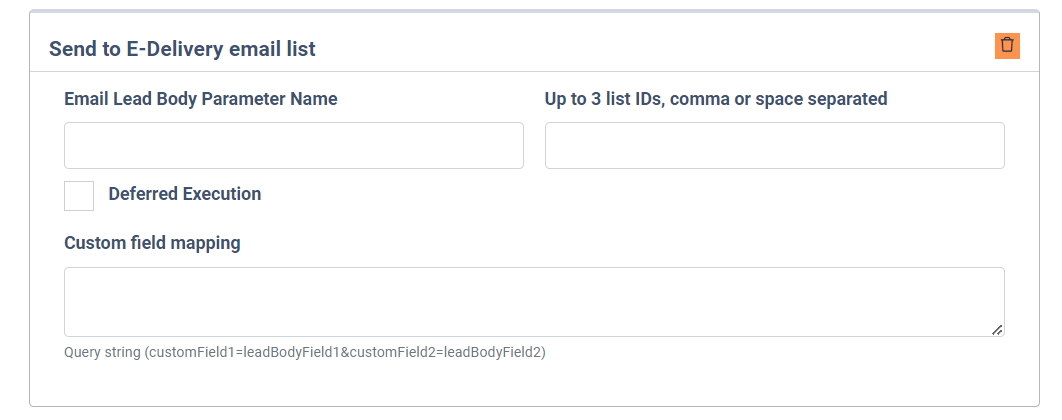
- Email Lead Body Parameter Name: Enter the name of the lead body field from which you would like to get the email value(example: lb_email).
- Up to 3 list IDs, comma or space separated: Enter the list IDs to which the obtained emails would be added.
- Deferred Execution: Check the box to add emails to the selected lists manually by clicking the provided link. The link is active for five minutes. The data is added to the selected lists automatically by default.
- Custom field mapping: Enter the name of the custom field along with the name of the field from the Lead Body. Note, that the custom field should be created in the List Management > All Contacts section > the “Field Management” tab. Read more information about this section in the Knowledge Base article.
The “Send to E-Delivery SMS list” processor
The “Send to E-Delivery SMS list” processor allows you to get the value of the phone number lead body field and send it to the corresponding E-Delivery Contact List.
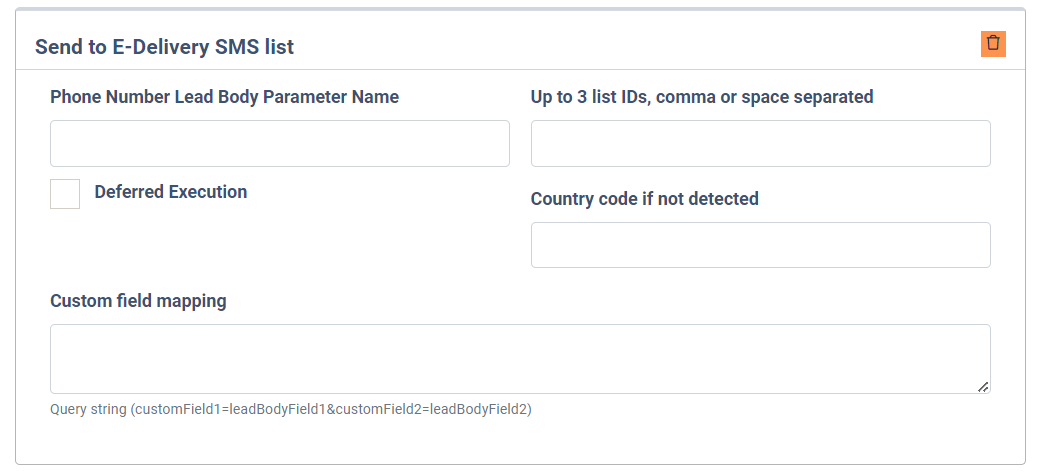
- Phone Number Lead Body Parameter Name: Enter the name of the lead body field from which you would like to get the phone number value (example: lb_cellPhone).
- Up to 3 list IDs, comma or space separated: Enter the list IDs to which the obtained phone numbers would be added.
- Deferred Execution: Check the box to add phone numbers to the selected lists manually by clicking the provided link. The link is active for five minutes. The data is added to the selected lists automatically by default.
- Country code if not detected: Enter the country code. It is automatically added to the phone numbers whose country code the system is unable to define.
- Custom field mapping: Enter the name of the custom field along with the name of the field from the Lead Body. Note, that the custom field should be created in the List Management > All Contacts section > the “Field Management” tab. Read more information about this section in the Knowledge Base article.
The “Send to E-Delivery unsubscribe email list” processor
The “Send to E-Delivery unsubscribe email list” processor allows you to get the value of the email lead body field and send it to the corresponding E-Delivery Unsubscribe List. The processor adds the contact to E-Delivery lists. Works only if the "Get Lead Data" processor is on and there is data.
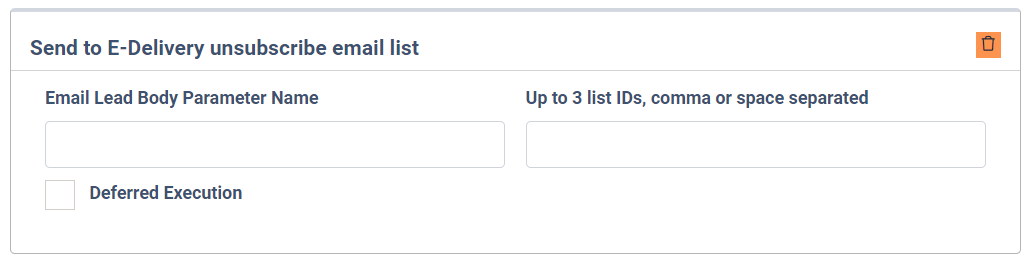
- Email Lead Body Parameter Name: Enter the name of the lead body field from which you would like to get the email value.
- Up to 3 list IDs, comma or space separated: Enter the unsubscribe list IDs to which the obtained emails would be added.
- Deferred Execution: Check the box to add emails to the selected lists manually by clicking the provided link. The link is active for five minutes. The data is added to the selected lists automatically by default.
The “Send to E-Delivery unsubscribe SMS list” processor
The “Send to E-Delivery unsubscribe SMS list” processor allows you to get the value of the phone number lead body field and send it to the corresponding E-Delivery Unsubscribe List. The processor adds the contact to E-Delivery lists. Works only if the "Get Lead Data" processor is on and there is data.
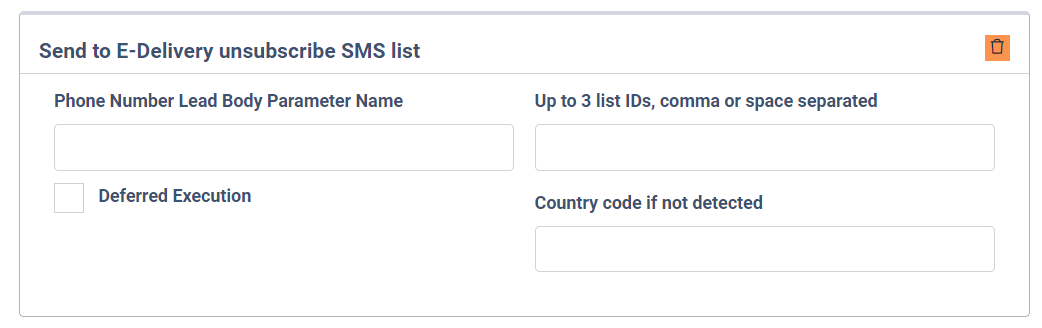
- Phone Number Lead Body Parameter Name: Enter the name of the lead body field from which you would like to get the phone number value.
- Up to 3 list IDs, comma or space separated: Enter the unsubscribe list IDs to which the obtained phone numbers would be added.
- Deferred Execution: Check the box to add phone numbers to the selected lists manually by clicking the provided link. The link is active for five minutes. The data is added to the selected lists automatically by default.
- Country code if not detected: Enter the country code. It is automatically added to the phone numbers whose country code the system is unable to define.
The “Post Back” processor
The “Post Back” processor allows you to send the POST request to the particular URL once the page is fully loaded. You may add available placeholders to the URL according to your preference. Simple post back. Supports (or at least should support) all the placeholders listed in the "Show available placeholders" section.
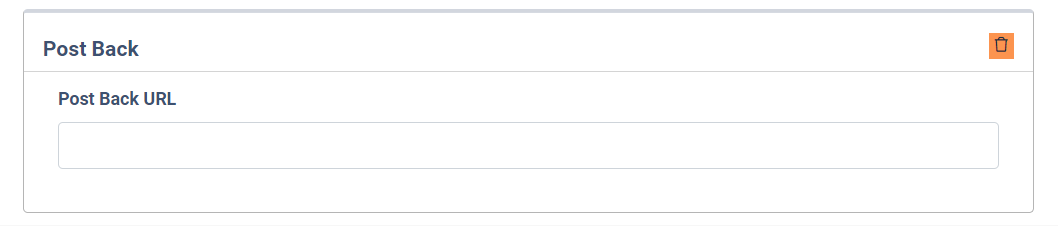
- Post Back Url: Enter the URL for the post request. Add the suitable placeholders according to the following format: methodid = { {: methodId :} } (for the preprocessors), firstName={ {: lb_firstName :} } (for the Lead Body).
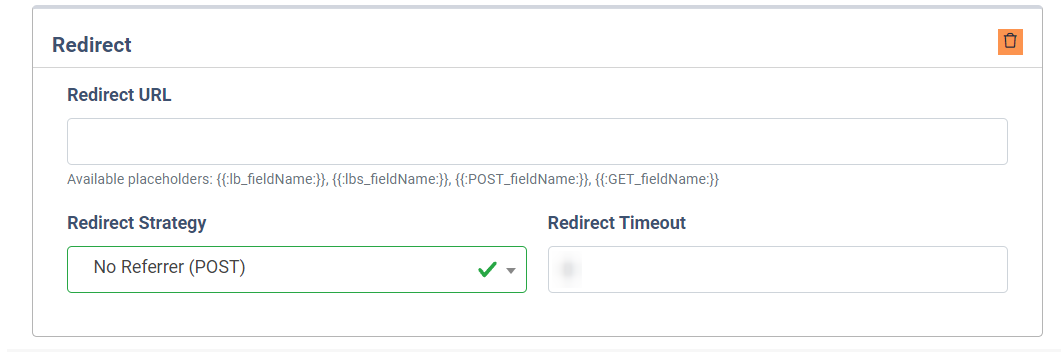
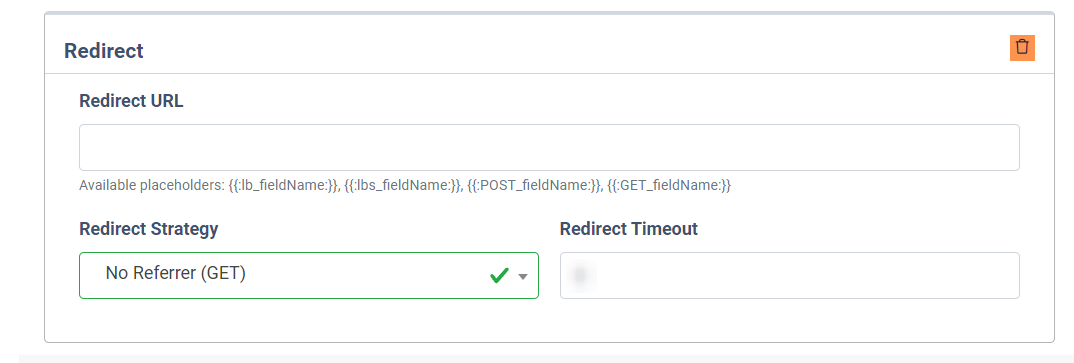
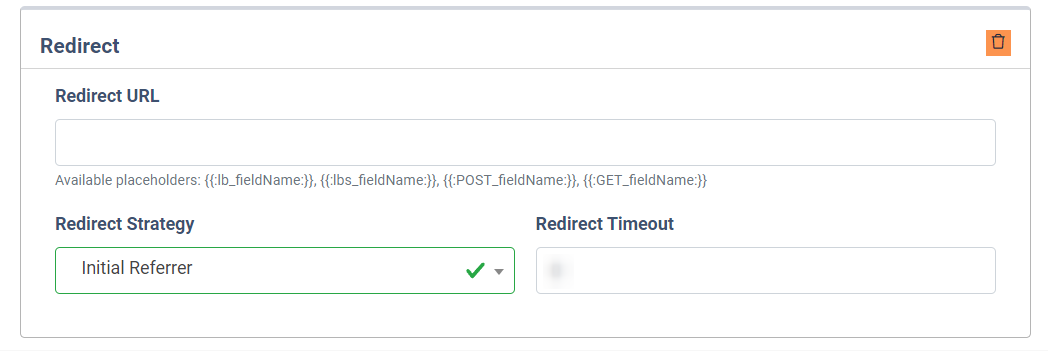
The “Redirect” processor
The “Redirect” processor allows you to make a redirect to the particular URL once the page is fully loaded. The processor performs an unconditional redirect to another page. Supports placeholders and different redirect strategies. The redirect Strategy is needed to show/hide the source page of the redirect in different scenarios.
You may add available placeholders to the URL according to your preference.
Note: This processor can not be used with forms, since the redirect URL page will be loading instead of the form page.
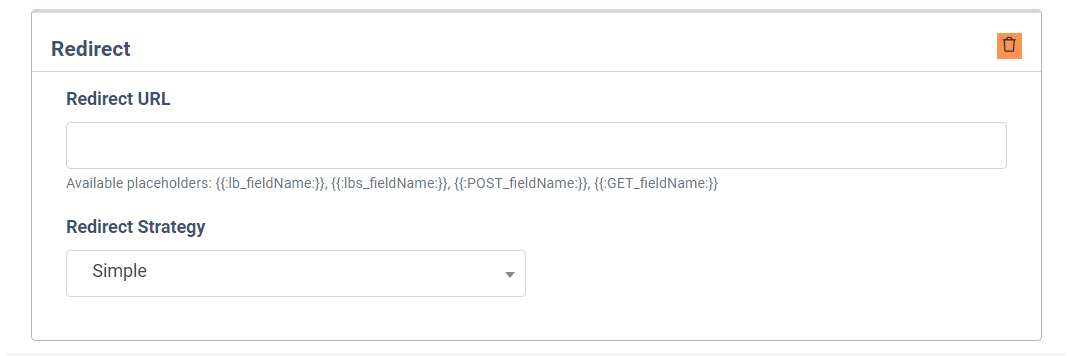
- Redirect URL: Enter the URL for the redirect. Available placeholders: { {: lb_fieldName :} }, { {: lbs_fieldName :} }, { {: POST_fieldName :} }, { {: GET_fieldName :} }
- Redirect Strategy: Select one of the following redirect strategies:
- Simple: The redirect to a particular page (without timeout) by the GET request.
- No Referrer (POST): The redirect to the particular page(with a timeout if set) by the POST request.
- No Referrer (GET): The redirect to the particular page (with a timeout if set) by the GET request.
- Initial Referrer: The redirect to the particular page (with a timeout if set) by the POST request.
- Redirect Timeout: Enter the duration of the timeout before the redirect to the particular page in seconds (available for all redirect strategies, except the “Simple”).
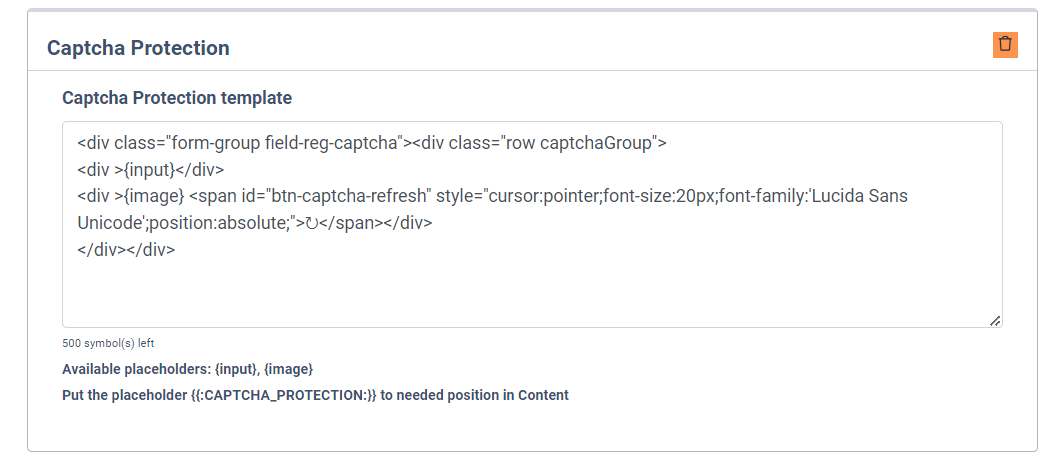
The “Captcha Protection” processor
The “Captcha protection” processor Is used only for registration pages. Adds the most useful layer of the spam-protection for registration pages.
The “Refer Policy” processor
The “Refer Policy” processor sets the Referrer Policy to the page. Specific cases that are usually used in "Redirect" scenarios.
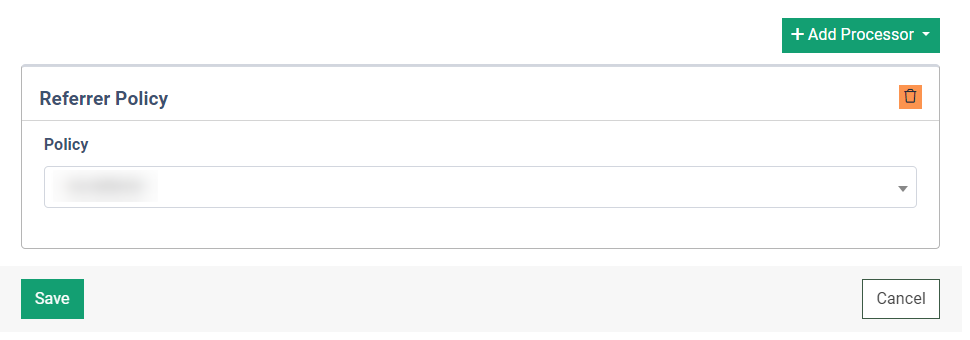
Click the “Save” button to confirm.