Read about the Event Tracking feature in the Phonexa system and how to set it up in this Knowledge Base article.
To manage Integration Rules, go to the System Management > Products section, select the Product from the list, and click the “Settings” button in the “Actions” column. Select the “Tracking” tab on the Product Setup page.
Tracking Rules
-3.png?width=670&height=348&name=unnamed%20(37)-3.png)
The list of Tracking Rules contains the following information:
-3.png?hsLang=en)
- ID: The unique identification number of the rule.
- Trigger: The name of the trigger that is set in this rule.
- Trigger Settings: The list of settings for the trigger.
- Action: The action to perform according to the rule.
- Action Settings: The list of settings for the action.
- Status: The status of the rule (Active/Disabled).
- Created At: the date and time of the rule creation.
- Author: The name of the user who created the rule.
- Adjacent Rules: The number of tracking rules that can be applied simultaneously with the selected rule. Click on the number to see the list of rules that can run concurrently. To go back to the full list of tracking rules, click the “Reset” button.
To add a new Tracking Rule, click the “Add Rule” button, select the action you want to perform, the trigger for this action, and click the “Config Rule” button.
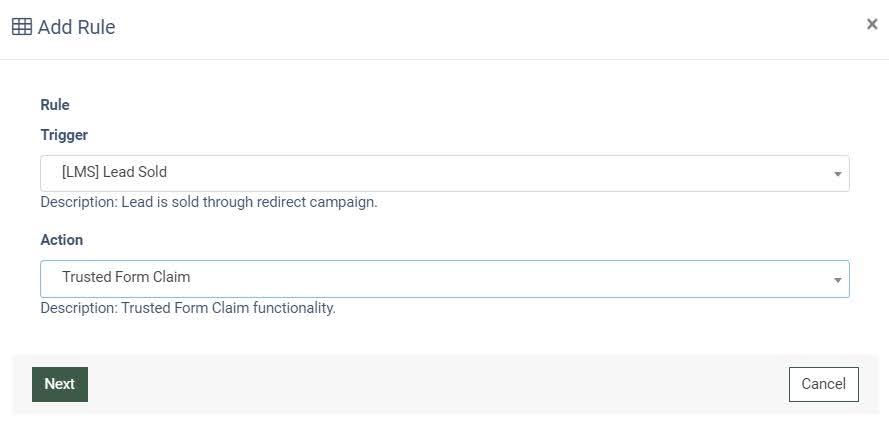
Depending on the Product and Tracking Type, you need to fill in the required fields in the pop-up window to define the trigger and action settings.
Find detailed information about each Tracking Action in the following articles:
- Ping URL
- Pixel
- Google Ads Conversions from Clicks
- Call Criteria
- SMTP
- Send to Opt Intel
- Send to E-delivery Contact List
- Google Analytics
- Facebook Conversion
- Trusted Form Claim
- Add to DNPL
- Twilio
- Post Lead to LMS
- Add to Five9 List
- Google Sheets
To test the existing tracking rule configuration, click the “Test Run” button in the “Actions” column. Fill in the test data in the provided fields (not mandatory) that match the tracking rule configuration placeholders.
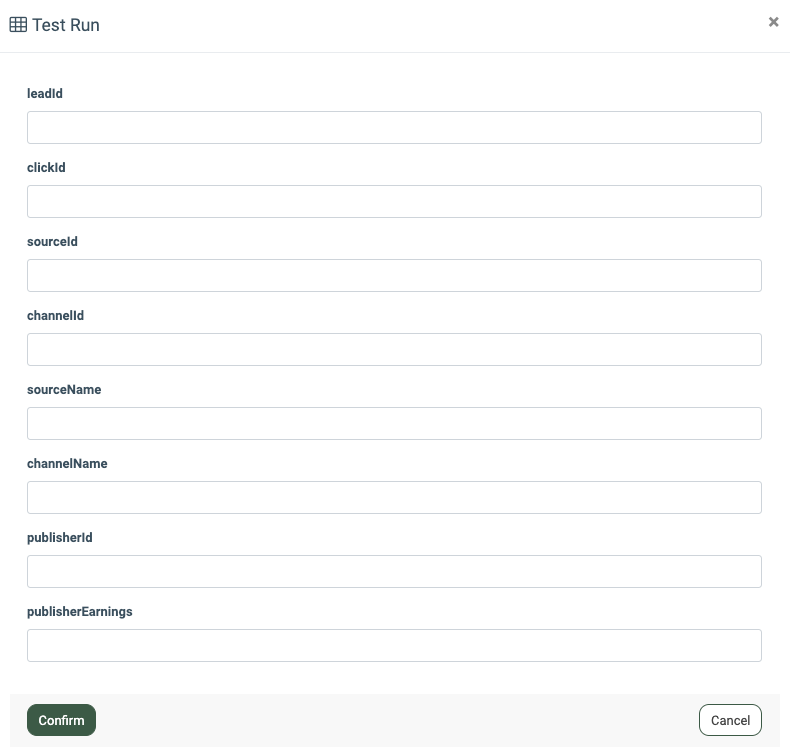 Click the “Confirm” button to complete the test run. Once the test run is executed, the result is displayed in the “Tracking Log” report via the “Test Runs” tab. Read more about the Tracking Log report in the following article.
To edit the existing rule, click the “Config” button in the “Actions” column.
To delete the rule from the system, click the “Delete” button in the “Actions” column.
Preset Rules
You can create a Preset Tracking Rule to use as a rule template for the Campaign or Publisher configuration level. Note: Changes made in the Preset Tracking Rule on the Product level are applied to all rules based on this preset.
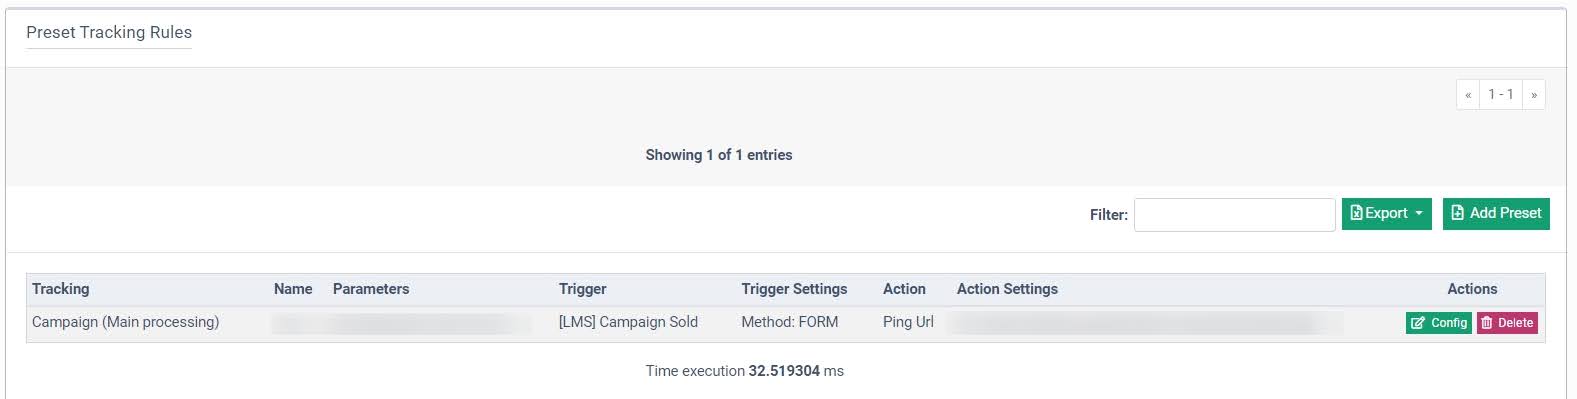
The list of Preset Tracking Rules contains the following information:
- Tracking: The scope for the preset rule (Campaign(Main Processing)/Campaign(Background Processing)).
- Name: The name of the preset.
- Parameters: The list of the parameters defined in this rule.
- Trigger: The event that triggers the action.
- Trigger Settings: The list of the settings for the trigger.
- Action: The action to perform according to the rule.
- Action Settings: The list of the settings for the action.
To create a preset of the Tracking Rule, click the “Add Preset” button.
Fill in the following fields in the “Add Preset” pop-up window:
- Scope: Select the scope for the rule (Campaign(Main Processing)/Campaign(Background Processing)).
- Trigger: Select the event that triggers the action.
- Action: Select the action to perform in the system.
- Type: Select the type of the parameter (String with placeholders/String/Number/User Phone).
- Label: Enter the label for the parameter.
- Placeholder: Enter the placeholder for the parameter.
Click the “Next” button to continue the action.

Enter the preset's name in the “Name” field and fill in the rest of the fields in the Trigger Settings section. Click the “Save Rule” button to complete the action.
Once the preset is configured, you can use it for the tracking rule on the Campaign and Publisher levels.

To edit the existing preset, click the “Config” button in the “Actions” column.
To delete the preset from the system, click the “Delete” button in the “Actions” column.
The “Warnings” block allows you to specify the actions for the system to determine as errors:
- Warn if Content-type is text/html: Select the option for the system to warn if the content type is text/html (Yes / No).
Use case: This option is useful when the system expects a non-HTML response (for example, JSON or plain text) from an endpoint. Receiving a text/HTML response often indicates an error page, redirect, or unexpected web response instead of a valid tracking response. Enabling this warning helps users quickly identify misconfigured URLs, authentication issues, or endpoints returning fallback pages rather than valid data. - Warn if HTTP-response contains Set-Cookie header: Select the option for the system to warn if HTTP-response contains Set-Cookie header.
Use case: This warning helps detect responses that attempt to set cookies. In tracking and server-to-server integrations, cookies are usually unnecessary and may indicate redirects, session-based responses, or unintended web behavior. Enabling this option can help prevent issues caused by incorrect endpoints or responses designed for browsers rather than backend integrations. - Valid Response Codes: Enter the valid response codes separated by commas or line breaks. Note: This setting refers to specific HTTP response codes that should be considered successful for the tracking rule (for example, 200, 201, or 204). Users can determine which codes to include by checking the documentation of the receiving endpoint.

You can easily view and address these issues through the Warning Log report.
-3.png?hsLang=en)
Read more about the Warning Log report in the Knowledge Base article.
The “Warning Notifications” block allows you to set up the email notifications for cases when processing the rules, errors specified in the “Warnings” block appear:
- Enable notifications: Select the option to enable the warning notifications and receive automatic email alerts when too many warnings are detected within a selected timeframe (Yes / No). Example: Enable notifications and set the Timeframe to “1 hour,” % of Warnings to “10,” and Number of Warnings to “100.” If, within one hour, more than 10% of your events or over 100 total warnings occur, the system will send an alert to the listed Emails so you can investigate the issue quickly. Note: Enabling notifications will incur an additional charge of $0.0001 on top of the regular price.
- Timeframe: Select the time period within which the warning data will be analyzed (5 minutes / 3 hours / 6 hours).
- % of Warnings: Enter the percentage of events with warnings that must exceed this value within the selected timeframe.
- Number of Warnings: Enter the number of warnings that must exceed this value within the selected timeframe.
- Users to Notify: Select the users to whom the system will send the warning notification.
- Emails to Notify: Enter the email addresses of notification recipients, separated by a comma.
- Notification frequency (every X minutes): Enter the value for the notification frequency in minutes.

Click the “Save Rule” button to complete the action.