The E-delivery section of Project Settings provides centralized controls for configuring how your system handles key delivery-related processes. Administrators can tailor system notifications, enforce data protection policies, and define smart click event filtering. Proper configuration ensures:
- Accurate alerting for critical system events
- Secure handling of sensitive data
- Cleaner engagement statistics free from non-human traffic
To configure the Project Settings for the E-Delivery component, go to the System Management > General > Project Settings section, and select the E-delivery platform.

-
Notifications
-
Data Protection
- Click Events
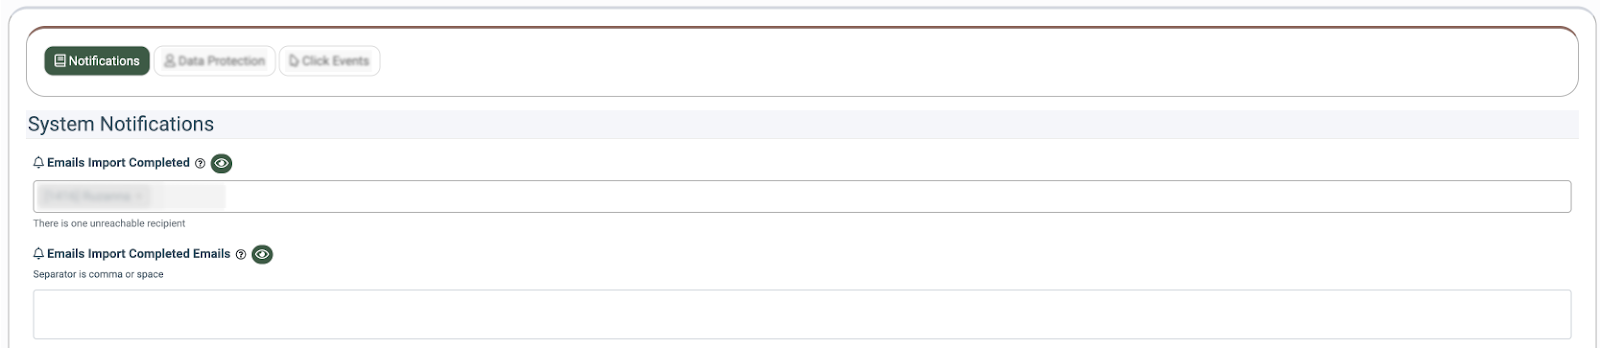
Notifications
The Notifications tab allows you to configure system-generated alerts for key E-delivery events. These alerts help ensure that relevant team members are informed when important processes are completed.
What You Can Configure
For each event type below, you can:
- Select internal users to receive notifications
- Specify email addresses (comma- or space-separated)
- Enable or disable specific alerts by entering at least one user or email address
Available Notification Events
Typical events include:
1 - Import & Data Management
- Emails Import Completed – Notifies when a batch of email addresses is successfully imported.
- Suppression Import Completed – Notifies when a suppression list import has completed.
- Mail List Import Completed – Notifies when a mail list import process finishes.

2 - Campaign Activity
-
Campaign Send – Notifies when an E-delivery campaign is sent.

3 - Domain & Tracking Status
- SMS Domain Active – Notifies when an SMS domain becomes active and ready for use.
- SMS Domain Pending – Notifies when an SMS domain enters a pending or verification state.
- Custom Domain Tracking – Notifies when a custom domain tracking issue is detected, such as unverified link tracking.

4 - Errors & System Health
- Algorithm Error – Notifies when an internal algorithm error occurs during processing.
- Channel Error – Notifies when an error occurs within a delivery channel.
- General Task Error – Notifies when a background task fails due to a system or processing error.

5 - Automation & Recovery
- Auto Restart for Scheduled Task Errors – Automatically attempts to restart scheduled tasks that encounter errors (up to three attempts within 30 minutes).

Click the “View” button next to the required notification field to check, edit, and assign templates for E-Delivery event notifications.

Note: You can read more about Event Notification templates in this Knowledge Base article.
Click the “Save” button at the bottom to confirm the changes.
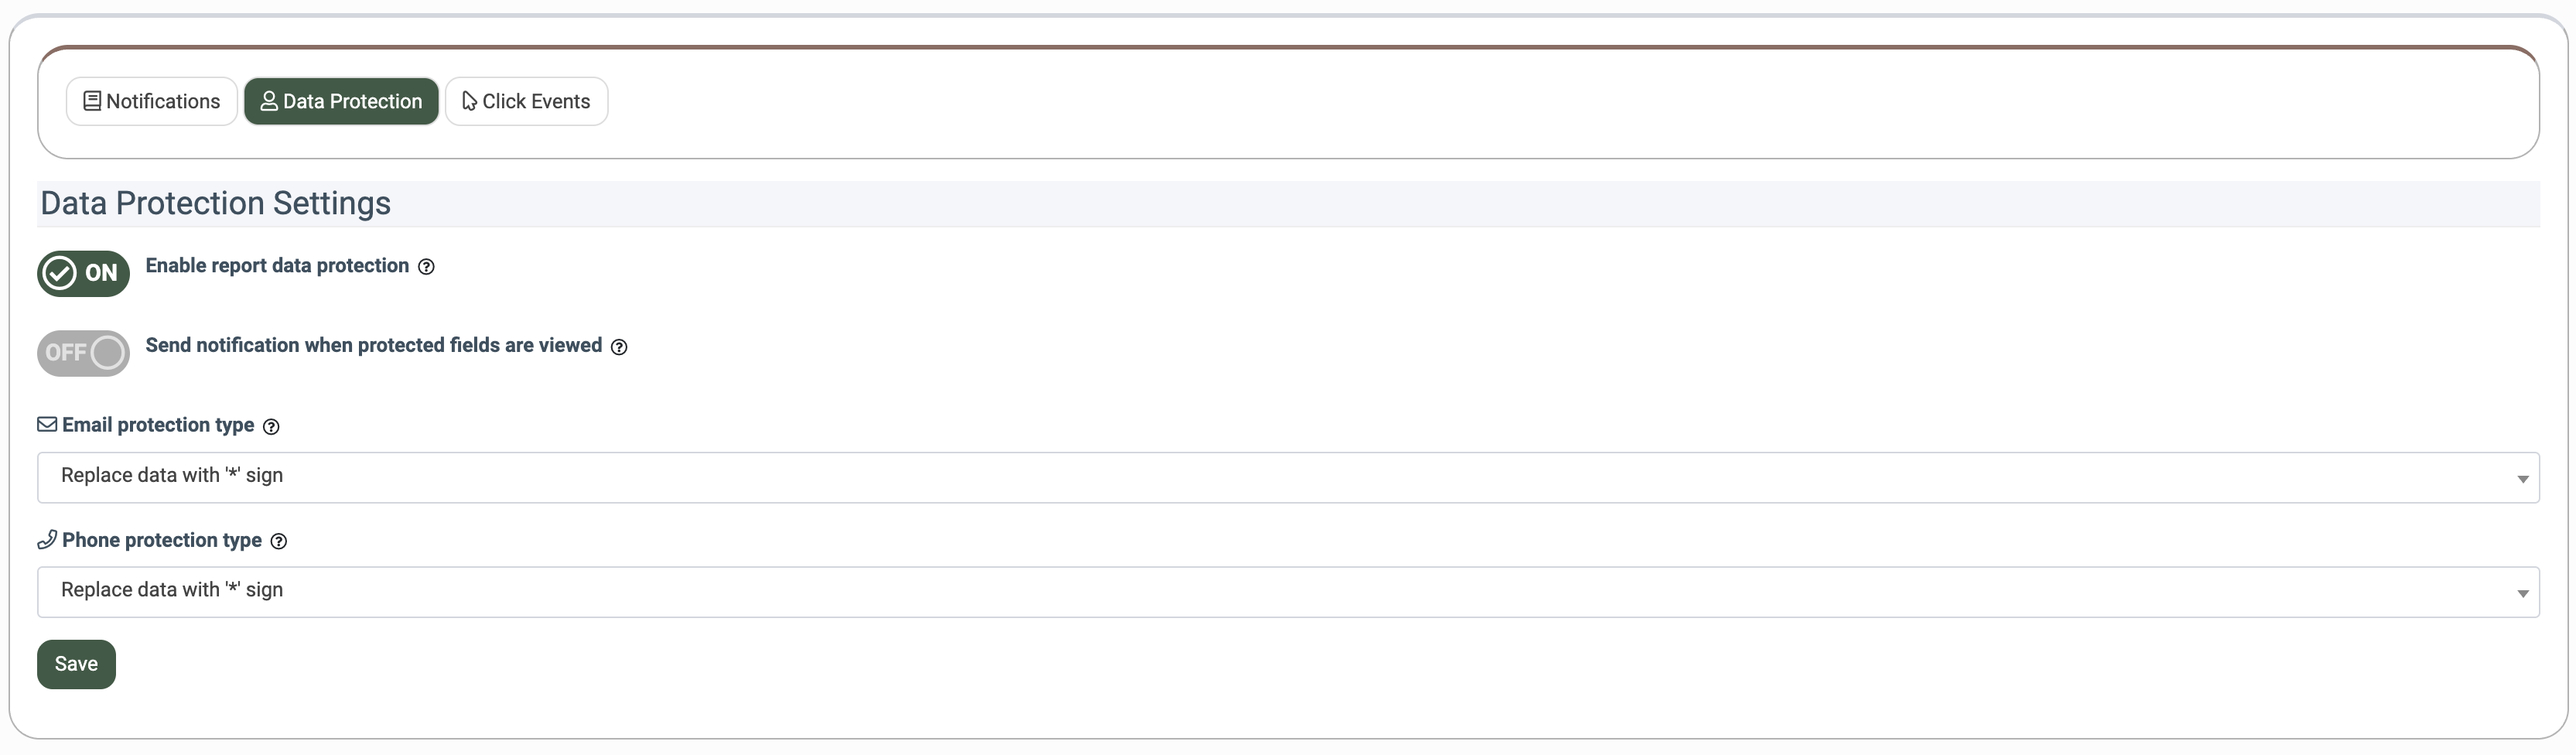
Data Protection
The Data Protection tab allows you to control how sensitive data is displayed and accessed within reports. These settings help safeguard personal information by applying protection rules to email and phone fields, while providing visibility into when protected data is viewed.
What You Can Configure
- Enable or disable section- and report-level data protection
- Choose how email and phone data is protected in reports
- Send notifications when protected fields are accessed
- Monitor access to sensitive information for compliance and security purposes
Available Data Protection Settings
You can enable or disable different protection options except for the Notification setting.
Note: Only users with the System Owner role can make changes to the Notification settings.
The Data Protection Settings block contains the following fields:
- Enable report data protection: Enable or disable data protection for sections and reports (Yes / No).
- Send notification when protected fields are viewed: Enable or disable the option to send notifications when protected fields are disclosed (Yes / No).
Note: Only users with the System Owner role can configure this option and get the notification.
- Email protection type: Select the email protection type from the drop-down list (Replace data with '--protected--', Replace data with ‘x' sign, Replace data with '*’ sign, Replace data with zero sign, Protector v1 (ex: myemail@gmail.com => myemail@)).
- Phone protection type: Select the phone protection type from the drop-down list (Replace data with '--protected--', Replace data with ‘x' sign, Replace data with '*’ sign, Replace data with zero sign, Display First Half (123456 => 123***), Display Last Half (123456 => ***456), First 4 symbols (123456 => 1234**), Last 4 symbols (123456 => **3456)).
Click the “Save” button to confirm the changes.
When the Protected Fields option is enabled, the “Show Protected Data” button will appear next to the “Search” button in the following sections: List Management > All Contacts, List Management > Contacts Lists, Suppression Management > Suppression Lists, System Logs > Sent Logs > Messages, and System Logs > Sent Logs > Delivery Events. Once you click the "Show Protected Data" button, the search results will display the disclosed information in Protected Fields. With each data access, the instance owner will receive a notification about the user who made a request and a time log if the respective notification setting is enabled. This mode is intended to prevent accidental or intentional data loss, misuse, or bulk exposure of sensitive information (such as email addresses and phone numbers) through exports, mass operations, and similar actions, while still allowing controlled access for legitimate operational needs such as investigations, compliance checks, or customer support.
Click Events
The Click Events section allows you to control how E-delivery link clicks are processed and to filter out non-human or potentially fraudulent traffic, such as crawlers, data centers, and high-risk clicks based on fraud score.
These settings help ensure that only valid user interactions are counted as clicks, while technical or suspicious requests are excluded from analytics.
Note: To use this feature, please activate the "E-Delivery: IP Scoring of Event" paid service subscription via the System Management > System Subscription section.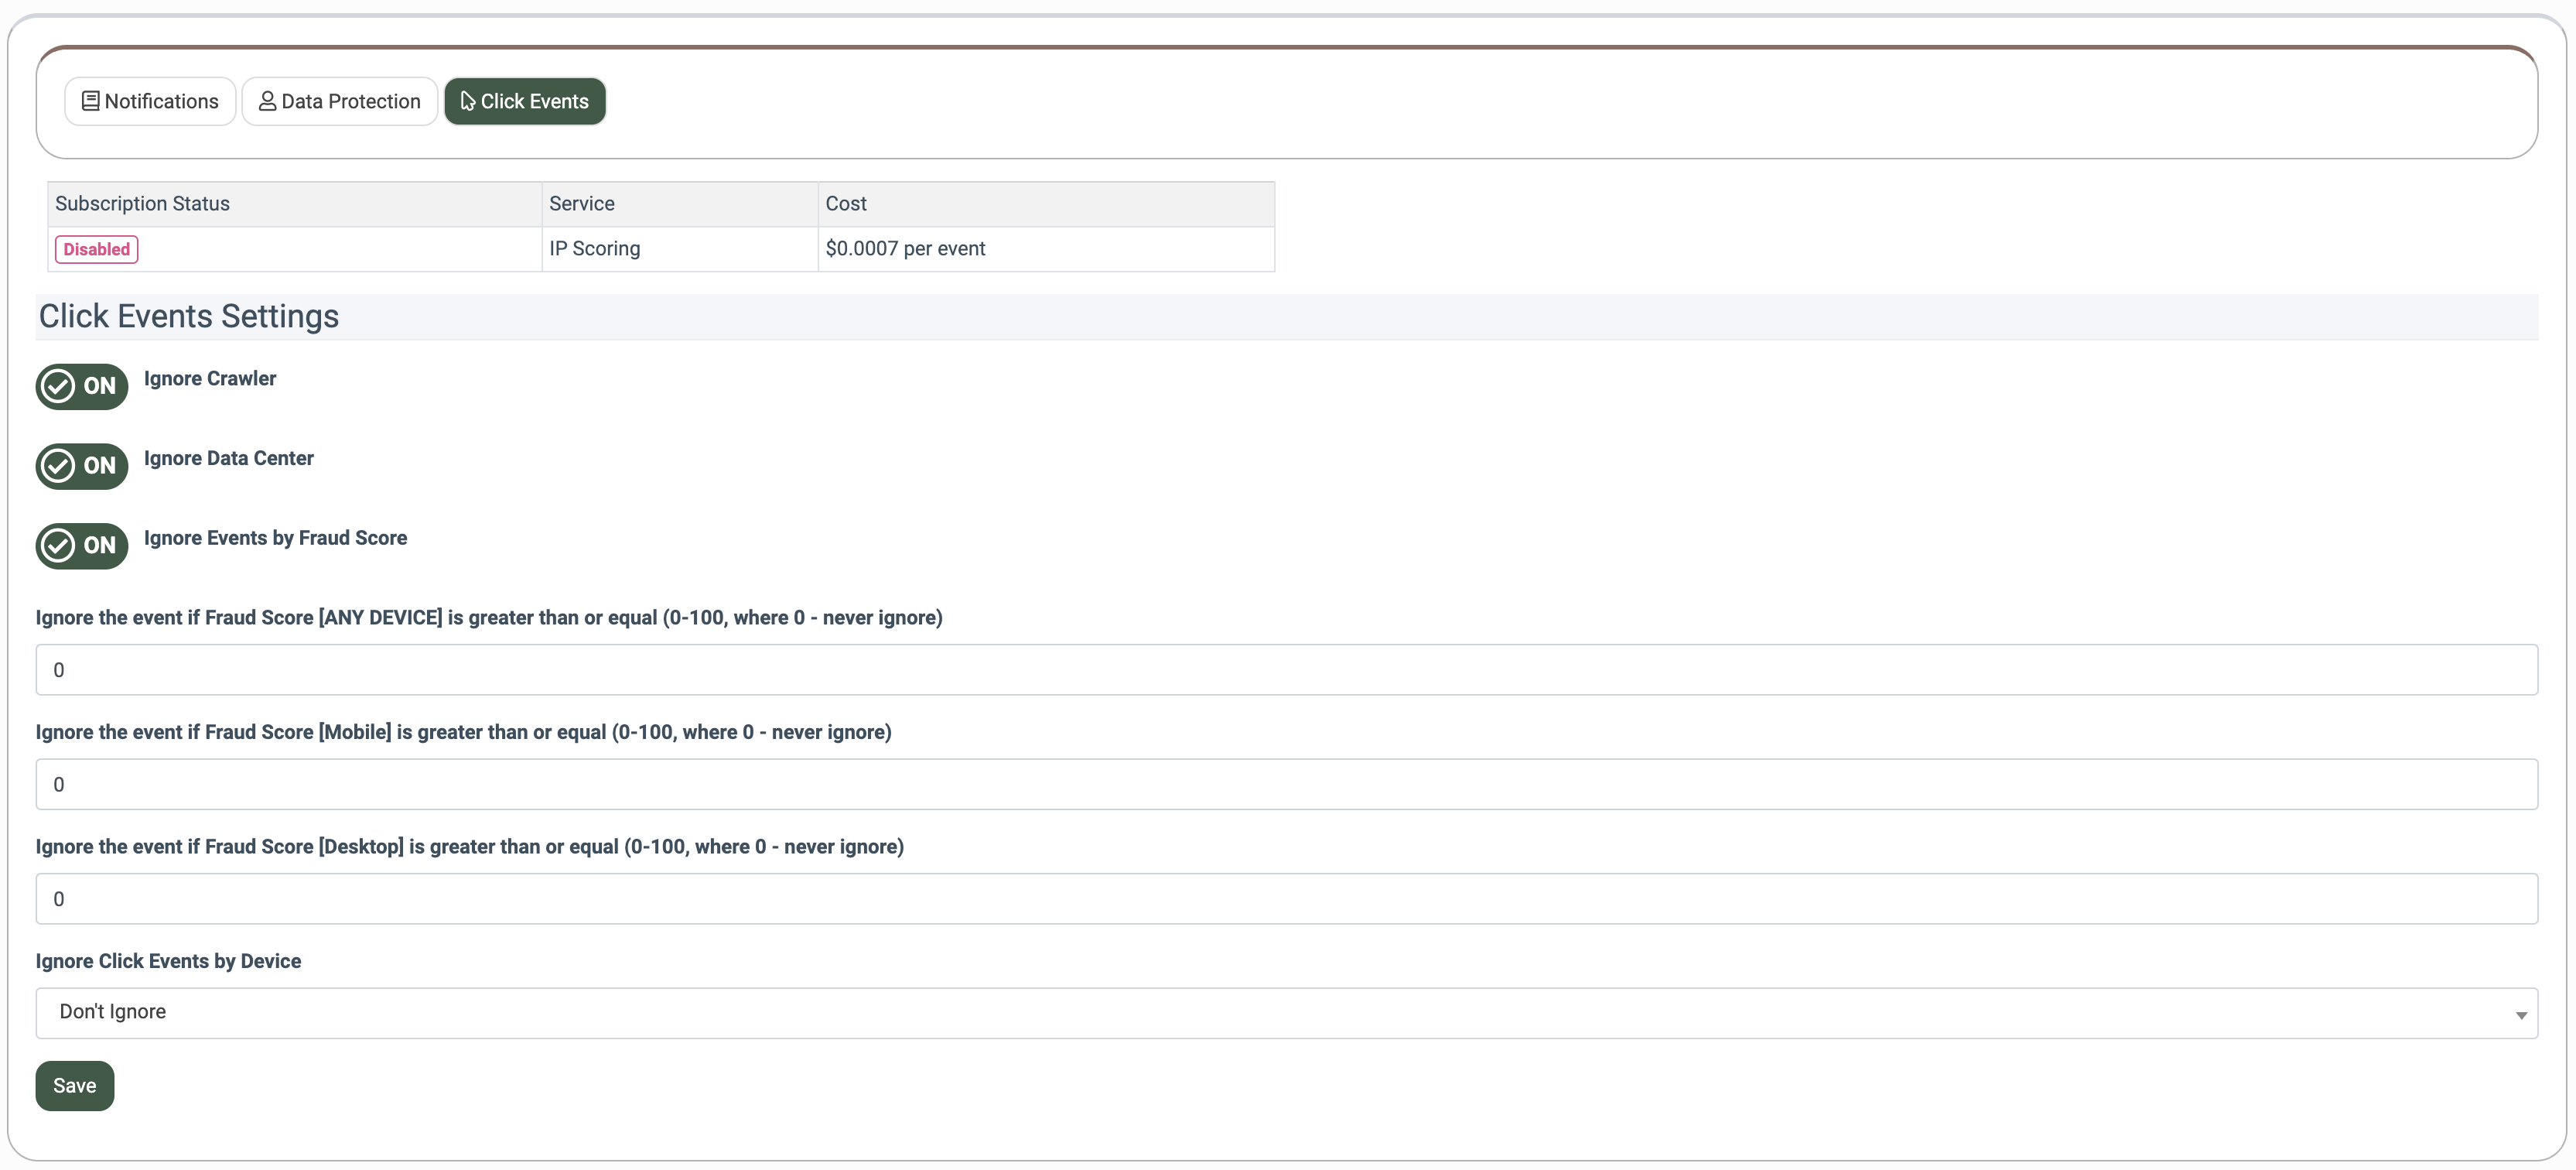
The “Click Events” block contains the following settings:
- Ignore Crawler: Ignores click events generated by crawlers and bots (such as Googlebot, SkypeUriPreview, etc.) in reporting. Detection is based on the User-Agent. Useful for excluding email clients, messengers, link preview, and indexing bots.
- Ignore Data Center: Ignores click events originating from data centers. Detection is based on the IP address. Commonly filters traffic from VPNs, proxies, and server-based requests
- Ignore Events by Fraud Score: Switch the toggle to the “ON” position to ignore click events based on the fraud score:
- Ignore the event if Fraud Score [ANY DEVICE] is greater than or equal (0-100, where 0 - never ignore): Ignores click events from any device based on the fraud score returned by the IP Scoring service. Applies to both mobile devices and desktop devices. Filters suspicious traffic when the score is equal to or exceeds the set score. A value of 0 means clicks are never ignored.
- Ignore the event if Fraud Score [Mobile] is greater than or equal (0-100, where 0 - never ignore): Ignores click events from mobile devices based on the fraud score returned by the IP Scoring service. Applies to mobile devices only. Filters suspicious traffic when the score is equal to or exceeds the set score. A value of 0 means clicks are never ignored.
- Ignore the event if Fraud Score [Desktop] is greater than or equal (0-100, where 0 - never ignore): Ignores click events from desktop devices based on the fraud score returned by the IP Scoring service. Applies to desktop devices only. Filters suspicious traffic when the score is equal to or exceeds the set score. A value of 0 means clicks are never ignored
- Ignore click events from: Ignores click events from selected device types (regardless of fraud score). Ignores click events from the selected device type. Detection is based on the selected device type and is used to filter traffic from mobile or desktop devices. Click events from the selected device type are excluded from reporting. Selecting “Don’t Ignore” disables device-based filtering.
Click the “Save” button to confirm.