Project Setup: Global
The Global tab of the Project settings centralizes the settings related to consumer data management and privacy, including Global Unsubscribe, CCPA Unsubscribe, and Access Settings for user data requests, ensuring compliance with data protection.
To configure the Global tab, go to the System Management > General > Project Settings section and select the Global tab.
 The Global tab contains four subtabs:
Global Unsubscribe
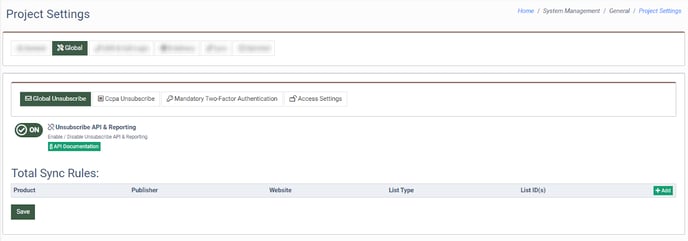
The Global Unsubscribe feature allows you to collect and manage unsubscribe requests in your instance. It allows users to opt-out of receiving communications from a company across all marketing channels or platforms. This feature can be integrated through the API or the built-in unsubscribe form.
Switch the “Unsubscribe API & Reporting” toggle to the “ON” position to enable the Unsubscribe API & Reporting.
Read more about the Global Unsubscribe feature in the following Knowledge Base article.
Ccpa Unsubscribe
The CCPA Unsubscribe feature allows you to collect and manage unsubscribe requests in your instance and specifically relates to compliance with the CCPA regulations. This feature can be integrated through the API or the built-in unsubscribe form.
Read more about the CCPA Unsubscribe feature in the following Knowledge Base article.
Mandatory Two-Factor Authentication
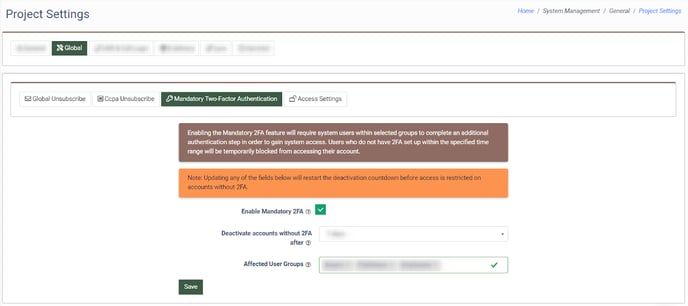
The Mandatory Two-Factor Authentication feature will require system users within selected groups to complete an additional authentication step to access the system and temporarily block users without 2FA from account access.
The Mandatory Two-Factor Authentication subtab allows you to enable the feature and set the deactivation time for user groups. It is available for the instance owner role.
 Check the “Enable Mandatory 2FA” box to enable the mandatory two-factor authentication and fill in the following fields:
- Deactivate accounts without 2FA after: Select the amount of time given for 2FA set up before account deactivation (7 days, 14 days, 30 days, 90 days).
- Affected User Groups: Select the user groups to require the setup of 2FA (Buyer, Publisher, Employees, Buyer Accountant).
Click the “Save” button to apply the mandatory 2FA.
Access Settings
The Access Settings subtab allows you to restrict access to system components for specific system roles.
Note: The Component Access Settings on the user level override the Project settings.
The sections contain two tabs.
The “Component Access Settings” tab allows you to manage the access settings for the corresponding system roles.
Depending on the component the following roles could have access:
- Call Logic: Available for selection for Global Admin, Billing Access, Security Officer, LMS Sync, Buyer Agent, Publisher Agent, Support, Buyer Representative, Buyer New, Buyer Accountant, Publisher, Publisher New, Accounting, Buyer Agent Senior, Buyer Operations Agent, Publisher Agent Senior, Content Manager, Blank, Employee New, Buyer Compliance, Publisher Compliance, Compliance Internal, Buyer Editor, Publisher Limited, Permission Agent, Sub-user, Call Logic Admin, Recording Origin Listener, Recording Masked Listener, and Recording Masked Agent.
- LMS Sync: Available for selection for Global Admin, Billing Access, Security Officer, LMS Admin, LMS Sync, Buyer Agent, Publisher Agent, Support, Buyer Representative, Buyer New, Buyer Accountant, Publisher, Publisher New, Accounting, Buyer Agent Senior, Buyer Operations Agent, Publisher Agent Senior, Content Manager, Blank, Employee New, Buyer Compliance, Publisher Compliance, Compliance Internal, Buyer Editor, Publisher Limited, Permission Agent, and Sub-user.
- E-Delivery: Available for selection for Global Admin, Billing Access, Security Officer, Support, Accounting, Blank, Employee New, and Permission Agent.
- Cloud PBX: Available for selection for Global Admin, Billing Access, Security Officer, Support, Accounting, Blank, Employee New, Permission Agent, Recording Origin Listener, Recording Masked Listener, and Recording Masked Agent.
- Opt-Intel: Available for selection for Global Admin, Billing Access, Security Officer, Support, Blank, Employee New, and Permission Agent.
- LYNX: Available for selection for Global Admin, Billing Access, Security Officer, Support, Accounting, Blank, Employee New, Lynx Affiliate, Lynx Affiliate Senior, and Permission Agent.
- Books 360: Available for selection for Global Admin, Billing Access, Security Officer, Support, Accounting, Blank, Employee New, and Permission Agent.
The “System Updates Access Settings” tab allows you to manage the access level to the system updates section for the corresponding system roles.
Read more about the Access Settings subtab in this Knowledge Base article.


