The Call Details section allows you to view detailed analytics for incoming calls and analyze your performance and call traffic. You can view the report data grouped into three tabs: Lead Details, Call Details, and Lead Body.
To view the report, go to the All Reports > Publisher Reports > Call Details section.
Lead Details
The “Lead Details” tab displays detailed information such as the Lead ID, Publisher name, phone number, etc. Quality indicates the number of times the Lead was recorded in the system and its details.
-2.png?hsLang=en)
You can narrow down the search results by using the following filters:
- Lead ID: Select the Lead ID.
- Date: Select the date range for the report.
- Product: Select the Product.
- Publisher Agent: Select the Publisher Agent.
- Publisher: Select the Publisher.
- Publisher Phone Number: Select the Phone Number of the Publisher.
- Lead Status: Select the status of the Lead (Sold / Reject / Test / New / Fraud Reject / Offer Received).
- Phone Number Tag: Select the Phone Number Tag.
- PingTree: Select the Ping Tree.
- Buyer: Select the Buyer.
- Buyer Campaign: Select the Buyer Campaign.
- Call Status: Select the status of the call (Buyer not found / Duplicate Call / Hangup by buyer / Hangup by Lead / Hang by Lead(IVR) / In progress / IVR Error / IVR Reject / Not answered / Sold / Transferred / Transferred to IVR / Unknown error).
- Redaction (NDRS): Select the status (Yes/No) of the Numerical Data Redaction.
- IVR: Select the name of the IVR.
- Duration: Select the time range of the call duration.
- Publisher Tags: Select the Publisher tags.
- Lead Tag: Select the Lead tag.
- Show Lead Tags: Check the box to display the lead tags.
- Show Only Sold Conflicts: Check the box to display only the leads with sold conflicts.
- Show TCPA lookup: Check the box to display only the leads with TCPA lookup.
- Show Lead Quality/Disposition: Check the box to display additional information about lead quality and lead disposition.
- Show Connected Leads: Check the box to display the parent lead of the connected leads.
- Buyer Return: Select the (Yes / No) option to display the leads with the returned Buyer’s amount.
- Pub Return: Select the (Yes / No) option to display the leads with the returned Publisher’s amount.
Note: Click the “More Filters” button to display all available filters.
The “Lead Details” report contains the following information:
- ID: The unique identification number of the lead. To view detailed lead info, click on the lead ID.
- Quality: The quality bubbles display the number of times the same lead has been seen in the system today, yesterday, in 30 days, or in 45 days.
- Date: The date and time when the call started, and the lead was created.
- Lead Status: The status of the lead (Sold, Reject, Test, New, Fraud Reject, Offer Received).
- Product: The Call Logic Product.
- Publisher: The Publisher’s name. To view the Publisher settings page, click the "View" button (the button with the cursor in the square icon) that appears next to the publisher’s name.
- Publisher Tags: The tags assigned to the Publisher. Read more about Publisher Tags in this article.
- Label: The Publisher’s phone number label.
- Publisher Phone Number: The reserved phone number of the Publisher. To edit the phone number, click the "Edit" button next to the phone number.
- Comments: The last comment added to the Call Record.
- Phone Number Tag: The phone number tag (Default, Primary, Success, Warning, Danger, Info).
- Call Status: The Publisher call status depending on the Buyer's response (Buyer nor found, Duplicate Call, Hang up by buyer, Hang up by lead, Hang up by lead (IVR), In progress, IVR Error, IVR Reject, Not answered, Sold, Transferred, Transferred to IVR, Unknown error). Read more about the Call Status in this Knowledge Base article.
- Buyer Call Status: The status of the lead (Sold or Reject) received from the Buyer. The Buyer Call Status column is disabled by default. To enable it, click the top right "Selected" button and click the checkbox next to the "Buyer Call Status".
- Duration: Total call duration.
- Duration (Buyer): The call duration after it was connected to the Buyer. To listen to the record, click the “Play” button.
- Redaction: The numerical data redaction status (Yes, No).
- Buyer: The Buyer’s name.
- Buyer Phone Number: The phone number of the Buyer.
- Campaign: The Campaign the lead was sold to. To view the Campaign settings page, click the "View" button (the button with the cursor in the square icon) that appears next to the campaign name.
- Pub: The Publisher's earnings.
- AGN: The Agent payment.
- REF: The Referral payment.
- ADM: The Admin revenue.
- TTL: The total revenue.
- Buyer Return: Shows if there’s a Buyer’s amount return:
- Yes: In case of successful amount return.
- No: In case when the amount return is denied.
- -: In case of no lead return.
- Pub Return: Shows if there’s a Publisher’s amount return
- Yes: In case of successful amount return.
- -: In case of no lead return.
- Buyer Return: Indicates if the lead return was requested by the Buyer (Yes/No).
- Pub Return: Indicates if the lead return was confirmed by the Publisher (Yes/No).
- IVR: The name of the IVR.
- Caller: The caller’s phone number.
Note: To add more lead parameters to the report, please go to System Management > Products section, select the Product, and click on the "Report Custom Fields" tab. Read more about the Report Custom Fields in this article.
You can add custom columns to the report by clicking the “Add New Column” button. Read more about how to create custom columns and how to manage them in this Knowledge Base article.
To create the lead export to Cloud PBX, click the “Export To Cloud PBX” button, and fill out the following fields:
Note: The export will include all the leads listed in the report based on the currently selected filters. Please make sure that you apply all the necessary filters before starting an export.
- Allowed Publisher List: Select the Allowed Publisher list.
- Restricted Publisher List: Select the Restricted Publisher list.
- Max Lead Count: Enter the maximum number of leads to be exported. Note: Max Count Lead must be no greater than 1000.
- Cloud PBX Call Group: Select the Call Group (created in the Cloud PBX component).
- Cloud PBX Campaign: Select the campaign (created in the Cloud PBX component).
- Cloud Dialing List: Select the dialing list (New or Existing (created in the Cloud PBX component)).
- Dialing List Name: Enter the name of the dialing list.
-2.png?width=461&height=676&name=unnamed%20(16)-2.png)
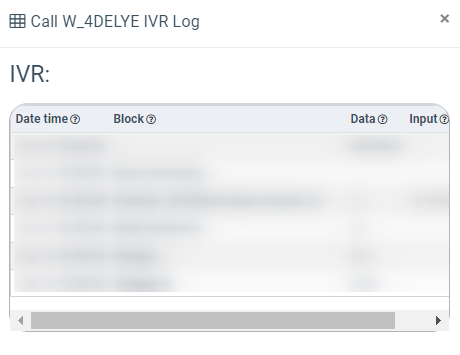
To view the IVR Log for the call, click the “IVR log” button in the “Action” column. The “Call *** IVR Log” pop-up window contains the following information:
- IVR: The name of the IVR.
- Date time: The specified time frame for the Block from the call.
- Block: The name of the information block.
- Data: The sensitive information provided by the lead.
- Input: The autocomplete data.
Call Details
The Call Details tab includes information about the call in the system, such as date and time, status, call type, total and IVR duration, and the Lead ID that completes the call.
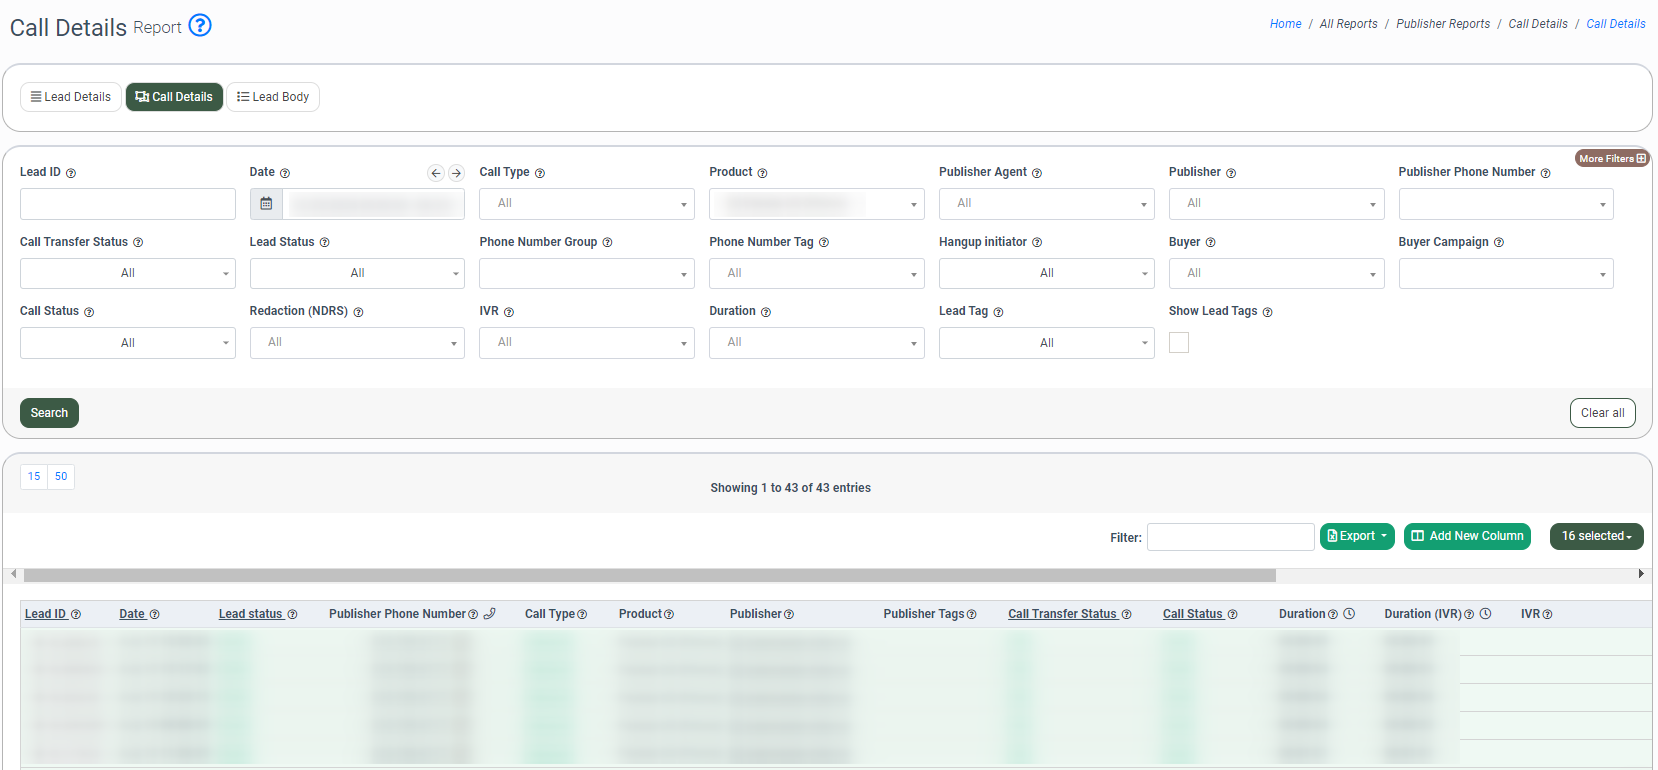
You can narrow down the search results by using the following filters:
-
Lead ID: Select the Lead ID.
-
Date: Select the date range for the report.
-
Call Type: Select the type of the call.
-
Product: Select the Product.
-
Publisher Agent: Select the Publisher Agent.
-
Publisher: Select the Publisher.
-
Publisher Phone Number: Select the phone number of the Publisher.
-
Call Transfer Status: Select the status of the Call Transfer (Trying, Ringing, Ok, Connection Error, No answer, Channel unavailable, Busy, Cancel, Error).
-
Lead Status: Select the status of the Lead (Sold / Reject / Test / New / Fraud Reject / Offer Received).
-
Phone Number Group: Select the Phone Number Group.
-
Phone Number Tag: Select the Phone Number Tag.
- Hangup Initiator: Select the Hangup Initiator (System, Lead, or Partner hangup initiator).
- Buyer: Select the Buyer.
- Buyer Campaign: Select the Campaign.
- Call Status: Select the status of the call (Buyer not found / Duplicate Call / Hangup by buyer / Hangup by Lead/ Hang by Lead(IVR) / In progress / IVR Error / IVR Reject / Not answered / Sold / Transferred / Transferred to IVR / Unknown error).
-
Redaction (NDRS): Select the status (Yes/No) of the Numerical Data Redaction.
-
IVR: Select the IVR.
- Duration: Select the time range of the call (0 - 29 sec / 30 - 59 sec / 60 - 89 sec / 90 - 119 sec / 120 - 179 sec / 180 - 299 sec / 5:00 - 14:59 min /15:00 - 29:59 min/ 30 - ∞ min).
- Publisher Tags: Select the Publisher tags.
- Lead Tag: Select the lead tag(s).
- Show Lead Tags: Check the box to display the lead tags.
The “Call Details” report contains the following information:
-
Lead ID: The unique identification number of the Lead. To view detailed Lead info, click the Lead’s ID in the column.
-
Date: The date and time when the Lead was created.
-
Lead status: The status of the Lead (Sold, Reject, Test, New, Fraud Reject, Offer Received).
-
Publisher Phone Number: The reserved phone number of the Publisher. To edit the phone number settings, click the "Edit" button next to the phone number.
-
Call type: The type of the call.
-
Product: The Call Logic Product.
-
Publisher: The Publisher’s name. To view the Publisher settings page, click the "View" button (the button with the square and cursor icon) that appears next to the publisher name.
- Publisher Tags: The tags assigned to the Publisher. Read more about Publisher Tags in this article.
- Call Transfer Status: The status that indicates the response from the Buyer when the call is transferred. Read more about the Call Transfer Status in this Knowledge Base article.
-
Call Status: The Publisher call status depending on the Buyer's response (Buyer not found, Duplicate Call, Hang up by buyer, Hang up by lead, Hang up by lead (IVR), In progress, IVR Error, IVR Reject, Not answered, Sold, Transferred, Transferred to IVR, Unknown error). Read more about the Call Status in this Knowledge Base article.
-
Buyer Call Status: The status of the lead (Sold or Reject) received from the Buyer. The Buyer Call Status column is disabled by default. To enable it, click the top right "Selected" button and click the checkbox next to the "Buyer Call Status".
-
Duration: Total call duration.
- Duration (IVR): Total call duration in IVR.
- IVR: The name of the IVR.
- Buyer: The Buyer’s name.
- Buyer Phone Number: The phone number of the Buyer.
- Campaign: The Campaign the Lead was sold to. To view the Campaign settings page, click the "View" button (the button with the cursor in the square icon) that appears next to the Campaign name.
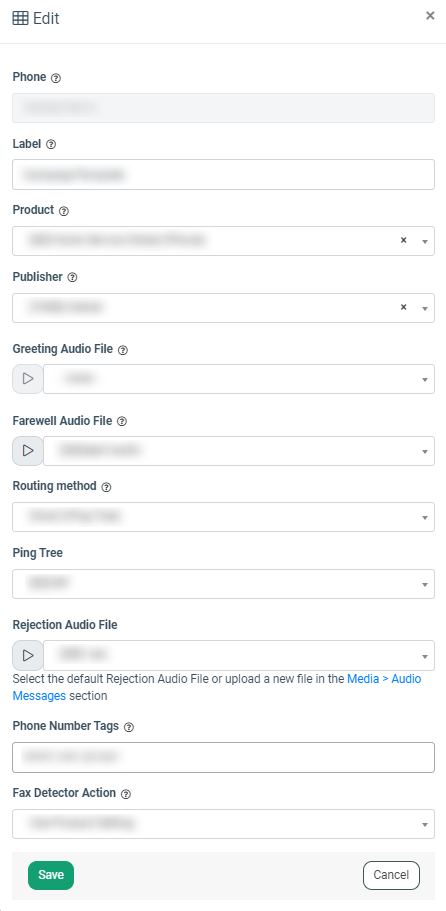
To change or edit the Publisher Phone Number, click the “Edit” button in the appropriate row in the Publisher Phone Number column and fill in the following fields in the “Edit” pop-up window:
- Phone: The reserved phone number.
- Label: Enter the phone number label.
- Product: Select the Product the phone number is reserved for.
- Publisher: Select the Publisher the phone number is attached to.
- Greeting Audio File: Select the call greeting audio file for the phone number.
- Farewell Audio File: Select the call farewell audio file for the phone number.
- Routing Method: Select the phone number routing method:
-
- Default (IVR): Select this option to transfer calls to the Product’s default IVR. Select the Ping Tree from the drop-down list in the “Override IVR Ping Tree Settings (Direct Call)” field to override the default IVR Ping Tree settings and set up a specific Ping Tree for the Phone Number.
-
- Direct (Campaign): Select this option to transfer calls to the Campaign selected in the field below. Select the Campaign and the default Rejection Audio File in the appropriate fields.
-
- Specific IVR: Select this option to transfer calls to the specific IVR. Select the IVR in the “IVR” field and the Ping Tree from the drop-down list in the “Override IVR Ping Tree Settings (Direct Call)” field to override the default IVR Ping Tree settings and set up a specific Ping Tree for the Phone Number.
-
- Direct Ping Tree: Select this option to transfer calls directly to the Ping Tree selected in the field below. Select the Ping Tree and the default Rejection Audio File in the appropriate fields.
- Ping Tree: Select to override the default IVR Ping Tree settings and set up a specific Ping Tree for the Phone Number, Select the Ping Tree in the drop-down list.
- Rejection Audio File: Select the rejection audio file for the phone number.
- Phone Number Tags: Select the custom phone number tag(s).
- Fax Detector Action: Select the action when the fax transmission from the caller is determined (Use Product Settings/Hung up/Routing fax calls)
Callback Details
The Callback Details tab contains information about the processed callbacks in the system, including the IDs of the callback request and the lead, as well as their statuses, total and IVR durations, and other relevant details.
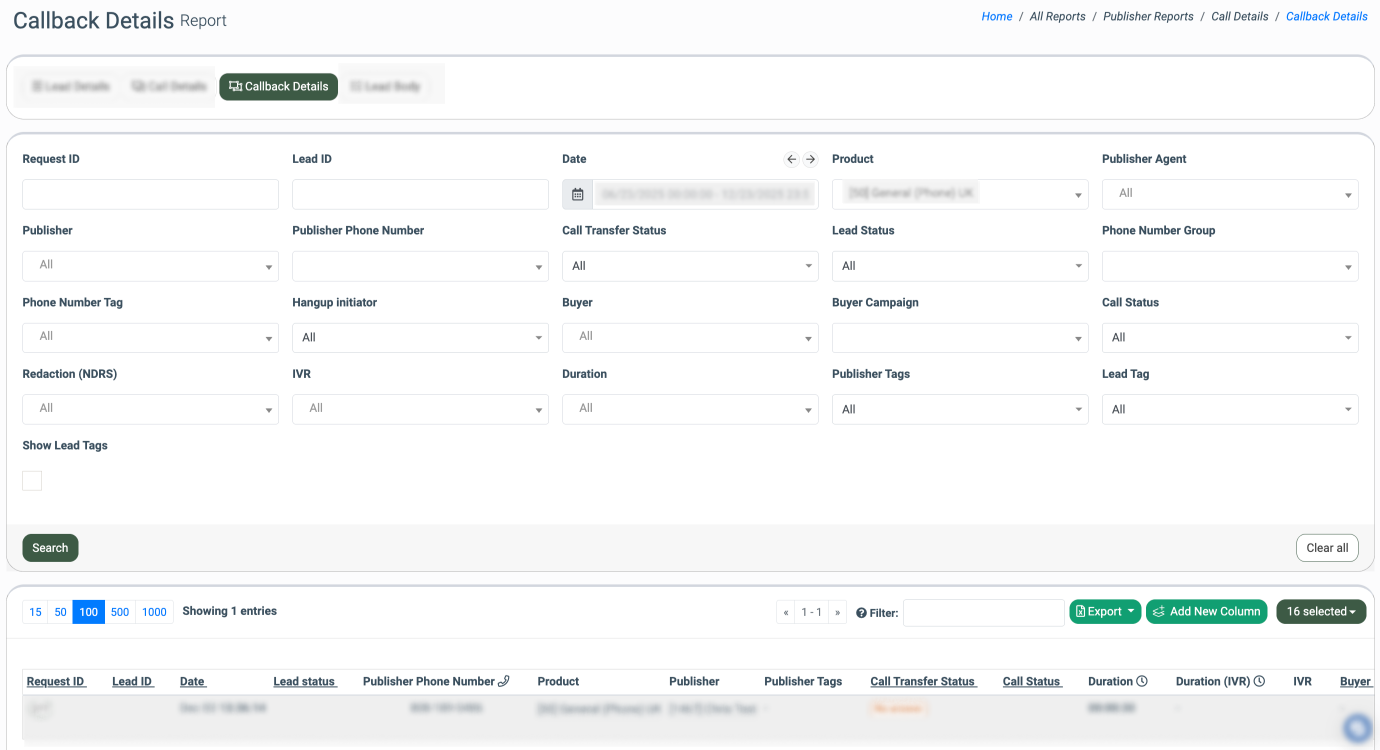
You can narrow down the search results by using the following filters:
- Request ID: Enter the unique identification number of the Callback Request.
- Lead ID: Enter the unique identification number of the Lead.
- Date: Select the date range for the report.
- Product: Select the Product.
- Publisher Agent: Select the Publisher Agent.
- Publisher: Select the Publisher.
- Publisher Phone Number: Select the phone number assigned to the Publisher.
- Call Transfer Status: Select the status of the Call Transfer (Trying, Ringing, Ok, Fax/silents not accepted, Connection Error, No answer, Channel unavailable, Busy, Cancel, Error, Call Rejected).
- Lead Status: Select the status of the Lead (Sold, Reject, Test, New, Fraud reject, Post Error, Pre-screening, Verifying, Offer Received).
- Phone Number Group: Select the phone number group.
- Phone Number Tag: Select the phone number tag.
- Hangup Initiator: Select the hangup initiator (System, Lead, or Partner hangup initiator).
- Buyer: Select the Buyer.
- Buyer Campaign: Select the Campaign.
- Call Status: Select the status of the call (Buyer not found, Duplicate Call, Fax/silents detected, Hangup by buyer, Hangup by lead, Hangup by lead (IVR), In progress, IVR Error, IVR Reject, Not answered, Sold, Transferred, Transferred to IVR, Unknown error).
- Redaction (NDRS): Select the status (Yes/No) of the Numerical Data Redaction.
- IVR: Select the IVR.
- Duration: Select the time range of the call duration (0 - 29 sec / 30 - 59 sec / 60 - 89 sec / 90 - 119 sec / 120 - 179 sec / 180 - 299 sec / 5:00 - 14:59 min /15:00 - 29:59 min/ 30 - ∞ min).
- Publisher Tags: Select the Publisher tags.
- Lead Tag: Select the Lead tags.
- Show Lead Tags: Check the box to display the Lead tags.
The “Callback Details” report contains the following information:
- Request ID: The unique identification number of the Callback Request. To view the information about the request, click the request ID in the column.
- Lead ID: The unique identification number of the Lead. To view detailed lead info, click the lead’s ID in the column.
- Date: The date and time when the Lead was created.
- Lead status: The status of the Lead.
- Publisher Phone Number: The reserved phone number of the Publisher.
- Product: The Call Logic Product.
- Publisher: The Publisher’s name. To view the Publisher settings page, click the "View" button (the button with the square and cursor icon) that appears next to the publisher name.
- Publisher Tags: The tags assigned to the Publisher. Read more about Publisher Tags in this article.
- Call Transfer Status: The status that indicates the response from the Buyer when the call is transferred. Read more about the Call Transfer Status in this Knowledge Base article.
- Call Status: The Publisher’s call status depending on the Buyer's response. Read more about the Call Status in this Knowledge Base article.
- Duration: Total call duration.
- Duration (IVR): Total call duration in IVR.
- IVR: The name of the IVR.
- Buyer: The Buyer’s name.
- Buyer Phone Number: The phone number of the Buyer.
- Campaign: The Campaign the Lead was sold to. To view the Campaign settings page, click the "View" button (the button with the cursor in the square icon) that appears next to the campaign name.
Lead Body
The "Lead Body" is a detailed report on all lead bodies connected with calls from all Publishers. The report includes information about the Publishers’ channels and sources, and the Leads' data, such as Status, State, Age, etc.
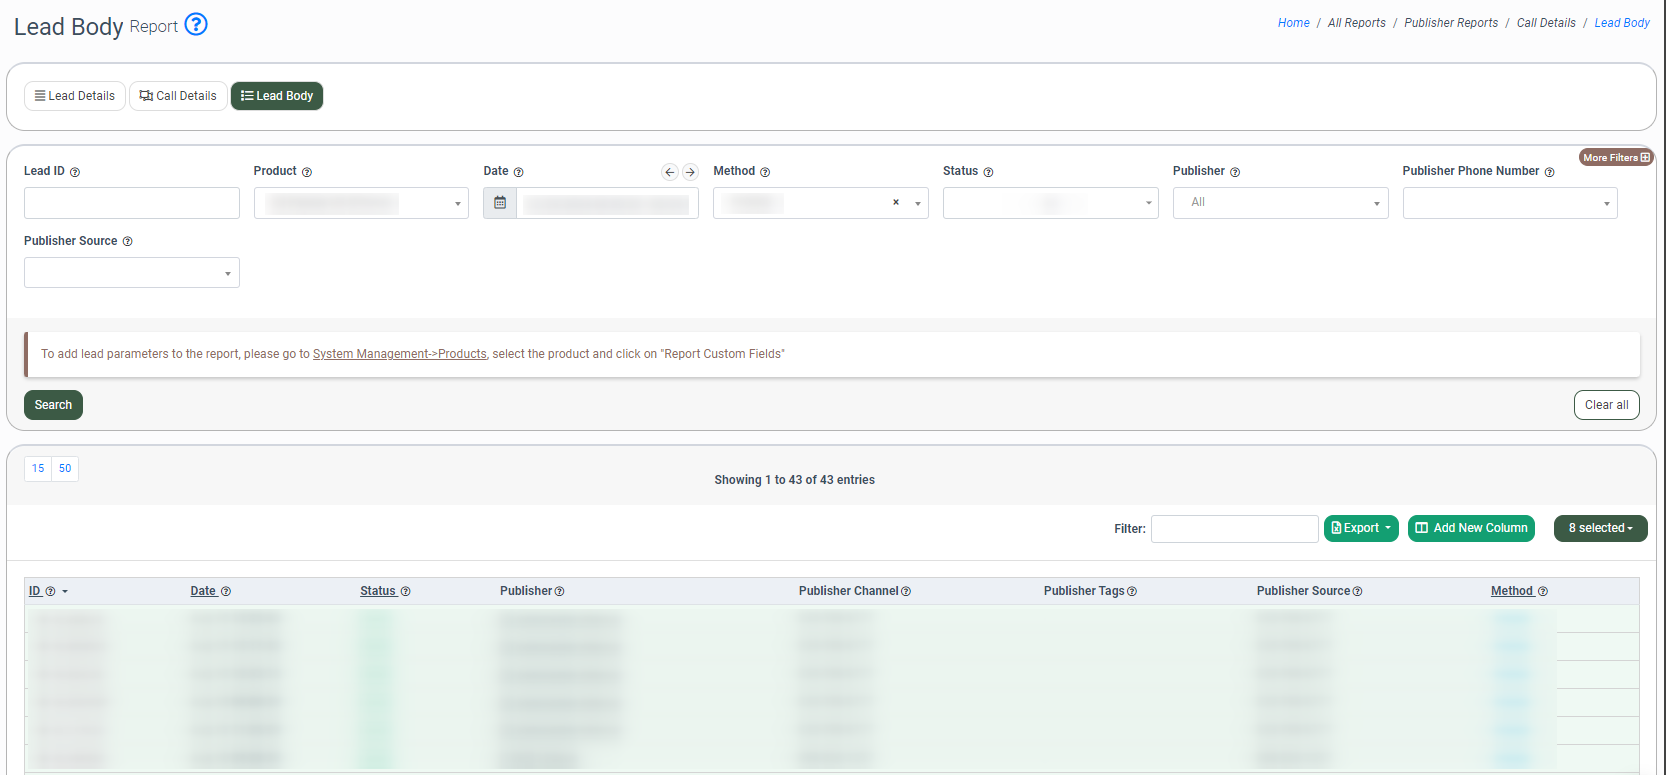
You can narrow down the search results by using the following filters:
-
Lead ID: Select the Lead ID.
-
Product: Select the Product.
-
Date: Select the date range for the report.
-
Method: Select the lead’s acquisition method.
-
Status: Select the status of the Lead. (Sold / Reject / Test / New / Fraud Reject / Offer Received).
-
Publisher Agent: Select the Publisher Agent.
-
Publisher: Select the Publisher.
-
Publisher Phone Number: Select the Phone Number of the Publisher.
-
Publisher Source: Select the Publisher Source.
-
Buyer: Select the Buyer.
-
Buyer Campaign: Select the Buyer Campaign.
- Lead Tag: Select the Lead Tag.
- Show Lead Tags: Check the box to display the lead tags.
- Publisher Tags: Select the Publisher tag(s).
The "Lead Body" report contains the following information:
-
ID: The unique identification number of the Lead.
-
Date: The date and time of the Lead creation.
-
Status: The status of the Lead.
-
Publisher: The name of the Publisher.
-
Click ID: The unique identification number of the click.
- Publisher Channel: The name of the Publisher Channel.
- Publisher Tag: The tags assigned to the Publisher. Read more about Publisher Tags in this article.
-
Publisher Source: The name of the Publisher Source.
-
Method: The Lead’s acquisition method.
Note: To add lead parameters to the report, please go to System Management > Products, select the product, and click on "Report Custom Fields".
Read more about the Report Custom Fields in this article.