To manage the repost automation, go to the Publisher Management > Service > Repost Automation section.
Repost Queues
The Repost Queues tab allows you to create new queues, configure them, and view the statistics data.
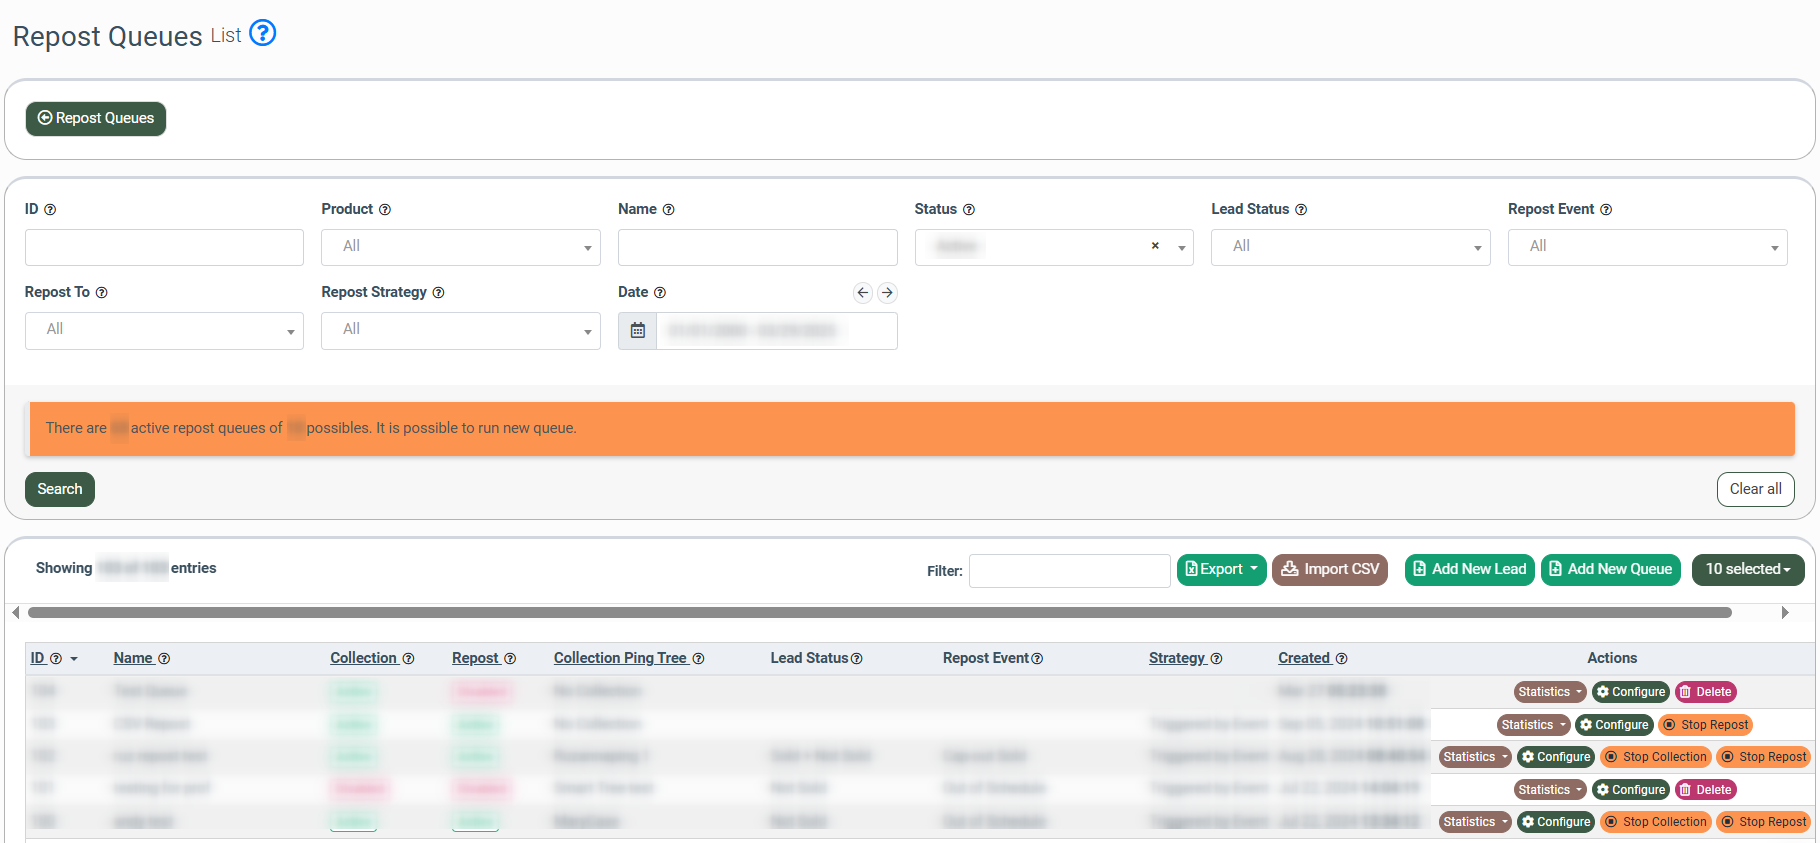
The Repost Queue list contains the following information:
- ID: The unique identification number of the queue.
- Name: The name of the queue.
- Collection: The lead queue lead collection status.
- Repost: The lead queue lead repost status.
- Product: The name of the Product.
- Collection Ping Tree: The name of the collection Ping Tree.
- Lead Status: The status of the leads to be collected in the queue. Note: The Lead Status field will be blank if the repost is based on the imported CSV.
- Repost Event: The event that triggers the collection and repost and repost. Note: The Repost Event field will be blank if the repost is based on the imported CSV.
- Strategy: The repost strategy (Triggered by Event / Scheduled).
- Created: The date and time the queue was created.
- Currently in Queue: The number of leads that are currently in the queue.
You can narrow down the search results by using the following filters:
- ID: Enter the queue ID.
- Product: Select the Product.
- Name: Enter the name of the queue.
- Status: Select the status of the queue (Active / Disabled).
- Lead Status: Select the lead status (Sold + Not Sold / Sold / Not Sold).
- Repost Event: Select the triggering event (Out of Schedule / Cap-out Sold / Cap-out Send / Cap-out Group Sold/ Timeout).
- Repost To: Select the repost type (Same Campaign / Ping Tree).
- Repost Strategy: Select the repost strategy (Trigger by Event / Scheduled).
- Date: Select the period during which the queue was created.
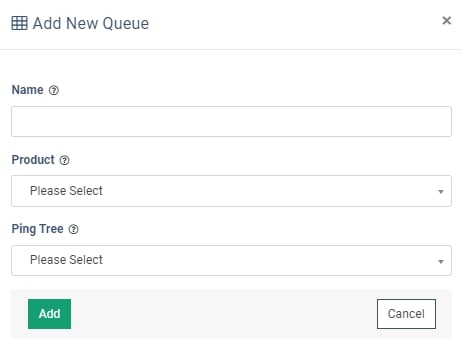
To create a new queue, click the "Add New Queue" button and fill in the following fields:
- Name: Enter the name of the queue.
- Product: Select the Product.
- Ping Tree: Select the Ping Tree (Main Processing/Silent Processing).
Click the “Add” button to confirm.
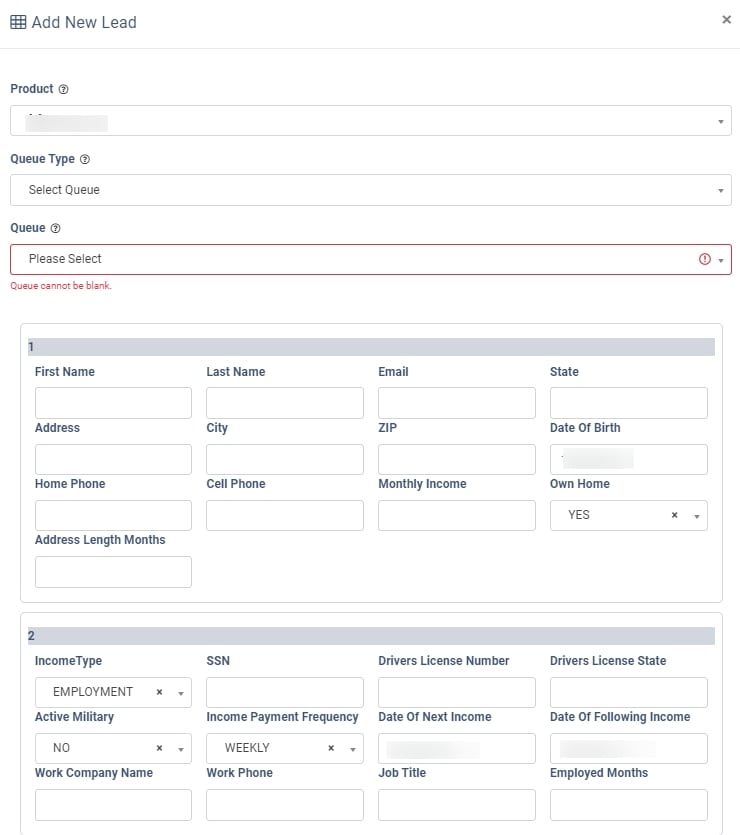
To add a lead to the collection manually, click the “Add New Lead” button.
Fill in the following fields in the “Add New Lead” pop-up window:
- Product: Select the Product.
- Queue Type: Select the “New Queue” option to create a new queue for this lead or the “Select Queue” option to add the lead to an existing queue.
- Queue: Select a queue from the list. Note: Only queues that were created for the lead import (using the “Add New Lead” or “Import CSV” options) are displayed in this list.
Enter the lead information into the corresponding fields and click the “Add lead to collection” button to complete the process. ields and click the “Add lead to collection” button to complete the process.
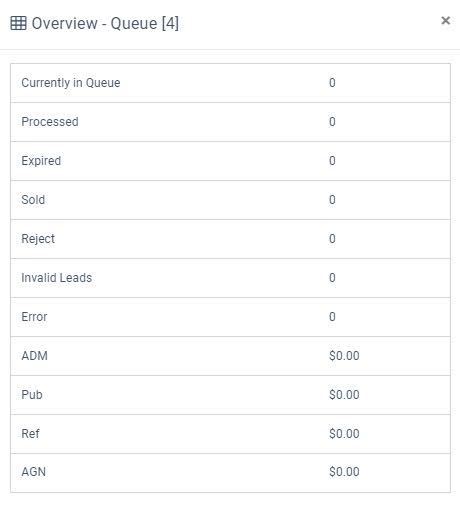
 To view more detailed information on the queue performance, click the “Statistics” button and select the “Overview” option in the “Actions” column. The queue overview contains the following information:
- Currently in Queue: The number of leads that are currently in the queue.
- Processed: The number of leads that have been processed.
- Expired: The number of leads that expired before being reposted.
- Sold: The number of reposted leads that were sold.
- Reject: The number of reposted leads that were rejected.
- Invalid Leads: The number of invalid leads (where some of the lead data is missing or incorrect).
- Error: The number of system errors that occurred during the lead posting.
- TTL: The total revenue amount.
- ADM: The Admin revenue.
- Pub: The Publisher earnings.
- Ref: The Referral payment.
- AGN: The Agent payment.
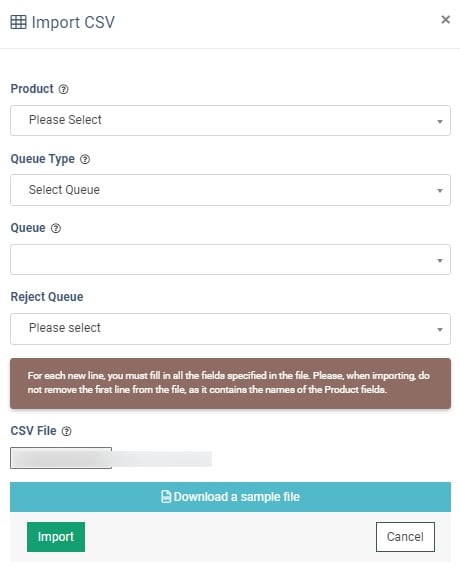
To import leads to the collection from the CSV file, click the “Import CSV” button.
Fill in the following fields in the “Import CSV” pop-up window:
- Product: Select the Product.
- Queue Type: Select the “New Queue” option to create a new queue for the leads in the CSV or the “Select Queue” option to add the leads in the CSV to an existing queue.
- Queue: Select a queue from the list. Note: Only queues created for the lead import (using the “Add New Lead” or “Import CSV” options) are displayed in this list.
- Reject Queue: Select the queue from the list. Use this queue to repost leads from the import with the “Reject” status.
- CSV File: Click the “Choose File” button to select the file for import.
You can download a sample file by clicking the “Download a sample file” button to check the format and use it as a template.
Click the “Import” button to complete the process.
When you upload a file for import, the system runs a quick format pretest (the first 1000 lines are checked). If a maximum of 10 mistakes are found, the system stops the pretest process and shows the pop-up window with the list of the lines that have format issues or the description of the issue. If no errors are found, the system will show the pop-up window to confirm the successful import.

To stop active reposting or collection of leads, click the “Stop Repost” or “Stop Collection” button in the “Actions” column.
To configure the queue settings, click the “Configure” button in the “Actions” column. The system will redirect you to the Repost Queue Settings page.
To remove a record from the Repost Queues list, click the “Delete” button in the “Actions” column.
Repost Queue Settings
The Repost Queue Settings page allows you to configure Collection Settings which define how leads are collected for the repost, and Repost Settings which define the reposting strategy for the collected leads.
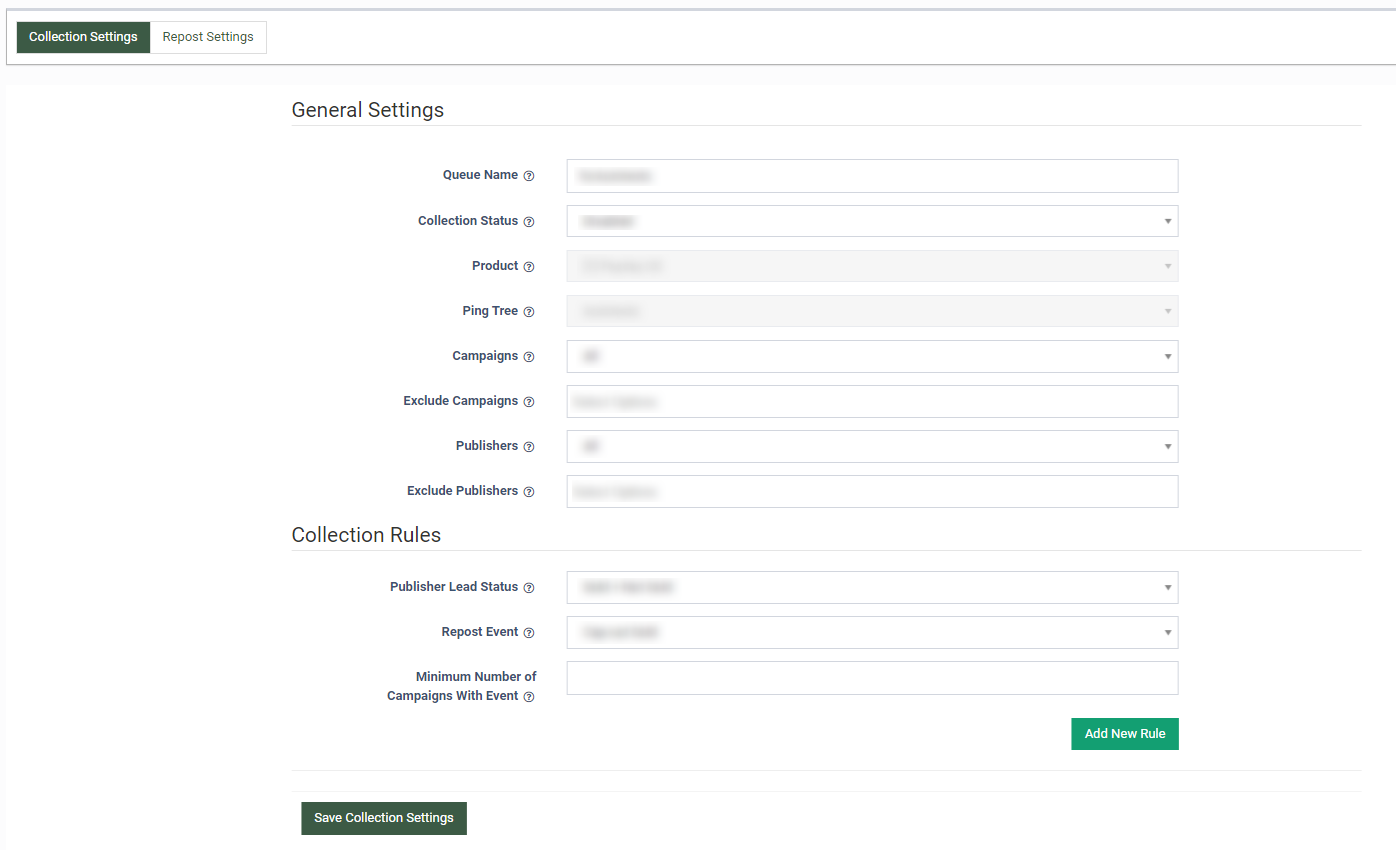
Collection Settings
The “Collection Settings” tab allows you to manage the collection process for the queue and configure the events that trigger the repost.
General Settings block: Configure general collection settings.
- Queue Name: Enter the name of the queue.
- Collection Status: Select the collection status.
- Select the “Disabled” option to stop the lead collection process for the queue.
- Select the “Active” option to enable the lead collection for the queue.
- Select the “Paused” option to put the lead collection process on hold.
- Product: The selected Product (cannot be changed after the queue is created).
- Ping Tree: The selected Ping Tree (cannot be changed after the queue is created).
- Campaigns: Select the “All” option to process the collection for all the campaigns of the selected Ping Tree or exclude campaigns from the collection. Choose the “Selected” option to specify campaigns for the collection.
- Exclude Campaigns: Select campaigns you want to exclude from the collection (Optional). Note: This field is available only when the “All” option is selected in the “Campaigns” field.
- Select Campaigns: Select campaigns you want to add to the collection. Note: This field is available only when the “Selected” option is selected in the “Campaigns” field.
- Publishers: Select the “All” option to collect leads from any Publisher. Select the “One” option to collect leads from the specific Publisher only.
- Exclude Publishers: Select Publishers to be excluded from the collection (Optional).
- Select Publisher: Select a Publisher to collect leads from.
- Publisher Lead Status: Select the final lead status. Only leads with this status will be collected in the queue.
- Select the “Sold + Not Sold” option to collect both Sold and Not Sold leads.
- Select the “Sold” option to collect Sold leads only (not available for Silent Campaigns).
- Select the “Not Sold” option to collect the leads that are not sold (not available for Silent Campaigns).
- Repost Event: Select the Campaign event that will trigger a lead to be collected to the queue.
- Select the “Cap-out Sold” option to add a lead to the collection if it was presented to a Campaign that reached the set Cap-Out Sold limit.
- Select the “Cap-out Send” option to add a lead to the collection if it was presented to a Campaign that reached the set Cap-Out Send limit.
- Select the “Timeout” option to add a lead to the collection if it was presented to a Campaign that reached the set timeout limit.
- Select the “Out of Schedule” option to add a lead to the collection if one of the Campaigns selected in the General Settings was out of the schedule when the lead was processed (only for the selected Campaigns).
- Select the “Cap-out Group Sold” option to add a lead to the collection if one of the Campaigns selected in the General Settings has reached the set Group-Cap limit. Note: This repost event is for selected Campaigns only. Hourly, daily, and monthly caps are taken into account.
- Minimum Number of Campaigns with Event: Enter the minimum number of Campaigns with the specified repost event to trigger a lead to be collected (Min=1, Max=100). Example: You set “Cap-out Sold” as the repost event and put three as a minimum number of campaigns with the event. With that setup, a lead will be collected only if there were three or more campaigns with the “Cap-out Sold” event when the lead was processed.
Click the “Save Collection Settings” to confirm the changes.
You can add up to three collection rules to one queue. To do that, click the “Add New Rule” button. To delete a rule, click the “Delete” button. If at least one rule applies to a lead, it will be added to the collection.
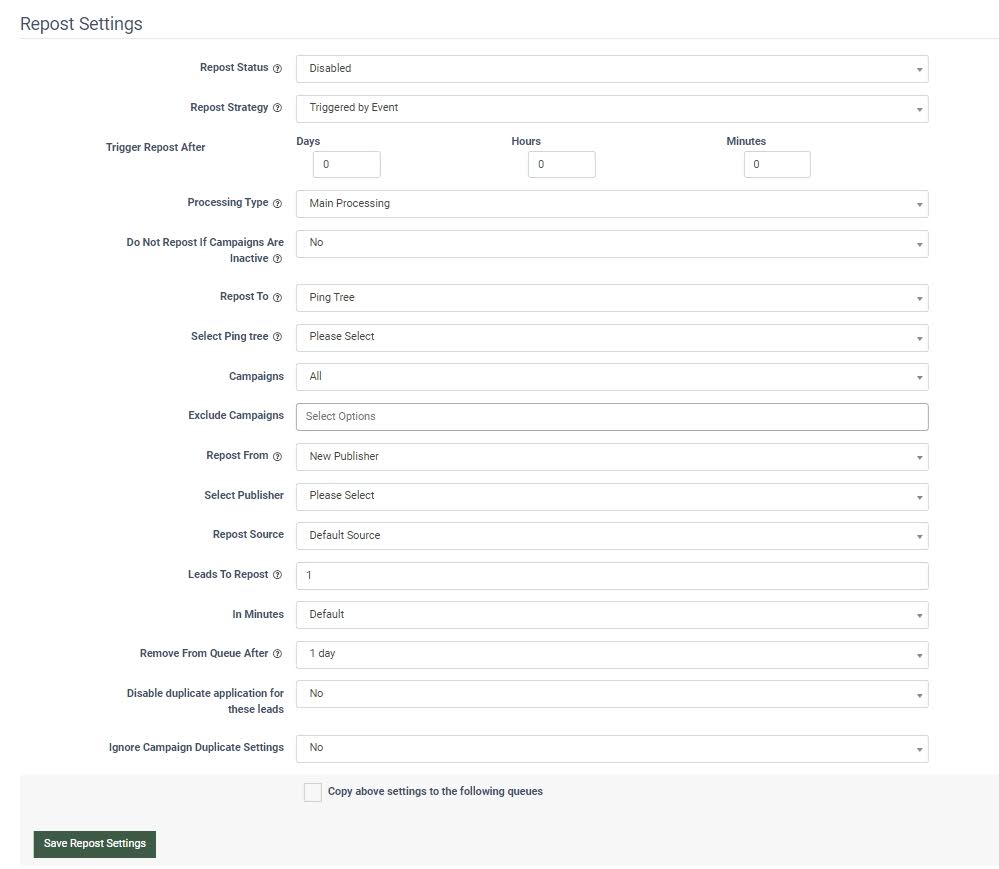
Repost Settings
The “Repost Settings” tab allows you to manage the repost configuration for the queue.
- Repost Status: Select the repost status of the queue. Select the “Active” option to enable reposting. Select the “Disabled” option to stop the reposting. Select the “Paused” option to put the reposting on hold.
- Repost Strategy: Select the repost strategy for the queue.
- Select the “Triggered by Event” option to set the reposting to trigger after the repost event.
- Trigger Repost After: Select the period when the reposting will begin once the lead is collected. Example: If “Trigger Repost After” is set to 2 minutes, the reposing will start 2 minutes after the repost event takes place, and a lead is added to the queue.
- Select the “Scheduled” option to trigger the reposting according to a specific schedule. You may add up to three schedules. All leads collected to the queue by the time the schedule opens will start getting reposted.
- Schedule Days: Fill in the “Start Time” and “End Time” fields to set the reposting timetable. Check the boxes to set the schedule for the particular days of the week.
- Delay repost for: To delay the set schedule, fill in the preferable delay time that can be specified by Days, Hours, and Minutes.
- Select the “Triggered by Event” option to set the reposting to trigger after the repost event.
- Processing Type: Select the processing type (Main Processing / Silence Processing). The processing type will define which repost options are available. Note: The Silence Processing option is available for the queues that were created with the Silent Ping Tree type in the Collection Settings.
- Do Not Repost If Campaigns Are Inactive: Select "Yes" to disable automatic reposting for inactive campaigns. When processing a lead, the following check is performed:
- Checking whether Campaigns’ status is "Active";
- Checking Cap Limits (Post, Sold);
- Checking Campaigns’ Schedule (Post, Do Not Post).
Note: If the system is not able to repost the lead because the criteria haven’t been met, then the lead is removed from the queue within x amount of days which is specified in the “Remove From Queue After” field. However, if during this period a Campaign becomes available to purchase the lead, it will be reposted immediately before reaching the specified removal time. - Repost To: Select the repost type.
- Select the “Same Campaign” option to repost leads to the same Campaigns with the repost events.
- Select the “Ping Tree” option to repost the leads to a different Ping Tree of the same Product. (Main Processing only)
- Select Ping Tree: Select the Ping Tree from the drop-down list.
- Campaigns: Select the “All” option to process the collection for all the Campaigns of the selected Ping Tree or exclude Campaigns from the collection. Choose the “Selected” option to specify Campaigns for the reposting.
- Exclude Campaigns: Select Campaigns you want to exclude from the reposting (Optional). Note: This field is available only when the “All” option is selected in the “Campaigns” field.
- Select Campaigns: Select the Campaigns you want to add to the reposting list. Note: This field is available only when the “Selected” option is selected in the “Campaigns” field.
- Repost From: Select the Publisher to assign the reposted leads to. Select the “Same Publisher” option to assign it to the Publisher that first posted the lead. Select the “New Publisher” option to repost it from a new Publisher.
- Repost Source: Select the Publisher Source to assign the reposted leads to.
- Select the “Same Source” option to repost leads under the source it was collected from.
- Select the “Default Source” option to set Publisher Source as a “Default” for the reposted leads.
- Select the “New Source” option to set the particular Publisher Source for the reposted leads in the “Source Name” field (Note: this option is available in case of “New Publisher” is selected in the “Repost From” field).
- Leads to Repost: Enter the number of leads to be reposted during the time range specified in the “In Minutes” field. The system will distribute reposting to meet this threshold.
- In Minutes: Select the time range to set the intensity of the lead reposting. The number of leads set in the “Leads to Repost” field will be distributed evenly every minute during this time range (if you have 600 leads to be reposted during the 60 minutes, the system will process 10 leads every minute).
- Remove From Queue After: Select the period for the lead to expire and be removed from the queue in the event it has not been reposted by that time. Once the set period has passed, the Repost Status will change from “Active” to “Expired”.
- Disable duplicate applications for these leads:
- Select the “Yes” option to disable duplicate applications for the leads in the queue. Some reposted leads might be considered duplicate applications and be blocked if reposted within 5 minutes unless this option is enabled.
- Select the “No” option to allow duplicate applications.
- Ignore Campaign Duplicate Settings:
- Select the “Yes” option to ignore the campaign duplicate settings when reposting leads.
- Select the “No” option to process the repost, considering the campaign duplicate settings.
- Copy above settings to the following queues: Check the box to apply the same configuration to the selected queues.
Click the “Save Report Settings” button to confirm the changes.
Reporting
You can review stats on the reposted leads in the All Reports > Publisher Reports > Lead Details section. Each lead that goes through the repost automation is assigned a corresponding lead tag:
- All the leads that are added to the repost queue are assigned the “Repost Queue 123” tag, where 123 corresponds to the queue ID number.
- All the leads that are processed and reposted, are assigned the “Reposted Queue 123”, where 123 corresponds to the queue ID number.
To view more detailed information about the leads in the specific queue, use the corresponding tags to narrow the search results in the “Lead Details” report.
To access the report, go to the All Reports > Publisher Reports > Lead Details section. To apply the search filter, select a repost lead tag in the “Lead Tag” field, and click the “Search” button.
Read more about the Lead Details report in the Knowledge Base article.