The Lead Details report allows you to view detailed lead analytics for all Publishers and analyze their performance.
The Lead Details section contains the following tabs:
To view the report, go to the All Reports > Publisher Reports > Lead Details section.
-Dec-02-2024-10-18-34-6124-AM.png?hsLang=en)
Lead Details
You can narrow down the result using the following filters:
- Lead ID: Enter the unique identification number of the lead.
- Date: Select the date range for the report (Today/ Yesterday/ This Week/ Last Week/ This Month/ Last Month/ Last 3 months/ Last 6 months/ Custom Range).
- Product: Select the Product.
- Method: Select the posting method (Post/ Form).
- Status: Select the status of the lead (Sold/ Reject/ Test/ New/ Fraud reject/ Post Error /Pre-screening / Verifying / Offer Received).
- Redirect Status: Select the status of the redirect (Yes/ No).
- Publisher Agent: Select the Publisher Agent.
- Publisher: Select the Publisher.
- Publisher Channel: Select the Publisher Channel.
- Publisher Source: Select the Publisher Source.
- Buyer: Select the Buyer.
- Buyer Campaign: Select the Buyer Campaign.
- Email Validation: Select the status of the email validation (Verified/ Catch All/ Role/Unknown/ Undeliverable/ Malformed/ SpamTrap/ Complainer/ Bot/ Seed Account/ Disposable Email/ Suppressed).
- Lead Tag: Select the Lead Tag (AI Agent, AMD, Bad Country, Bad Email, Bad Email (Score >= 91), Bad IP (75), Compliance, Disconnected Phone, DNC - Listed Phone, Email with dots and plus, Fraud Reject, iClear Reject Global, iClear Reject Rule, Not Posted, Possible fraud, Short Call, Sold CPF, Too many Tags, TPS Reject, VoIP Phone).
- Show Lead Tags: Check the box to display the Lead Tags for the Publisher Lead Details report.
- Ping Tree: Select the Ping Tree.
- Publisher Tags: Select the Publisher Tags.
- Show Connected Leads: Check the box to display the parent lead of the connected leads for the Publisher Lead Details report.
- Show Lead Quality/Disposition: Select the checkbox to view additional information about lead quality and lead disposition in the report.
- Buyer Return: Select the (Yes / No) option to display the leads with the returned Buyer’s amount.
- Pub Return: Select the (Yes / No) option to display the leads with the returned Publisher’s amount.
Note: Click the “More Filters” button to display all available filters.
Click the "Export" button and select "Current Page to CSV" to export the current page to CSV or "All Pages to CSV" to export all pages to a CSV file. Select the “Scheduled Export” button to create the scheduled export. Fill in the required fields and click the “Add” button to confirm.
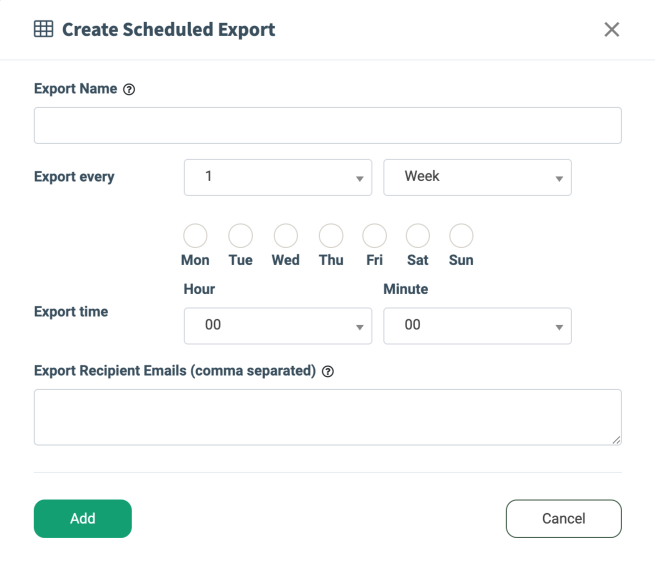
Note: The scheduled export feature is available only on demand. Read more about the Scheduled Report Export in the Knowledge Base article.
You can add a custom tag to this report by creating the After-Processing Rule on the Product level. Go to the System Management > Product section. Click the “Configure” button next to the corresponding Product, and click the “Lead Processing Rules (iClear)” tab. In the “After-Processing Rules” subtab, click the “Add Rule” button.
This feature might help you distinguish which leads were sold exclusively and which were sold to multiple Buyers or Campaigns.
Read more about the Advanced Lead Processing Rules in our Knowledge Base article.
Note: In the Lead Info report, click the Tag name to generate a Lead Details report with applied corresponding “Tag” and “Campaign” filters.
Read more about the Lead Info report in the Knowledge Base article.
The “Lead Details” tab contains the following information:
- ID: The unique identification number of the lead. To view detailed lead information, click on the lead ID.
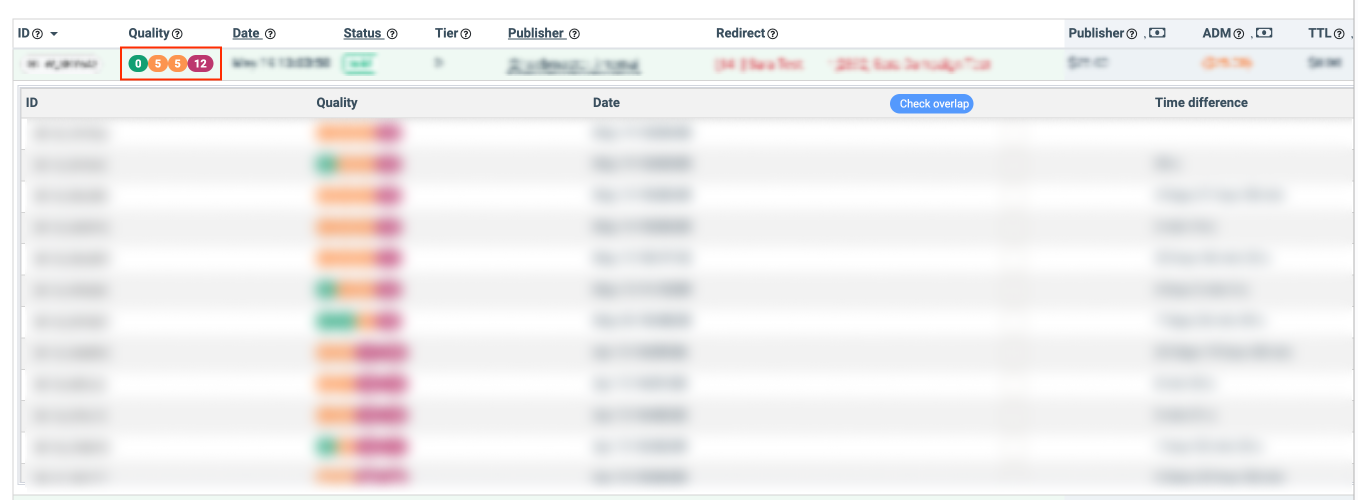
- Quality: Indicates the number of times the same lead has previously been recorded in the system.
- 1st left bubble - within the last 24 hours
- 2nd from left - within the last two weeks
- 3rd from left - within the last 30 days
- 4th from left - within the last 45 days
- Date: The date and time when the lead entered the system.
- Status: The status of the Lead.
- Tier: The lead tier price (Publisher min price for the lead).
- Publisher: The name of the Publisher.
- Redirect: The redirect status of the lead. The green color indicates a successful redirect, while the red indicates a failed redirect.
- Referrer: The URL of the website from which the lead was redirected.
- Bucked Before, USD: The amount on the Publisher’s bucket balance before the lead was posted to the system.
- Bucket After, USD: The amount on the Publisher’s bucket balance after the lead was processed.
- Smart Bucket Before: The Smart Tree bucket bank balance amount before the lead was posted to the system.
- Smart Bucket After: The Smart Tree bucket balance bank amount after the lead was posted to the system.
- Publisher: The Publisher earnings.
- ADM: Admin revenue.
- TTL: Total revenue.
- REF: The Referral payment.
- AGN: The Agent payment.
- Buyer Return: Shows if there’s a Buyer’s amount return:
- Yes: In case of successful amount return.
- No: In case when the amount return is denied.
- -: In case of no lead return.
- Pub Return: Shows if there’s a Publisher’s amount return
- Yes: In case of successful amount return.
- -: In case of no lead return.
- Product: The name of the Product.
- Channel: The name of the Publisher channel.
- Publisher Tags: The tags assigned to the Publisher.
- Method: The posting method for the Lead. The POST method indicates that the lead was posted to the system via API, and the FORM method indicates that the lead was posted via the Phonexa form.
- Source: The source of the Publisher.
- Click ID: The identification number of the lead sent by the publisher.
- Email: The email address of the lead.
- State: The state of the lead.
- User IP: The IP address of the user.
- Ping Tree: The Ping Tree through which the lead was processed.
To view the information about the same leads that previously entered the system, click the bubble values in the “Quality” field. The information about previous entries of the same lead will be displayed in the collapsible section. This section includes the detailed lead details about the previous entities of the same lead, including the name of the Buyer who purchased the lead, the name of the corresponding campaign, and the redirect status in the “Redirect” field.
You can add custom columns to the report by clicking the “Add New Column” button. Read more about how to create custom columns and how to manage them in the following Knowledge Base article.
To create the lead export to Cloud PBX, click the “Export To Cloud PBX” button, and fill out the following fields:
Note: The export will include all the leads listed in the report based on the currently selected filters. Please make sure that you apply all the necessary filters before starting an export.
- Allowed Publisher List: Select the Allowed Publisher list.
- Restricted Publisher List: Select the Restricted Publisher list.
- Max Lead Count: Enter the maximum number of leads to be exported.
- Note: Max Count Lead must be no greater than 1000.
- Cloud PBX Call Group: Select the Call Group (created in the Cloud PBX component).
- Cloud PBX Campaign: Select the campaign (created in the Cloud PBX component).
- Cloud Dialing List: Select the dialing list (New or Existing (created in the Cloud PBX component)).
- Dialing List Name: Enter the name of the dialing list.
 Click the “Export” button to continue.
Post Details
The “Post Details” tab contains the following information:
- Date: The date and time when the lead entered the system.
- Status: The status of the lead.
- Lead ID: The unique identification number of the lead. To view detailed lead information, click on the lead ID.
- Quality: Indicates the number of times the same lead has previously been recorded in the system.
- 1st left bubble - within the last 24 hours
- 2nd from left - within the last 2two weeks
- 3rd from left - within the last 30 days
- 4th from left - within the last 45 days
- Redirect: The redirect status of the lead. The green color indicates a successful redirect, while the red indicates a failed redirect.
- Min Price: The minimum price of the lead sent by the publisher.
- PUB: The publisher earnings.
- ADM: Admin revenue.
- TTL: Total revenue.
- AGN: The Agent payment.
- Publisher: The name of the Publisher.
- Publisher Tags: The tags assigned to the Publisher.
- Post Time: The post-processing time.
- Email: The email address of the lead.
- State: The state of the lead.
- User IP: The IP address of the lead.
- Product: The name of the Product.
You can narrow down the result using the following filters:
- Lead ID: Enter the identification number of the lead.
- Date: Select the date range for the report (Today/ Yesterday/ This Week/ Last Week/ This Month/ Last Month/ Last 3 months/ Last 6 months/ Custom Range)
- Product: Select the Product.
- Method: Select the posting method (Post/ Form).
- Publisher: Select the Publisher.
- Publisher Channel: Select the Publisher Channel.
- Publisher Source: Select the Publisher Source.
- Status: Select the status of the lead (Sold/ Reject).
- Redirect Status: Select the status of the redirect (Yes/ No).
- Ping Tree: Select the Ping Tree.
- Publisher Agent: Select the Publisher Agent.
- Buyer: Select the Buyer.
- Buyer Campaign: Select the Buyer Campaign.
- Post Time: Select the time range for the post processing time (6s/ 6s-15s/ 16s-30s/ 31s-45s/ 46s-60s/ 61s-90s/ 91s-100s/ 101s-110s/ 111s-120s/ 121s-130s/ 131s-140s/ 141s-150s/ >151s).
- Lead Tag: Select the Lead Tag.
- Show Lead Tags: Check the box to display the Lead Tags for the Publisher Lead Details report.
- Publisher Tags: Select the Publisher Tags.
To view the information about the same leads that previously entered the system, click the bubble values in the “Quality” field. The information about previous entries of the same lead will be displayed in the collapsible section. This section includes the detailed lead details about the previous entities of the same lead, including the name of the Buyer who purchased the lead, the name of the corresponding campaign, and the redirect status in the “Redirect” field.
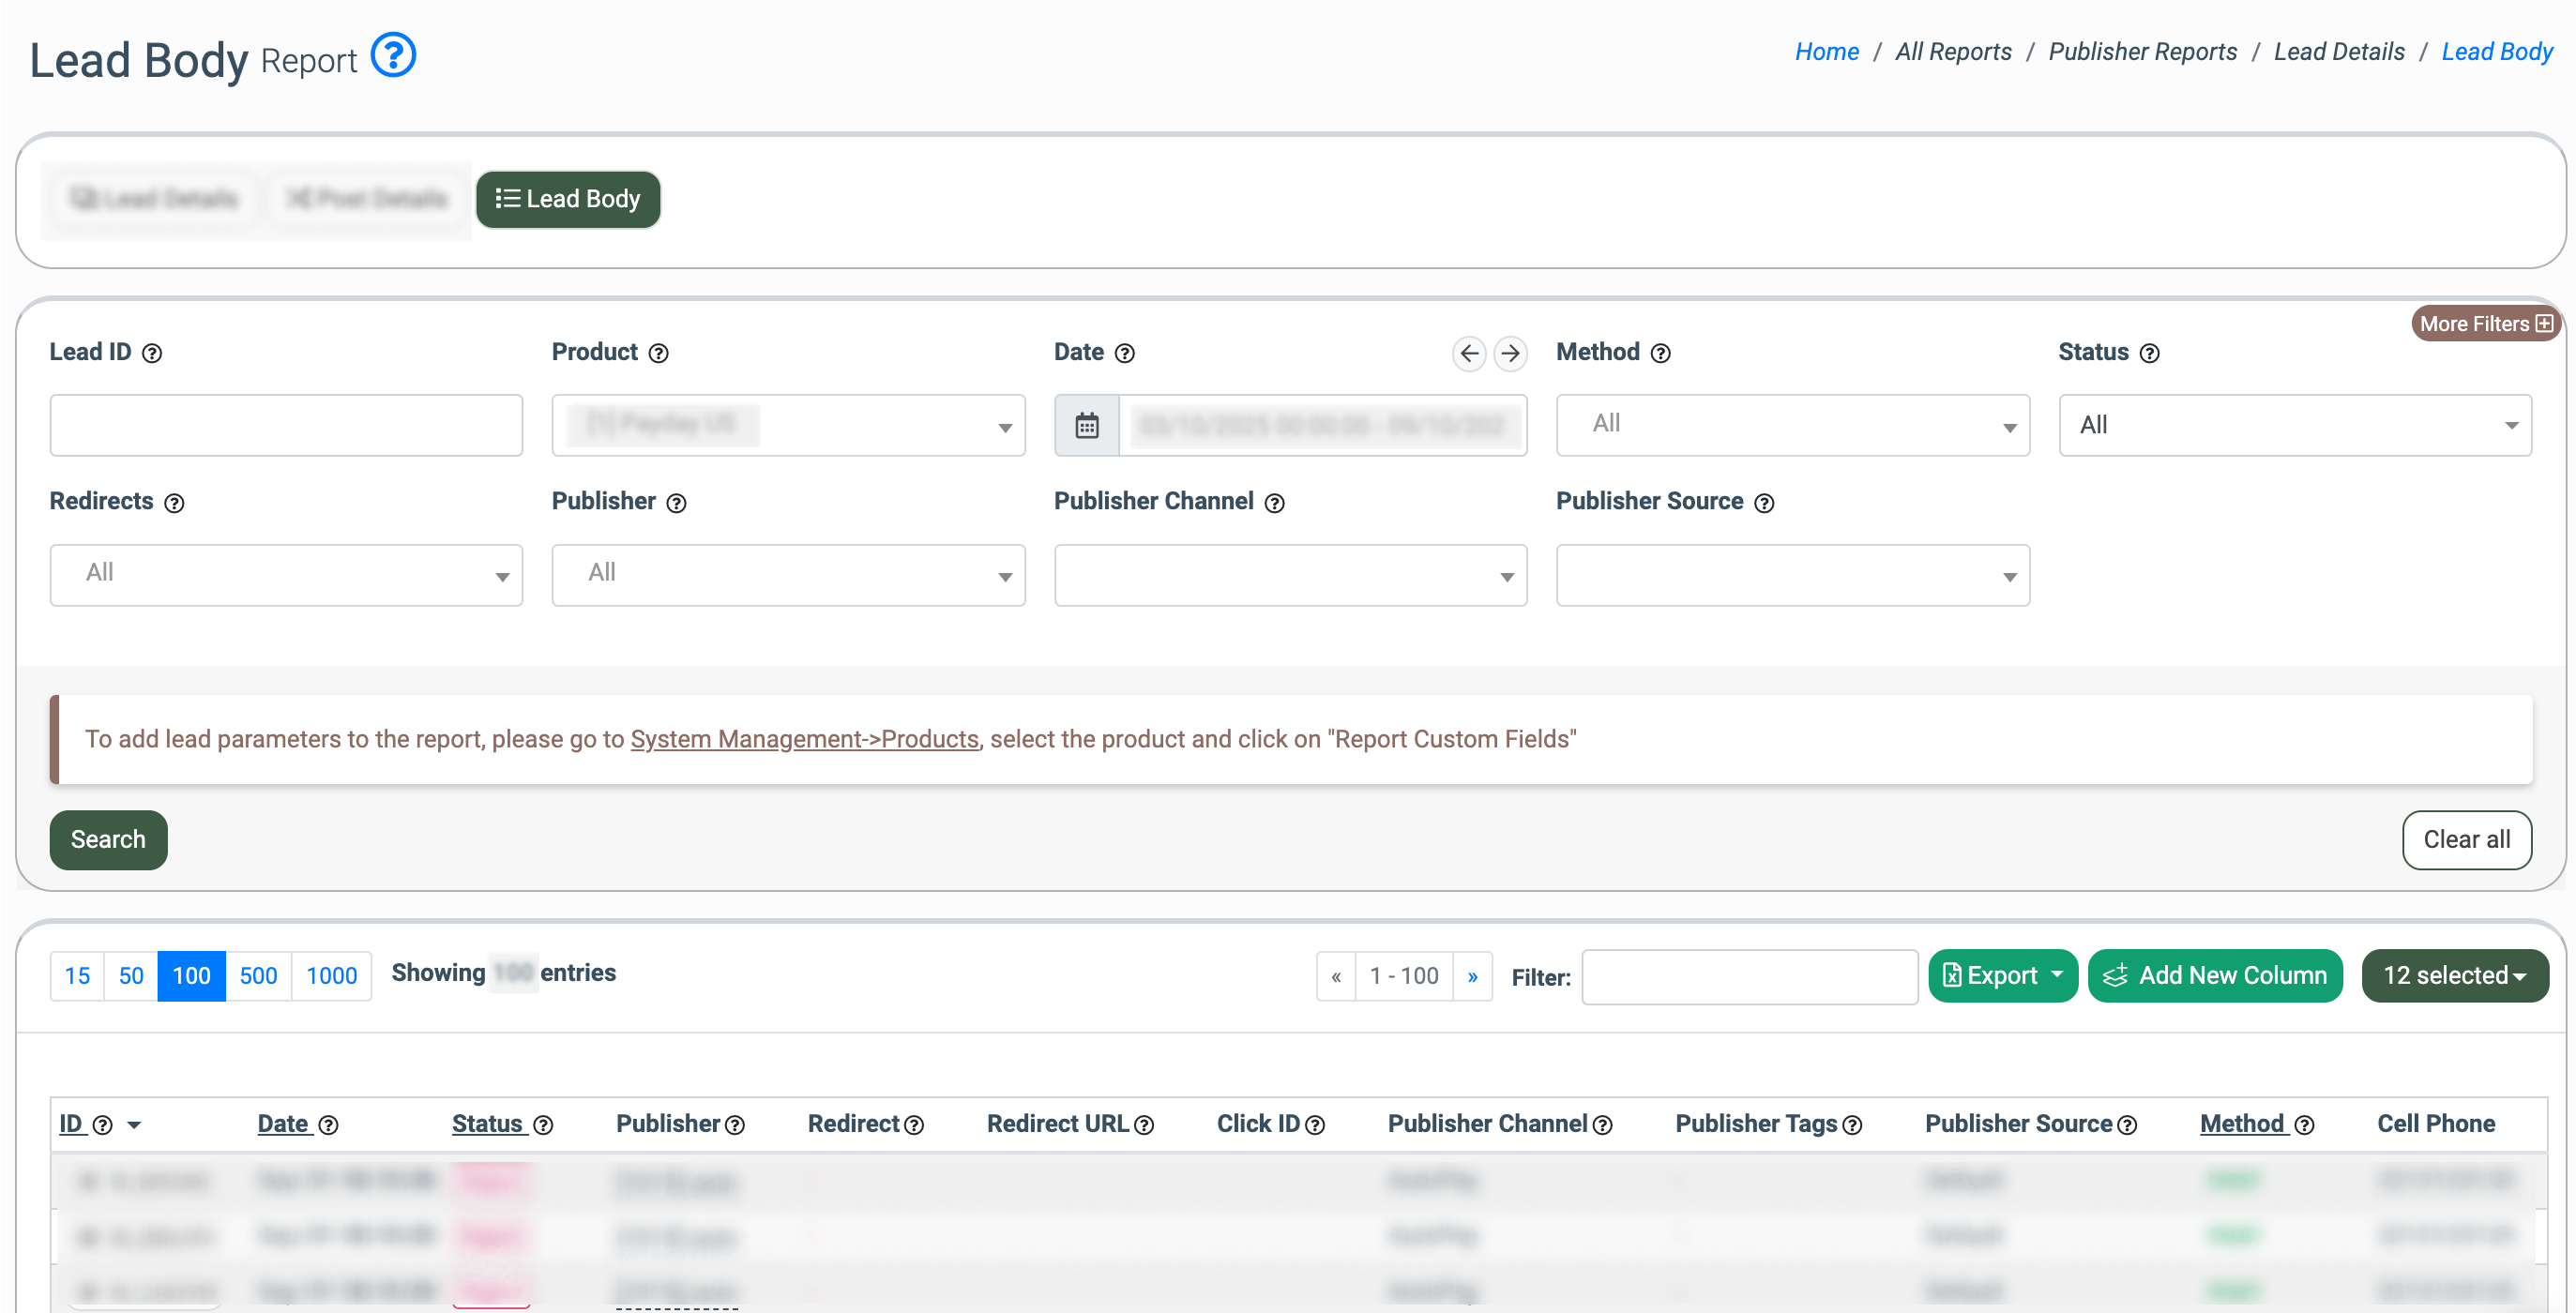
Lead Body
The “Lead Body” tab contains the following information:
- ID: The unique identification number of the lead. To view detailed lead information, click on the lead ID.
- Date: The date and time when the lead entered the system.
- Status: The status of the lead.
- Publisher: The name of the Publisher.
- Redirect: The redirect status of the lead. The green color indicates a successful redirect, while the red indicates a failed redirect.
- Redirect URL: The redirect URL.
- Click ID: The identification number of the lead sent by the publisher.
- Publisher Channel: The Publisher Channel.
- Publisher Tags: The tags assigned to the Publisher.
- Publisher Source: The name of the publisher source.
- Method: The lead posting method. The POST method indicates that the lead was posted to the system via API, and the FORM method indicates that the lead was posted via the Phonexa form.
- Cell Phone: The cell phone number of the lead.
- Home Phone: The home phone number of the lead.
- Work Phone: The work phone number of the lead.
You can narrow down the result using the following filters:
- Lead ID: Enter the identification number of the lead.
- Product: Select the Product.
- Date: Select the date range for the report (Today/ Yesterday/ This Week/ Last Week/ This Month/ Last Month/ Last 3 months/ Last 6 months/ Custom Range)
- Method: Select the posting method (Post/ Form).
- Status: Select the status of the lead (Sold/ Reject/ Test/ New/ Fraud reject/ Post Error /Pre-screening / Verifying / Offer Received).
- Redirects: Select if the lead was redirected (Yes/ No).
- Publisher Agent: Select the Publisher Agent.
- Publisher: Select the Publisher.
- Publisher Channel: Select the Publisher Channel.
- Publisher Source: Select the Publisher Source.
- Buyer: Select the Buyer.
- Buyer Campaign: Select the Buyer Campaign.
- Lead Tag: Select the Lead Tag.
- Show Lead Tags: Check the box to display the Lead Tags for the Publisher Lead Details report.
- Ping Tree: Select the Ping Tree.
- Publisher Tags: Select the Publisher Tags.