You can enable the services on the Product level or set rules for specific channels to filter out leads that do not meet set requirements. Advanced rules can be used in conjunction with Global Rules to further optimize lead filter parameters.
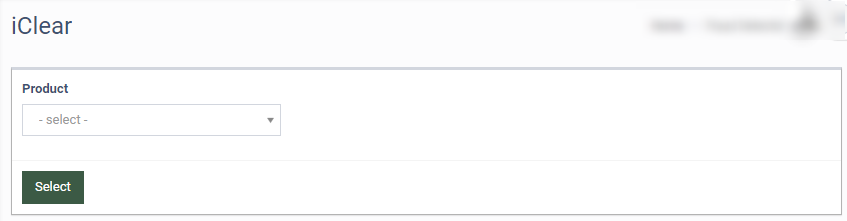
To access the configuration, go to the Fraud and Anomaly > iClear section and select a Product from the drop-down list.
Once you select the Product, you’ll be automatically redirected to the Lead Processing Rules (iClear) tab. You may also navigate here by selecting the System Management > Products section on the left-hand menu and clicking on the “Settings” button for the corresponding product (Lead Processing Rules (iClear) tab).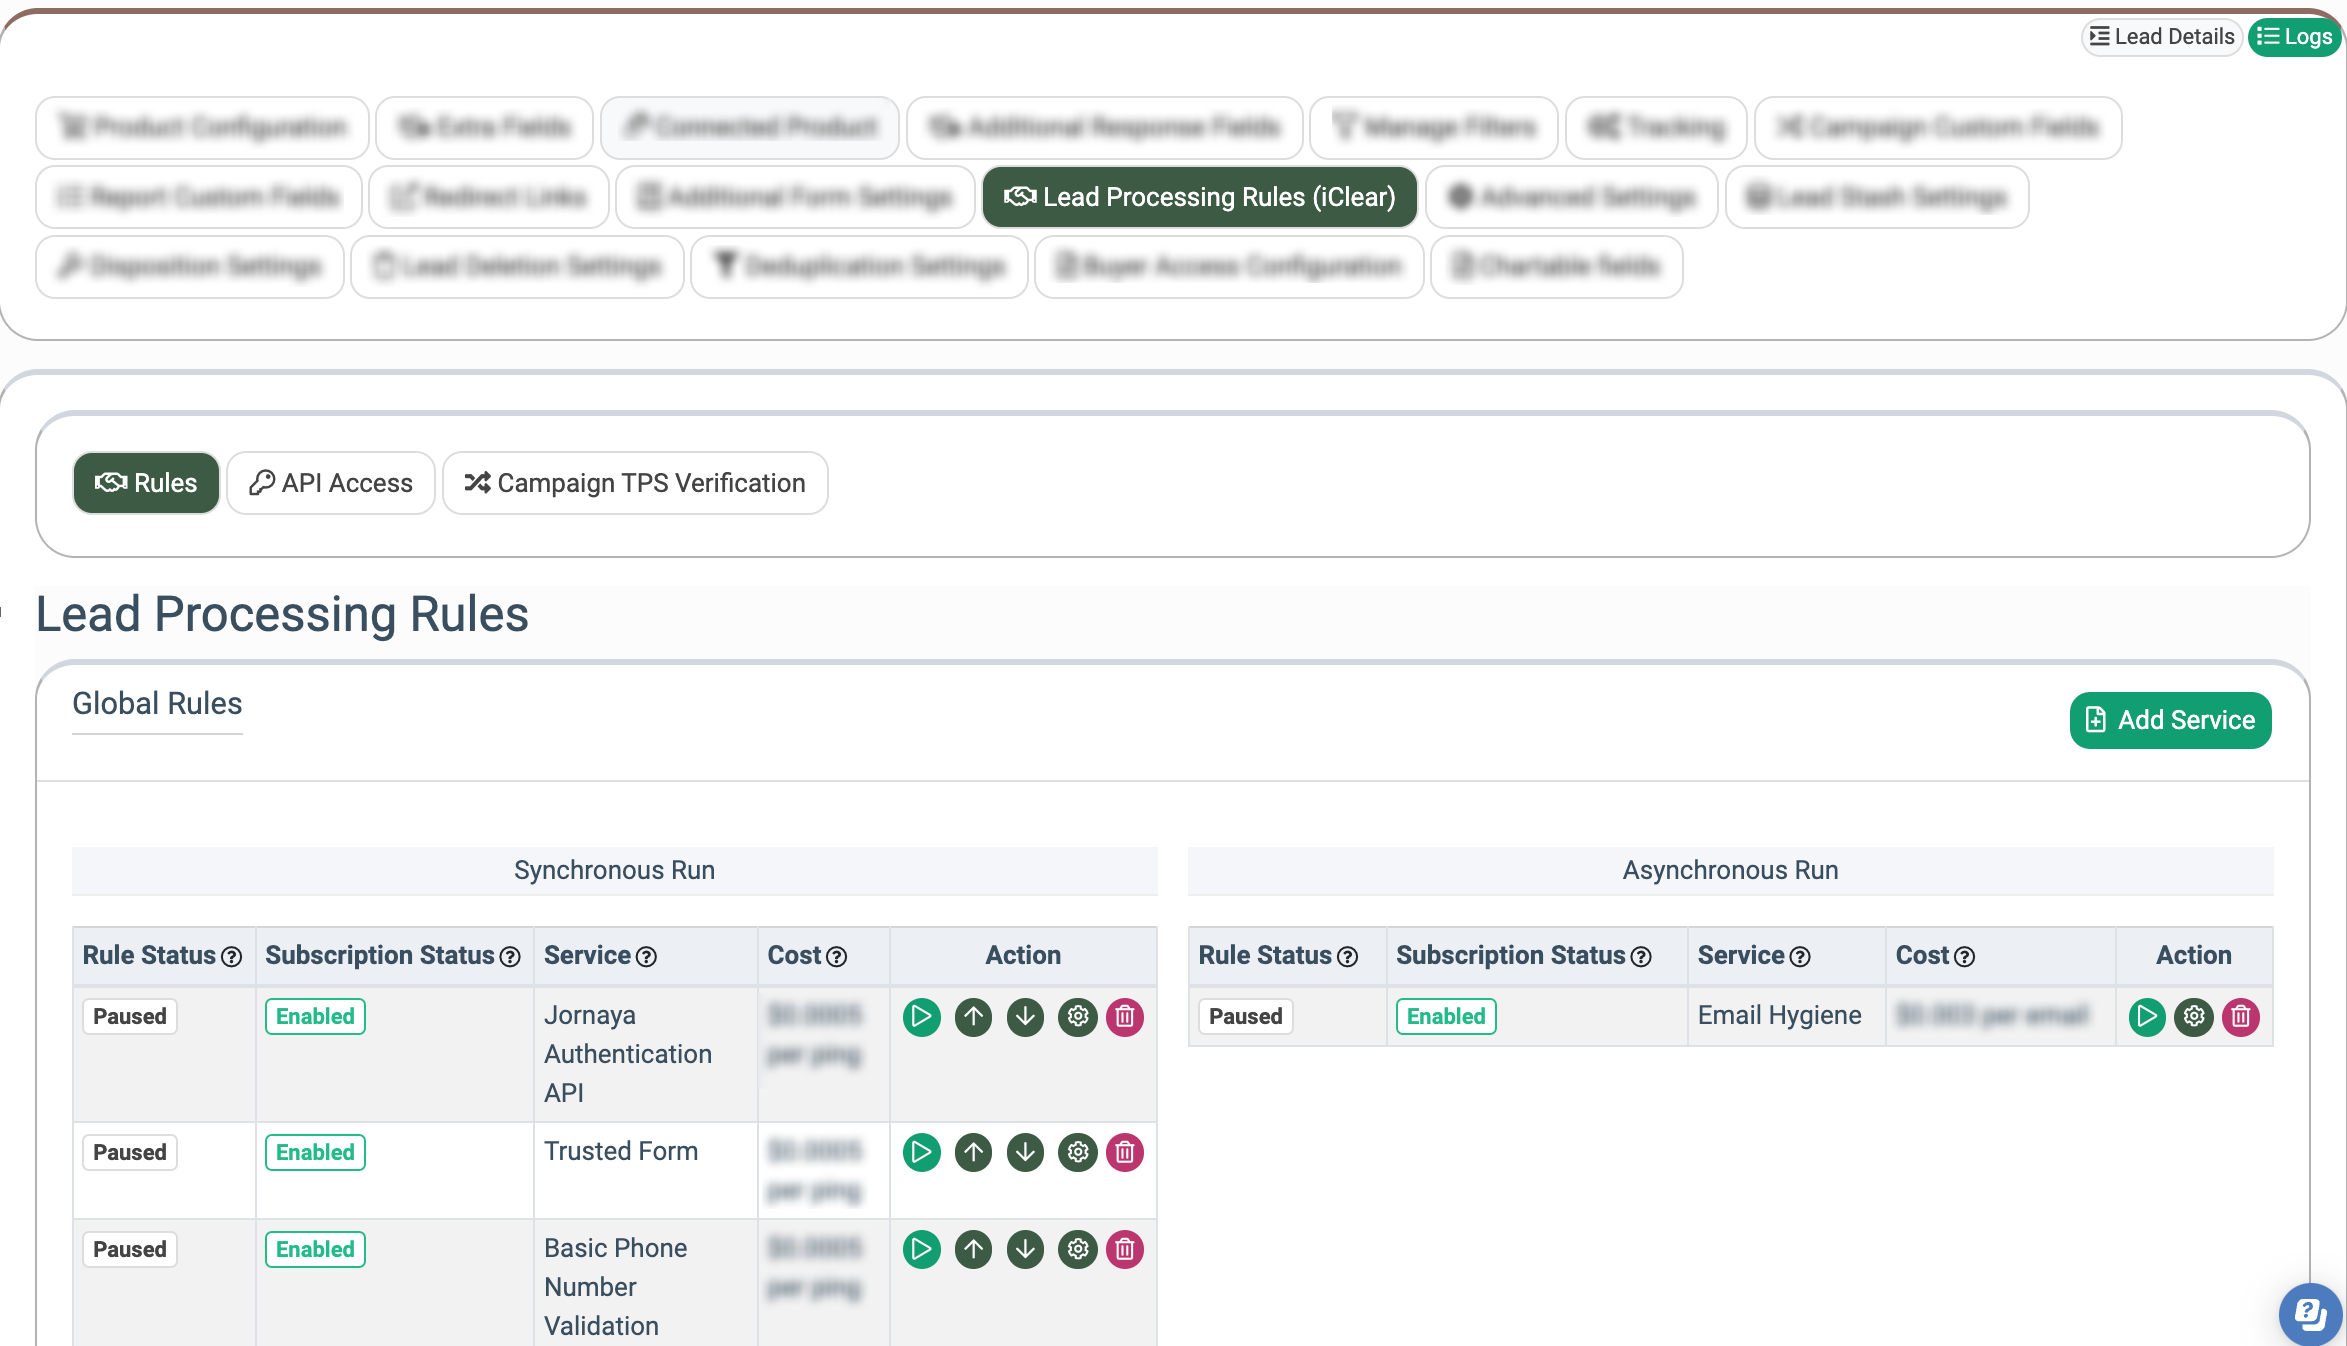
Rules
The "Rules" subtab allows you to activate iClear third-party services at the Product level. You can configure Global Rules to enable the service for the entire Product or choose to add and configure Advanced Rules for more detailed management based on specific parameters and conditions. Additionally, you can apply caps to limit the number of times the selected service can process leads per hour, day, or month.
Global Rules
The Global Rules block allows you to enable/configure available third-party services and decide what percentage of incoming leads to apply the selected global rule. You will also be able to set a cap on the number of leads processed per global rule to manage associated costs. You can also choose to add the preset global rules that are already configured for the most common scenarios.
When setting up Global Rules, you must select the Execution Type (Synchronous, Asynchronous, On-Demand).
The Synchronous Run services are executed concurrently with lead processing and can impact the flow.
The Asynchronous Run services do not impact the lead processing flow. Instead, they help evaluate lead quality after processing has taken place for analysis purposes. The lead will go through regular processing, but depending on the result of the lookup status, it may be included in the DNPL. Please note that this can only happen if the DNPL has been set up. You can learn more about Present and Do Not Present Lists by referring to this article.
The On-Demand Run enables leads filtration when the “% of lead to lookup” is set as 0 (null)
All lists contain the following information:
- Status: The rule status (Active/Paused).
- Subscription Status: The subscription status of a third-party service (Enabled, Disabled).
-
Service: The name of a third-party service.
-
Cost: The cost of the service per lookup.
-
Actions: Configure the service using the provided tools.
-
Click the “Pause” button to change the service status to Paused.
-
Click the “Activate” button to change the service status to Active.
-
Use the arrow buttons to set service priority in the lead processing flow. The arrangement determines the order in which services are executed. If one of the services rejects a lead, then the lead will not be processed further down. Once the order of services has been configured, click the “Save Order” button to confirm changes.
-
Click the “Settings” button to configure the service.
-
Click the “Delete” button to remove the rule from the list and disable the service.
-
To add additional services to the Global Rules, click the “Add Service” button. Then choose your preferred option from the list of available services and click the “Add to iClear” button located in the corresponding section. If you would like to learn more about the service you want to add, click the “Learn more on Knowledge Base” button, which will take you to the relevant article.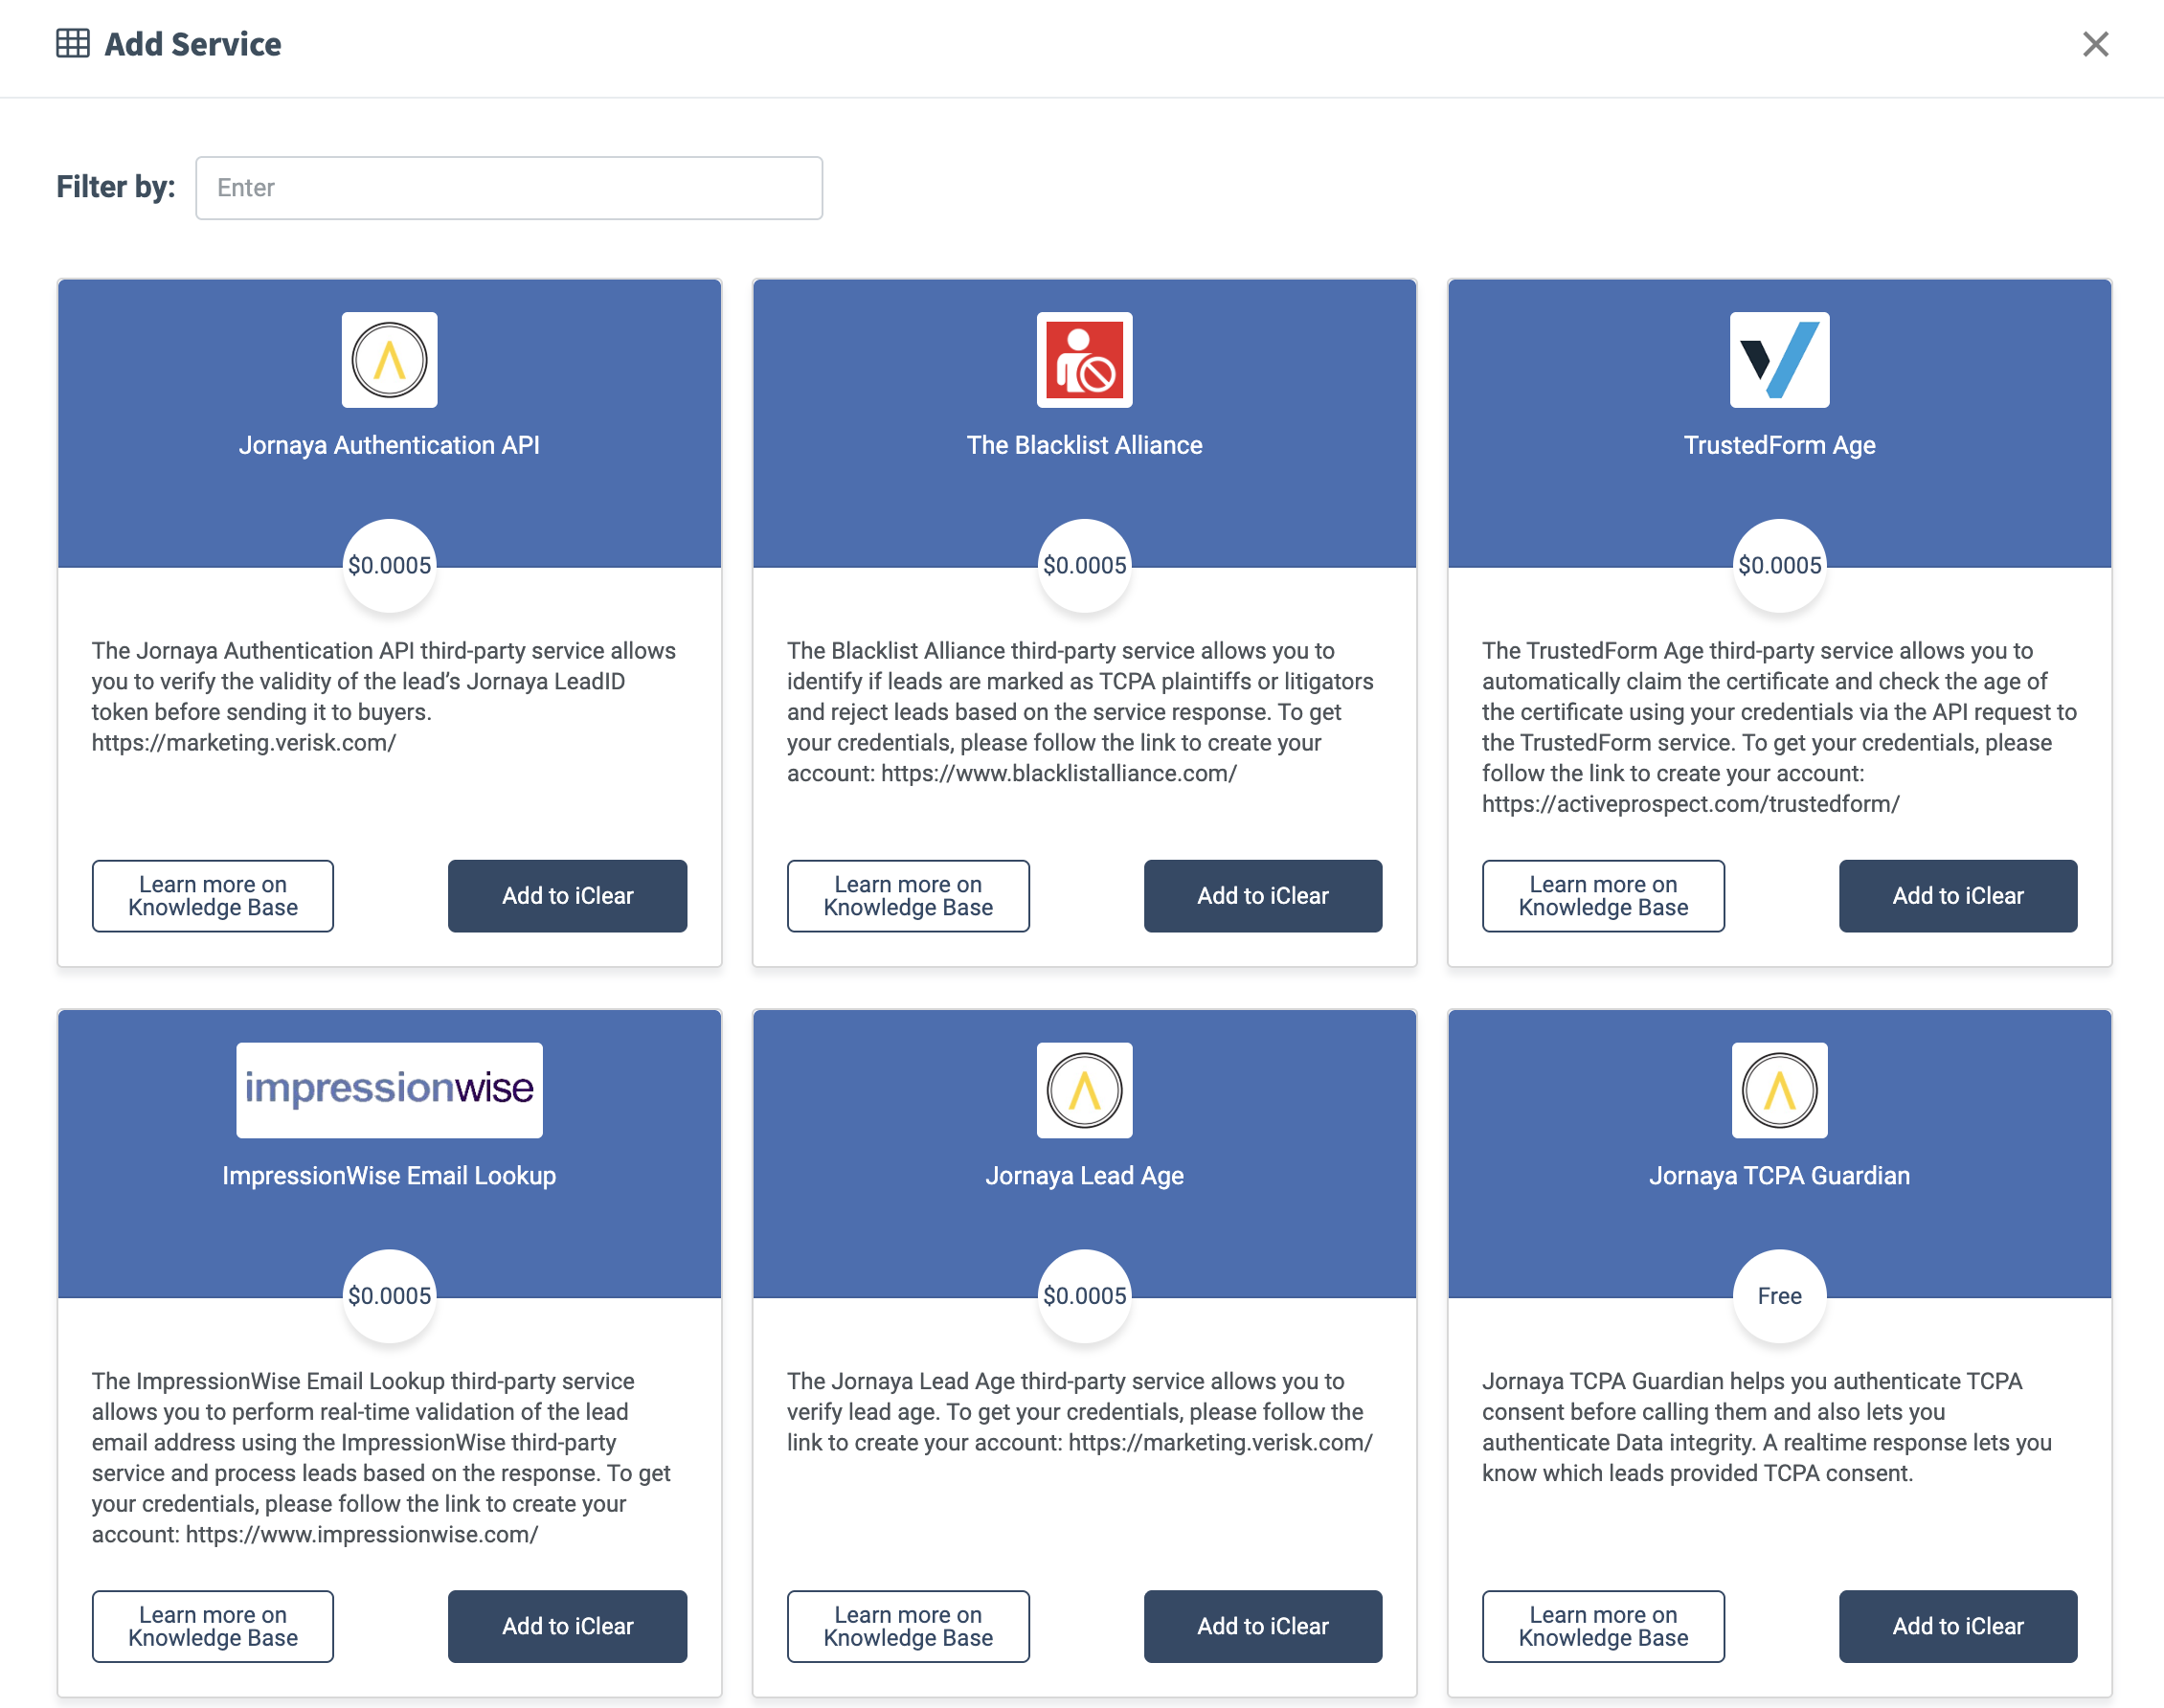
Once you have selected the preferred service, fill in the configuration-specific fields and click the “Add” button.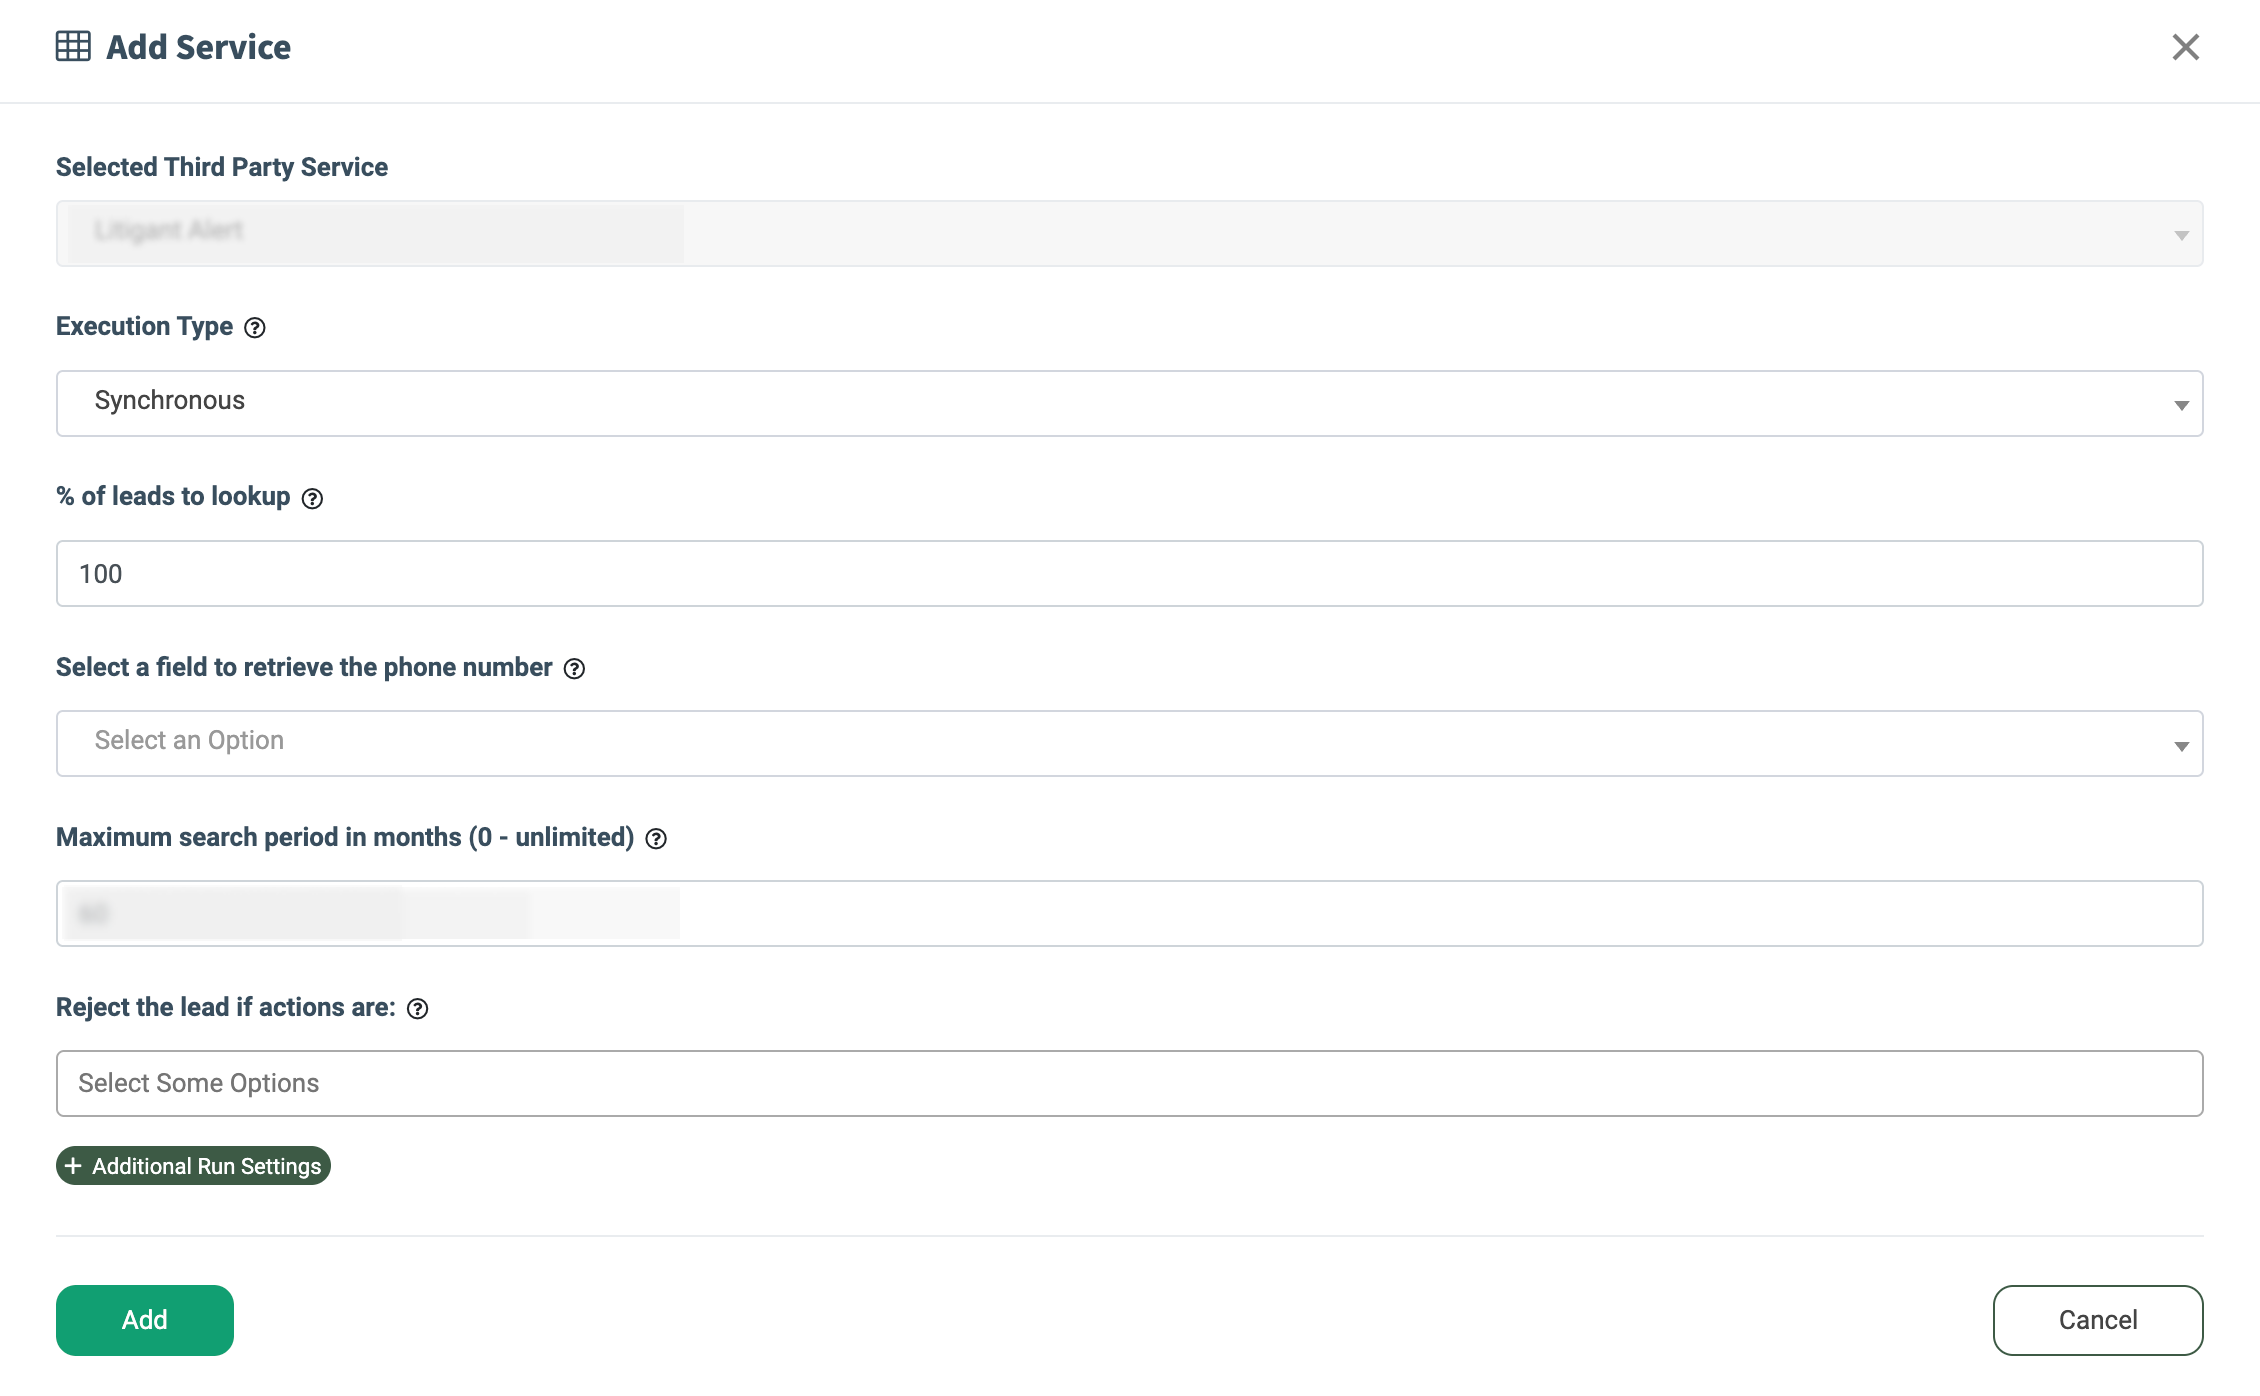
Note: If you need to apply multiple rules for the same service, please contact your account manager to enable this feature.
To add a preset global rule that contains recommended service settings for specific use cases, click the “Add Preset Advanced Rule” button. Select the preferred service setup from the list and click the “Add” button.
![]()
Please read and follow the instructions provided in the pop-up window. You can manage and configure the necessary rule actions according to your needs and select a ping tree for proper routing. If the desired ping tree is not available in the list, click the “Redirect” button next to the “Ping Tree” field to create a new one via the Ping Tree Settings section. After creating the new ping tree, click the “Refresh” button to view it in the list, and then make your selection. Once you’ve made all the required changes, click the "Agree & Create" button to proceed.
Note: You can create multiple rules with the same name without duplicates or numerous charges.![]()
Once you have added a new preset rule, you have the option to configure it further using a set of detailed advanced settings. To do this, click the “Edit” button. To learn how to manage the advanced configuration, please refer to the instructions in the Advanced Rules Configuration section below.
Note: When a preset is added, if the services included in the system subscription are not activated or if global rules have not been established, these will be added or created automatically. However, the advanced rule will be created in a paused state, and you will need to activate it before it can be used.
Advanced Rules
The Advanced Rules block allows you to create a set of conditions and actions to filter leads further and specify how they are processed. Using the Advanced Rules, you can target leads per Publisher, Publisher Channels, and Publisher Sources. The list of actions includes the option to stop processing a lead, run additional third-party service verification, or route a lead to a different ping tree.
The Pre-Validation Rules tab allows you to apply the set of rules for the leads that enter the system before the validation process. The list of available actions for such rules includes the options to stop processing the lead, stop processing Pre-Validation rules or change the input data. This can specifically be useful for Publishers' raw data in case of Product changes or if the Publisher cannot change the data of the lead. To view the information about the rejected leads, go to the Fraud and Anomaly > Pre Screen Reject Log section. Read more about the Pre Screen Reject Log report in this article.
The After-processing Rules tab allows you to apply the set of rules for the leads that are already processed for reporting purposes. The list of available actions includes the option to add or remove tags, add the lead to PL/DNPL list(s), run a third-party service, change the lead body fields, or change the response parameter.
The Advanced Rules on Redirect tab allows you to create and apply a set of rules to the lead redirect process. The available actions include adding the lead to PL/DNPL, incrementing counter value, stopping processing rules, finding and replacing characters within a specific redirect parameter, and running the action from tracking. This is particularly useful if you need to detect parameter replacement for the lead redirect process to prevent unauthorized data changes. To view the information about the lead’s redirect process affected by the applied rules, go to the All Reports > Publisher/Buyer Reports > Lead Details section. Select the lead from the list and click its ID number. In the “Lead Info” block, select the “Redirect” tab and then the “Advanced Rules Log” subtab.
The list of rules for each tab contains the following information:
- ID: The unique identification number of the rule.
- Rule Name: The name of the rule.
- Rule Filters: The list of filters that are applied to the rule. This list contains the name of the Publisher, Publisher Channel, and Publisher Source set for the corresponding filtration rules. If the rule is applied on the Product level without setting the additional filtration, the “Any” value will be displayed. To view the full list of the applicable rule filters for every rule, click the “Show All” button in the column header next to its title.
- Conditions: The list of conditional rules that should be met for the actions set in the “Actions” field to trigger. Note: The logical operation should be taken into consideration when conditions are met. To view the list of all conditions set for the rules, click the arrow-down button in the column header next to its title. To view the list of all conditions set for the particular rule, select the rule from the list and click the arrow-down button in the corresponding field.
- Actions: The list of actions that should be triggered after the rules from the “Conditions” field are met. To view the list of all actions set for the rules, click the arrow-down button in the column header next to its title. To view the list of all actions set for the particular rule, select the rule from the list and click the arrow-down button in the corresponding field.
- Status: The rule status (Active/Paused).
- Created At: The date and time when the rule was created.
- Action: Configure the advanced rule using the provided tools.
-
-
Click the “Pause” button to change the rule status to Paused.
-
Click the “Activate” button to change the rule status to Active.
-
Use the arrow buttons to set rule priority in the lead processing flow. The arrangement determines the order in which rules are executed. If one of the rules rejects a lead, then the lead will not be processed further down. Once the order has been configured, click the “Save Order” button to confirm changes.
-
Click the “Edit” button to configure rule parameters.
-
Click the “Delete” button to remove the rule from the list.
-
To sort the list of rules into groups by categories, click the “Add Category” button. Enter the name of the category in the pop-up window and click the “Save” button.
 To set rule priority and move the rules across the categories, use the arrow buttons in the “Actions” column. The arrangement determines the order in which rules are executed. Once the order has been configured, click the “Save Order” button to confirm the changes.
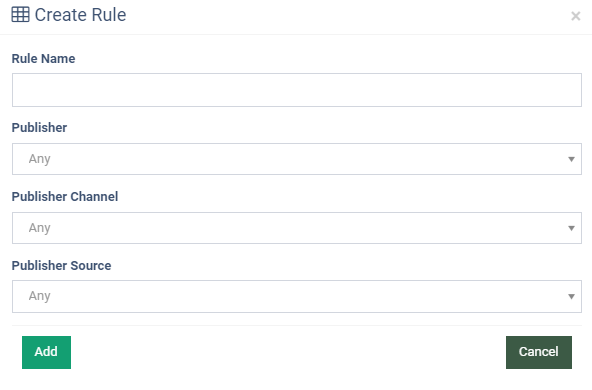
Create a Rule
To set a new rule, click the “Create Rule” button and fill in the following fields:
-
Rule Name: Enter the name of a new rule.
-
Publisher: Select the Publisher for which you want to set this rule. Leave blank to apply for all the Publishers.
-
Publisher Channel: Select the Publisher Channel for which you want to set this rule. Leave blank to apply for all the Publisher Channels.
-
Publisher Source: Select the Publisher Source for which you want to set this rule. Leave blank to apply for all the Publisher Sources. Select the “All New” option to apply the rule to all sources that were created after a particular date (creation date or the date that is specified in the “General” tab of the Advanced Rule settings).
Click the “Add” button to confirm.
Advanced Rules Configuration
Once a new rule is added, you can click “Configure” on the pop-up window to define rule parameters or click “Refresh” to see the updated list of Advanced Rules. The rule parameters can also be configured by clicking the “Edit” button in the Actions column and filling in the relevant fields in the General, Conditions, and Action tabs.
General
The General tab allows you to manage the general and advanced rule settings as well as update rule status.
The “Main Settings” block allows you to edit the general information and status of the rule:
- Rule Name: Update the rule name.
- Publisher: Select the Publisher you want to set this rule for. Leave blank to apply for all the Publishers.
- Publisher Channel: Select the Publisher Channel you want to set this rule for. Leave blank to apply for all the Publisher Channels.
- Publisher Source: Select the Publisher Source you want to set this rule for. Leave blank to apply for all the Publisher Sources. Select the “All New” option to apply the rule to all sources that were created after a particular date (creation date or the custom date set by the user). Note: This option can be selected with the blank “Publisher” and “Publisher Channel” fields.
- Status: Select the status for the rule (Active/Paused).
Click the “+ Rule filters” button to expand the set of additional filter configurations.
The “Rule filter” block allows you to include and exclude specific Publishers, Channels, and Sources for the created rule. Fill in the system ID numbers into the following fields using commas if needed:
- Publisher IDs, comma separated
- Exclude Publisher IDs, comma separated
- Channel IDs, coma separated
- Exclude Channel IDs, comma separated
- Source IDs, comma separated
- Exclude Source IDs, comma separated
- Select the Method (POST/FORM): Specify whether this rule applies to POST leads, FORM leads, or both.
The “Rule caps” block allows you to set the maximum number of times the selected service can be processed within the rule. You can set action-triggered rule caps to monitor how many times the actions of a rule are triggered.
- To enable the daily limit, switch on the “Rule Daily Caps” toggle and fill in the limit number in the “Daily Limit” field.
- To enable the monthly limit, switch on the “Rule Monthly Caps” button and fill in the limit number in the “Monthly Limit” field.
You can also set “Action-Triggered Rule Caps” to monitor how many times the actions of a rule are triggered. These caps are evaluated only after all the rules' conditions have been successfully met, meaning that leads that do not meet the conditions will not increase these caps.
- To enable the action-triggered daily caps, switch on the “Actions Daily Caps” toggle and fill in the limit number in the “Daily Limit” field.
- To enable the action-triggered monthly caps, switch on the “Actions Monthly Caps” toggle and fill in the limit number in the “Monthly Limit” field.
Click the “Save” button to confirm.
Conditions
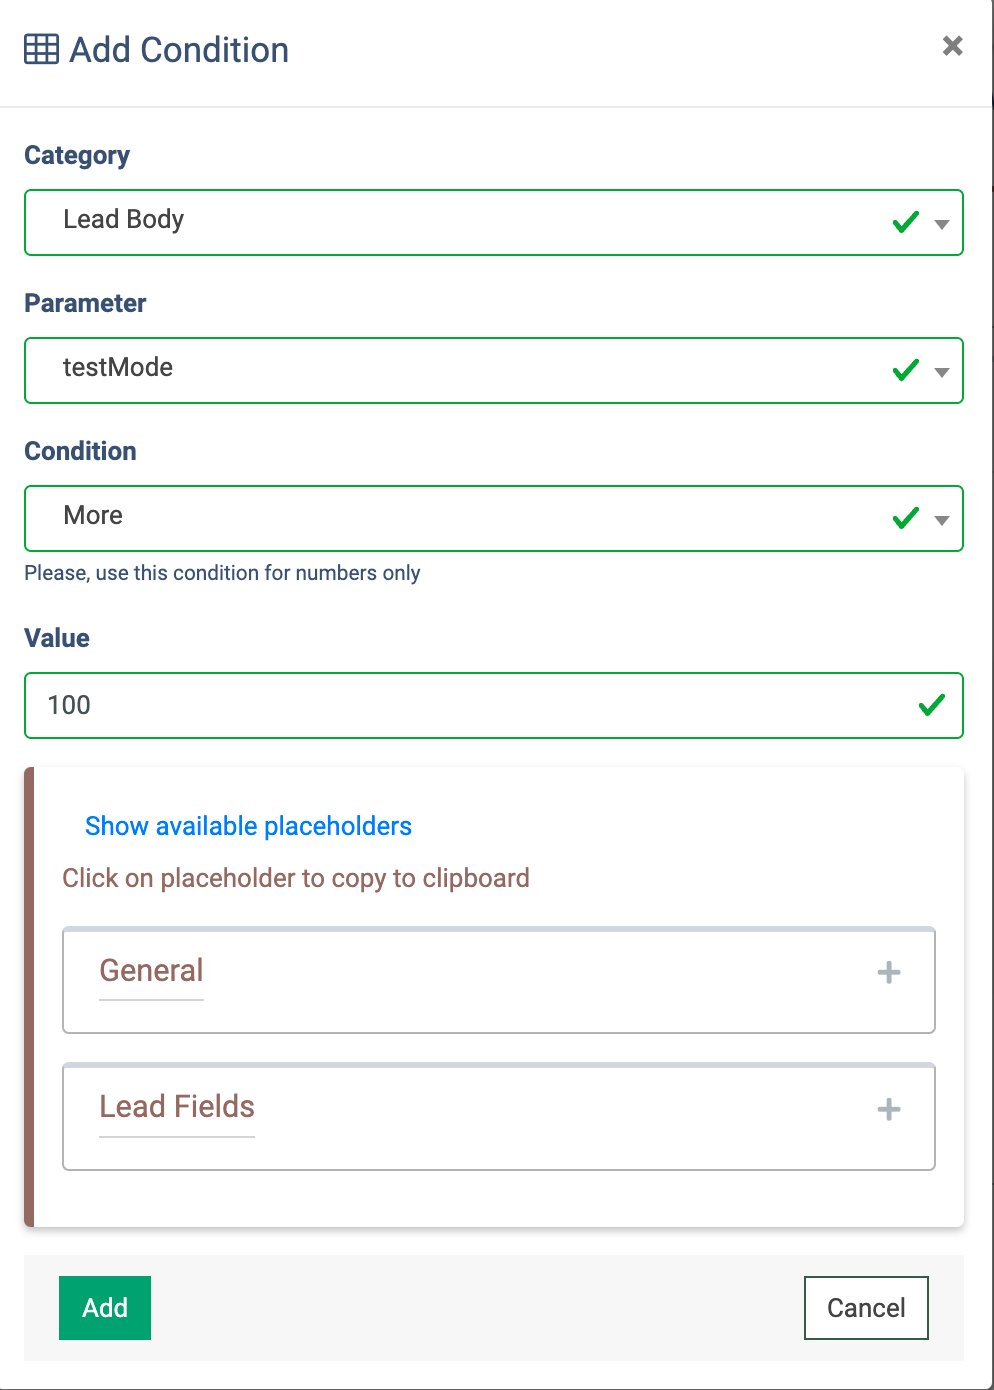
The Conditions tab allows you to add a single condition or multiple conditions that must be met for this rule to trigger the action (set on the Action tab).
To add a new condition for the rule, click the “Add Condition” button and fill in the following fields:
- Category: Select the preferred category according to your needs (Lead Body / Lead Parameters / Third Party Services / Generate Random Number (0 - 1000) / iClear Rules / Check counter value / Check in PL/DNPL / Input Data / Constants / Third Party Service Launched).
-
Parameter: Select one of the available parameters.
-
Condition: Select one of the available conditions to apply.
- Value: Fill in the corresponding value.
- Show available placeholders: You can use the list of preset placeholders from the General and Lead Fields blocks. Tap the “+” icon to open the list and click on the placeholder to copy it to the clipboard.
Click the “Add” button to confirm.
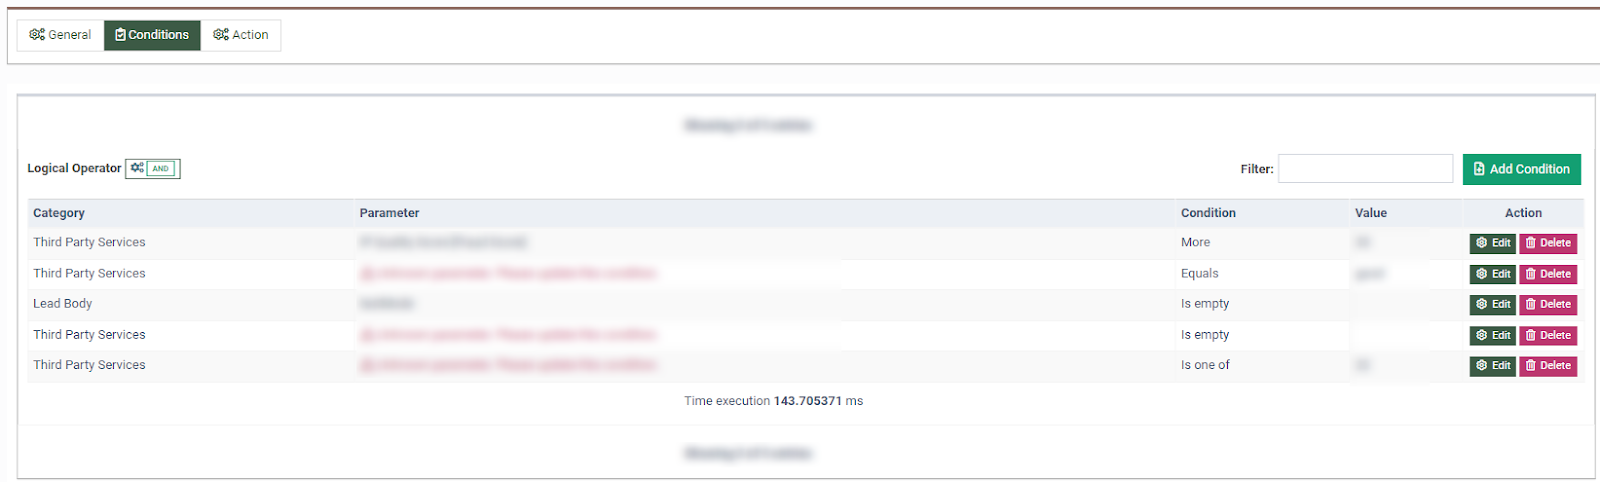
Logical Operator
When adding multiple conditions, the Logical Operator will appear above the list of conditions allowing you to toggle between options AND and OR.
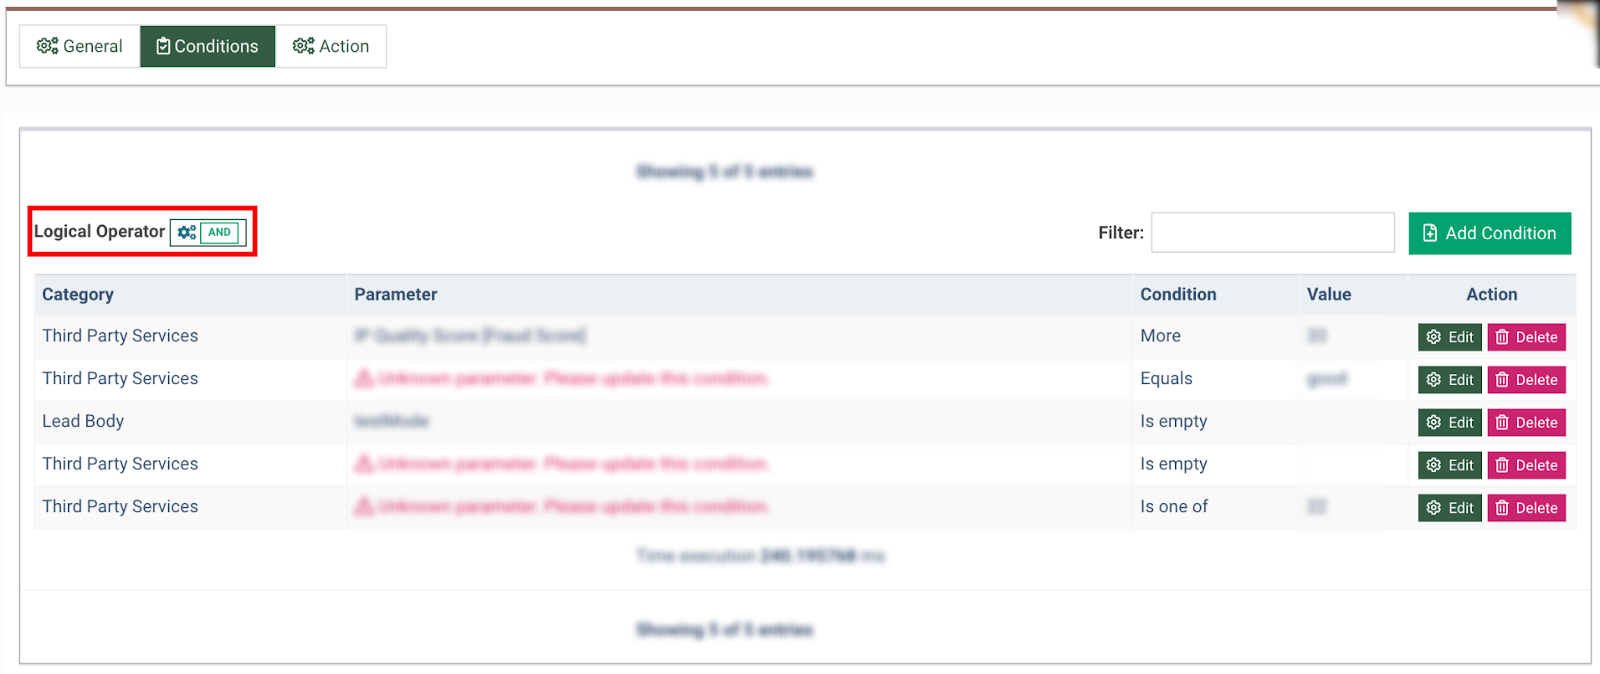
To set the Logical Operator for the list of conditions, click on the gear icon. Select the preferred option from the list:
-
Selecting the AND logical operator will require that all conditions in the list are met to trigger the Action.
-
Selecting the OR logical operator will require that at least one condition is met from the list to trigger the Action.
Click the “Save” button to confirm.
 Once the list of conditions is created, the following columns will be displayed:
-
Category: The conditions category.
-
Parameter: The name of the selected parameter.
-
Condition: The required condition to trigger the action.
-
Value: The value that should meet the set condition.
-
Actions: Configure the condition using the provided tools.
-
Click the “Edit” button to configure the condition.
-
Click the “Delete” button to remove the condition from the list.
-
Action
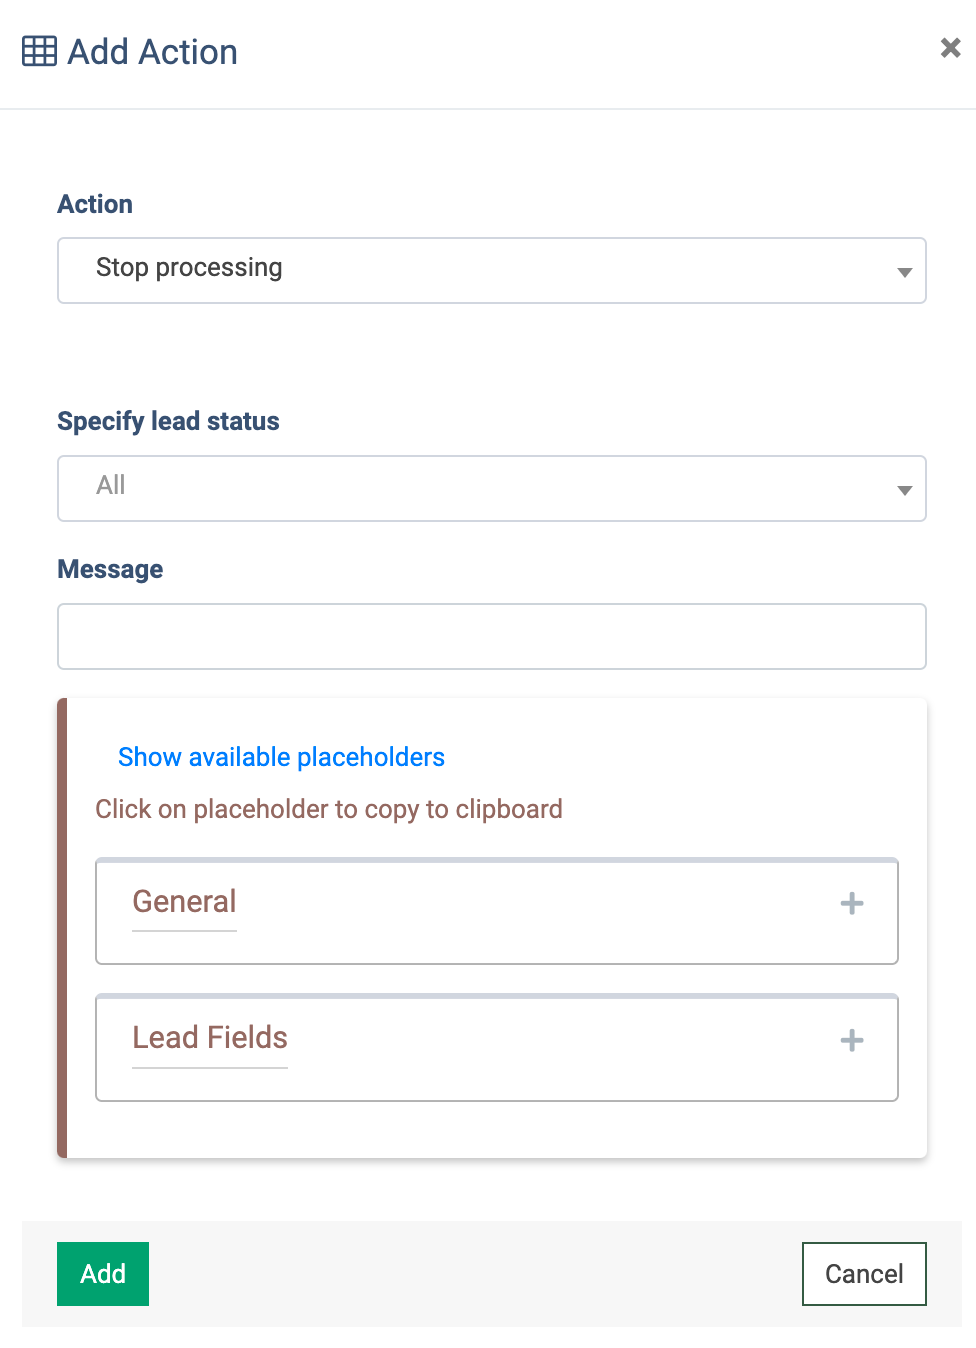
After completing the Conditions tab setup, proceed to the Action tab, where you can set how leads are processed.
To add a new action to the list, click the “Add Action” button. Select the preferred Action from the drop-down list, followed by any additional required fields:
- Stop processing: Select this action to reject the leads that match the set conditions.
- Block Monetization: Select this action to prevent the lead from being sold through the Silent Campaign.
- Route Lead To: Select this action to override the initial lead routing. You can direct the lead to the designated Campaign or Ping Tree, and also to the IVR for the Call Logic component.
- Trigger silent campaign: Select this action to route the lead to the designated Silent Campaign.
- Change Lead Body Fields: Select this action to update the Lead Body fields.
- Run third-party service: Select this action to run the service added to the Asynchronous Run category. The service will run despite the “Paused” status or the “% of leads to lookup” setting.
- Lead Tags: Select this action to assign/remove the tags to the leads that match the set conditions.
- Stop Processing Rules: Select this action to stop processing all the subsequent rules after the current one.
- Add to PL/DNPL: Select this action to add the lead to the selected PL/DNPL list. Read more about Present and Do Not Present lists in this article.
- Mark lead by Ping Tree: Select this action to mark the lead with the selected ping tree for the reporting. The lead will still be processed via the actual ping tree.
- Increment counter value: Select this action to change the selected counter value. This action is only applicable to a specific setup that involves two rules. The first rule assigns the counter to the lead using this action, and the second rule is configured with the "Check counter value" condition to verify the current counter based on the specified "Counter Name".
- Set Lead Body Fields From iClear Service Response: Select this action to assign the Lead Body field with a parameter taken from the iClear service response.
- Email Domain Corrector: Select this action to check the email domain for spelling mistakes and correct it.
- Find and Replace: Select this action to replace the characters/portions of text in the specific Product field.
- Run action from Tracking: Select this action to run the event tracking rule action. Read more about the Event Tracking feature in this article.
- Stop processing Pre-Validation rules: Select this action to stop processing all the subsequent Pre-Validation rules after the current one.
- Change Input Data: Select this action to modify the initial lead’s parameter value.
- Change Response Parameter: Select this action to modify the response displayed after sending the lead.
- Pause Lead for Verification: Select this action to pause leads with specific selected statuses for a verification request.
- Mark Lead by Source: Select this action to mark the lead with the selected source for the reporting. Note: This action is available only on demand.
You can use the list of preset placeholders from the “Show available placeholders” block. Tap the “+” icon to open the list of the General and/or Lead Fields blocks and click on the placeholder to copy it to the clipboard.
Click the “Add” button to confirm.
After the Action has been set, it will appear on the Actions list and will contain the following information:
-
Action: The name of the selected action.
-
Configuration: The detailed configuration of the selected action.
-
Status: The status of the action (Active/Paused).
-
Actions: Configure the action using the provided tools.
-
Click the “Pause” button to change the action status to Paused.
-
Click the “Activate” button to change the action status to Active.
-
Click the “Edit” button to configure the action.
-
Click the “Delete” button to remove the action from the list.
-

Global Rules Caps
The Global Rules Caps block allows you to set the system-wide caps on the selected service processing. You may set daily or monthly caps to limit the number of times the service can run in a day or a month.

The list of configured caps contains the following information:
-
Service: The name of the service.
-
Status: The status of the service.
-
Period type: The selected period (daily/monthly).
-
Start day: The start day of the monthly cap. E.g., if 15 is entered, the cap will reset every 15th day of each month.
-
Limit: The maximum number of times the service can be run within the selected period.
-
Current Value: The current number of times the service has already been run within the selected period.
-
Actions: The following actions are available:
-
Click the “Edit” button to update the cap configuration.
-
Click the “Delete” button to delete the service cap.
-
To create a cap for a service globally, click the “Add New Cap” button. Fill in the following information in the pop-up window:
-
Service: Select a service from the drop-down list.
-
Period Type: Select the period for the cap to be applied to the service.
-
Limit: Enter the maximum number of times the service can be run.
-
Start Day: Enter the start day of the monthly cap. E.g., if 15 is entered, the cap will reset every 15th day of each month.
Click the “Add” button to confirm.

Campaign TPS Verification
The “Campaign TPS Verification” subtab allows instance owners or admins to configure specific iClear third-party services at the Product level, enabling Buyers or themselves to use their credentials and define rejection conditions for individual Campaigns at the Campaign level.
Note: This option is available only for the iClaim, IP Analysis with Client Credentials, Phone Number Analysis with Client Credentials, and TrustedForm v4.0 services.
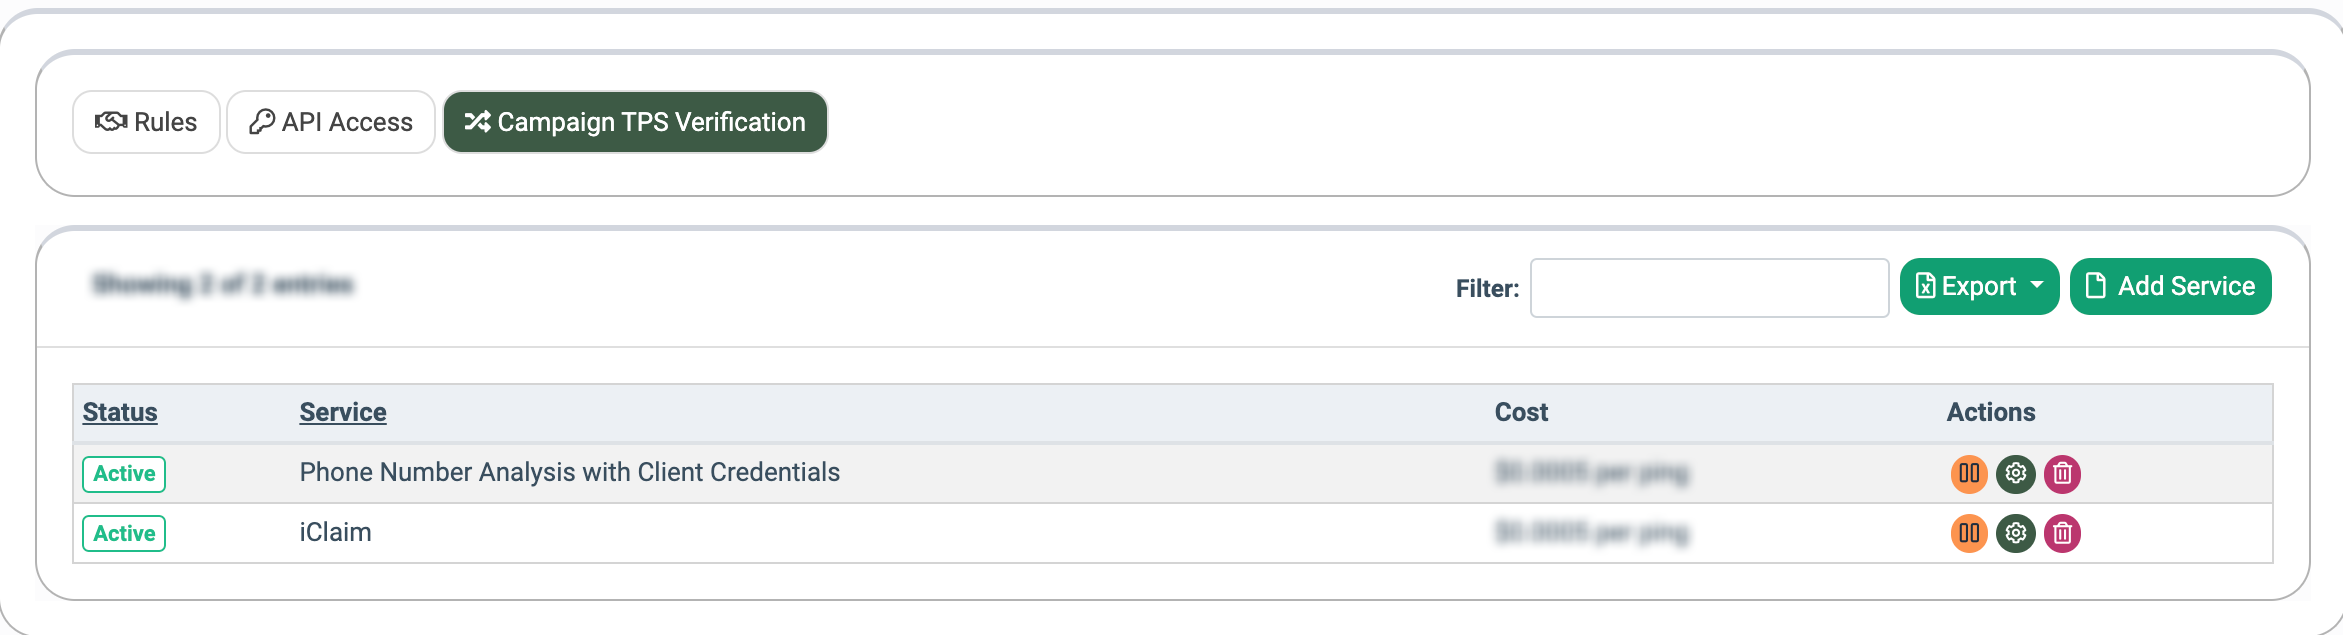
The list of approved services contains the following information:
- Status: The status of the service.
- Service: The name of the service.
- Cost: The cost of the service.
To add a service that will be accessible at the Campaign level, click the “Add Service” button and select the respective service from the list.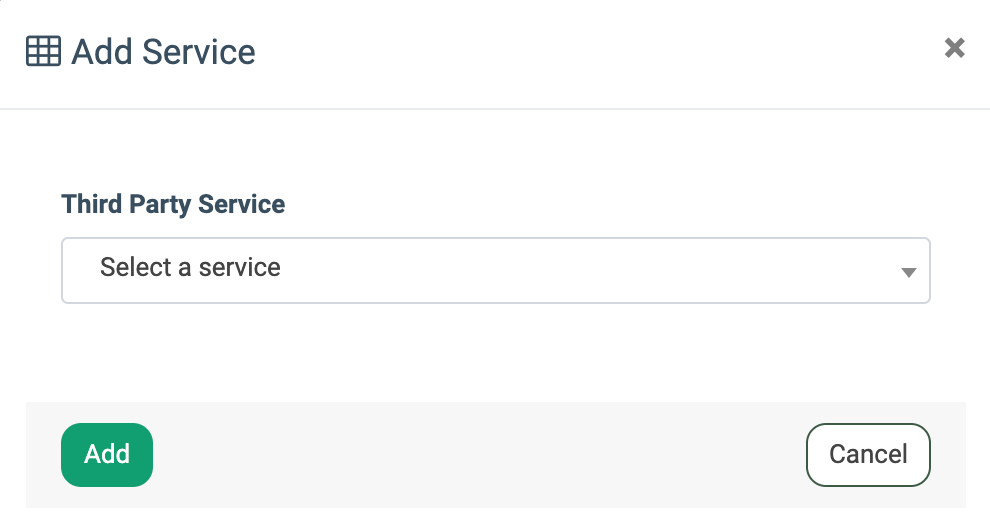
Depending on the selected service, choose the fields required to retrieve data for the service and click the “Add” button to confirm.
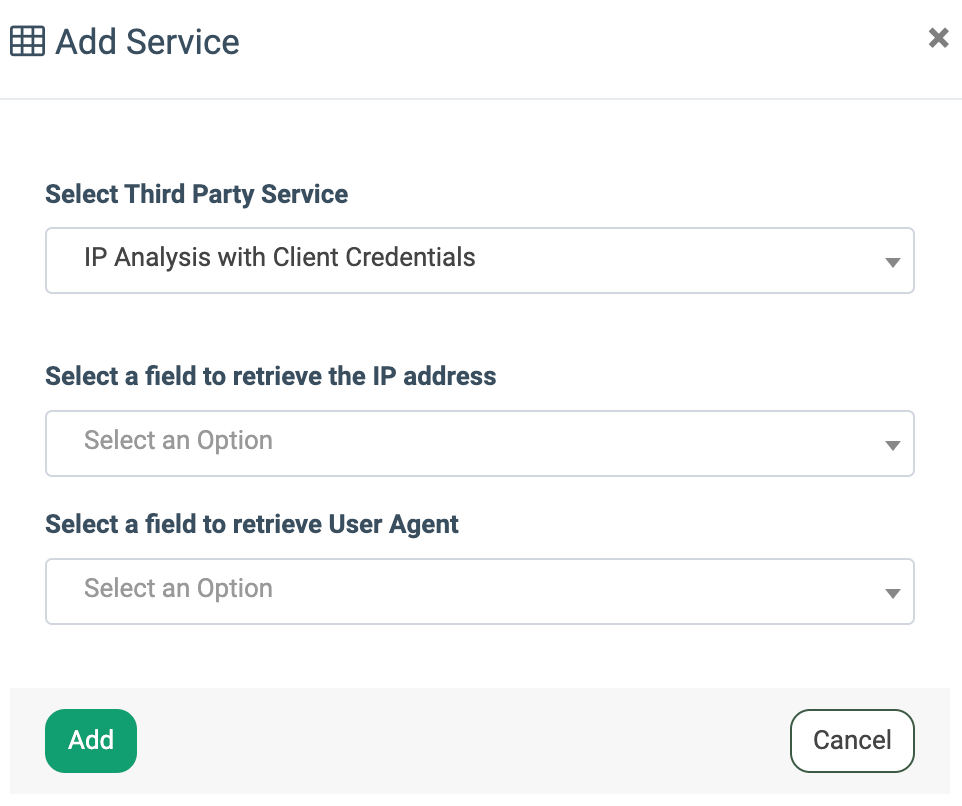
Once you have added the service to the list it will be configurable at the Campaign level within the Product. For more information about setting up Third-Party Verification on a Campaign level, please refer to this Knowledge Base article.
You can hide the credentials, masking them with asterisks instead. Note: this feature is available only for users with Admin system roles. Click the “Configure” button in the “Actions” and select the “Yes” option in the following fields, depending on the particular service:
- For TrustedForm: “Hide TrustedForm API Key”.
- For IP Analysis with Client Credentials: “Hide API Key”.
- For Phone Number Analysis with Client Credentials: “Hide API Key”.
- For iClaim: Both “Hide Account ID” and “Hide API Token”.
-4.png?width=615&height=616&name=unnamed%20(12)-4.png)
In the configuration settings, you can also define default values for credential fields. It allows you to manage credential field values flexibly and tailor their behavior to your needs in the “Default API Key (optional)" field:
- If no default value is specified, the credential field on the Campaign side becomes mandatory.
- If a default value is set:
- The campaign side will display a placeholder labeled “SYSTEM DEFAULT.”
- The field will no longer be required.
- If the credential field is left empty on the Campaign side, the default value from the Product settings will be used.
- If you need an empty value (“”) on the Campaign side, enter { %EMPTY_STRING% } (without space before and after the curly brackets) in the field. Note: This will override the default value and set it to an empty string (“”).
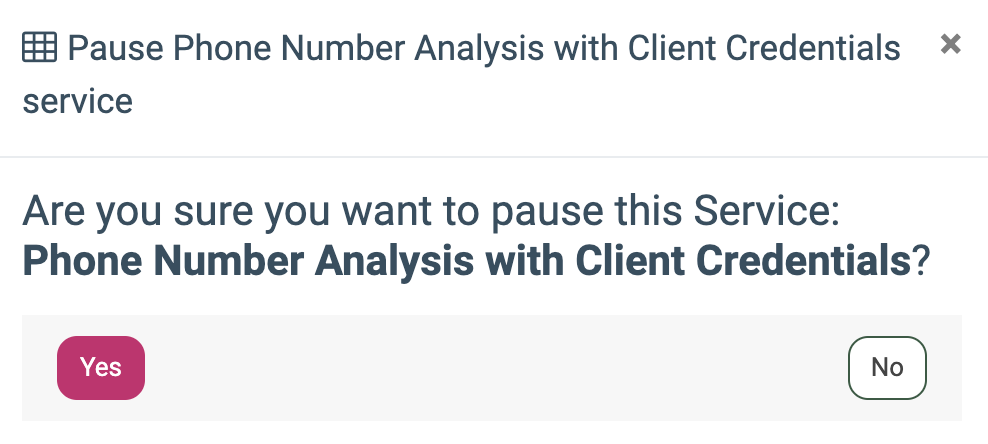
To pause the service, click the “Pause” button in the “Actions” column and click “Yes” to confirm.
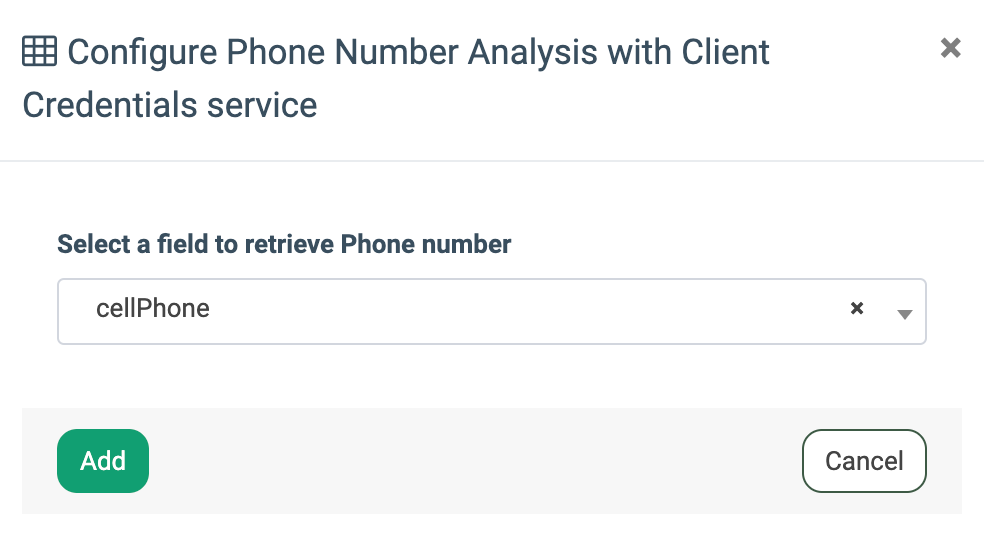
To modify the existing service, click the “Configure” button in the “Actions” column, make the necessary changes in the pop-up window, and click the “Add” button to confirm.
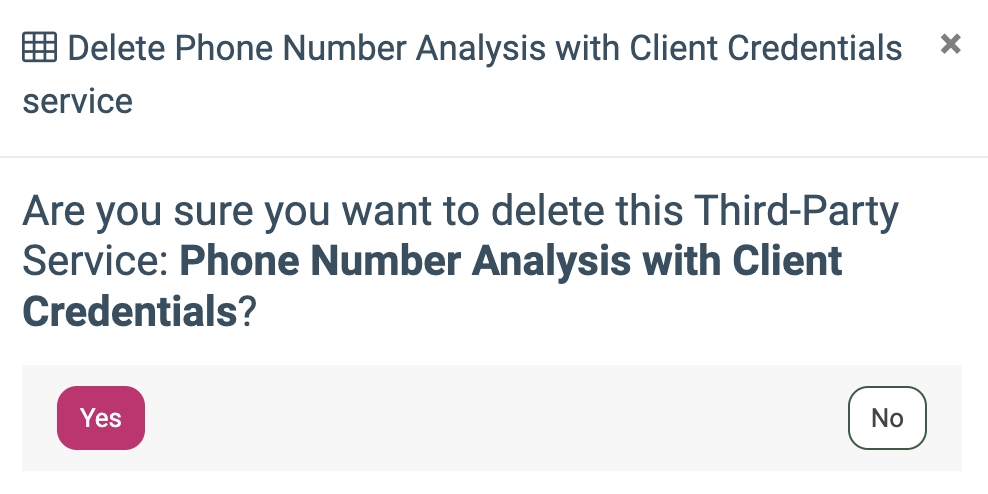
To remove the service from the list, click the “Delete” button in the “Actions” column and click “Yes” to confirm.
API Lead for Verification
The “API Lead for Verification” subtab allows you to create, view, and manage the API key credentials used by the Verification History Service. This service allows you to use field placeholders to automatically check the Lead Stash for a lead's verification history and the last verification time. By automatically tracking these verification timestamps and statuses, your system can easily prevent duplicate checks and ensure you are always working with fresh and validated data. Note: The Verification History Service is available only on demand.
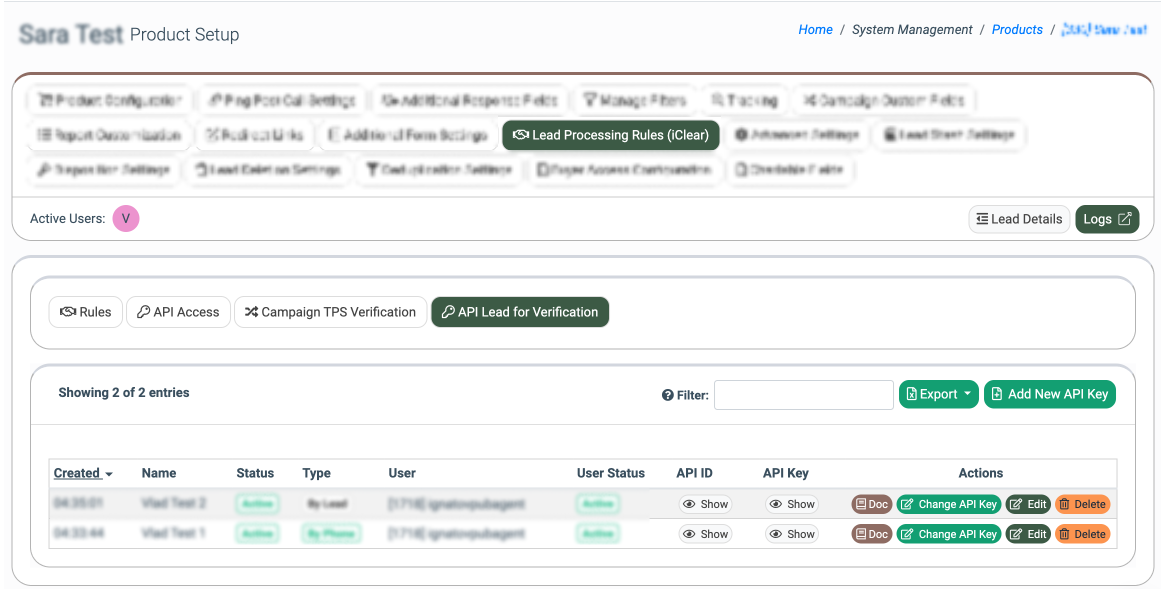
This tab contains the following information:
- Created: The date and time when the API key was created.
- Name: The name of the API key.
- Status: The API key status.
- Type: The API key type (By Lead / By Phone).
- User: The name of the user for whom the API key was created.
- User Status: The current status of the user.
- API ID: The API identification number.
- API Key: The API key value.
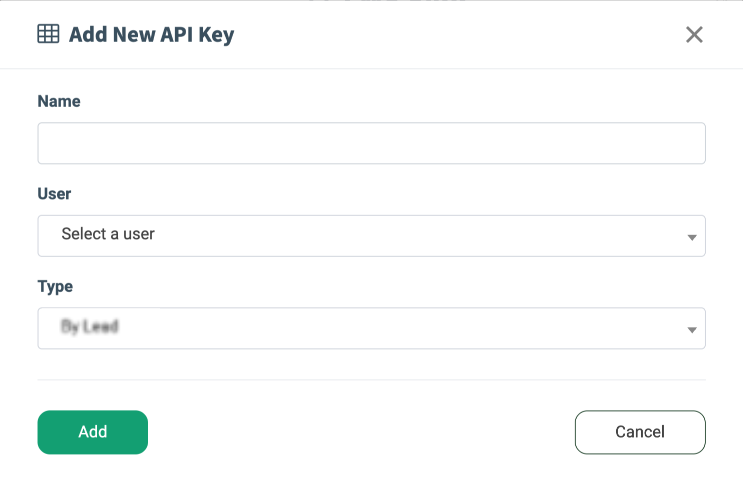
To create a new API key, click the Add New API Key” button and fill in the required fields:
- Name: Enter the name of the API key.
- User: Select the user for whom you want to create the API key.
- Type: Select the API key type (By Lead / By Phone).
- By Lead: Select this type when the lead has already been created in the system, and verification happens later (for example, during the pre-screening stage). The system checks the validation history for that specific, existing Lead ID.
- By Phone: Use this type for pre-verification before a lead is created. It allows you to check whether a phone number has been verified previously, helping you decide whether to accept the contact as a new lead before creating a record in the system.
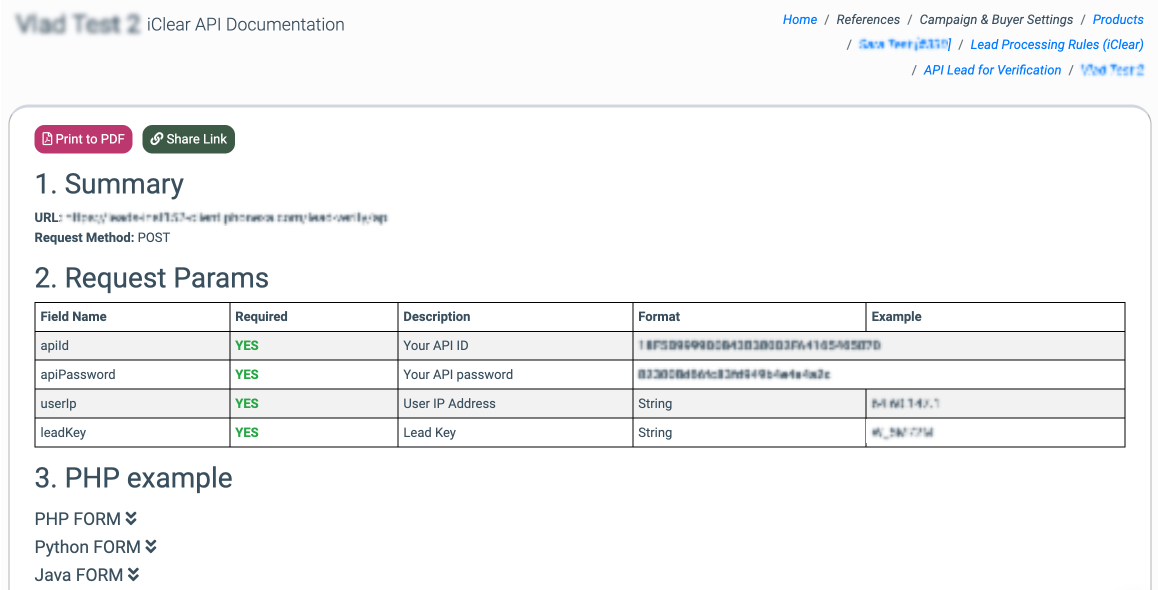
To view the API documentation, click the “Doc” button in the “Actions” column.

Reporting
To view a detailed log of each individual lead processed through the iClear third-party service(s), navigate to the Lead Info page. You can access it by going to All Reports > Publisher Reports / Buyer Reports > Lead Details section. From there, select a specific lead from the list and click the “ID” button. Once you are on the Lead Info page, click the “Filter Log” tab to review the logs.
The “iClear Log ” block displays information about the lead’s enabled iClear third-party service(s) responses, including details about the initial request's origin.
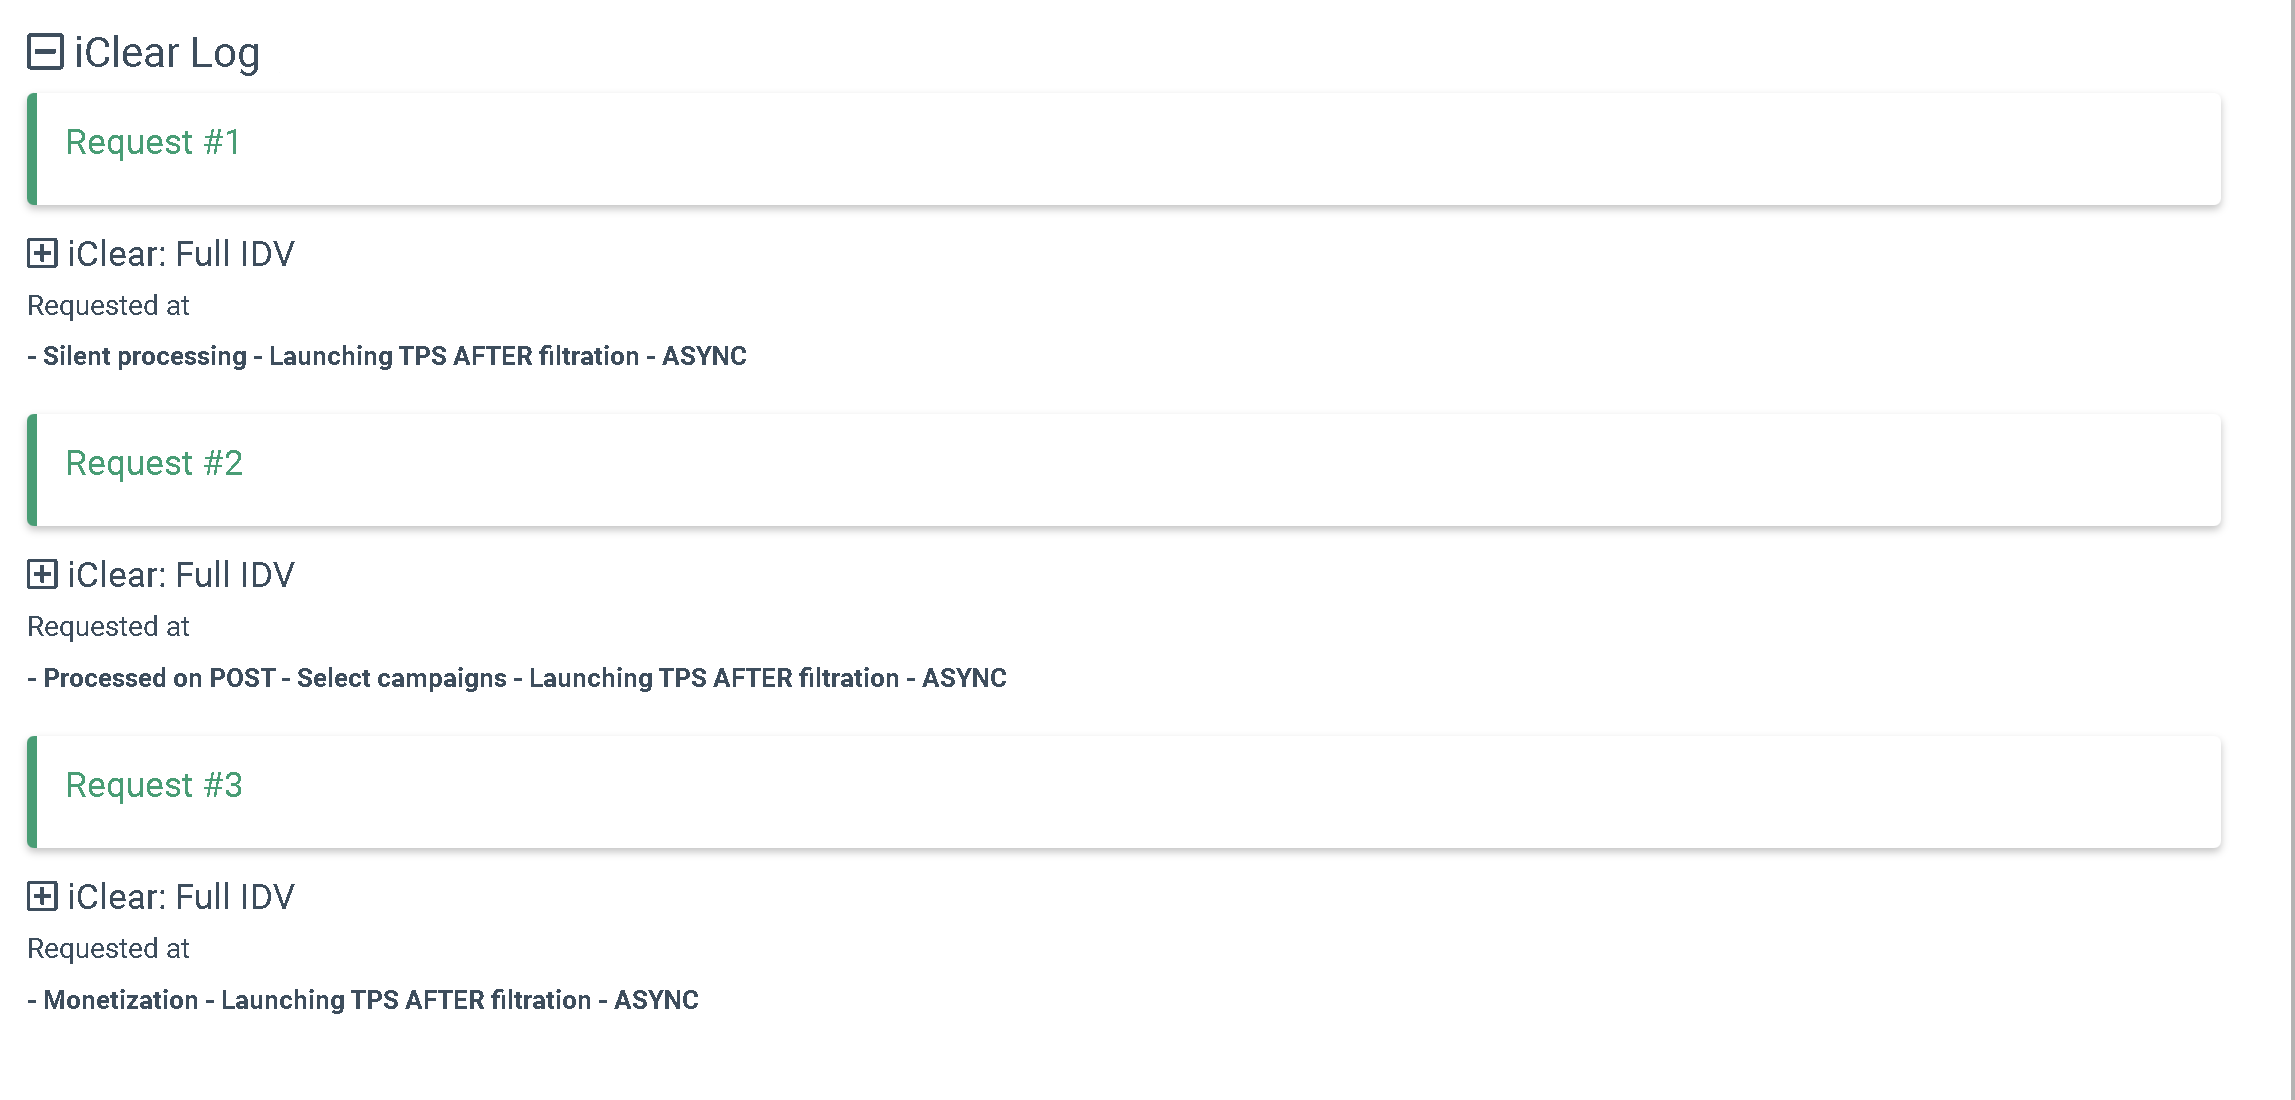
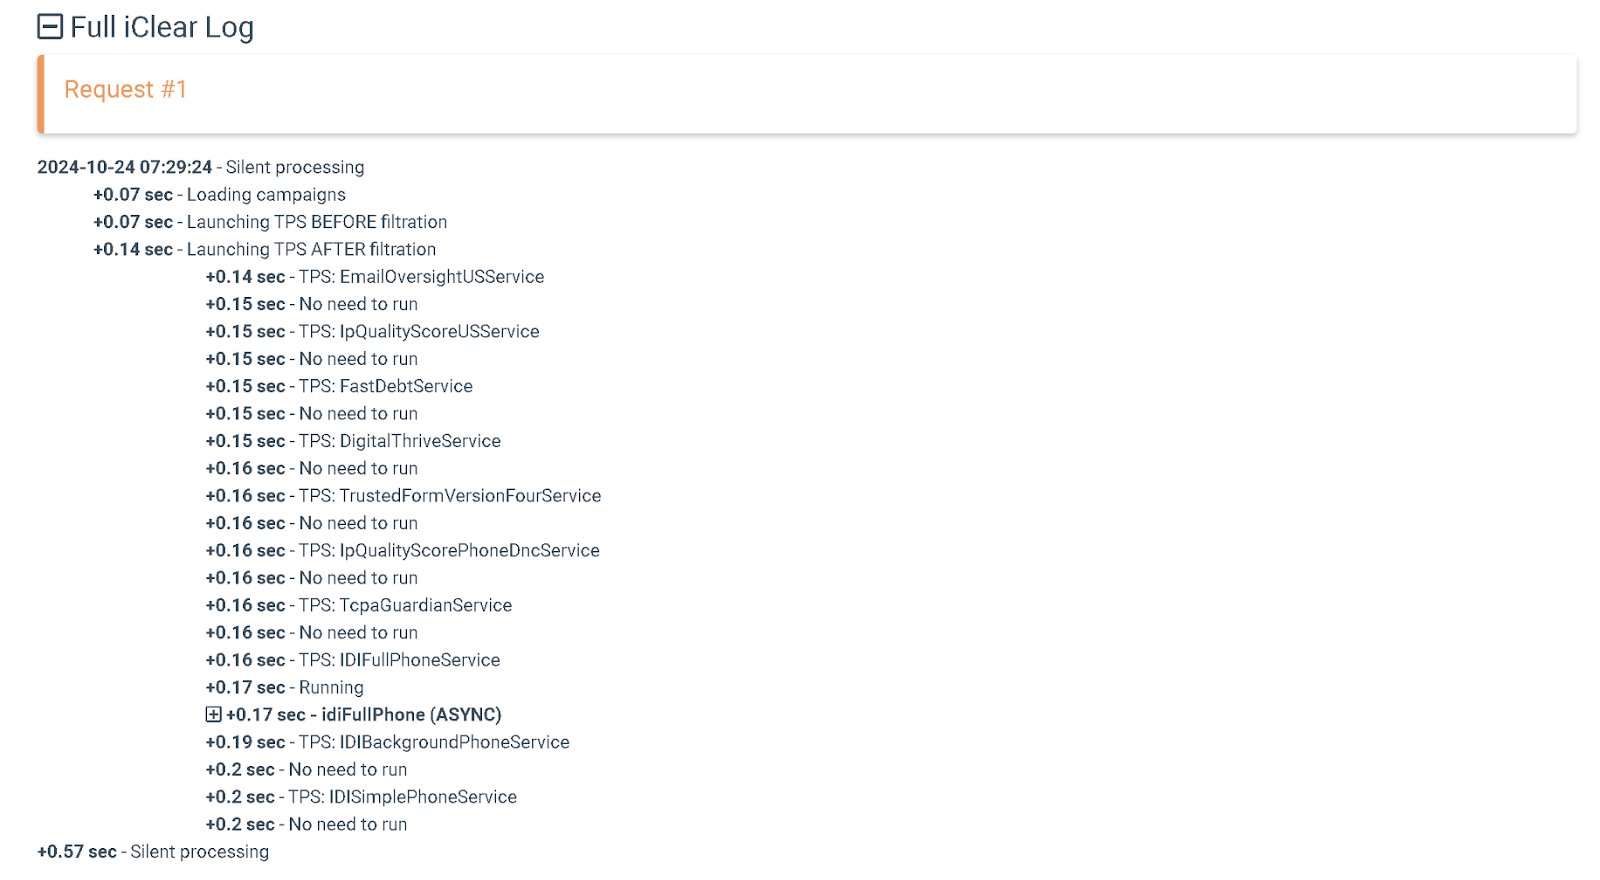
The “Full iClear Log” provides a detailed overview of the lead's processing through the iClear service(s), including a timestamp.
Read more about the Lead Info page in this Knowledge Base article.
Available Services
The following services are available for iClear configuration:
- Acqualify
- Address Validation
- Anura
- Background Check
- Basic Email Domain Validation
- Basic Phone Number Validation
- Do Not Call Check
- Email Scoring
- Fast Debt
- Full IDV
- Get Geo Info from User IP
- iClaim
- iClear: Bankruptcy Check
- iClear: Caller Identity
- iClear: Criminal/Infractions Check
- iClear: Foreclosure Check
- iClear: Judgments Check
- iClear: Liens Check
- IP Analysis with Client Credentials
- Jornaya TCPA Guardian
- Litigant Alert
- Phone Line Analysis (UK only)
- Phone Number Analysis
- Phone Number Analysis with Credentials
- Post Code Validation
- Simple IDV
- Simple IDV via SSN
- TrueCall
- TrustedForm Ping
- TrustedForm Retrieve Insights
- TrustedForm v4.0
- XVerify Email Lookup