The Buyer Disposition feature allows Buyers to ping the dispositions back to the system to review and control lead quality and optimize the lead return process.
Buyer Disposition Ping Back feature
Buyer Real Time Dispositions Report
Buyer Real Time Dispositions: Lead Search Tab
Buyer Disposition Ping Back feature
The “Disposition Ping Back” feature allows Buyers to set and update the lead disposition via API.
Use Case:
A Buyer has purchased a lead from a Phonexa client and pings the Disposition for purchased leads back to the system. Based on the Disposition, additional checks and verification could be performed, e.g., checking the quality of the lead by verifying the lead data and contacting the lead. Lead QC Disposition and comment can be added by system users in addition to the Disposition sent by Buyer. Read more about QC Dispositions in this Knowledge Base article.
To enable the Disposition Ping Back feature, go to the Client Management > Buyer List section, select the Buyer, and click the “Settings” button in the “Action” column. On the Buyer’s Setup page, select the “Integrations” tab and turn “ON” the “Disposition Ping Back” toggle.
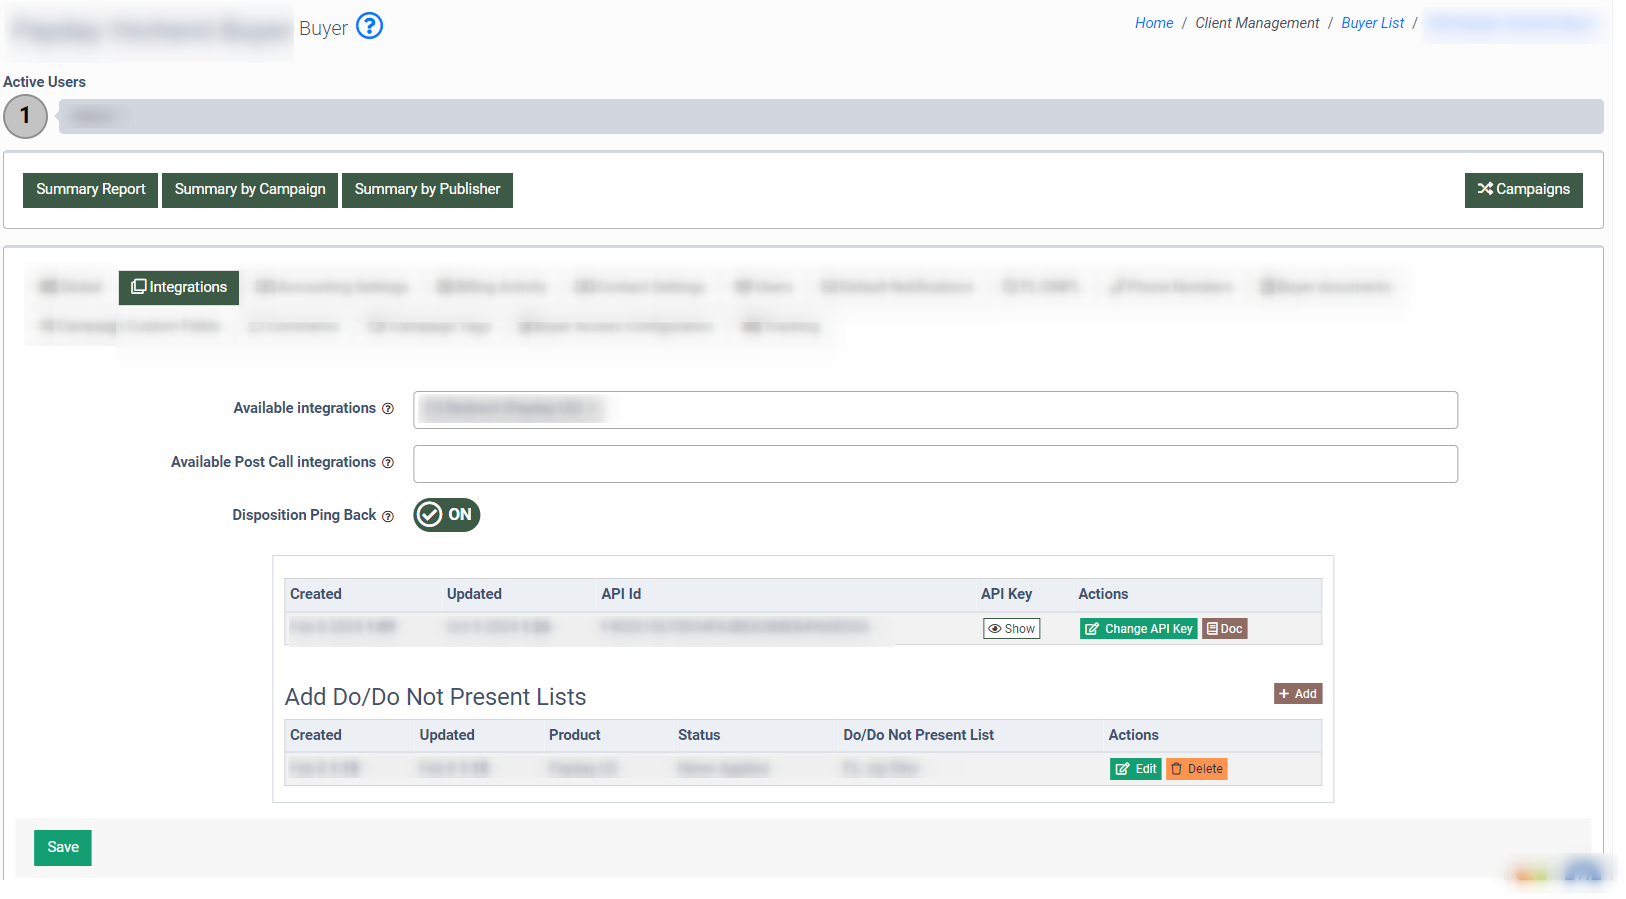
The API ID and API Key are automatically generated by the system.
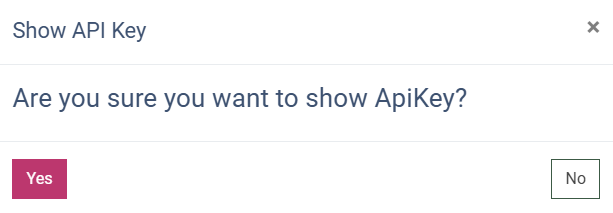
To view the current API Key, click the “Show” button in the “API Key” column. Click the “Yes” button in the “Show API Key” pop-up window to confirm the action.
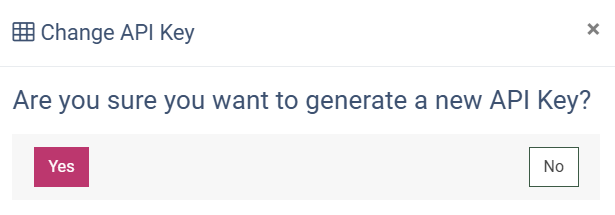
To change the current API Key, click the “Change API Key” button in the “Action” column. Click the “Yes” button in the “Change API Key” pop-up window to confirm the action.
The “Add Do/Do Not Present Lists” feature allows you to add lead data to the Do or Do Not Present Lists based on the buyer lead disposition. Read more about this feature in the Knowledge Base article.
To view the Buyer Disposition API documentation, click the “Doc” button in the “Actions” column. You will be redirected to the “Partner disposition setting API Doc” section.
To view the Buyer Disposition API for the particular Product, select the corresponding Product in the “Product” filter field, and click the “Search” button to pull up the doc.
Note: API settings are different for each Product.
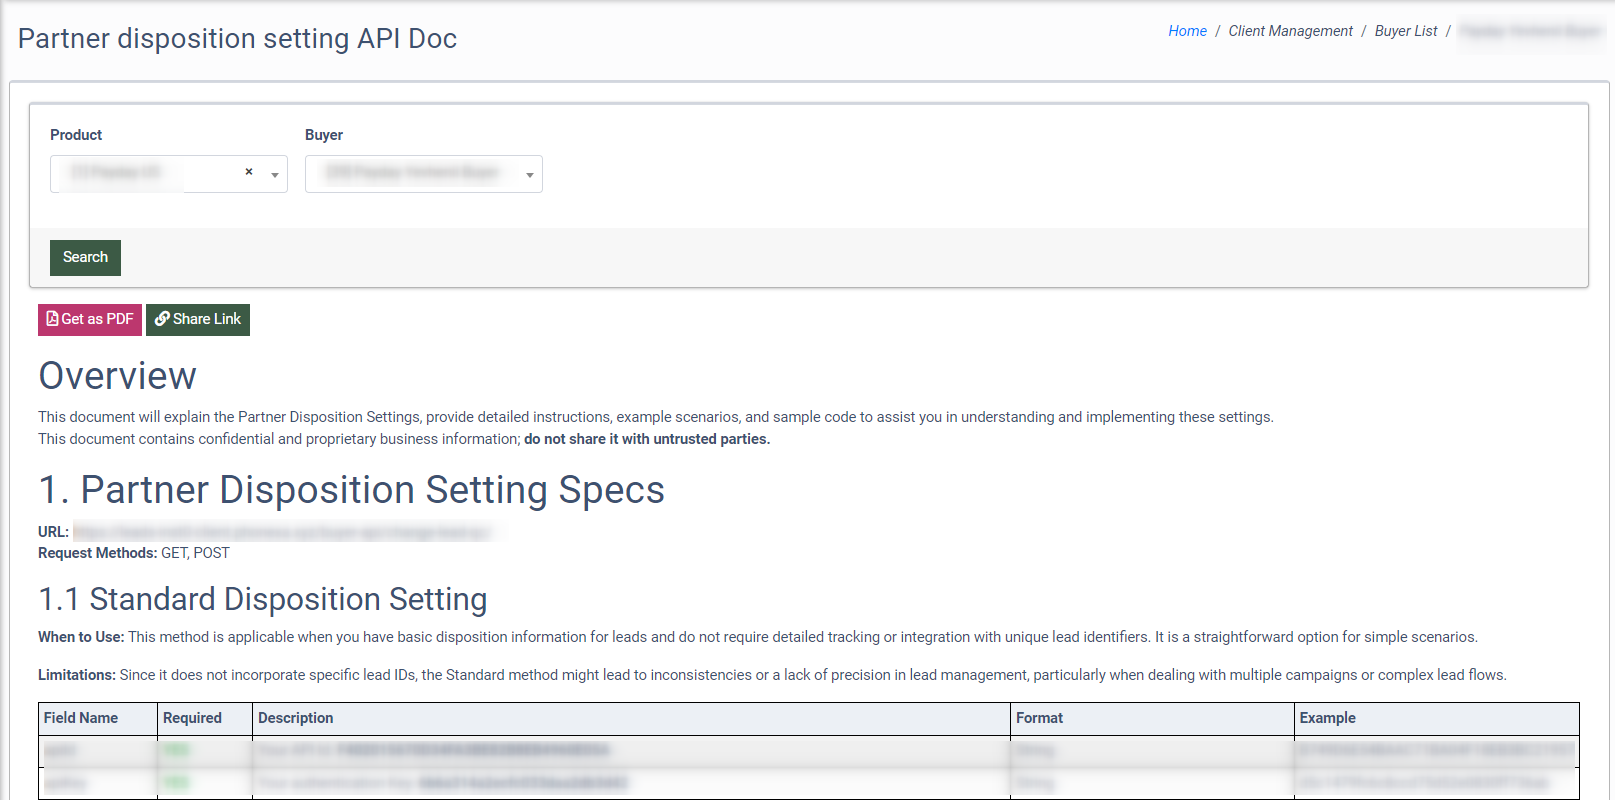
To download the particular Buyer Disposition API doc as a PDF file, click the “Get as PDF” button.
To share the link with access to the particular Buyer Disposition API doc, click the “Share Link” button, and select the expiration deadline for the link usage in the “Expires after” field of the “Share Link” pop-up window.
To generate and view the share link, click the “Get Link” button.
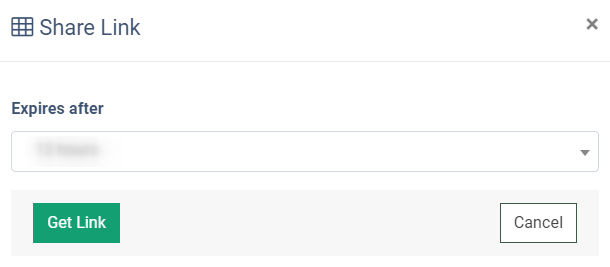
After the share link generation, the following information will be displayed in the “Share Link” pop-up window:
- Short Link: The link to the ongoing Buyer Disposition API doc itself. To copy this link in the buffer, click the “Copy Link” button.
- Expires At: The date and time of the share link expiration.
Note: The short link for the Buyer Disposition API Doc is temporarily available. It will be valid until the time limitation that is set in the “Expires At” field.
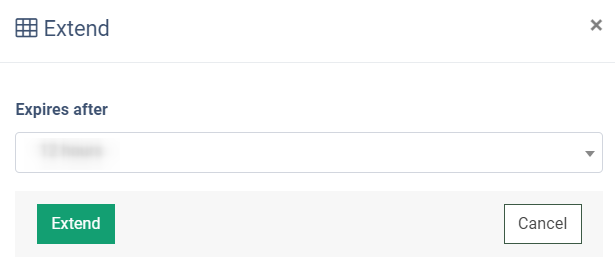
 To extend the time limit for the share link validity, click the “Extend” button. Select a new deadline for the share link expiration in the “Expires after” field of the “Extend” pop-up window. Click the “Extend” button to complete the action.
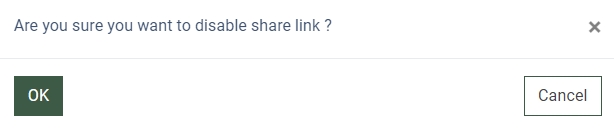
To disable the ongoing valid share link, click the “Disable” button. Confirm the share link is disabled by clicking the “OK” button in the following pop-up window.
To manage the available disposition statuses on the Product level, go to the System Management > Products section, select the Product, click the “Settings” button in the “Actions” column, and select the Disposition Settings > Buyer Real Time Disposition Statuses subtab.
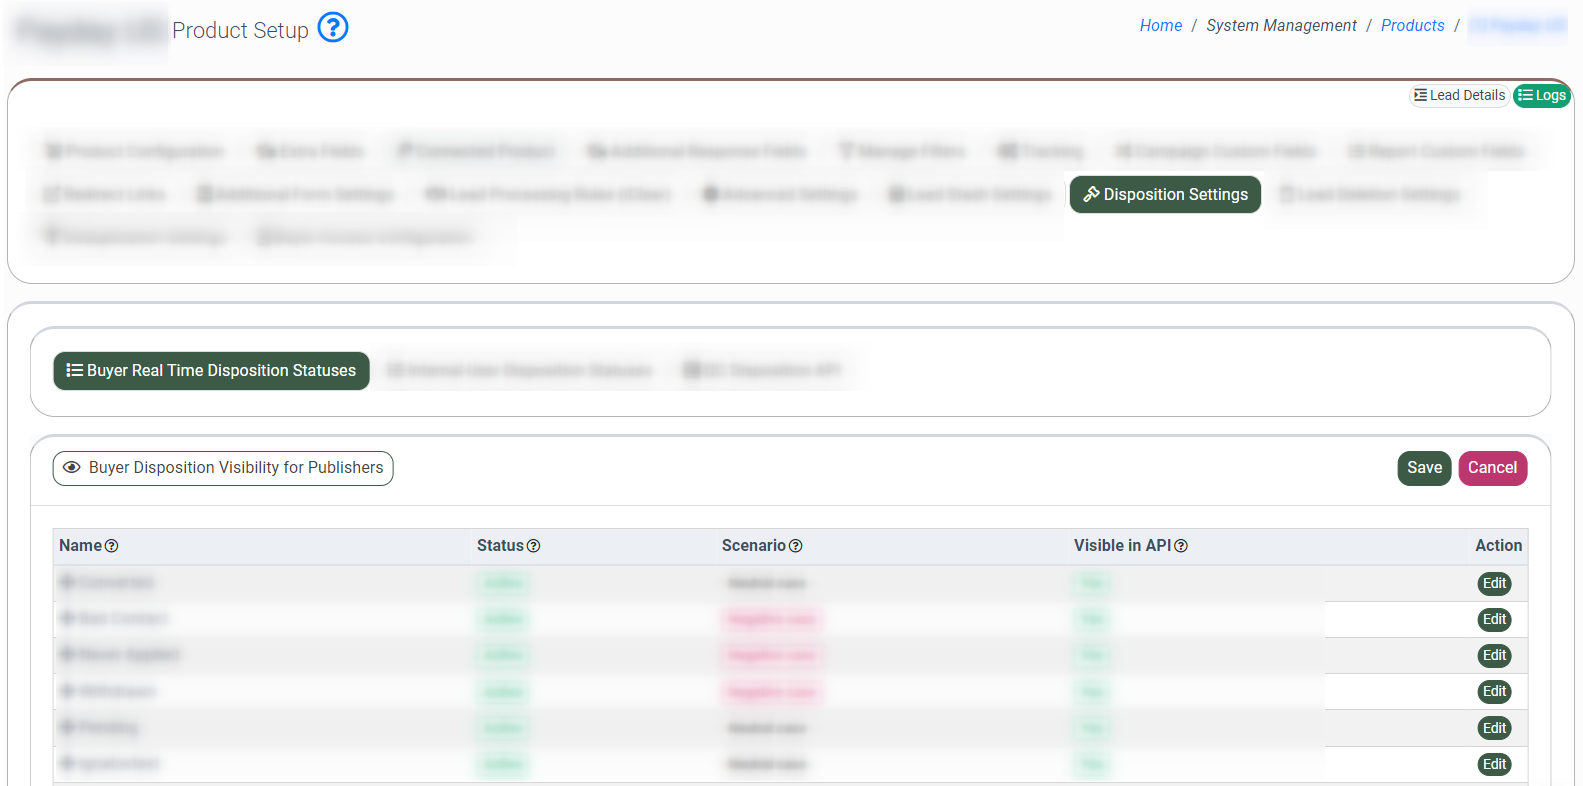
The list of Buyer Disposition statuses contains the following information:
-
Name: The name of the Buyer Disposition status.
-
Status: The current status of the Buyer Disposition.
-
Scenario: The type of the Buyer Disposition case (the disposition was qualified as positive, negative, or neutral).
-
Visible in API: The visibility of the field in the API Doc.
To change the current status of the Buyer Disposition, click the “Edit” button in the “Action” column. Change the information in the following fields from the “Edit” pop-up window:
-
Name: Enter the name of the Buyer Disposition.
-
Status: Select the current status of the Buyer Disposition.
-
Case: Select the corresponding scenario for the Buyer Disposition.
-
Visible in API: Select the visibility of the field in the API Doc.
Click the “Save” button to complete the changes.

Note: The edit option is allowed only for the custom disposition statuses. Pre-set system disposition statuses can not be edited.
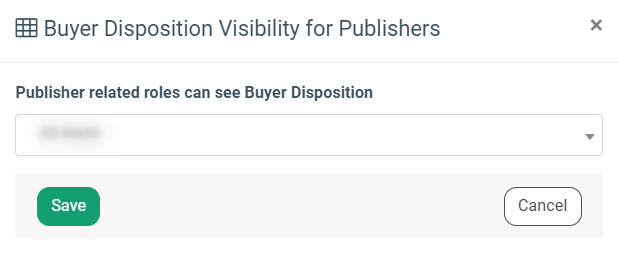
To set the visibility of the disposition statuses in the Publisher’s Lead Details report for users with the Publisher, Publisher Agent, or Publisher Senior Agent system roles, click the “Buyer Disposition Visibility for Publisher” button and select the option in the “Publisher related roles can see Buyer Disposition” field of the “Buyer Disposition Visibility for Publishers” pop-up window:
-
Not visible: The status of the Buyer Disposition will be hidden.
-
Sold leads only: The status of the Buyer Disposition will be displayed only for leads with the “Sold” status. For leads with the set Buyer Disposition but another status of the lead, the “Not Set” status will be displayed.
-
All leads: The status of the Buyer Disposition will be displayed for all leads.
Click the “Save” button to complete the action.
Buyer Real Time Dispositions Report
The Buyer Real Time Dispositions report allows you to import the disposition data into the system manually, view the detailed information about the dispositions posted by buyers via the Disposition Ping Back feature, and search leads to add disposition manually.
To view the report, go to the Analytics and Optimization > Dispositions >Buyer Real Time Disposition section.
On the “Buyer Real Time Disposition” tab, you can review leads with assigned Buyer Disposition, as well as QC disposition and comment. Note: This report will only present leads with the Dispositions added. The report will present the “No records found” message if there are no leads with disposition added matching the selected filters.
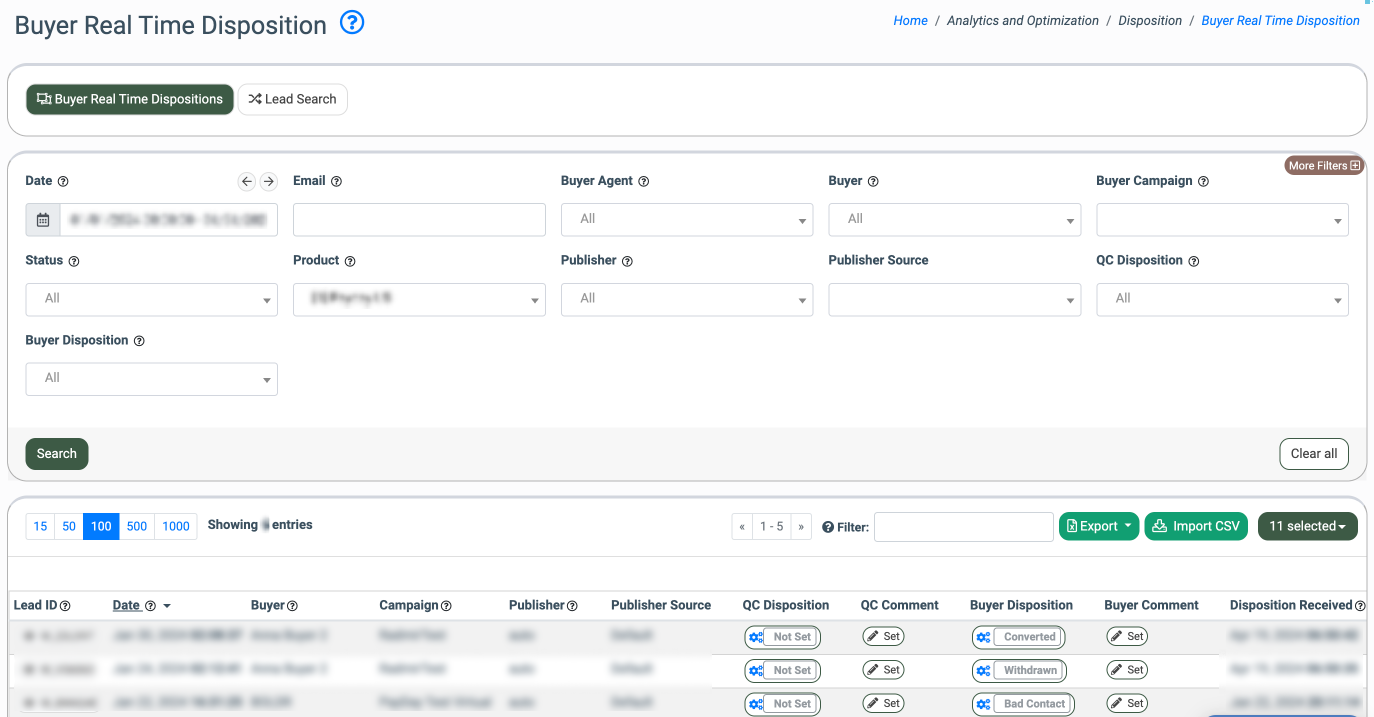
You can narrow down the search results by using the following filters:
-
Date: Select the date range of the report.
-
Email: Enter an email or a list of email addresses of the Leads. (LMS Only)
-
Phone Number: Enter a phone number or a list of phone numbers of the Leads. (Call Logic Only)
-
Buyer Agent: Select the Buyer Agent.
-
Buyer: Select the Buyer.
-
Buyer Campaign: Select the Buyer Campaign.
-
Campaign Tag: Select the Campaign Tag.
-
Status: Select the status of the Lead posting on the particular Campaign.
-
Product: Select the Product.
-
Publisher: Select the Publisher.
-
Publisher Source: Select the Publisher Source.
-
QC Disposition: Select the QC Disposition status.
-
Buyer Disposition: Select the Buyer Disposition status.
Click the “Search” button to generate the report.
The report contains the following information:
- Lead ID: The unique identification number of the Lead. To open the Lead Info section of the particular Lead, click the “Lead ID” button.
- Date: The date and time when the Lead has entered the system.
- Buyer: The name of the Buyer.
- Campaign: The name of the Campaign.
- Publisher: The name of the Publisher.
- Publisher Source: The name of the Publisher Source.
- Click ID: The unique value of the Click ID. Note: This field is displayed if it’s available for the particular Product.
- Email: An email address of the Lead.
- First Name: The first name from the Lead data.
- Last Name: The last name from the Lead data.
- Home#: The home phone number from the Lead data.
- Work#: The work (business) phone number from the Lead data.
- Cell#: The mobile phone number from the Lead data.
- Pub: The earnings of the Publisher.
- TTL: The total revenue of the system.
- Disposition Received: The date and time when the Disposition status was set.
- Disposition Updated: The date and time when the Disposition status was updated.
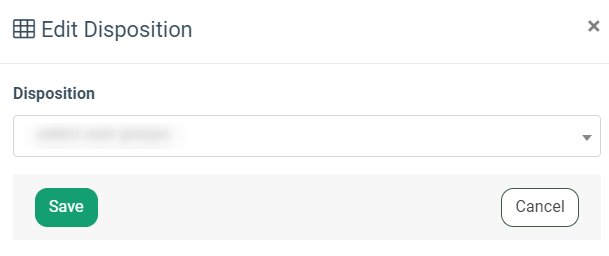
To set up the QC (Quality Control) Disposition for the Lead, click the respective button in the “QC Disposition” column that says "Not Set" select the “Disposition” option from the drop-down list in the pop-up window, and click the “Save” button to complete the action.
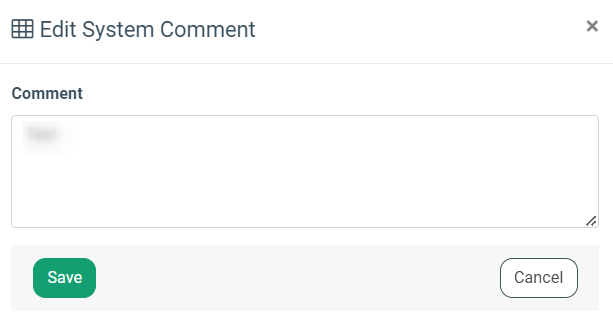
To add a comment to the QC(Quality Control) Disposition status, click the respective button in the “QC Comment” column that says “Set” enter the text in the “Comment” field of the pop-up window, and click the “Save” button to complete the action.

To edit or delete an existing comment, click the “Edit System Comment” button in the “QC Comment” column, edit an existing comment in the “Comment” field of the pop-up window, and click the “Save” button to complete the action.
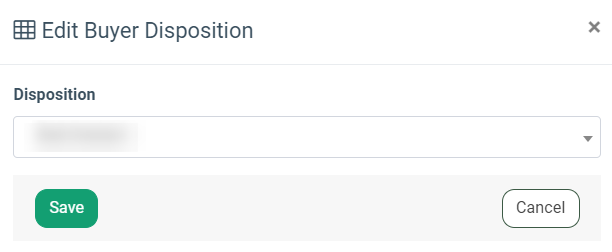
To set the status of the Buyer’s Disposition, click the “Edit Buyer Disposition” button in the “Buyer Disposition” column, select the option from the “Disposition” drop-down list in the pop-up window, and click the “Save” button to complete the action.
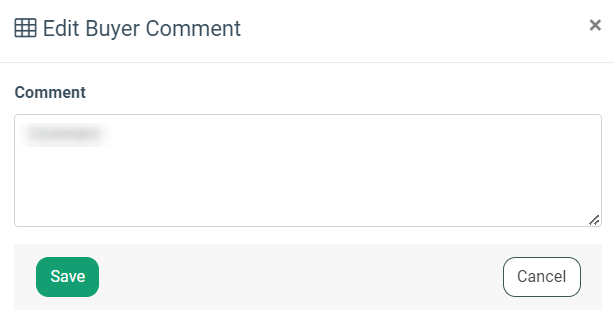
To add, edit, or delete a comment to the Buyer’s Disposition status, click the “Edit Buyer Comment” button in the “Buyer Comment” column, enter the text in the “Comment” field in the pop-up window, and click the “Save” button to complete the action.
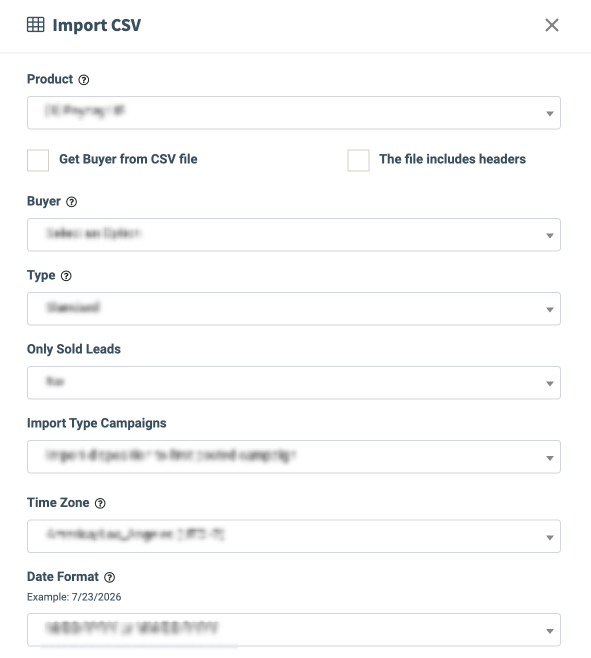
To import the data from the CSV file, click the “Import CSV” button and fill in the information in the following fields of the “Import CSV” pop-up window:
- Product: Select the Product.
- Get Buyer from CSV file: Check the box to import the data to the “Buyer” field from the CSV file. If the checkbox is marked, the “Buyer” field will be inactive for selection.
- The file includes headers: Check the box to automatically ignore the table headers during the importation process (the first row of the CSV file for importation).
- Buyer: Select the Buyer.
- Type: Select the type of the import operation (Standard, Advanced).
- The “Standard” option allows you to import the CSV file in a format with the following columns' order: Email, Buyer Disposition, Buyer Comment (optional), Date (optional), Campaign Id (optional).
- The “Advanced” option allows you to import the CSV file in a format with the following columns' order: Lead Id, Buyer Disposition, Buyer Comment (optional), Campaign Id (optional).
- Only Sold Leads: Select the option to import the disposition only for leads that were sold through the system (Yes, No).
- If the “No” option is selected:
- Import Type Campaigns: Select the option for the lead importation depending on the disposition obtained from the Campaign(s) through which the lead was processed in case the lead was posted on multiple Campaigns (Import disposition to first posted campaign, Import disposition to all posted campaigns).
- If the “Import disposition to first posted campaign” option is selected, the disposition obtained from the first campaign, on which the lead was posted, will be imported.
- If the “Import disposition to all posted campaigns” option is selected, all dispositions obtained from all campaigns on which the lead was posted will be imported.
- Import Type Campaigns: Select the option for the lead importation depending on the disposition obtained from the Campaign(s) through which the lead was processed in case the lead was posted on multiple Campaigns (Import disposition to first posted campaign, Import disposition to all posted campaigns).
- If the “No” option is selected:
- Time Zone: Select the timezone according to which the imported leads were processed.
- Date Format: Select the format of the field with the date and time data for the import (M/DD/YYYY or MM/DD/YYYY, Day Name, Month Name (Full) DD, YYYY, YYYY-MM-DD or YYYY-MM-DD HH:MM:SS, M/DD or MM/DD, M/DD/YY or MM/DD/YY, DD-Month (Abbreviated)). The example of the selected date format will be displayed below this field.
- CSV File: Select the file with the data you would like to upload. Please follow the requirements for the CSV file format:
- It is required to follow the specified column order: Email, Buyer Disposition, Buyer Comment (optional), Date (optional), Campaign ID (optional).
- If the “Get Buyer from CSV file” checkbox is marked, the column order will be Buyer Name, Email, Buyer Disposition, Buyer Comment (optional), Date (optional), Campaign ID (optional).
- If the “The file includes headers” checkbox is marked, the column order will be Email, Buyer Disposition, Buyer Comment (optional), Date (optional), Campaign Id (optional).
- You need to remove the headers from your table; the data being imported should start from the first row. To ignore the headers (the first row of the CSV file) while importing the file, check the “The file includes headers” box.
- Otherwise, the system will respond with the “Error” status. You can view the error logs in the Export/Import Tasks report > Dispositions Import Tasks tab. Read more information about the report and logs in the following Knowledge Base article.
- It is required to follow the specified column order: Email, Buyer Disposition, Buyer Comment (optional), Date (optional), Campaign ID (optional).
Click the “Import” button to start the data import into the system.
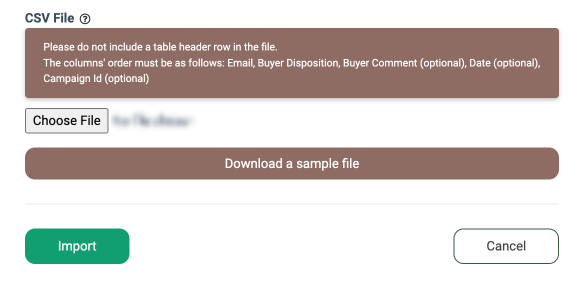
To download a sample of the CSV file with the appropriate format, click the “Download a sample file” button.
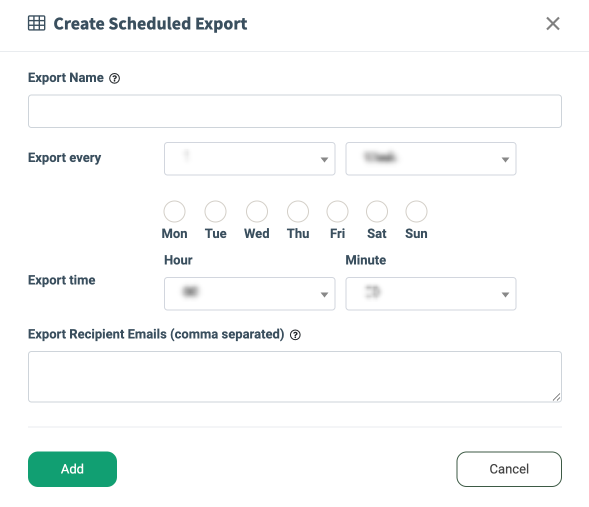
To create a scheduled reporting export request, click the “Export” button and select the “Scheduled Export” option. Enter the export name in the “Export Name” field in the pop-up window. Select the number of weeks or months for the repeat period, select the day and time to start export, and enter recipient emails in the “Export Recipient Emails (comma separated)” field. Click the “Add” button to complete the action.
Read more about the Scheduled Report Export feature in the following Knowledge Base article.
Buyer Real Time Dispositions: Lead Search Tab
The “Lead Search” tab allows you to find Leads in the system according to the selected filters and manually set up the Buyer’s and QC Disposition, which will be available for review in the “Buyer Real Time Disposition” tab.
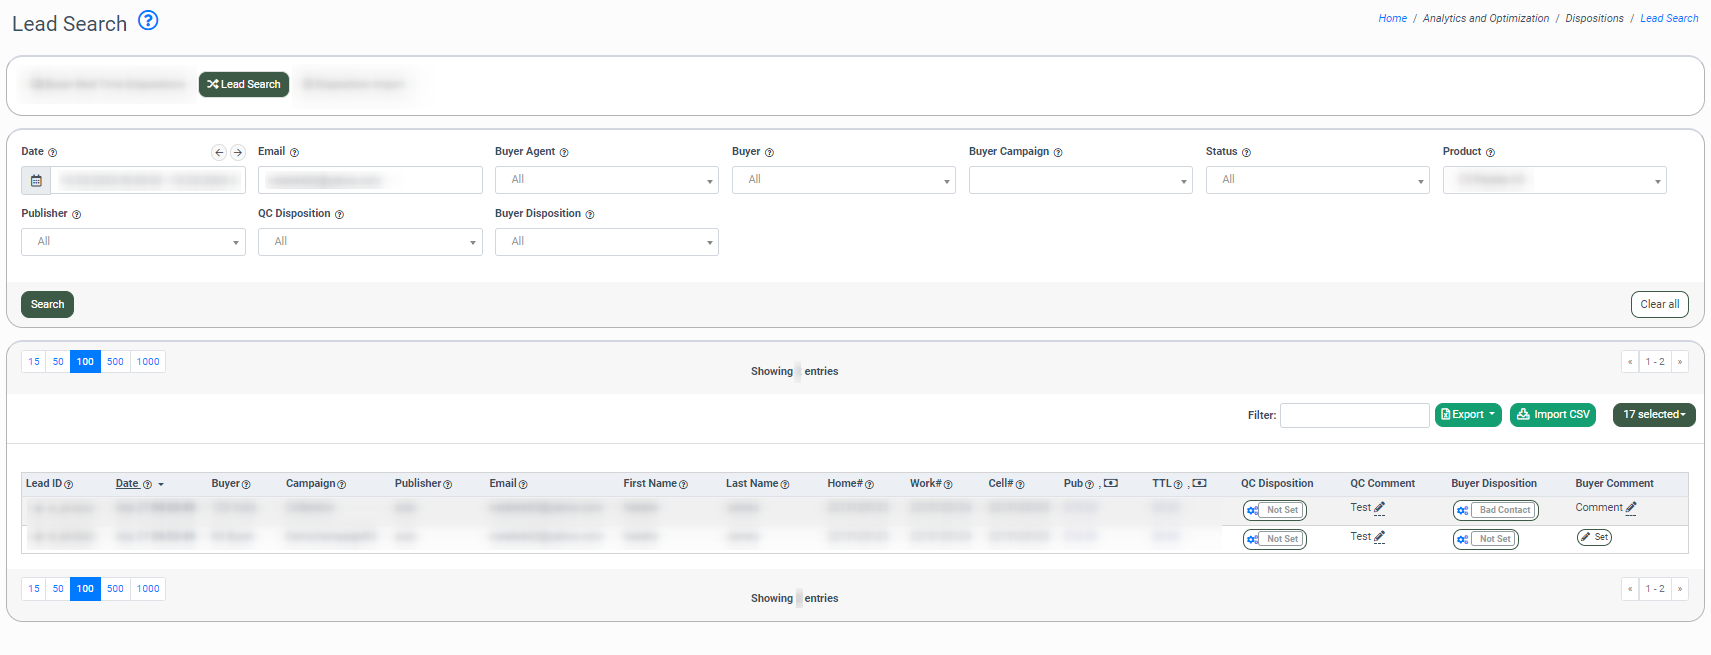
You can search for leads by using the following filters:
-
Date: Select the date range of the report.
-
Email: Enter an email or a list of email addresses of the Leads. (LMS Only)
-
Phone Number: Enter a phone number or a list of phone numbers of the Leads. (Call Logic Only)
-
Buyer Agent: Select the Buyer Agent.
-
Buyer: Select the Buyer.
-
Buyer Campaign: Select the Buyer Campaign.
-
Status: Select the status of the Lead posting on the particular Campaign.
-
Product: Select the Product.
-
Publisher: Select the Publisher.
-
QC Disposition: Select the QC Disposition status.
-
Buyer Disposition: Select the Buyer Disposition status.
Click the “Search” button to generate the report.