Note: Only users with the “Buyer Representative”, “Buyer Editor”, and “Buyer Accountant” system roles have access to this page. If no available payment methods are displayed, please contact your Partner who provided you access to the system.
To access this tab, go to the Account Settings > My Profile section, then select the “Billing Settings” tab. Alternatively, you can access it through the My Profile Modal Window in the upper-right corner of the page. The Billing Settings tab contains five blocks:
-2.png?hsLang=en)
The “Balance” block allows you to view and replenish your account balance.
Note: For the Post Pay payment setting, this block displays the account’s outstanding balance.
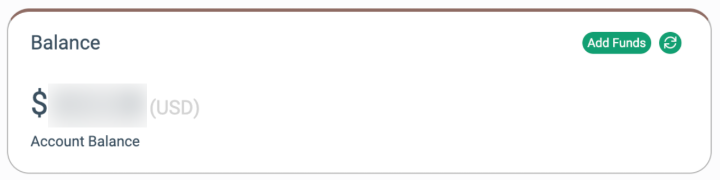
To add a certain amount to your account balance, click the “Add funds” button and fill in the following fields in the pop-up window:
- Payment Method: Select the payment method.
- Enter Amount: Enter the amount you wish to add to your account.
Click the “Add” button to finish.
To refresh data, click the “Refresh” button next to the “Add Funds” button.
The “Recent Activity” block allows you to view the latest activity (amount of charge, date, and payment method) applied to your account balance.

To view a complete history of transactions, click the “View Log” button, and the system will forward you to the “Billing Activity” tab.
The “Billing Settings” block allows you to set up the payment method for replenishing your account’s balance.
-3.png?hsLang=en) Fill in the following fields:
Fill in the following fields:
- Payment Setting: The model of payment set for your account.
- Payment Method: Select the payment method you would like to use in your account.
-3.png?hsLang=en)
The “Auto Recharge” block allows you to set up the auto recharge of balance when it gets below a certain threshold.
Note: The Prepaid Buyer feature has to be enabled via the Buyer Setup page. Read more about the Prepaid Buyer option in this Knowledge Base article.
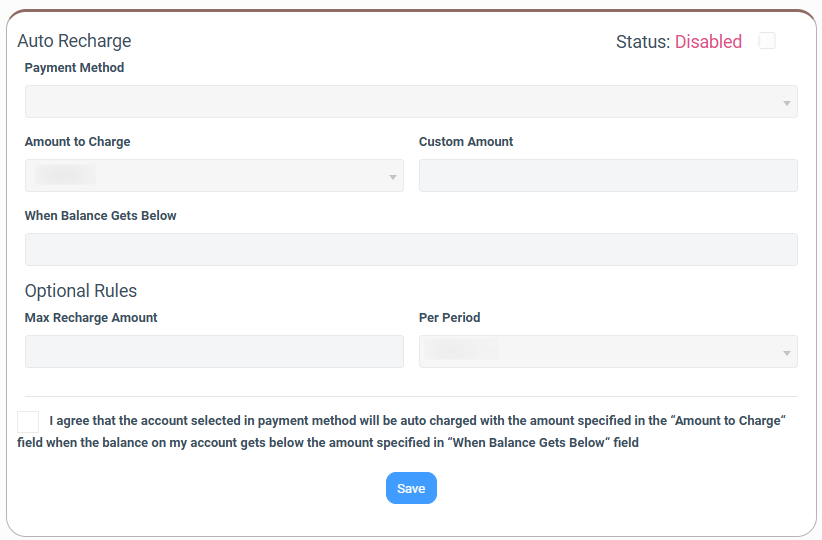
Fill in the required fields in the Auto Recharge part:
- Auto Recharge Status: Switch the toggle to change the auto recharge status (Enabled / Disabled). Note: If you switched from the Post-Pay to the Pre-Pay feature and have an unpaid balance this toggle will be inactive until you top up your balance.
Note: All fields below are showing inactive till you switch the toggle to ‘Enabled’. - Payment Method: Select the payment method for the auto recharge feature.
- Amount to Charge: Select the amount to charge.
Note: Autocharge can be set up with a custom amount or suggested preset amounts.
If a custom amount option is selected, enter your preferred amount into the provided “Custom Amount” box. - When Balance Gets Below: Enter the amount for the auto-charge to happen when the balance drops below that threshold.
Check the box to indicate your agreement with the conditions, and click the “Save” button to finish.
Optional Rules:
- Max Recharge Amount: Enter the amount that will serve as a limit for automated transactions for a certain time range.
- Per Period: Select the recharge cap frequency (Daily, Weekly, Monthly).
Note: The charged amount counter will reset to zero once you change the “Max Recharge Amount” and/or “Per Period” fields.
The “Transaction History” block allows you to view the last statements and invoices.
Click the “Statements” button to view the statements if you are using the Pre-Paid model. Click the “Invoices” button to view the invoices if you are using the Post-Paid model.
The “Transaction History” block contains the following information:
- Invoice/Statement: The name of the invoice/statement.
- Issue Date: The date when the invoice/statement has been issued.
- Status: The payment status.
- Amount: The amount to pay.
- Paid: The paid amount.
- Due: The amount left to pay.
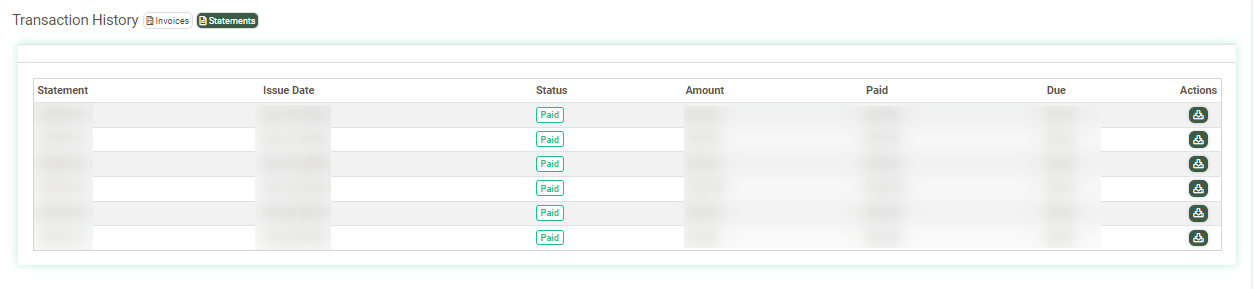 To download the invoice/statement, click the “Download” button in the “Actions” column.