Postback is a mechanism for transmitting conversion data. For example, you can send conversion data directly to an advertising platform, an analytics system, or a third-party tracker.
To configure the postback, go to the Offers > Manage Offers section, click the “Configure” button for the offer you would like to add a postback to and select the “Postbacks” tab.
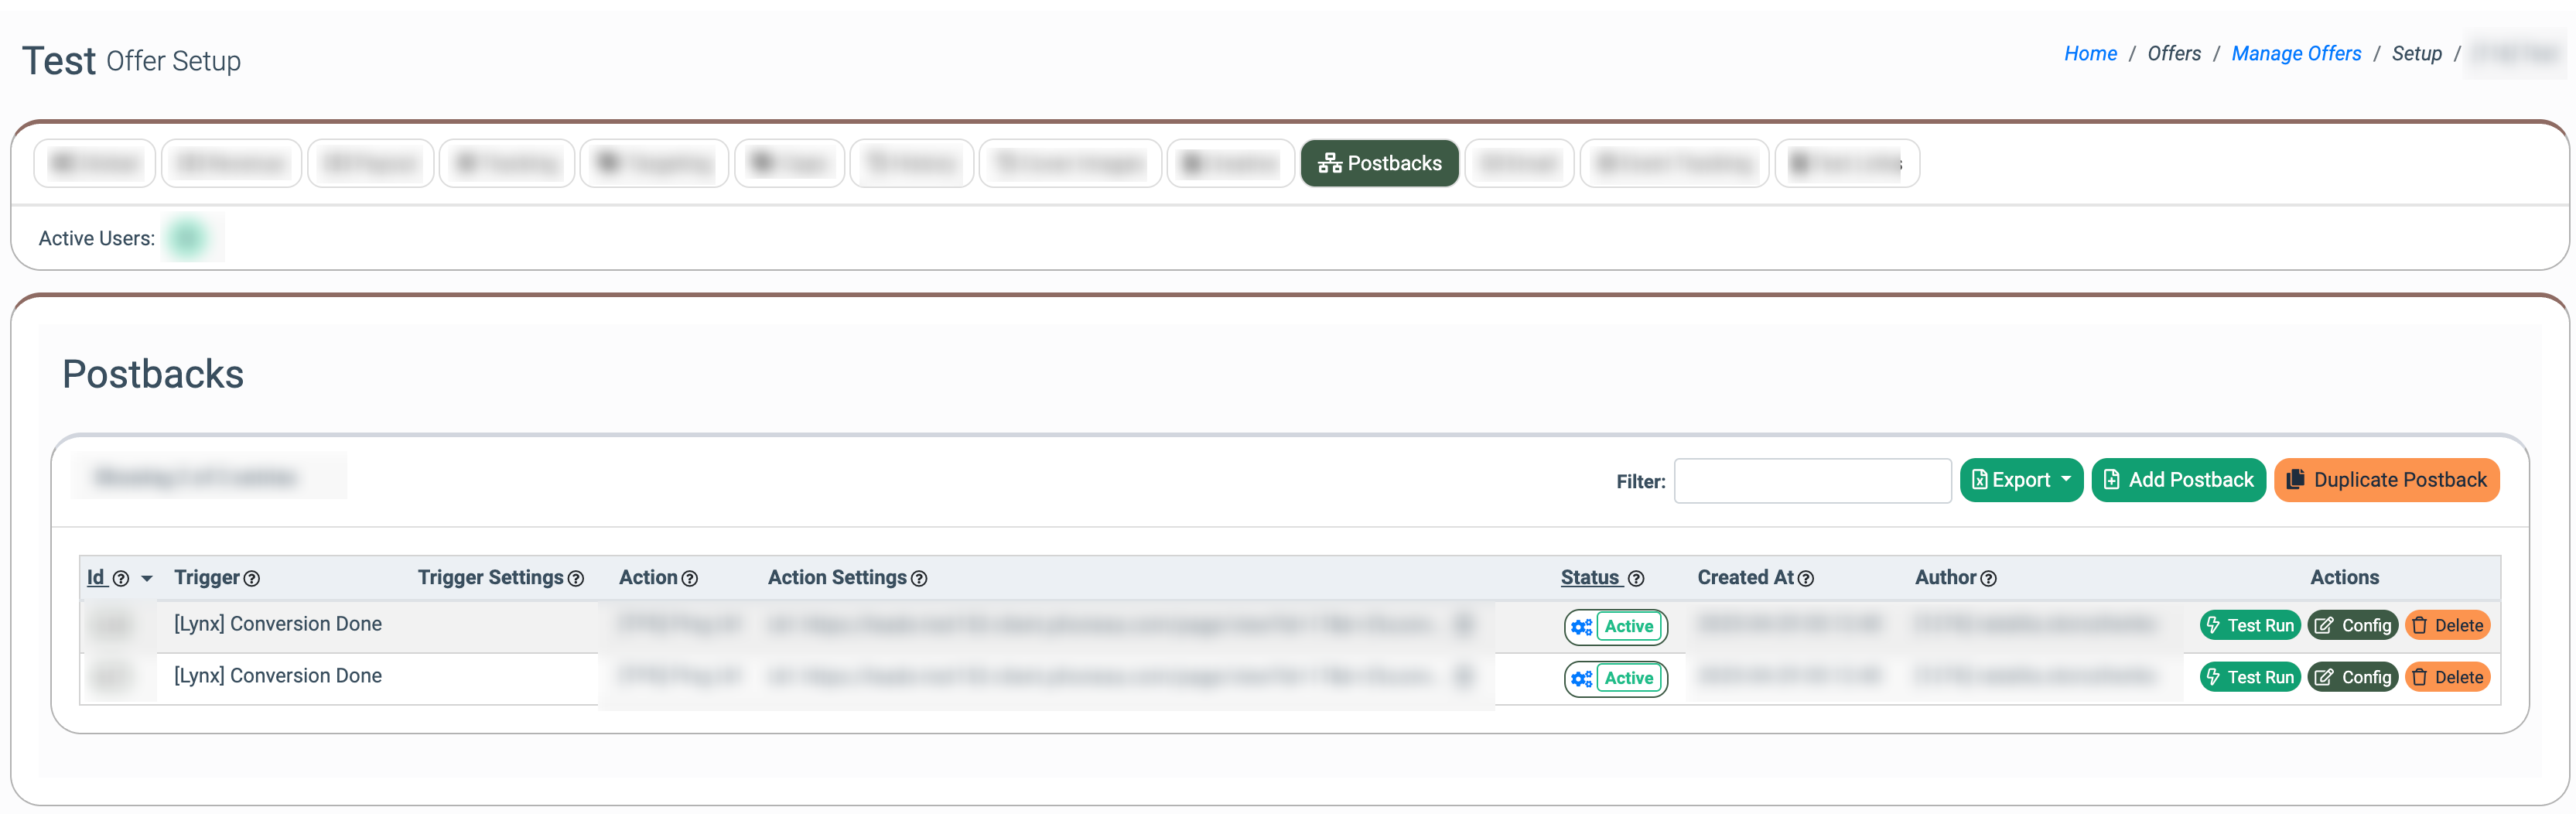
The Postbacks list contains the following information:
- ID: The unique identification number of the postback.
- Trigger: The name of the trigger.
- Trigger Settings: The combination of the general postback trigger settings for which the conversions are tracked.
- Action: The name of the action.
- Action Settings: The list of the action postback settings, such as method and URL.
- Status (Active / Disabled): The status of the postback. Note: To change the postback status, click the corresponding button and select the status in the pop-up window.
- Created At: The date and time of the postback creation.
- Author: The ID and name of the user created a postback.
To create a new postback, click the “Add Postback” button in the “Action” column and fill in the following fields:
- Trigger (Conversion Done / Conversion Reject / Conversion Pending / Click): Select the postback trigger.
- Action: Select the action which determines the way to transfer the conversion data:
- E-Delivery Contact List Status V2 (API): Select to activate or suppress the contact from your contact lists.
- E-Delivery Suppression List(s) V2: Select to add or remove the contact from your suppression lists.
- Send To E-delivery Contact List (API): Select to send to E-delivery Contact list.
- [E-Delivery] Add To Unsubscribe List: Select to add/remove contact from the E-Delivery unsubscribe list.
- [E-Delivery] Send To Contact List (API): Select to add an email address and/or phone number to the existing Contacts List in E-Delivery when the selected trigger event occurs.
- [Leads] Add to DNPL (API): Select to add data to the existing DNPL list when the selected trigger event occurs. Note: The Add to DNPL tracking type can be configured only on the Product level.
- [Leads] Post Lead to LMS/Lead Stash: Select to post a lead to LMS or Lead Stash.
- [Opt-Intel] Add to unsubscribe list (API): Select to add/remove a contact from the Opt-Intel unsubscribe list.
- [Opt-Intel] Send to Opt Intel (API): Select to add an email address or phone number to the existing Email Opt-out List/Phone Number Opt-out List in Opt-Intel when the selected trigger event occurs.
- [PBX] Add to DNPL (API): Select to add data to the existing DNPL list when the selected trigger event occurs. Note: The Add to DNPL tracking type can be configured only on the Product level.
- [TPS] Add to Five9 List: Select to send a lead data record to the Five9 cloud contact center software.
- [TPS] Facebook Conversion: Select to send data to Facebook Conversion API. Read more information about the Facebook Conversion event tracking type in the following Knowledge Base article.
- [TPS] Google Ads Conversions from clicks: Exporting CSV for Schedule uploading conversions from clicks. Read more information about the Google Ads Conversions from clicks event tracking type in the following Knowledge Base article.
- [TPS] Google Analytics: Select to send a new event to Google Analytics.
- [TPS] Google Sheets: Select to add data as a record to Google Sheets using placeholders when the selected trigger event occurs.
- [TPS] Ping Url: Select to send a GET or POST request to the third-party server when the selected trigger event occurs.
- [TPS] SMTP: Select to send an email automatically when the selected trigger event occurs.
- [TPS] Send Slack Message: Select to automatically send Slack messages to a particular user or channel when a specific event takes place, ensuring timely alerts.
- [TPS] Trusted Form Claim: Select to check the TrustedForm certificate in the lead data to verify its legitimacy.
- [TPS] Twilio: Select to set Twilio integration to send SMS automatically when the selected trigger event occurs.
-Jul-10-2024-12-40-04-9140-PM.png?hsLang=en)
Click the “Next” button to proceed.
Fill in the following fields in the “Add Postback” pop-up window:
- Affiliate: Select the Affiliate for which the conversions are tracked, which will be one of the conditions to trigger the postback.
- Goal: Select the goal that will be one of the conditions to trigger the postback. This field is available only when the “Enable Goals” option in Offer is enabled.
- Payout Restrictions: Select the payout restrictions (Payout is greater than 0, Payout is greater than a certain value, Payout is greater than or equal to a certain value, Payout is lower than a certain value, Payout is lower than or equal to a certain value, Payout range inclusive).
- Source: Select the conditions for which conversions are tracked (Source name (Exact match), Exclude source name (Exact match), Source name starts with, Exclude source name starts with), multi source name (comma separated), multi exclude source name (comma separated).
- Source Value: Enter the Source(s) name for which the conversions are tracked.
-Feb-24-2025-03-04-59-5841-PM.png?hsLang=en) Depending on the selected action, the system will require you to fill in the additional fields in this pop-up window.
Depending on the selected action, the system will require you to fill in the additional fields in this pop-up window.
Press the “Save Rule” button to complete the action.
To test the postback you have created, click the “Test Run” button. You will see various parameters in the “Test Run” pop-up window based on your trigger settings and the selected action. Fill in the provided fields with the unique parameters. Once you have completed this, click the “Confirm” button to finalize the action.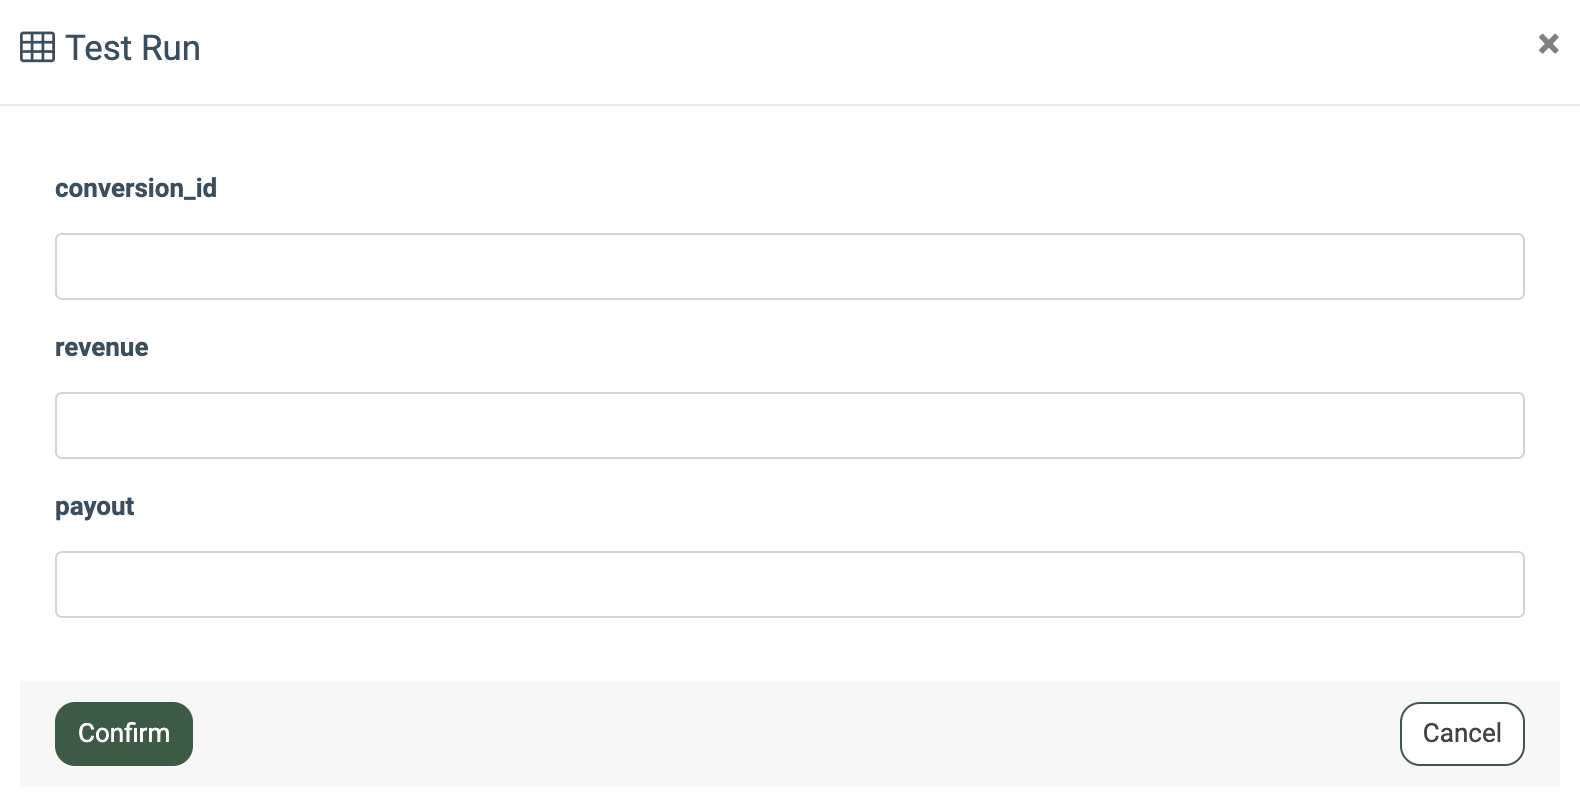
Then click the “Proceed to the Log” button to check the test run record data.
To configure the postback, click the “Configure” button. In the pop-up window, fill in the required fields.
-Feb-24-2025-03-07-04-7413-PM.png?hsLang=en)
-Feb-24-2025-03-07-45-5509-PM.png?hsLang=en) Click the “Save Rule” button to apply changes.
Click the “Save Rule” button to apply changes.
To delete the postback, click the “Delete” button. In the pop-up window, type the ID of the postback and click the “Delete” button to finish.
-4.png?hsLang=en)
To duplicate the existing postback from another offer, click the “Duplicate Postback” button. In the pop-up window, select the offer and check the box next to the postback you would like to duplicate.
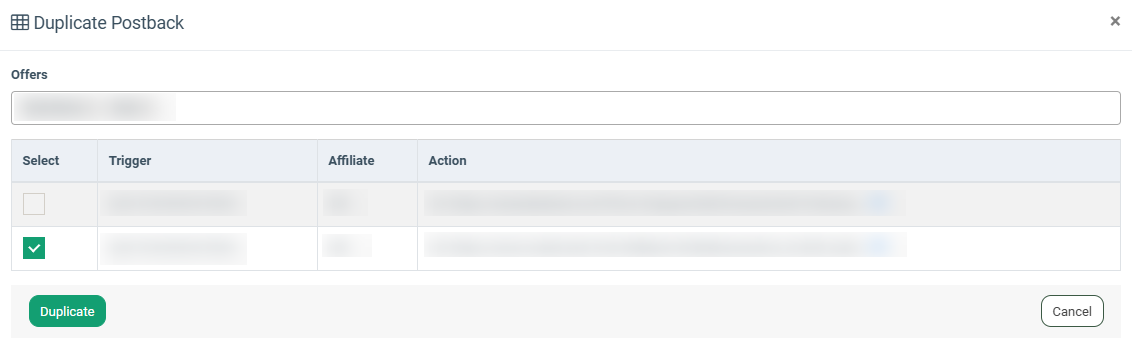
Click the “Duplicate” button to confirm your intention.
Note: Affiliate users can not see postbacks created by users of another affiliate or admin.
The following conditions should be met to trigger a postback:
- The system received a new conversion that fulfills all conditions for the postback (“Affiliate”, “Conversion Status”, and “Goal”) in case it matches the postback settings.
- For each update of the “Conversion Status,” the system checks whether the postback conditions are fulfilled and triggers the postback.
You can configure postbacks individually for each offer goal using specific postback conditions. When a new conversion for a particular goal occurs, all postbacks that satisfy the conditions for that goal are triggered.
If you remove the goal from the postback, the "Goal" condition is no longer required, and only the "Affiliate" and "Conversion status" conditions will be evaluated for new conversions. When you add the goal back, the previous postback settings related to the "Goal" are restored.