To manage the settings, go to the System Management > Products section, and for the required Product, click the “Settings” button in the “Actions” column.
The “Advanced Settings” tab contains the following settings for the Product:
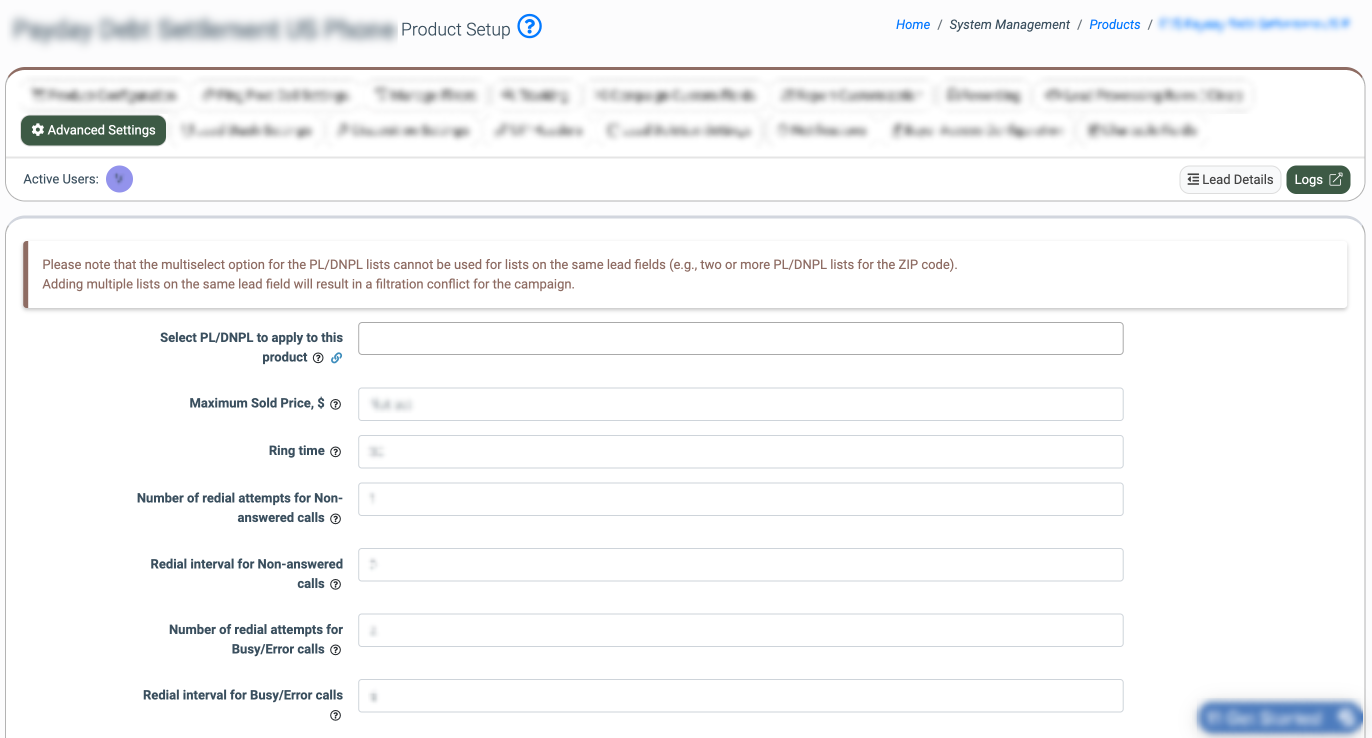
- Select PL/DNPL to apply to this product: Select the Present List or Do Not Present List to apply to this Product.
Note: This option is available when the PL/DNPL is enabled in your system. Read more information about the Present & Do Not Present Lists feature in this Knowledge Base article.
- Maximum Sold Price, $: Enter the maximum lead price for the Product.
- Ring time: Enter the ring length in seconds, which determines the length of the ring before the buyer’s agent picks up the incoming call. The default duration is set to “30”.
- Number of redial attempts for Non-answered calls: Enter the number of attempts the system will make to reach the buyer if there is no response during the “Ring time” period. The default number of attempts is set to “1”.
- Redial interval for Non-answered calls: Enter the duration of time between call attempts. The default duration is set to “0”.
- Number of redial attempts for Busy/Error calls: Enter the number of attempts the system will make to reach a buyer if a “Busy” signal was received (the call was dropped / the line is busy). The default number of redial attempts is set to “2”.
- Redial interval for Busy/Error calls: Enter the duration of time between call attempts if the system receives a “Busy” signal (the call was dropped / the line is busy). The default duration is set to “5”.
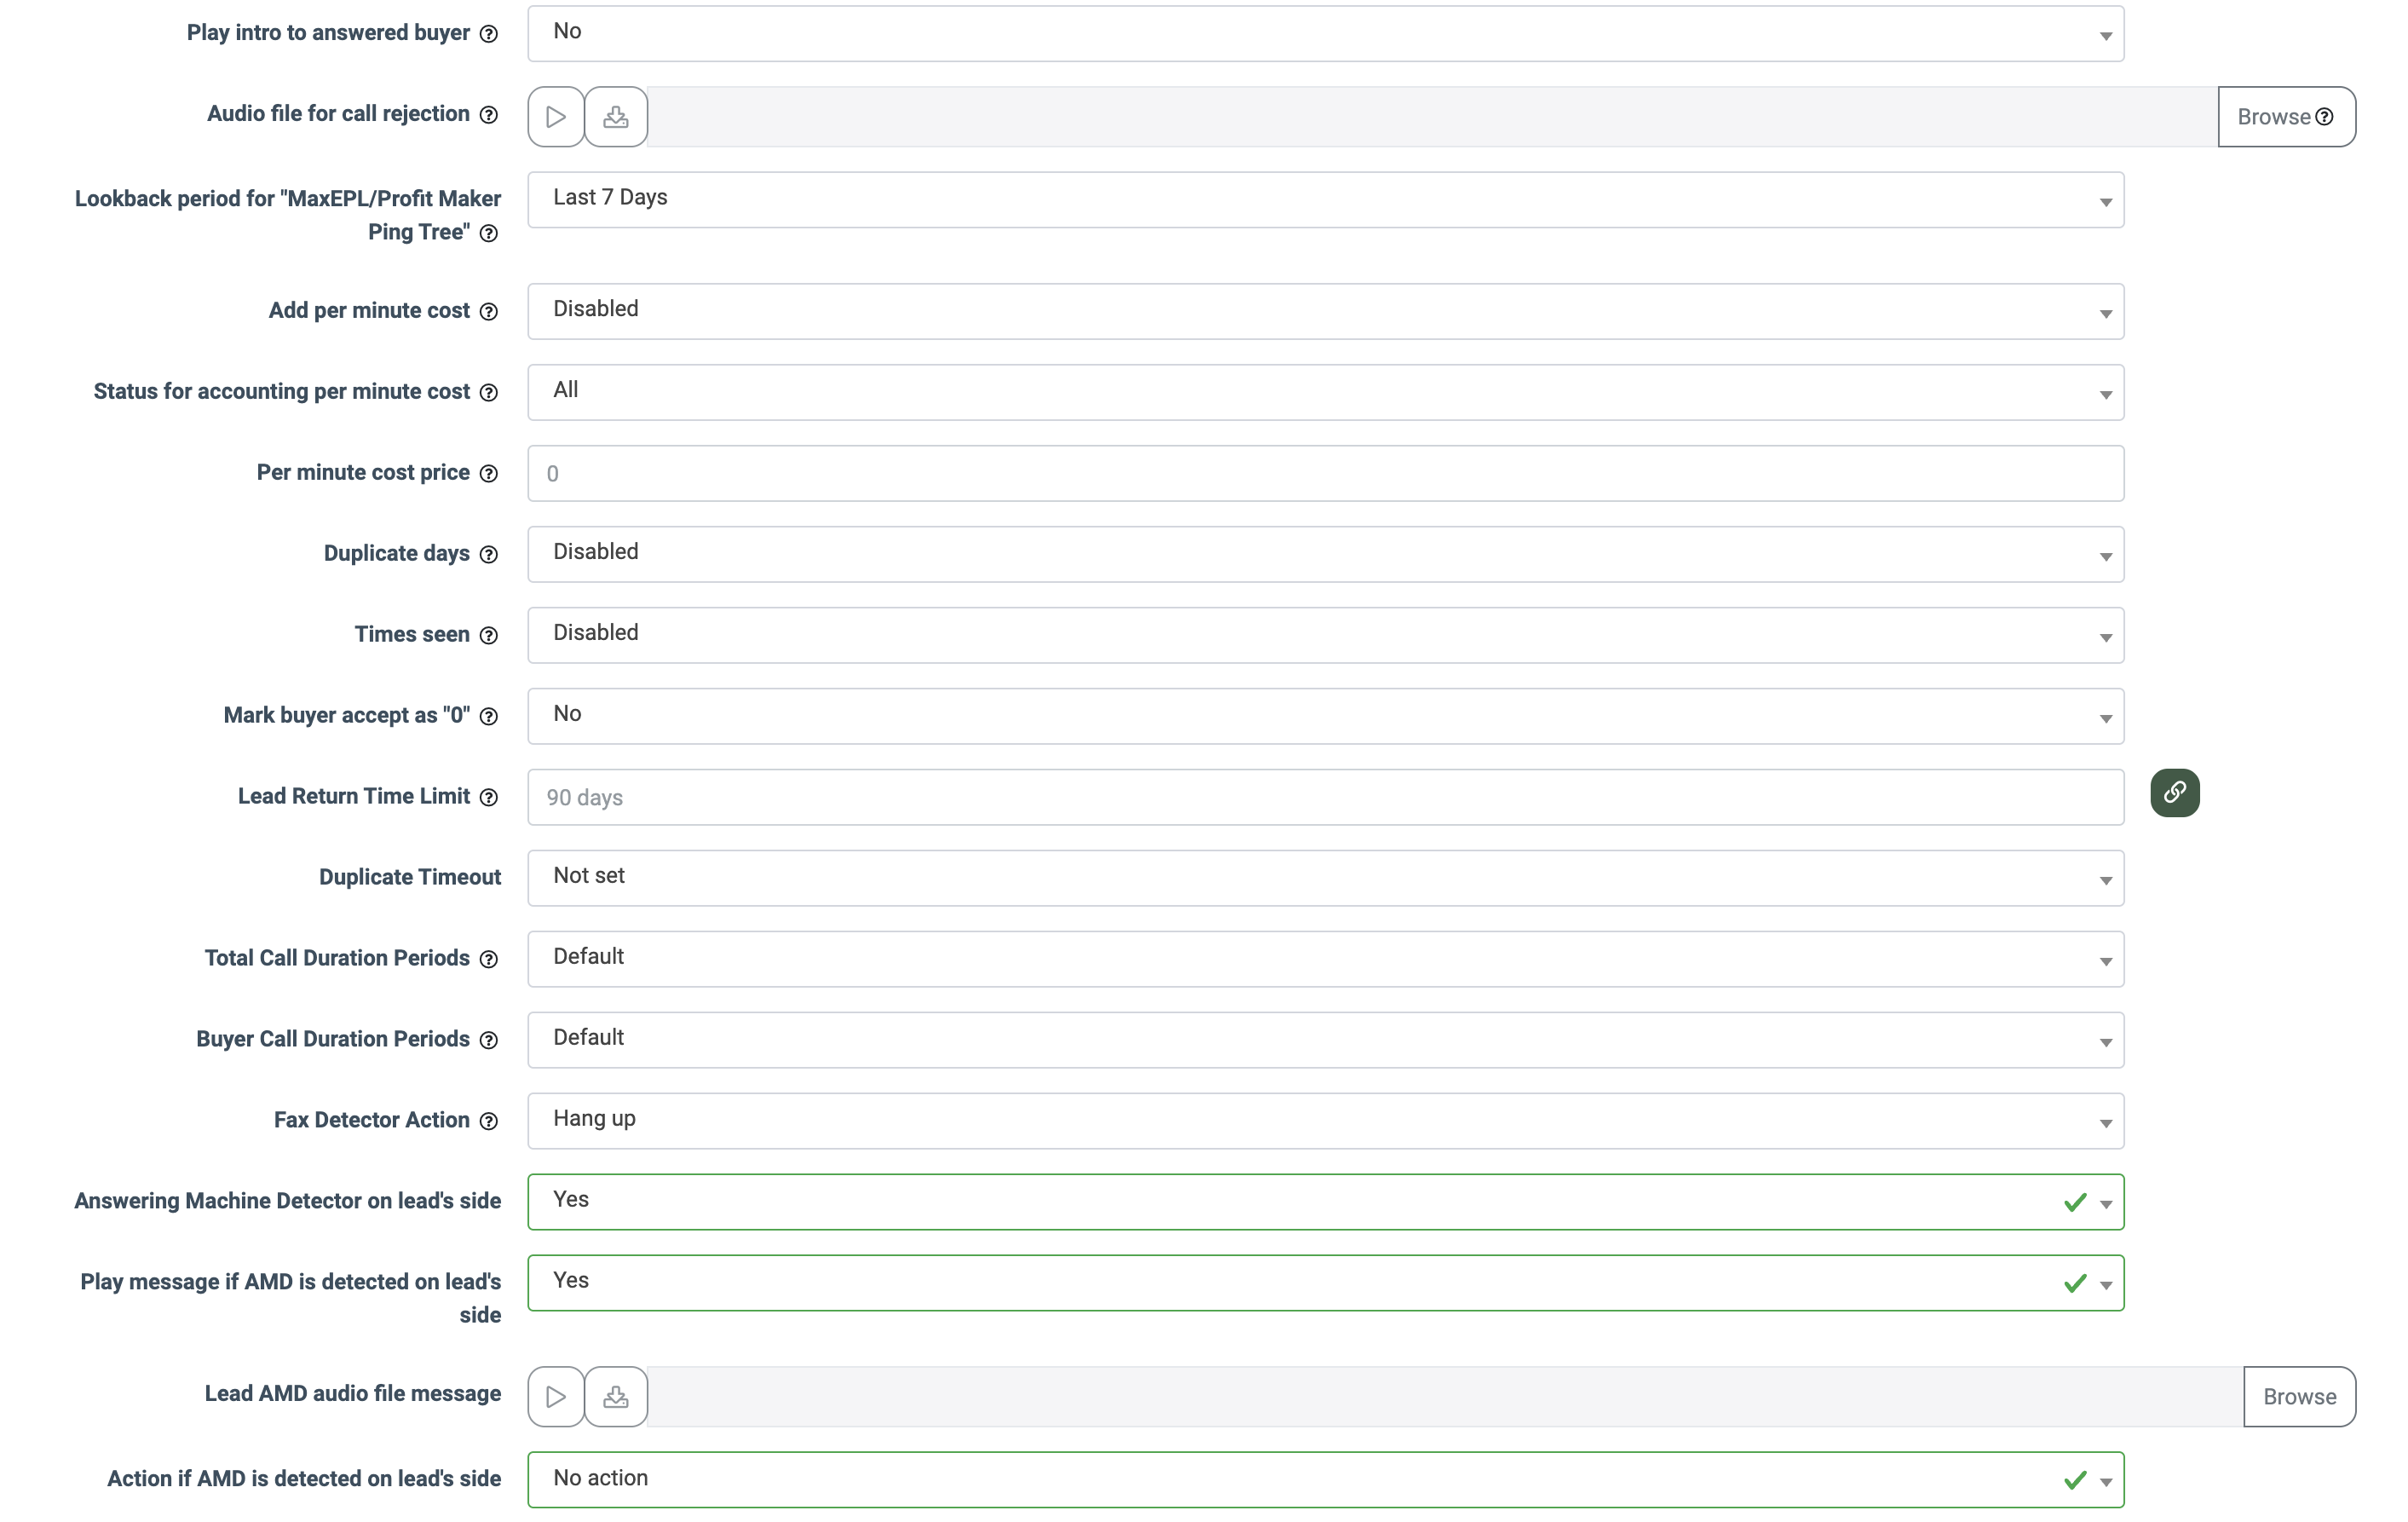
- Play intro to answered buyer: Select the “Yes” option to upload the intro file to play for the answered buyer. By default, the “No” option is set.

- Audio file for call rejection: Click the “Browse” button to upload the audio file for the call rejection.
- Lookback period for "MaxEPL/Profit Maker Ping Tree": Select the lookback period for the "MaxEPL/Profit Maker Ping Tree" strategy application (Last 7 Days, Previous 7 Days, Same Day Last Month). The “Max EPL” strategy allows you to reach your maximum earnings per call. Calls are distributed to the Buyer who has the highest expected price. The “Profit Maker” strategy allows you to achieve overall maximum profitability for the campaigns with the least remaining distribution time. The Profit Maker compares a Campaign’s Highest Expected Price with the available caps and hours remaining to sell. Note that the “Last 7 Days” option will be applied by default. Read more about the strategy workflow in the following Knowledge Base article. The example of the date consideration:
- For the “Last 7 Days” option: if today's date is 02/06/2026, the period for consideration is from 01/30/2026 to 02/06/2026 (the range is from 7 days ago through today).
- For the “Previous 7 Days” option: if today’s date is 02/06/2026, the period for consideration is from 01/23/2026 to 01/29/2026 (the range is from 14 days ago through 8 days ago).
- For the “Same Day Last Month” option: if today's date is 02/06/2026, the date consideration is 01/09/2026 (the date that was 4 weeks before today’s date).
- Answering Machine Detector on lead's side: Select the “Yes” option to enable the detection of the answering machine call on the lead’s side. By enabling this option, the system will automatically detect the calls handled by the machine (non-human).
- Play message if AMD is detected on lead's side: Select the “Yes” option to play the audio file message if the answering machine call is detected on the lead’s side.
- Lead AMD audio file message: Upload the audio file that will be played in case of the answering machine call detection.
- Action if AMD is detected on lead's side: Select the action that will be performed in case of the answering machine call detection (No action, Lead disconnect).
- If the “No action” option is selected, no additional action will be performed.
- If the “Lead disconnect” option is selected, the call will be disconnected and finalized.
- Add per minute cost: Select the “Active” option, to enable the Call Price Per Minute feature. When enabled, this feature transfers the per minute cost of the call to the buyer. By default, the “Disabled” option is set.
- Status for accounting per minute cost: Select the lead status for which the Buyer will be charged the cost per minute fee (All, Sold, Reject).
- Per minute cost price: Enter the price for each minute of the Buyer call.
- Duplicate days: Select the time frame for checking if the lead is a duplicate in the system. Depending on the selected option, one of the following rules will be applied:
- Disabled: Select to disable this feature (this value is set by default).
- Today Only: The time range between 00:00:00 and 23:59:59 for the current day only.
- 1, 2, 3, 5, 7, 15, 30: The period in days.
- Times seen: Select the maximum number of times the lead to be seen in the system before it is considered a duplicate. Note: The lead will not be posted to any Campaign.
- Mark buyer accept as "0": This feature allows you to reflect zero revenue and payout for a lead with the “Sold” status regardless of the campaign price:
-
- Select the “Yes” option to apply the configuration for all the Campaigns of the selected Product.
Note: This feature will be enabled for all Campaigns related to this Product with the “Default” settings. If it is enabled or disabled for specific Campaigns, the Campaigns’ configuration will override the Product configuration.
- Select the “Yes” option to apply the configuration for all the Campaigns of the selected Product.
-
- Select the “No” option to disable the feature for the selected Product.
Note: This feature will be enabled for all Campaigns related to this Product with the “Default” settings. If it is enabled or disabled for specific Campaigns, the Campaigns’ configuration will override the Product configuration.
- Select the “No” option to disable the feature for the selected Product.
Read more information about this feature in this Knowledge Base article.
Note: If the “Mark buyer accept as ‘0’” feature is enabled, the “Mark lead status as sold, if the campaign price is 0” feature will be blocked, and vice versa.
- Lead Return Time Limit: This feature allows you to set the maximum lead return period. Enter the value between 1 and 90 days.
- Duplicate Timeout: Select the time value (in seconds) during which, if the lead entered the system with the same email and minimum price from the same publisher, the lead will receive the reject status.
- Total Call Duration Periods:
- Select the “Default” option to keep the system default call duration periods.
- Select the “Custom” option to enter the custom call duration periods.
Note: This feature allows you to set the call periods by which leads can be grouped and filtered in the Call Summary report for publisher reports.
- Buyer Call Duration Periods:
- Select the “Default” option to keep the system default buyer call duration periods.
- Select the “Custom” option to enter the custom buyer call duration periods.
Note: This feature allows you to set the call periods by which leads can be grouped and filtered in the Performance Summary for buyer reports.
- Fax Detector Action: Select the option for the calls with fax message processing:
- Select the “Hang up” option to hang up calls with a fax message processing.
- Select the “Routing fax calls” option to redirect calls with fax messages to the campaign which is selected in the “Redirect to Campaign” field.

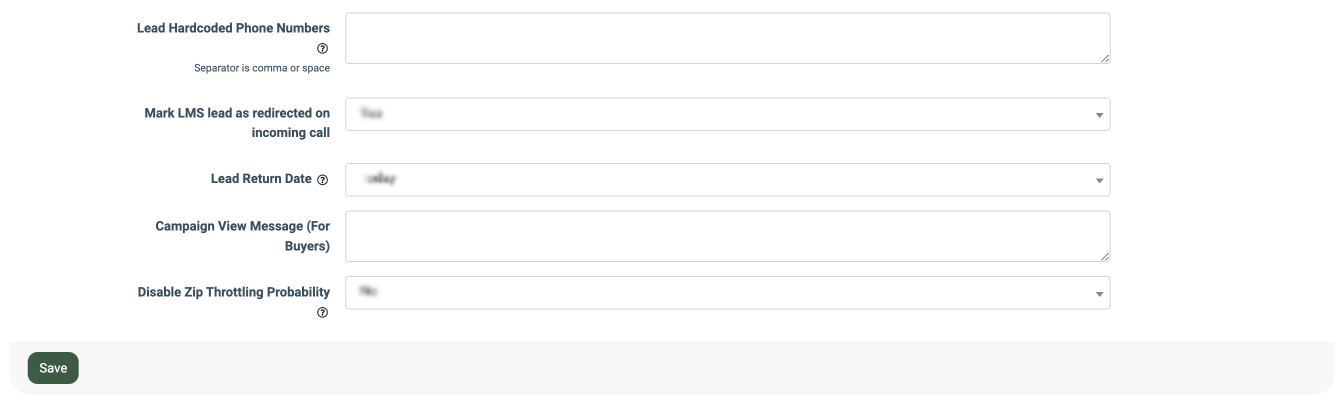
- Lead Hardcoded Phone Numbers: Enter numbers that will be considered non-existent. When the lead with the number from the list enters the system, the lead is considered to be without a number. In this case, the system will bind to it a free publisher number from the tracking pool list. If the number of the lead is not in the list of numbers on the product, we always bind to this lead the first publisher number from the tracking pool list. Note: The separator is a comma or space.
- Lead Return Date:
- Select the “Sold Date” to record the refund amount on the date the lead entered the system.
- Select the “Today” option to record the refund amount on the current date when such a refund is made.
- Campaign View Message (For Buyers): Enter the message that will be displayed for all Buyers who entered the Campaign Setup section. You can include general information or some specific warnings or additional details that should be displayed for Buyers about the settings of Campaigns.
- Disable Zip Throttling Probability: Select the ZIP throttling option application that allows you to control how leads are written to the Publisher and Buyer ZIP Reports. If the “No” option is selected, the system uses the ZIP report throttler algorithm to sample which leads should be included in the ZIP Summary Report, aiming to avoid exceeding daily lead caps while maintaining representative data. The system applies the daily limitation per product and uses a throttling mechanism to decide which subset of leads will be written. If the “Yes” option is selected, leads will be written with 100% probability until the daily cap for that product is reached. After the cap is reached, no further leads are written to the ZIP reports for that day.
Click the “Save” button to save the settings.