A Product is a set of rules, templates, and filters that are applied to traffic to process and redirect it.
To view the list of active products, go to the System Management > Products section.
.png?hsLang=en)
You can narrow down the search results using the following filters:
- ID: Enter the unique identification number of the Product.
- Name: Enter the name of the Product.
- Component: Select the component to which the Product is related (LMS Sync, Call Logic).
- Posting Type: Select the posting type for the Product (Direct Call, Direct Post, Ping-Post, Ping-Post Call, Smart, Smart Legs).
- Industry: Select the industry related to the Product.
The Products list contains the following information:
- ID: The unique identification number of the Product.
- Status: The status of the Product (Active, Disabled).
- Name: The name of the Product.
- Component: The component of the system to which the Product belongs.
- Industry: the industry related to the Product.
- Posting Type: The posting type of the Product.
- Bundle: The Product bundle status.
To view the Product configurations, click the “Settings” button in the “Actions” column. Read more about the “Product Configuration” tab in our Knowledge Base articles.
Preset Products
You can use Products that are already set up in the Phonexa system and customize them according to your business needs.
To add a preset Product, click the “Add Product” button and click the “Use Preset Product” button in a pop-up window.
.png?width=668&height=272&name=unnamed%20(2).png)
Select the Product from the “Product” drop-down list.
.png?width=668&height=279&name=unnamed%20(3).png) Click the “Continue” button to complete the action.
Click the “Continue” button to complete the action.
.png?width=666&height=300&name=unnamed%20(4).png)
To configure the Product, click the “Settings” button in the “Actions” column.
To disable the preset Product, click the “Disable” button in the “Actions” column, enter “YES” into the “Enter “YES” to disable product” field, and click the “Yes” button to complete the action. After the Product is disabled, it is removed from the Products list.
.png?width=666&height=380&name=unnamed%20(5).png)
Note: This action cannot be completed if the Product is currently linked to any Campaign with the following statuses: Active, Paused, Temp Paused, Disabled.

Custom Products
You can create a custom Product using the Product Builder feature and customize it according to your business needs. Also, you can duplicate, export, and import custom products.
To add a new custom Product, click the “Add Product” button. In the “Add Product” pop-up window, click the “Create Product” button, and fill in the data fields. Read the detailed instructions on how to create a new Product using the Product Builder feature in this Knowledge Base article.
Note: If the “Ping-Post” option is selected in the “Posting Type” field, the regular and the smart tree options will be available for the appliance to the Ping-Post Product in the “Ping-Post Mode” field.
Read more information about the regular and smart tree ping-post processing models in the following Knowledge Base article.
.png?width=667&height=430&name=unnamed%20(6).png)
To configure the Product, click the “Settings” button in the “Actions” column.
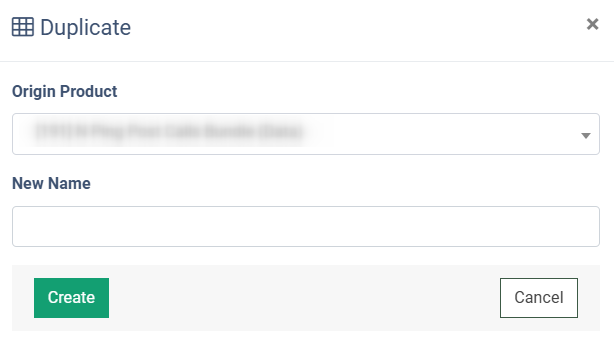
To duplicate the custom Product, click the “Duplicate” button in the “Actions” column, select the Product you want to duplicate from the “Origin Product” field, and enter the name of the new Product.
Click the “Create” button to complete the action.
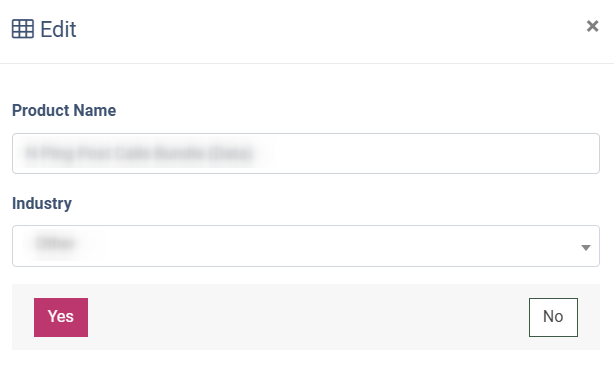
To rename or change the Industry for the Product, click the “Edit” button in the “Actions” column, enter the new name into the “Product Name” field, or select the Industry from the drop-down list, and click the “Yes” button to complete the action.
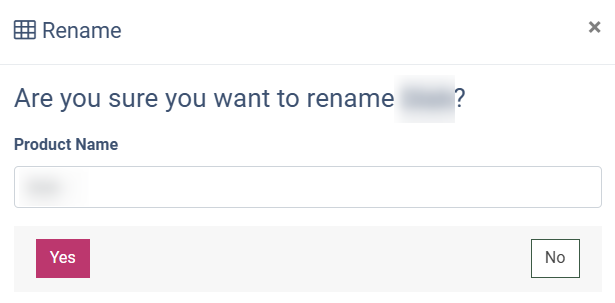
To rename the Product created from the template, click the “Rename” button in the “Actions” column, enter the new name of the Product, and click the “Yes” button.
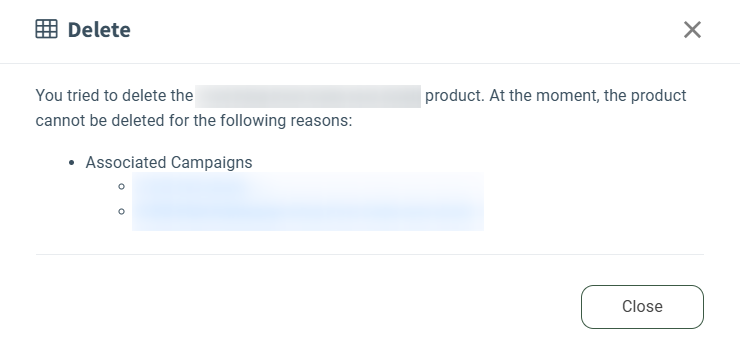
To delete the custom Product from the system, click the “Delete” button in the “Actions” column, enter “YES” in the “Enter “YES” to delete product” field, and click the “Yes” button to complete the action.
.png?width=667&height=380&name=unnamed%20(7).png)
Note: This action cannot be completed if the Product is currently linked to any Campaign with the following statuses: Active, Paused, Temp Paused, Disabled.

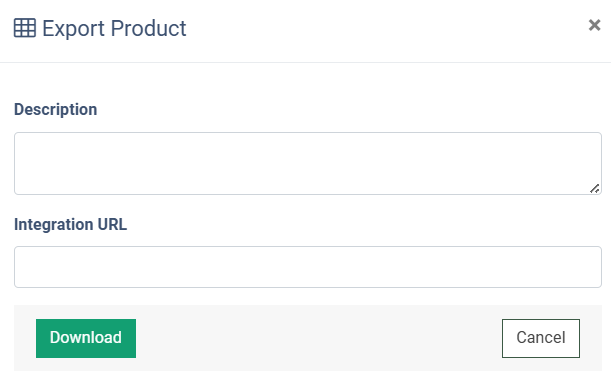
To export the configurations of the custom Product from the system, click the “Export” button in the “Actions” column, add a description and integration URL to the appropriate fields, and click the “Download” button to complete the action.
Note: The Custom Product will be downloaded in JSON format.
To open the AI Agent page for the particular Product, click the “AI Agent” button, and the system will forward you to the corresponding AI Agent page.
Note: AI Agents are available only for Call Logic Products. Read more about the AI Agents in the Knowledge Base article.
.png?width=654&height=831&name=unnamed%20(8).png)
Imported Products
You can import a custom Product (created using the Product Builder feature) to your system and customize it according to your business needs.
To import a new Product into the system, click the “Add Product” button. In the “Add Product” pop-up window, click the “Import a Product” button.
Enter the name of the Product, and select the JSON file with product configurations to upload.
.png?width=668&height=278&name=unnamed%20(9).png) Click the “Continue” button to proceed.
Click the “Continue” button to proceed.
To configure the Product, click the “Settings” button in the “Actions” column.
To duplicate the custom Product, click the “Duplicate” button in the “Actions” column, select the Product you want to duplicate from the “Origin Product” field, and enter the name of the new Product.
Click the “Create” button to complete the action.

To rename or change the Industry for the Product, click the “Edit” button in the “Actions” column, enter the new name into the “Product Name” field, or select the Industry from the drop-down field, and click the “Yes” button to complete the action.

To delete the custom Product from the system, click the “Delete” button in the “Actions” column, enter “YES” in the “Enter “YES” to delete product” field, and click the “Yes” button to complete the action.
Note: This action cannot be completed if the Product is currently linked to any Campaign with the following statuses: Active, Paused, Temp Paused, Disabled.
To export the configurations of the custom Product from the system, click the “Export” button in the “Actions” column, add a description and integration URL to the appropriate fields, and click the “Download” button to complete the action.
Note: The Custom Product will be downloaded in JSON format.

To open the AI Agent page for the particular Product, click the “AI Agent” button, and the system will forward you to the corresponding AI Agent page.
Note: AI Agents are available only for Call Logic Products. Read more about the AI Agents in the Knowledge Base article.