The Additional Components section allows administrators to enable, disable, and configure supplemental LMS and Call Logic features related to reporting, analytics, tracking, publisher tools, buyer tools, document management, advanced routing logic, and system-wide operational behavior.
To view this tab, go to the System Management > General > Project Settings section, then select the “LMS & Call Logic” tab, and the “Additional Components” subtab.
The settings are split into the following blocks:
-3.png?hsLang=en)
Hidden Products in Reports
The “Hidden Products in Reports” block allows you to hide the Product and its data from being displayed in reports.
Use case: The client has some Product(s) that were used for the testing traffic generation or any other internal purpose. The statistical and financial information related to this Product(s) should not be taken into consideration while collecting the summary data about all Products through the reporting system and corresponding dashboards. In this case, the client can hide the corresponding Product(s).
Note: Hidden Products can be displayed in the reports only if it’s specified in the filter block. These products will be marked with the [H] symbol.
-2.png?hsLang=en)
System Defaults
The “System Defaults” block allows you to set up the default products for LMS & Call Logic components and set up the expired redirect link. The default Products are used for the reports where the “Product” filter field is mandatory for the selection, so the client can set the default selection for the specific Product that requires additional attention and focus. The “System Defaults” block contains the following fields:
- LMS Sync Default Product: Select the default Product to be used when running reports in the LMS Sync component.
- Call Logic Default Product: Select the default Product to be used when running reports in the Call Logic component.
- Expired Redirect Link: Enter the expired redirect URL.
Note: When the redirect link from the lead body expires, and the “Expired Redirect Link” field is specified, the new redirect link will be displayed.
-2.png?hsLang=en)
Reports & Analytics
The “Reports & Analytics” block allows you to enable or disable specific data in the reports:
- Reflect Price Adjustment in Reports: Switch the toggle to the “On” position to reflect lead price adjustments in reports.
- Cap-Out Reports: Switch the toggle to the “On” position to enable the Cap-Out Reports.
Note: All reports under this feature will provide a look at a campaign’s caps by date, and if the caps were met. - Lead Reject Reasons Reports: Switch the toggle to the “On” position to enable the Lead Reject Reasons reports.
Note: This report captures the reject responses provided by the buyer and a count for each response. If you click on numbers with underlines, the lead details will be presented. - Price Reject Analysis: Switch the toggle to the “On” position to enable the Price Reject Analysis.
Note: Price Reject is a function that allows the buyer to reject the offer at a higher point tier and offer their price for it. - Min Price Reports: Switch the toggle to the “On” position to enable the Min Price Reports. The min price in this report is considered the price that the Publisher sends to the system with the lead. If there are no offers with a price higher than the one mentioned by the Publisher, the lead purchase cannot be made. Note: The “Min Price Report” displays information about min prices for sold leads based on the Publisher’s min prices (the lowest amount the publisher is willing to accept for a lead. If the system cannot meet or exceed this price, the lead will not be purchased.), sorted by tier values.
- Performance Summary by State: Switch the toggle to the “On” position to enable the “Performance Summary by State” report.
Note: The “Group by State” tab of the Performance Summary Report allows you to review the summary data by state affiliation. - Enable linked Campaigns settings: Switch the toggle to the “On” position to enable linked Campaigns settings.
Note: The linked Campaign option allows you to apply and use the schedule and cap settings of another Campaign. - Lead Price Adjustment: Switch the toggle to the “On” position to enable the lead price adjustment.
Note: The Lead Price Adjustment feature allows you to adjust the lead price. You may increase or decrease the lead price without changing the lead status. - Show Quality Bubbles to Publishers: Switch the toggle to the “On” position to display quality bubbles so Publishers can view lead quality.
- Enable iClear Cost Reports: Switch the toggle to the “On” position to enable the iClear Cost Report.
Read more about the iClear Cost Report in this Knowledge Base article. - Divided ZIP Summary: Select the option to specify how data is collected and displayed in Publisher and Buyer ZIP reports:
- Enabled: Select this option to enable the ZIP reports feature for both Publishers and Buyers.
- Disabled: Select to disable the ZIP reports feature for both Publishers and Buyers.
- Global ZIP Summary: Select the option to specify how data will be displayed in the Buyer ZIP Report:
- Enabled: Select this option to display the “Publisher” filter for the Buyer ZIP report. Note: This option is available only if the Divided ZIP Summary option is set to “Enabled”.
- Disabled: Select to disable the “Publisher” filter for the Buyer ZIP report.
-2.png?hsLang=en)
Tracking Tools
The “Tracking Tools” block allows you to set up the additional tracking tools:
- Advanced Call Tracking: Switch the toggle to the “On” position to enable the Advanced Call Tracking feature that allows you to add and customize widgets on your website, to receive and track your calls while obtaining detailed analytics for further analysis.
- Allow to Use All Data From Lead Body in Tracking URL: Select the Products from the drop-down list to allow usage of all data from the lead body in the tracking URL.
Attention: The feature allows transferring all lead data to the tracking system, which may affect security issues. Please make sure that you assess all the risks before enabling the feature.
-2.png?hsLang=en)
Publisher Tools
The “Publisher Tools” block allows you to set up additional tools for Publishers:
- JavaScript Widgets: Switch the toggle to the “On” position to enable JavaScript widget management and reporting in the system. JavaScript widgets are embeddable scripts that render interactive components on external or internal web pages while sending structured data back to LMS & Call Logic. This setting allows or disables the usage of such options as Call Tracking Pool widgets, JS Forms, and website widgets, and the corresponding reporting. The Call Tracking Pool widgets rotate phone numbers per session or visitor, collect device, geo, and source information, and log each “session” for attribution. The JS Forms are created with templates tied to specific products and publishers and embedded by copying a JS snippet.
- JavaScript Forms: Switch the toggle to the “On” position to enable JavaScript form management and reporting in the system. The JS Forms are created with templates tied to specific products and publishers and embedded by copying a JS snippet. This option allows creating the JS form using available templates according to existing Products in your system, viewing the settings, editing and customizing the existing JS Form, and checking the additional features.
- Banner tools: Switch the toggle to the “On” position to enable Publisher Banner management and reporting in the system. Banners can be used to turn website traffic into income, advertise your business on other resources, and let people know about you in general. The Banner management allows you to standardize banner creatives for publishers, measure banner engagement metrics, and enforce brand and compliance consistency.
- Feed CMS: Switch the toggle to the “On” position to enable a fully customizable CMS for your publishers. Feed CMS is a template‑driven site builder for publisher landing pages. Templates define the structure, layout, and reusable design blocks used by one or more feeds. The templates can be made public (visible to all publishers) or remain internal. This allows publishers to create a set of templates and then allows publishers to use feeds without writing code.
- Offers Page: Switch the toggle to the “On” position to enable the offers page. The Offers page displays all public feeds and forms, as well as descriptions of the Offers. This Offer page contains the publisher‑facing offers catalog, including the public feeds and forms, as well as descriptions of the Offers. You can use the Offers section to create an offer for the Publishers to bring the traffic to the form.
- Post Call: Switch the toggle to the “On” position to enable the post calls feature. The Post Call option allows the Buyer and Publisher to receive lead data during or after the call. The Post Call allows you to send and receive structured lead data during or after a phone call via the Call Logic component, Cloud PBX component, and external buyer APIs. Post Call integrations at the buyer and campaign level, checking the information from the Lead Stash for data retrieval, and supports advanced flows such as Ping‑Post Call and bundled Ping Post Calls.
- Publisher Schedule: Switch the toggle to the “On” position to enable the Publisher Schedule. The Publisher Schedule is used to control when web leads from Publishers can enter the system. This feature can be used for business hours gating, Product‑specific time ranges, adjustment according to the time zone. The feature provides time‑based control when specific publishers can send traffic, especially across multiple products and channels, and optimize performance by limiting intake to hours and days with proven high conversion, based on reporting.

Buyer Tools
The “Buyer Tools” block allows you to set up additional tools for Buyers:
- Enable Campaign Templates: Switch the toggle to the “On” position to enable the Campaign Templates. Templates themselves carry most of a campaign’s configuration (product, type, pricing model, min price, schedule, integrations, filtration rules, caps, notifications, access control, etc.), but are attached to an internal buyer instead of a real buyer. When a Buyer Editor instantiates a campaign from a template via Lead Deals, the system clones the template’s configuration into a new, real campaign tied to the actual buyer. The Campaign Templates simplifies the processes in cases when you have multiple buyers with similar requirements for a given product, frequent campaign launches (e.g., rotating offers, seasonal promotions), or complex integrations or compliance settings that must be applied consistently.
- Enable Campaign Tag feature for Buyer Representative: Switch the toggle to the “On” position to enable the Campaign Tag feature for Buyer Representatives and Buyer Editor. The Campaign Tags feature allows you to assign specific tags to particular Campaigns. It helps to filter out the Campaigns list according to the specific tag, and get the detailed data from the reporting system based on the tag filtration, which improves the reports’ usability.
.png?hsLang=en)
Document Management
The “Document Management” block allows you to manage your documents regarding the compliance policies. The “Document Management” block contains the following field:
-
Company Policies editor: Switch the toggle to the “On” position to enable the Company Policies editor feature. The Your Compliance Policies section allows the client to view and configure the list of uploaded policies that may reflect on their websites. Read more about the Compliance Policies section in the following Knowledge Base article.
Note: The document editor helps you manage and integrate your company's policies with external sites by using a URL. Read more information about linking the documents with the external sites in the following Knowledge Base article.
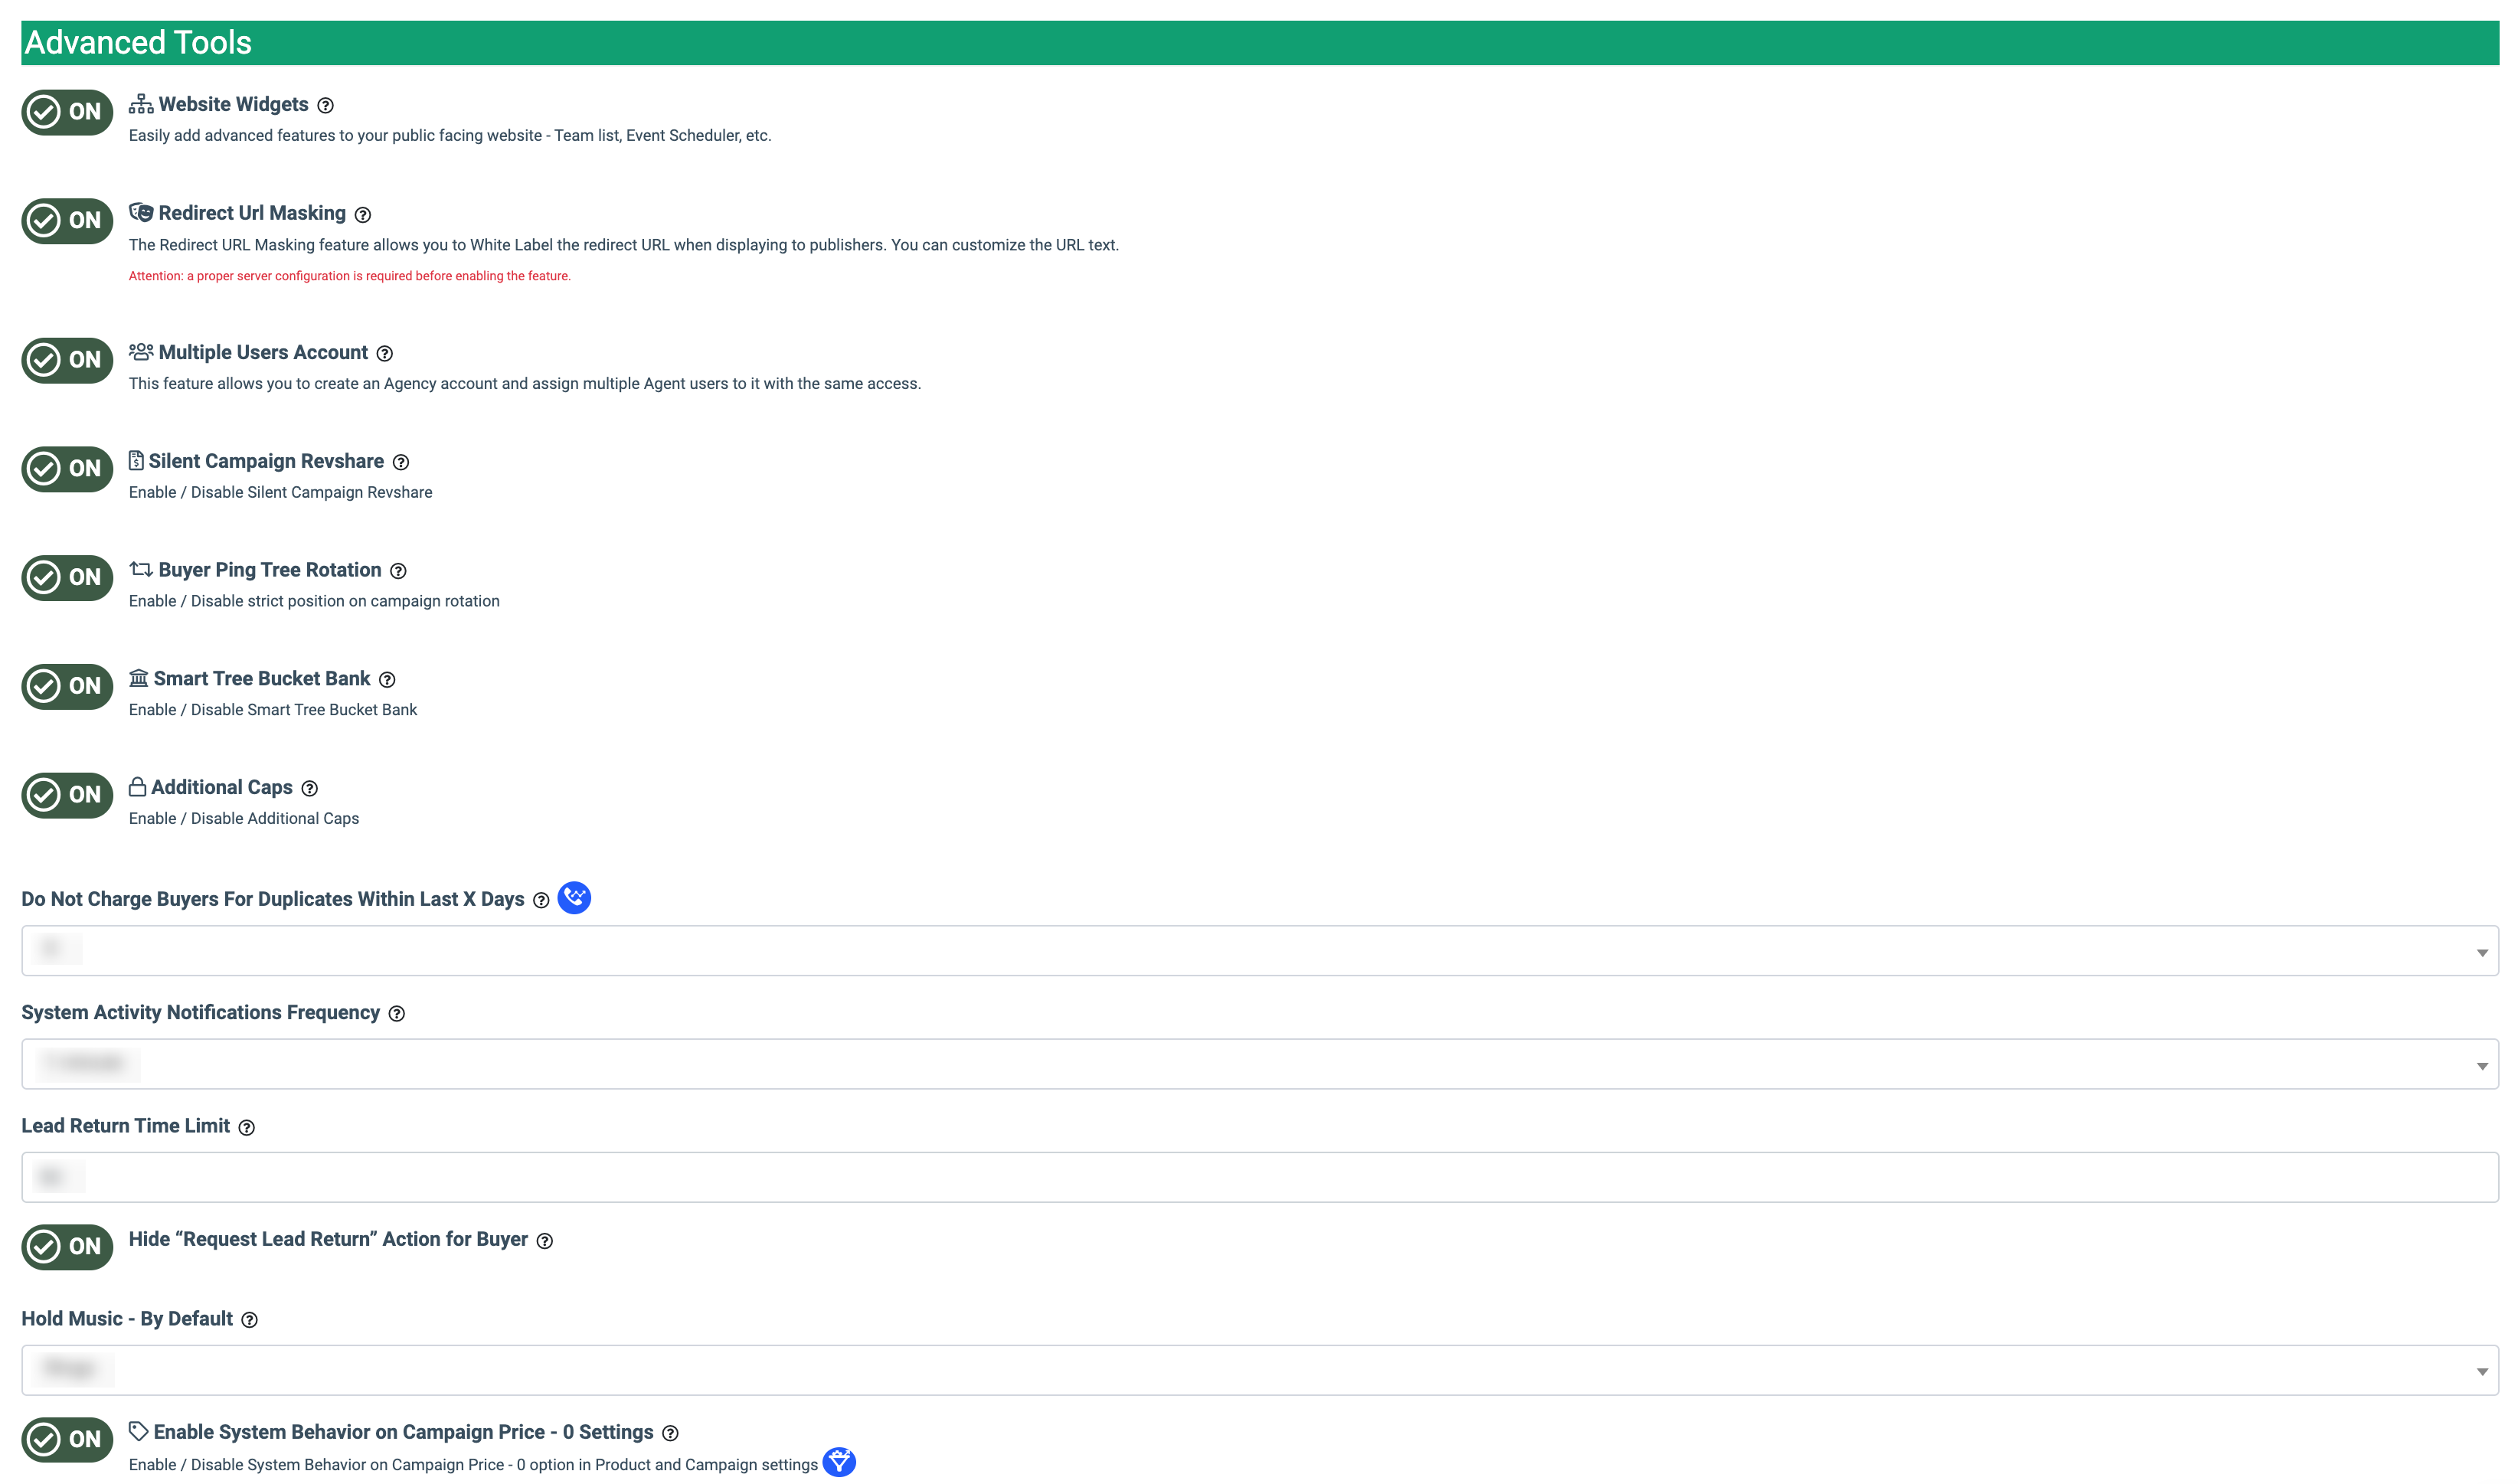
Advanced Tools
The Advanced Tools” block allows you to set up additional advanced features in the system:
-
Enable Round Robin Ping Tree: Enables sequential round-robin routing in Ping Trees, distributing traffic between ping trees based on defined percentages rather than random routing. Read more in the Knowledge Base article.
-
Enable Action "Mark by Source": Enables the “Mark by Source” action for iClear. This action allows you to mark the lead with the selected source for reporting. This action can be set in the “Actions” tab of the Advanced Rules Configuration settings. Read more in the Knowledge Base article.
-
Website Widgets: Switch the toggle to the “On” position to enable the website widgets. This option allows you to easily add advanced features to your public-facing website - Team list, Event Scheduler, and Pages. Read more about the Team section in the following Knowledge Base article. Read more about the Event Scheduler section in the following Knowledge Base article. Read more about the Pages section in the following Knowledge Base article.
-
Redirect Url Masking: Switch the toggle to the “On” position to enable the redirect URL masking feature. The Redirect URL Masking feature allows you to White Label the redirect URL when displaying to publishers. You can customize the URL text. Note: The proper server configuration is required before enabling the feature.
-
Multiple Users Account: Switch the toggle to the “On” position to enable the multiple users account feature. This feature allows a single business account to be used concurrently by multiple individual users, each with their own login and permissions. Instead of one person being the “owner” of an account, you can attach several employees or external stakeholders, all working under the same commercial and operational profile. The existing user’s account can be transformed into an agency that accumulates accounts of agents or into an agent that is attached to the agency. This feature can work for the accounts of users with the following system roles: Global Admin, LMS Admin, Call Logic Admin, Lynx Admin, E-Delivery Admin, Opt-Intel Admin, Buyer Agent, and Publisher Agent.
-
Silent Campaign Revshare: Switch the toggle to the “On” position to enable the Silent Campaign rev-share feature. The “Silent Campaign Revshare” option allows you to make a payout to the publisher from the Silent Campaign according to the publisher’s rev-share settings. Read more information about this option in the following Knowledge Base article.
-
Buyer Ping Tree Rotation: Switch the toggle to the “On” position to enable the buyer Ping Tree rotation feature. The “Buyer Ping Tree Rotation” option allows you to set a strict position for Campaigns’ rotation in a ping tree. The feature is available only for the Priority and Weight ping tree strategies of the LMS component. Read more about this feature in the following Knowledge Base article.
-
Smart Tree Bucket Bank: Switch the toggle to the “On” position to enable the smart tree bucket bank feature. Bucket Bank allows you to accumulate a certain amount of money in the publisher’s balance. In the interface, the leads will appear with a reject status (though in reality, they could be sold and redirected), and only when the balance reaches the necessary amount, a sold status will appear. Read more about the Bucket Bank feature in the following Knowledge Base article.
-
Additional Caps: Switch the toggle to the “On” position to enable the additional caps feature. The “Additional Caps” feature allows you to manage and set up additional settings for the Campaign’s caps. The option allows you to configure a weekly and monthly cap limitation. Read more about the Additional Caps feature in the following Knowledge Base article.
-
Group Temporary: Switch the toggle to the “On” position to enable the group temporary feature. The Group Temporary is the additional system role that can be assigned to the existing user for the specified period of time and gives additional access according to the permissions of the Accounting system role. Note that this setting is available only for the System Owner.
-
Do Not Charge Buyers For Duplicates Within Last X Days: Select the option from the drop-down list to apply no charges to the Buyers for duplicates for 0 — 30 days. Select the ‘Disabled” option to disable that feature. Note: This feature is available only for the Call Logic component. Read more information about this feature in the following Knowledge Base article.
-
System Activity Notifications Frequency: Select the option between 1 minute and 7 days to enable the system activity notifications feature. The notification about the system activity is considered for the application of the ongoing setting. Read more information about the System Activity report in the following Knowledge Base article.
-
Lead Return Time Limit: Enter the value between 1 and 90 days. This feature allows you to set and manage the maximum lead return period. Once configured, the lead return option for the purchased leads will only be available for the specified period. Read more about this feature in the following Knowledge Base article.
-
Hide “Request Lead Return” Action for Buyer: Switch the toggle to the “On” position to hide the option for the Lead Return in the Buyer’s Lead Details report for all system users that are related to the Buyer, except the Buyer Agent. Read more about the Lead Return option in the following Knowledge Base article.
-
Hold Music- By Default: Select the audio file that will be played while the lead is waiting on hold for the connection with the selected Buyer. Note: This feature is available only for the Call Logic component.
-
Hold Music - Audio File: Upload the audio file that will be played while the lead is waiting on hold for the connection with the selected Buyer. Note: This feature is available only for the Call Logic component.
-
Enable System Behavior on Campaign Price - 0 Settings: Switch the toggle to the “ON” position to enable the System Behavior on Campaign Price - 0 option in Product and Campaign settings. This feature applies to Campaigns with a minimum price of 0 and determines the lead status when it's posted to the Buyer. Read more information about this feature in the following Knowledge Base article.
Contact Us
The “Contact Us” block allows you to set up your “Contact Us” form. The Contact Us form allows the client to set this form on their own website, and it can be used as the email relay.
Read more about the Contact Us form in the following Knowledge Base article.
The “Contact Us” block contains the following fields:
- ReCaptcha V3: Switch the toggle to the “On” position to enable the ReCaptcha feature.
Note: The ReCaptcha feature allows you to protect your “Contact Us” forms from spam. - Deny requests without referrer: Switch the toggle to the “On” position to deny requests via your “Contact Us” form without the referrer. The referrer is an HTTP header sent by the user's browser indicating the specific web page where the form was submitted. Requiring this header ensures that the client is interacting with your actual website, helping to block direct submissions from automated spam bots.
.png?hsLang=en)
Click the “Save” button to apply changes.