To open the “Integrations” tab, go to the Client Management > Buyer List section and click the “Settings” button in the “Actions” column of the selected Buyer. On the Buyer Setup page, go to the “Integrations” tab.
-3.png?hsLang=en)
The “Integrations” tab contains the following information:
- Available integrations: The list of all active integrations of the Buyer. Select one or more integrations from the list to enable.
- Available Post Call integrations: The list of all active Post Call Integrations of the Buyer. Select one or more Post Call integrations from the list to enable. Read more about Post Call Integration in this Knowledge Base article.
- Disposition Ping Back: Switch the toggle to the “ON” position to enable the Disposition Ping Back feature. Read more about the Buyer Disposition Ping Back feature in this Knowledge Base article.
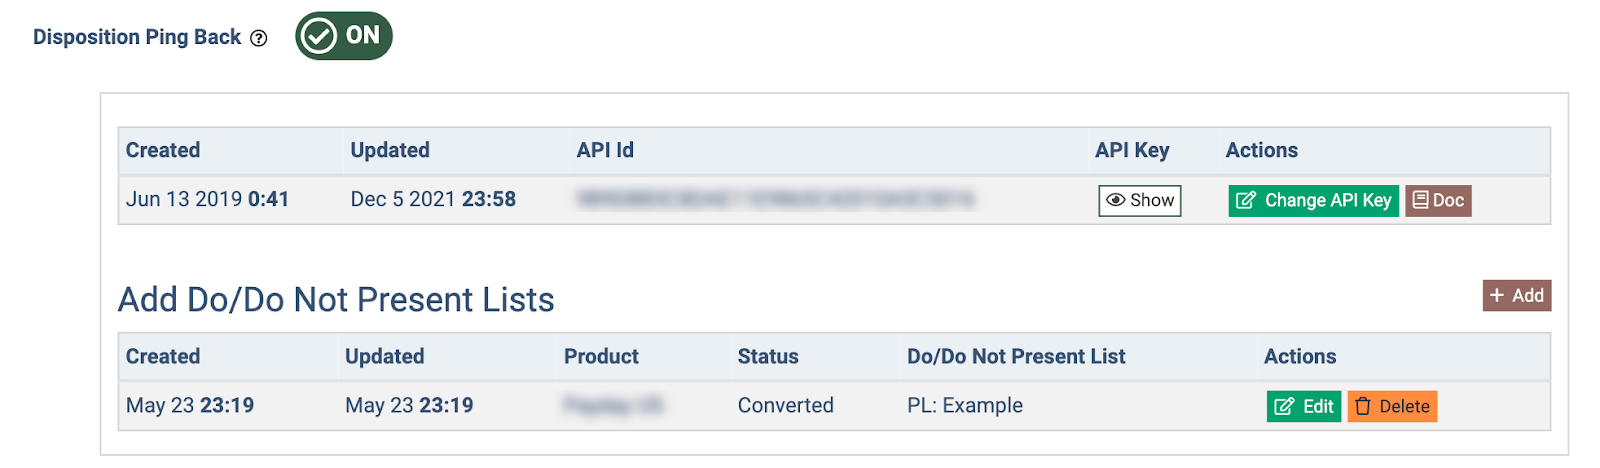
The Buyer Disposition Ping Back block contains the following information about the API Key:
- Created: The date and time of the API key creation.
- Updated: The date and time of the API key’s last update.
- API ID: The unique identification number of the API key. Note: The API ID is automatically generated by the system.
- API Key: The API Key value. Note: The API key is automatically generated by the system.
- To view the current API Key, click the “Show” button in the “API Key” column. Click the “Yes” button in the “Show API Key” pop-up window to confirm the action.
To generate a new API Key, click the “Change API Key” button and confirm the action in the pop-up window.
To view the Partner disposition setting API Documentation, click the “Doc” button. Read more about the Buyer Disposition Ping Back feature in this Knowledge Base article.
The “Add Do/Do Not Present Lists” block allows you to view, add, or delete the Present and Do Not Present Lists configuration for the Buyer, and contains the following information:
- Created: The date and time when the list was added.
- Updated: The date and time of the last update of the list.
- Product: The name of the Product.
- Status: The disposition (Converted, Bad Contact, Never Applied, Withdrawn, Pending) that triggers leads to be added or filtered out according to the Present or Do Not Present List.
- Do/Do Not Present List: The name of the Present and Do Not Present List. Read more about this feature in the Knowledge Base article.
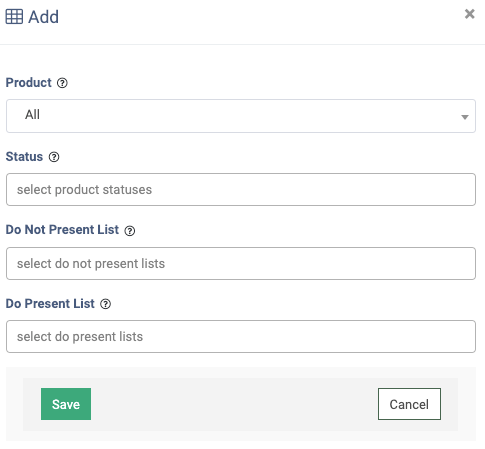
To add a new Present & Do Not Present List configuration for the Buyer, click the “Add” button and fill in the following fields:
- Product: Select the Product from the list.
- Status: Select the Lead disposition (Converted, Bad Contact, Never Applied, Withdrawn, Pending) that will trigger the leads to be added or filtered out according to the list.
- Do Not Present List: Select the DNPL to add leads to.
- Do Present List: Select the PL to add leads to.
To edit the existing Present and Do Not Present Lists configuration, click the “Edit” button in the “Actions” column. Fill in the new information in the provided fields and click the “Save” button.
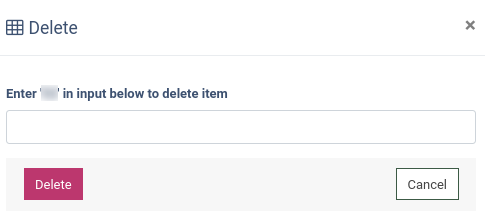
Click the “Delete” button in the “Actions” column to delete the PL/DNPL configuration and confirm the action in the pop-up window.
To enable the Global Revenue Ping Back feature, switch the “Global Revenue Ping Back” toggle to the “ON” position. Buyers that have multiple CPFs (Cost Per Funding) with enabled Revenue Postback campaigns and a large volume of leads can use a single set of credentials for all of their CPF campaigns when forming a link to update the revenue.
Within the link, the following fields will be passed: apiId, apiPassword, leadId, earning. Note: This toggle displays in the system on-demand. Improper use of this feature may result in revenue from the postback being attributed to incorrect campaigns or multiple campaigns for the same lead.
The “Global Revenue Ping Back” block contains the following information:
- Created: The date and time when API was created.
- Updated: The date and time when API was updated.
- API Id: The API identification number.
- API Password: The API password. Note: Click the “Show” button to display the password.
-3.png?hsLang=en)
To change the API password, click the “Change API Password” button in the “Actions” column.
To view the link examples, click the “Examples” button in the “Actions” column. Here, you can enable additional revenue settings for both Cost Per Acquisition (CPA) and Ping Post Call scenarios.
-3.png?hsLang=en)