- Product Fields List
- Product Field Configuration
- How to Generate a Product Schema
- How to Add a Standard Field
- How to Add an Advanced Field
- How to Add a Preset Field
To manage the settings, go to the System Management > Products section, select the Product from the list, and click the “Settings” button in the “Action” column.
Read more about the Products List section in the following Knowledge Base article.
Product Fields List
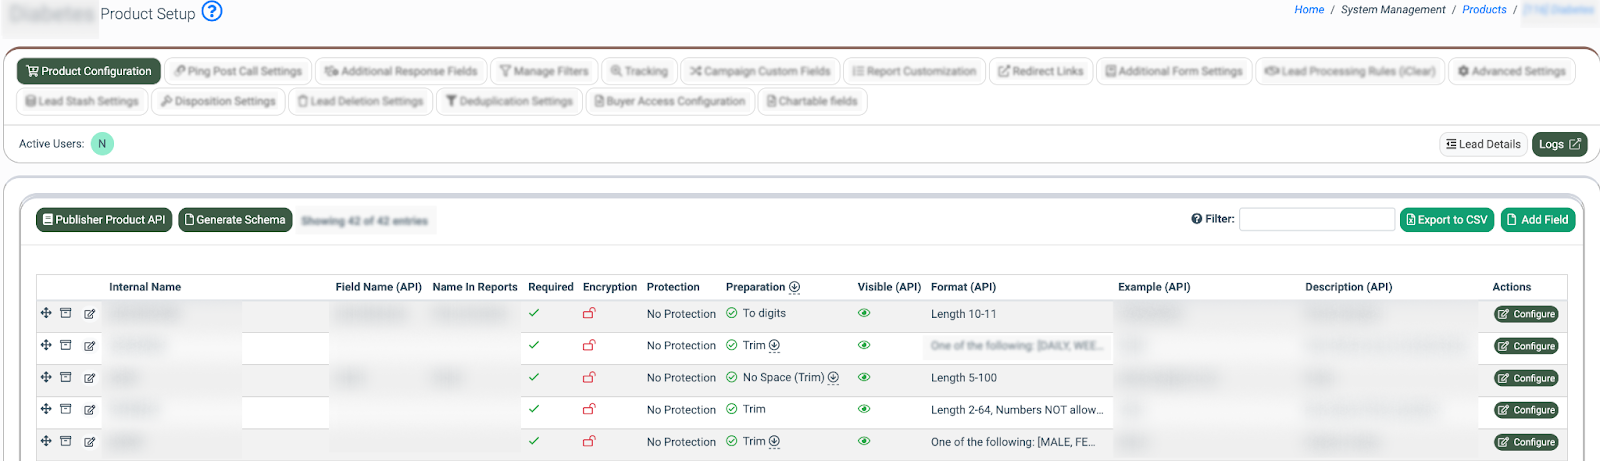
The “Product Configuration” tab contains the following information:
- Order: This field allows you to change the order of the data field. Use the drag-and-drop tool and move vertically up or down the necessary data field to change the order of the data fields in the table. Click the “Save Order” button to confirm the changes. Note: API documentation fields will be displayed according to the order at the Product Configuration tab (regardless of the setting status on/off). The API field's order in the Publisher API documentation will be the next:
- Required service fields (order not configurable).
- Fields from the Product Configuration tab.
- Optional service fields (order not configurable).
If the order is not preserved, the fields are displayed as a default.
- Internal Name: The name of the data field in the system.
- Field Name (API): The name of the field used as an API parameter and reflected in the API documentation.
- Name In Reports: The name of the field reflected in the reports and in the filters name (Lead Details (Publisher Report), Lead Details (Buyer Report), Lead Body, Search Lead (LMS Sync), Search Call (Call Logic), and Price Reject Analysis (Details tab) reports).
- Required: The indication whether the field is required or not.
- Encryption: The indication of whether the sensitive data in the field is encrypted or not.
- Protection: The preferred field protection option that secures sensitive data sent in the field.
- Preparation: The selected preparation method for the field validation.
- Visible (API): The indication of whether this field is visible in the API documentation.
- Format (API): The field value format in the API documentation.
- Example (API): The field usage example for the API documentation.
- Description (API): The field description in the API documentation.
Сlick the “Publisher Product API” button, and the system will redirect you to the section with the API documentation for the Product. Read more about the Publisher Products API in this Knowledge Base article.
Product Field Configuration
To configure the existing Product field, select the field from the list and click the “Configure” button. Manage the following fields in the pop-up window:
- Internal Name: The name of the data field in the system.
- Field Name (API): Enter the name of the field that will be used as an API parameter and reflected in the API documentation.
- Name In Reports: Enter the name of the field that will be reflected in the reports and in the filters name (Lead Details (Publisher Report), Lead Details (Buyer Report), Lead Body, Search Lead (LMS Sync), Search Call (Call Logic), and Price Reject Analysis (Details tab) reports).
- Validator: Select the field validator type. The data input in the fields is validated according to the set validation rules (available for custom Products only). Click the “Configure” button and select the type of validation in the “Configure validation” pop-up window (Default, String, Array, Range, Date, Date in future, Email, IP, ZIP Code, DOB, Phone Number).

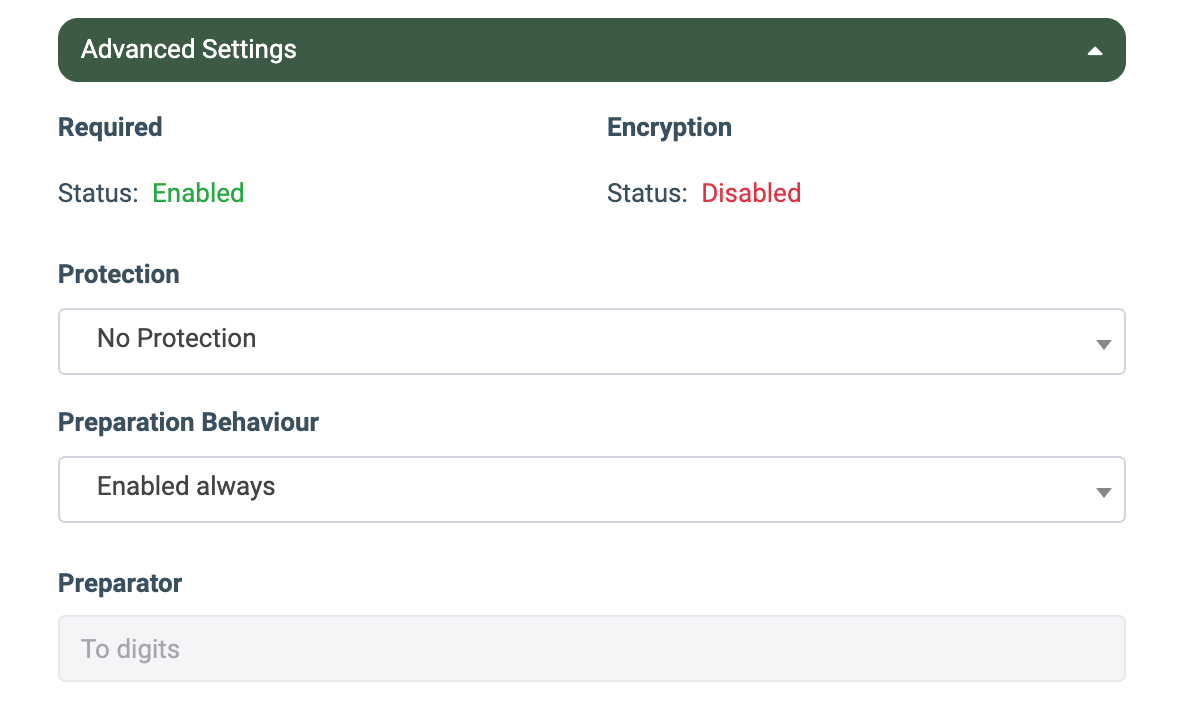
Click the “Advanced Settings” button to set additional parameters for the Product field:
- Required (Direct Post Products only): Define the field requirement settings.
- Select the “Force Required” option to make the field required. If this option is selected for the LMS component, you can set up the following parameters to make an extra field requirement dependent on the value of another selected field:
- Parent Field Dependency: Select a parent field.
- Condition Type: Select the condition type (Equal, Greater, etc).
- Condition Value: Enter the condition value.
Example: For the TestField extra field, the monthlyIncome was selected through the Parent Field Dependency. The Condition Type is set to "Greater," and the Condition Value is 1000. In this case, the TestField extra field is not required until the monthlyIncome reaches the value of 1000.
- Select the “Not Required” option to make the field non-required.
- Select the “Force Required” option to make the field required. If this option is selected for the LMS component, you can set up the following parameters to make an extra field requirement dependent on the value of another selected field:
- Ping Required (Ping-Post Products only): Define the field requirement settings on Ping.
-
- Select the “Force Required” option to make the field required.
- Select the “Not Required” option to make the field non-required.
- Post Required (Ping-Post Products only): Define the field requirement settings on Post.
- Select the “Force Required” option to make the field required.
- Select the “Not Required” option to make the field non-required.
- Encryption: Define the field encryption settings.
- Select the “Encrypted” option to encrypt the data in the field.
- Select the “No Encryption” option to leave the data unencrypted.
- Protection: The “Protection” settings allow you to protect your data from mass export. The fields are protected only within the detailed reports. Once you access a specific lead, field protection is not available. Select the preferred field protection option from the drop-down list to secure sensitive data sent in the field.
- Preparator Behaviour: Specify the priority of data passed through the preparator.
- Enabled Always: The data from the preparator is always passed through this parameter.
- Only if Empty: The preparator value is passed only if the parameter is empty or absent.
- Disabled Always: The preparator data is not processed at all.
- Preparator: Select the preferred way of data processing for this field from the drop-down list.
- Trim: The option removes the blank spaces from the received information. Example: “ trim ” > “trim”
- To digits: The option transforms the received information only into numerical data. Example: “12345abc” > “12345”.
- String to upper: The option converts received information into the upper-case letters. Example: “string” > “STRING”.
- YMD: The option converts received information into YMD format (year, month, date).
- Email: The option checks if the entered email is valid.
- Postcode: The option for the ZIP code input. The received information is converted into the postcode according to the selected area (US or UK).
- Canadian Postal Code: The option for the ZIP code input. The received information is converted into the postcode according to the Canadian area.
- Alias for Product Field: The option allows you to pull the value from another existing field of the Product for this exact field.
- Count non-empty fields (for LMS Products only): The option counts every non-empty field.
- Get city from zip: The option for the ZIP code input. The received information is converted into the City value, assuming that no other value has been passed to this Extra Field.
- Get State from zip: The option for the ZIP code input. The received information is converted into the State value, assuming that no other value has been passed to this Extra Field.
- Get zip from phone number: The option for the phone number input. The received information is converted into the ZIP value, assuming that no other value has been passed to this Extra Field.
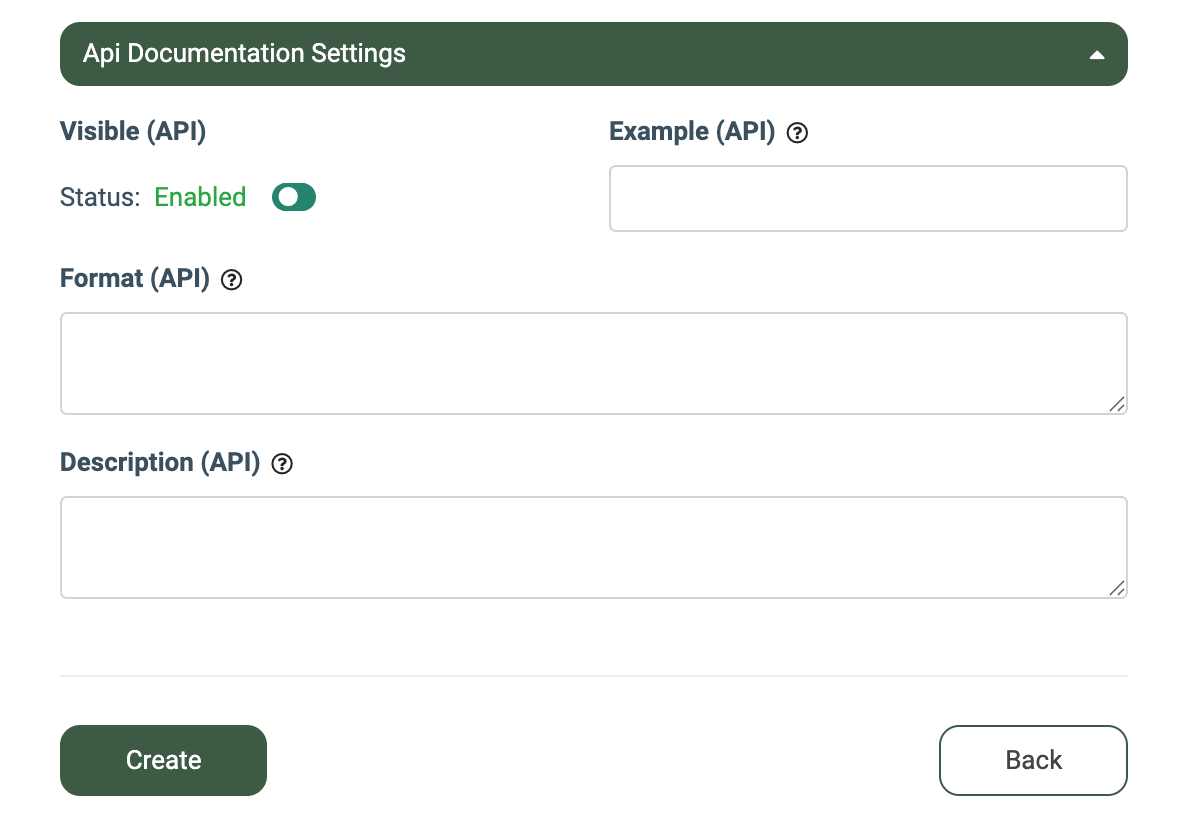
Press the “API Documentation Settings” button and fill in the following fields to add the set of parameters to the API:
- Visible (API) (optional): Select the preferred visibility option of the field in the API documentation (Not Visible / Visible). Note: The default configuration is set as “Visible”.
- Format (API): Add the format example for the field that will be displayed in the API documentation.
Examples: Numeric only, 10-11 digits long; One of the following: [YES, NO]. - Example (API): Add the usage example for the field that will be displayed in the API documentation.
- Description (API): Add the description of the field that will be displayed in the API documentation.
Click the “Save” button to confirm.
How to Generate a Product Schema
To export the JSON definition of the product schema displayed in the ongoing tab, along with the request and response structures in the JSON file, click the “Generate Schema” button. The system will generate a JSON file and give you an option to download it.
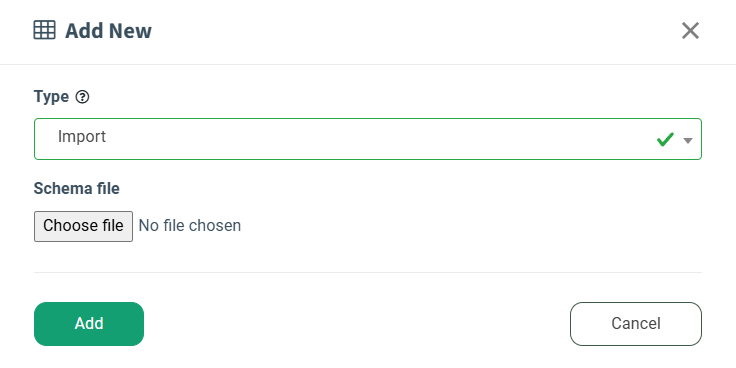
To import the downloaded product schema for further usage during the integration building process, go to the Client Management > Setup > Integration Builder section, and click the “Add New Record” button.
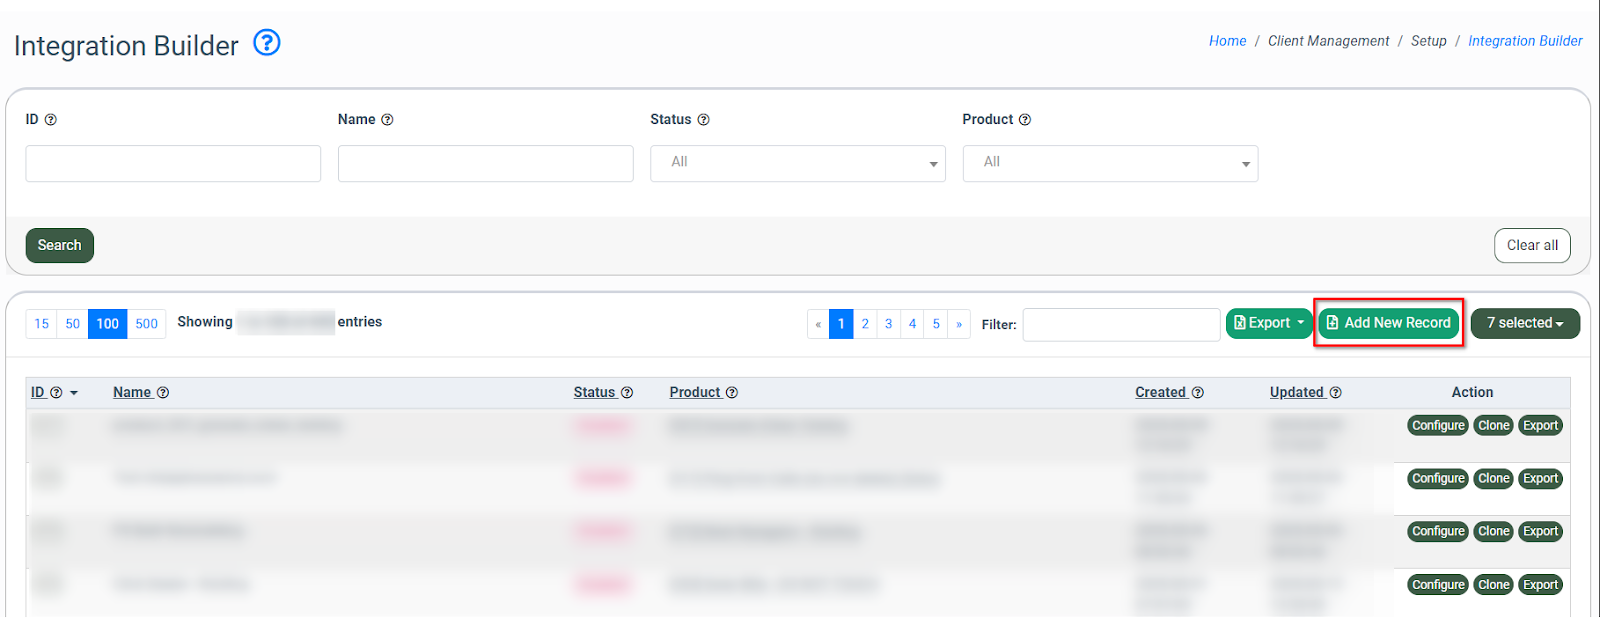
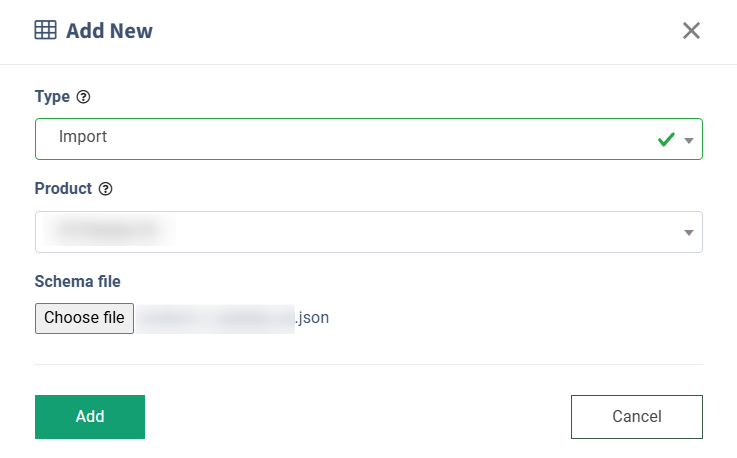
Select the “Import” option in the “Type” field, select and upload the corresponding JSON file in the “Schema file” field of the “Add New” pop-up window. Once the file is uploaded and appears in the pop-up window, select the product for the integration building in the “Product” field.
Click the “Add” button to complete the action.
Once the import process is completed, a new integration with the name that matches the imported file name will be created. The corresponding definition of the schema, the request/response structures, and all the fields and their mappings will be added to the created integration automatically.
Read more information about the Integration Builder section in the following Knowledge Base article.
How to Add a Standard Field
Note: This is a pre-built system field. Limited customization available.
To add a standard field, click the “Add Field” button and choose the “Add Standard Field” option in the pop-up window.

Fill in the following fields according to your preference:
- Field Type: Select the type of the field (Email, Phone, State, ZIP, Age, Date, Year, Yes/No, Integer, String, Big String).
- Field Name (API): Enter the field name for API.
- Name In Reports: Enter the name of the field that will be reflected in the reports and in the filter names.
- Validator: Select the type of field based on which data will be validated according to the set rules:
- String: The field type for the string data input. Fill in the “Min line length” and “Max line length” to determine the accepted string length.
- Array: The values validation will be based on the list of accepted values. Fill in the “Comma-separated list of valid arguments (ex.: option_1, option_2, option_3)” field to list all the values separated by commas.
- Range: Enter the range of values using the “Min value” and “Max value” fields.
- Date: The field type for the date input. The validator checks if the date is valid.
- Date in the future: The field type for the future date input only. The validator checks if the future date is valid. If the provided date is earlier than the next date, the lead can not be sold.
- Email: The field type for the email input.
- IP: The field type for the IP address input. Select the preferred option (IPv4 + IPv6 / IPv4 / IPv6) from the “Available IP Address Format” drop-down list.
- ZIP Code: The field type for the ZIP code input. Select the preferred option (ZIP Code / UK Post Code) from the “ZIP Code format” drop-down list.
- DOB: The date of birth input field.
- Phone Number: The field type for the phone number input. Select the preferred option (US Phone Number with Country Code / UK Phone Number with Country Code) from the “Phone Number Format” drop-down list.
- State/Province: The field type for the State or Province input.

Click the “Advanced Settings” button to set additional parameters for the new standard field:
- Required: Switch the toggle to change the “Required” status of the field (Enabled / Disabled).
- Field Protection: The “Field Protection” settings allow you to protect your data from mass export. The fields are protected only within the detailed reports. Once you access a specific lead, field protection is not available. Select the preferred field protection option from the drop-down list to secure sensitive data sent in the field.
- Filter: Switch the toggle to change the “Filter” status of the field (Enabled / Disabled).
- Preparation Behaviour: Specify the priority of data passed through the preparator.
- Enabled Always: The data from the preparator is always passed through this parameter.
- Only if Empty: The preparator value is passed only if the parameter is empty or absent.
- Disabled Always: The preparator data is not processed at all.

Press the “API Documentation Settings” button and fill in the following fields to add the set of parameters to the API:
- Visible in API (optional): Select the preferred visibility option of the field in the API documentation (Enabled / Disabled). Note: The default configuration is set as “Enabled”.
- Example (API): Add the usage example for the field that will be displayed in the API documentation.
- Description (API): Add the description of the field that will be displayed in the API documentation.

Click the “Save” button to confirm.
How to Add an Advanced Field
To add a custom field to the Product, click the “Add Field” button and choose the “Add Advanced Field” option in the pop-up window.

Fill in the following fields according to your preference:
- Internal Name: Enter the name of the field.
- Name In Reports: Enter the name of the field that will be reflected in the reports and in the filter names.
- Validator: Select the type of field based on which data will be validated according to the set rules:
-
- String: The field type for the string data input. Fill in the “Min line length” and “Max line length” to determine the accepted string length.
- Array: The values validation will be based on the list of accepted values. Fill in the “Comma-separated list of valid arguments (ex.: option_1, option_2, option_3)” field to list all the values separated by commas.
- Date: The field type for the date input. The validator checks if the date is valid.
- Date in the future: The field type for the future date input only. The validator checks if the future date is valid. If the provided date is earlier than the next date, the lead can not be sold.
- Email: The field type for the email input.
- IP: The field type for the IP address input. Select the preferred option (IPv4 + IPv6 / IPv4 / IPv6) from the “Available IP Address Format” drop-down list.
- ZIP Code: The field type for the ZIP code input. Select the preferred option (ZIP Code / UK Post Code) from the “ZIP Code format” drop-down list.
- DOB: The date of birth input field. Select one of the available advanced fields from the "Age field (DOB calculated)" drop-down list to record the calculated age according to the provided DOB value.
Note: The advanced fields are available in the list only if they are not required and have an active status, the "Integer" field type, and the "Range" validator are selected.
-
- Phone Number: The field type for the phone number input. Select the preferred option (US Phone Number with Country Code / UK Phone Number with Country Code) from the “Phone Number Format” drop-down list.
- State/Province: The field type for the State or Province input.

Click the “Advanced Settings” button to set additional parameters for the new advanced field:
Note: You can not make changes in preset fields except the “Is Required”, “Visible in API”, and “Description of API” settings.
- Field type: Select the field data type (String / Integer / Float number / Boolean / Json / Reference).
- Is required (Direct Post Products only): Define the field requirement settings.
- Select the “Force Required” option to make the field required. If this option is selected for the LMS component, you can set up the following parameters to make an advanced field requirement dependent on the value of another selected field:
- Parent Field Dependency: Select a parent field.
- Condition Type: Select the condition type (Equal, Greater, etc).
- Condition Value: Enter the condition value.
- Select the “Force Required” option to make the field required. If this option is selected for the LMS component, you can set up the following parameters to make an advanced field requirement dependent on the value of another selected field:
Example: For the TestField advanced field, the monthlyIncome was selected through the Parent Field Dependency. The Condition Type is set to "Greater," and the Condition Value is 1000. In this case, the TestField advanced field is not required until the monthlyIncome reaches the value of 1000.
-
- Select the “Not Required” option to make the field non-required.
- Ping Required (Ping-Post Products only): Define the field requirement settings on Ping.
- Select the “Force Required” option to make the field required.
- Select the “Not Required” option to make the field non-required.
- Post Required (Ping-Post Products only): Define the field requirement settings on Post.
- Select the “Force Required” option to make the field required.
- Select the “Not Required” option to make the field non-required.
- Encryption: Define the field encryption settings.
- Select the “Encrypted” option to encrypt the data in the field.
- Select the “No Encryption” option to leave the data unencrypted.
- Field Protection: The “Field Protection” settings allow you to protect your data from mass export. The fields are protected only within the detailed reports. Once you access a specific lead, field protection is not available. Select the preferred field protection option from the drop-down list to secure sensitive data sent in the field.
- Preparator Behaviour: Specify the priority of data passed through the preparator.
- Enabled Always: The data from the preparator is always passed through this parameter.
- Only if Empty: The preparator value is passed only if the parameter is empty or absent.
- Disabled Always: The preparator data is not processed at all.
- Preparation: The “Preparation” settings allow you to prepare the received information for validation. Select the preferred way of data processing for this field from the drop-down list.
- Trim: The option removes the blank spaces from the received information. Example: “ trim ” > “trim”
- To digits: The option transforms the received information only into numerical data. Example: “12345abc” > “12345”.
- String to upper: The option converts received information into the upper-case letters. Example: “string” > “STRING”.
- YMD: The option converts received information into YMD format (year, month, date).
- Email: The option checks if the entered email is valid.
- Postcode: The option for the ZIP code input. The received information is converted into the postcode according to the selected area (US or UK).
- Canadian Postal Code: The option for the ZIP code input. The received information is converted into the postcode according to the Canadian area.
- Alias for Product Field: The option allows you to pull the value from another existing field of the Product for this exact field.
- Count non-empty fields (for LMS Products only): The option counts every non-empty field.
- Get city from zip: The option for the ZIP code input. The received information is converted into the City value, assuming that no other value has been passed to this Advanced Field.
- Get State from zip: The option for the ZIP code input. The received information is converted into the State value, assuming that no other value has been passed to this Advanced Field.
- Get zip from phone number: The option for the phone number input. The received information is converted into the ZIP value, assuming that no other value has been passed to this Advanced Field.

Press the “+Add Filter” button and fill in the following fields to add a new filter option:
- Name: Enter the name of the filter.
- Type: Select the preferred filter type:
- Integer value: Allows you to assign the value properties.
- Select from list: Allows you to add a filter with the drop-down selection.
- Radio-buttons: Allows you to add a filter with the radio-button selection.
- Checkbox group: Allows you to add a filter with the checkbox selection.
- Starts with: Filters out the lead if the field for which the filter is set starts with the specified input.
- Starts with one of: Filters out the lead, if the field for which the filter is set starts with one of the specified inputs.
- Does not start with one of: Filters out the lead, if the field for which the filter is set does not start with one of the specified inputs.
- Is empty: Filters out the lead if the field for which the filter is set passes an empty value.
- Is non-empty: Filters out the lead if the field for which the filter is set is not empty.
- Is empty (Ignore Ping): Filters out the lead if the field for which the filter is set passes an empty value. This option ignores the ping (Ping-Post Products only).
- Is non-empty (Ignore Ping): Filters out the lead if the field for which the filter is set is not empty. This option ignores the ping (Ping-Post Products only).
- Comma-separated numbers: Allows you to list the numerical data using commas.
- Comma-separated text: Allows you to list the data using commas.
- Integer value (min): Enter the minimum value length allowed for the filter.
- Integer value (max): Enter the maximum value length allowed for the filter.
- Is none of: Filters out the lead, if the field for which the filter is set does not start with one of the specified inputs.
- Description: Enter the filter description.

Press the “API Documentation Settings” button and fill in the following fields to add the set of parameters to the API:
- Visible (API) (optional): Select the preferred visibility option of the field in the API documentation (Not Visible / Visible). Note: The default configuration is set as “Visible”.
- Format (API): Add the format example for the field that will be displayed in the API documentation.
Examples: Numeric only, 10-11 digits long; One of the following: [YES, NO]. - Example (API): Add the usage example for the field that will be displayed in the API documentation.
- Description (API): Add the description of the field that will be displayed in the API documentation.
Click the “Create” button to confirm.

How to Add a Preset Field
Preset Fields are predefined extra fields for service values such as jornayaLeadId and trustedFormURL. These fields are created automatically for Products that do not yet have the corresponding fields configured.
When a custom Product is created, lead posting may not be configured immediately. Preset Fields allow you to add and configure these service fields in advance so the Product is ready before traffic begins.
To add special service fields (Trusted Form URL, Jornaya Lead ID, iClaim Session ID, etc.) as extra fields for the Product, click the “Add Field” button and choose the “Add Preset Field” option in the pop-up window.-3.png?width=668&height=297&name=unnamed%20(73)-3.png)
Make a selection in the “Add Field” pop-up window and click the “Add” button.
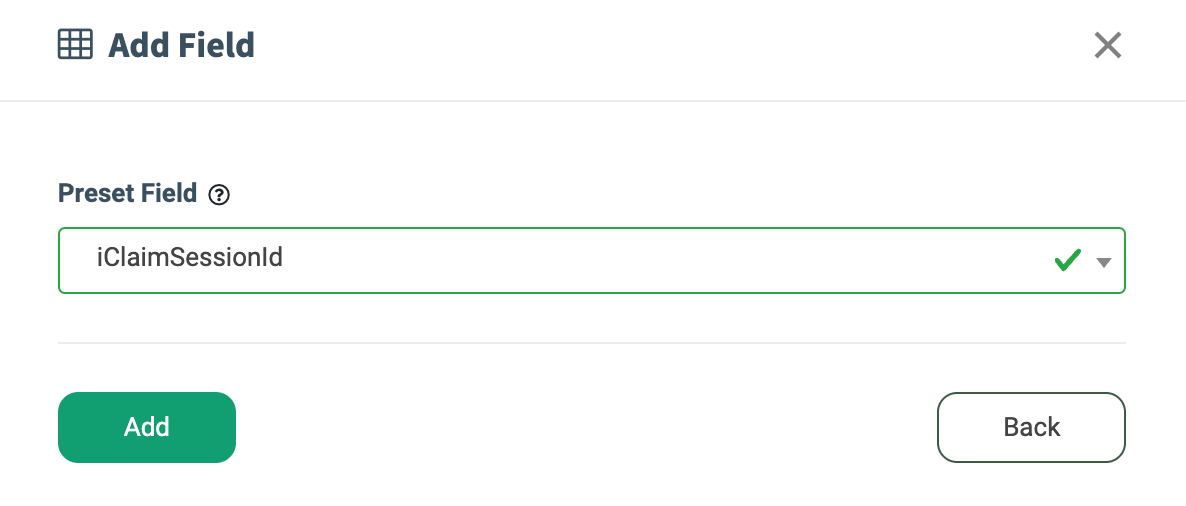
Note: Preset fields are available only for custom products. Once the preset fields are added, they can not be edited or deleted. If all available preset fields are added, the "No more preset fields available" pop-up window will be displayed.