IVR blocks are the building elements of an IVR flow. Each block represents a specific action or decision point, such as playing an audio message, collecting user input, routing a call, or integrating with external systems. By combining these blocks, you can design customized call flows that guide callers through various options and automate call handling.
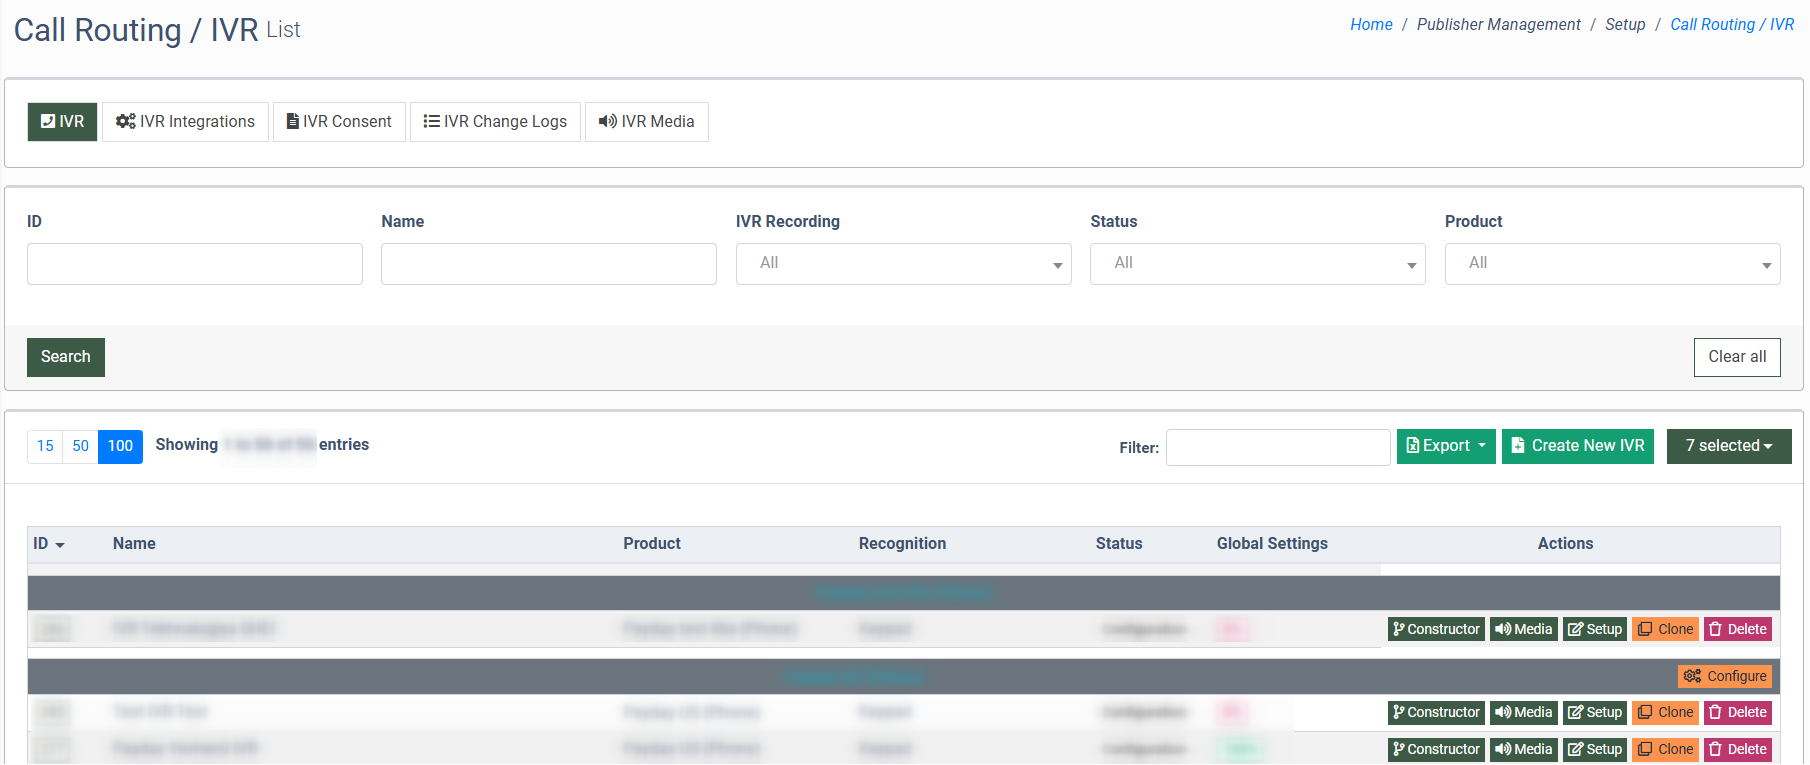
To create a new IVR schema or edit the existing one, go to the Publisher Management > Setup > Call Routing / IVR section, and click the "Constructor" button or the "Create New IVR" button accordingly.
Read about the “Call Routing / IVR” section in the Knowledge Base article.
The list of available blocks
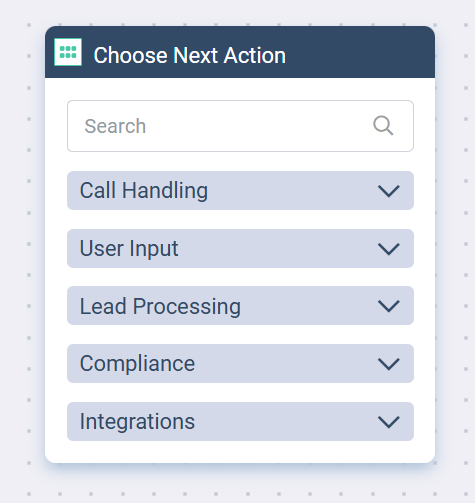
The available IVR blocks are split between the following categories:
- Call Handling
- User Input
- Lead Processing
- Compliance
- Integrations
- Compliance & ntegrations
To view the list of available blocks, select the category and click the expand button to open the collapsible section.
To search for the particular block by its name, enter the corresponding name of the block in the “Search” field.
The following blocks are available for the corresponding categories:
- Call Handling section
- The “Intro” block (available only for Call Logic)
- The “Play Audio” block
- The “Hangup Rejection Message” block
- The “Route to IVR” block
- The “Go To Block” block
- The “Transfer To” block (available only for Cloud PBX)
- The “Time Schedule” block
- The “Date Schedule” block (available only for Cloud PBX)
- The “Returning Caller” block (available only for Call Logic)
- The “Speech Composer” block (available only for Call Logic)
- The “AI Agents” block (available only for Call Logic)
- User Input section
- The “User’s Input” block (available only for Call Logic)
- The “User’s Consent” block
- The “Callback Requests” block
- The “IVR Branching” block
- The “Constant Input” block (available only for Call Logic)
- The “Voice-to-Operator Routing” block (available only for Cloud PBX)
- Lead Processing section (available only for Call Logic)
- Compliance section (available only for Call Logic)
- Integrations section (available only for Call Logic)
- Compliance & Integrations section (available only for Cloud PBX)
The “Intro” Block
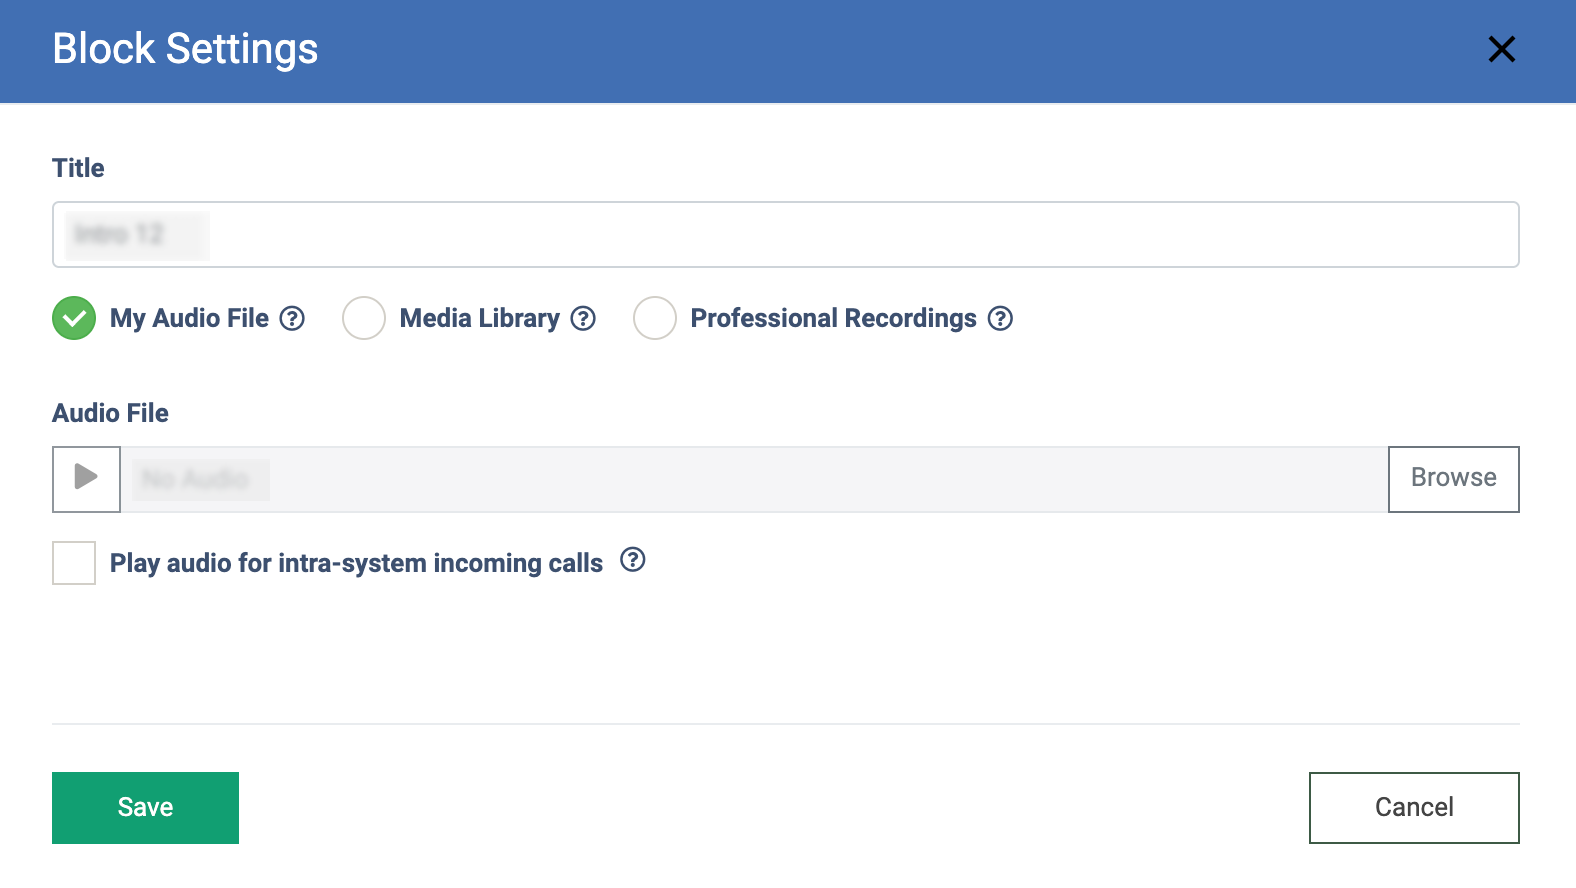
The “Intro” block allows you to play a greeting message in the IVR flow. The default greeting audio will be assigned to every phone number registered in the system. To set up the block with the default greeting audio file, click the “Block Settings” button (the button with the “Gear” icon) and enter the block name in the “Title” field.
Select the “My Audio File” radio button to upload the audio file, and upload the file in the “Audio File” field. To play audio for incoming calls from another Phonexa instance, check the “Play audio for intra-system incoming calls” box.
Click the “Save” button to complete the settings.
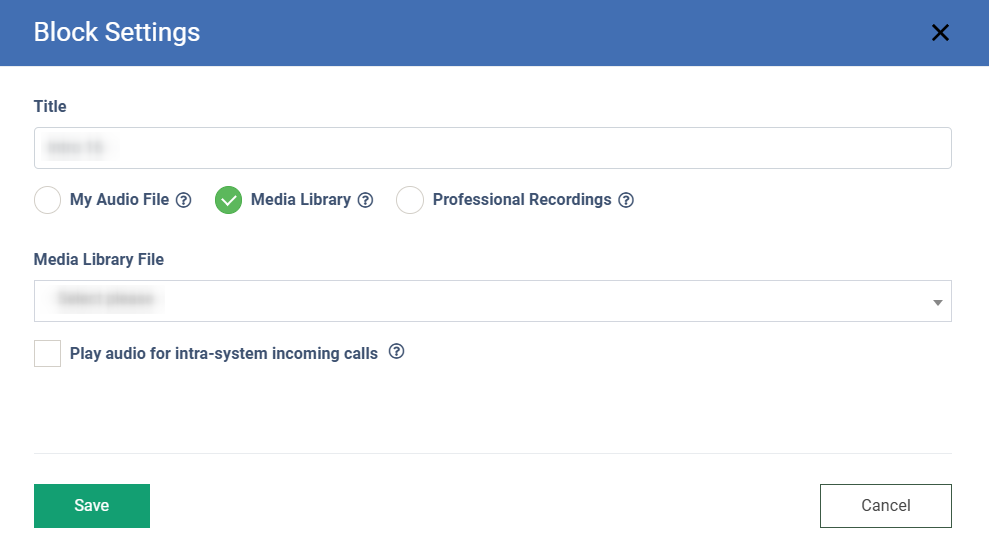
Select the “Media Library” radio button to select the file from the available in the Media Library in the “Media Library” field. To play audio for incoming calls from another Phonexa instance, check the “Play audio for intra-system incoming calls” box.
Click the “Save” button to complete the settings.
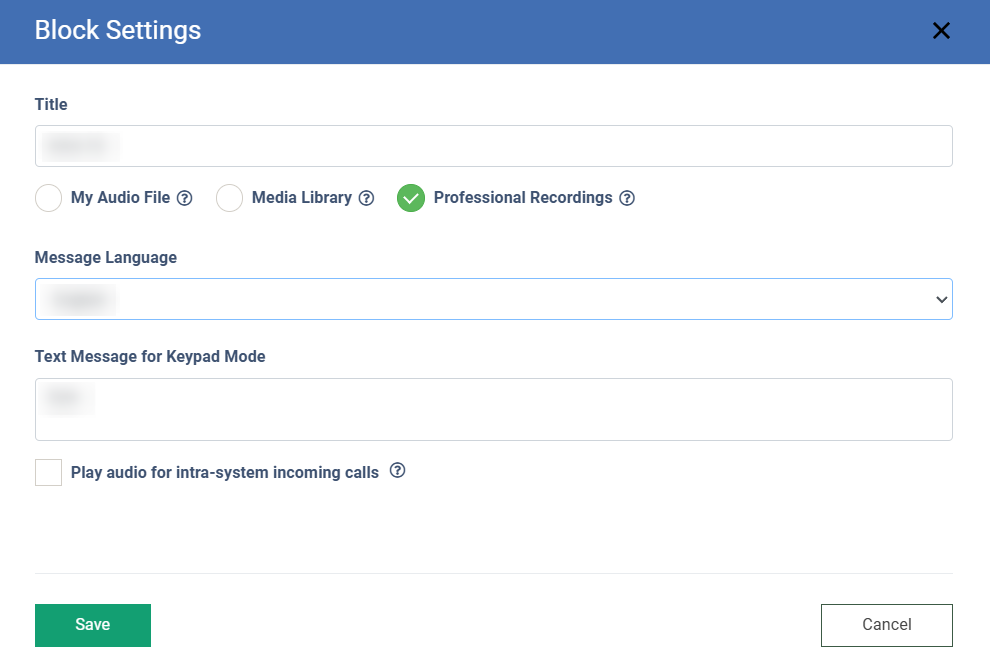
To delegate the audio file creation to professional artists, select the “Professional Recordings” radio button. Select the record language in the “Message Language” field and enter the text to voice-over in the “Text Message for Keypad Mode” field.
Click the “Save” button to complete the settings.
The “Play Audio” Block
The “Play Audio” block is used to play pre-recorded messages or audio prompts to the caller within the IVR flow. It can be utilized to provide information, instructions, or notifications before directing the caller to the next step in the IVR.
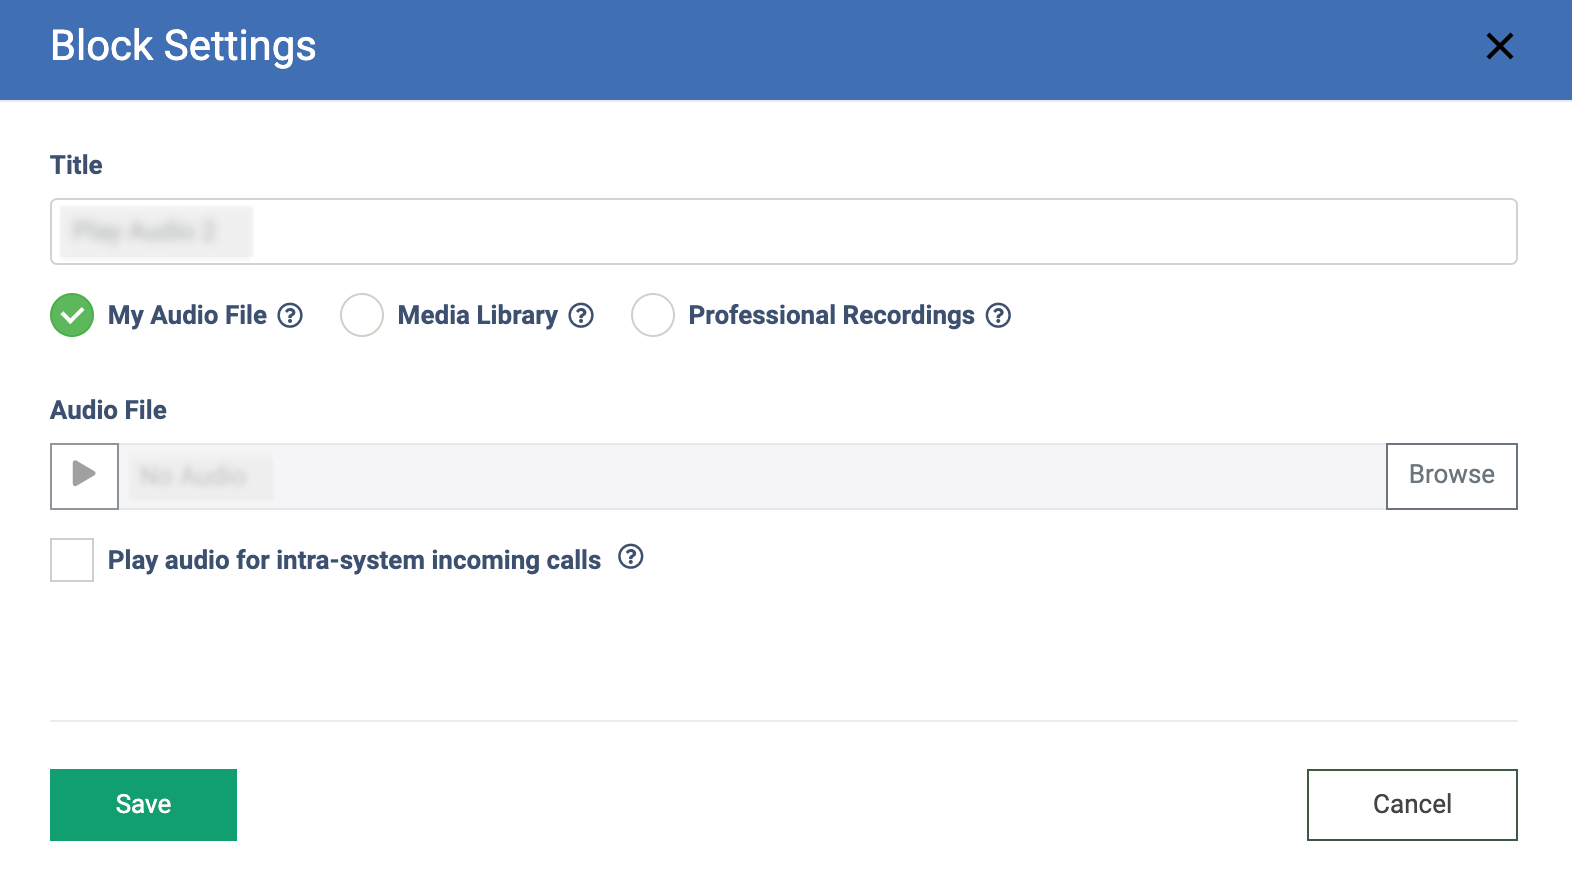
To set up the block, click the “Block Settings” button (the button with the “Gear” icon) and enter the block name in the “Title” field.
Select the “My Audio File” radio button to upload an audio file, and upload the file in the “Audio File” field. To play audio for incoming calls from another Phonexa instance, check the “Play audio for intra-system incoming calls” box.
Click the “Save” button to complete the settings.
Select the “Media Library” radio button to select the file from the available in the Media Library in the “Media Library File” field. To play audio for incoming calls from another Phonexa instance, check the “Play audio for intra-system incoming calls” box.
Click the “Save” button to complete the settings.
To delegate audio file creation to professional artists, select the “Professional Recordings” radio button. Select the record language in the “Message Language” field and enter the text to voice-over in the “Text Message for Keypad Mode” field.
Click the “Save” button to complete the settings.
The “Hangup Rejection Message” Block
The “Hangup Rejection Message” block is used to play a final message to the caller before disconnecting the call. It is typically used when a call cannot be processed, such as due to invalid input, unavailable services, or restricted access. The default rejection message will not be played when the “Hangup Rejection Message” block is used. The default rejection message can be set in the “Product Settings” section > the “Advanced Settings” tab > the “Audio file for call rejection” field.
It is not allowed to add any other blocks after the “Hangup Rejection Message” block.
To set up the block, click the “Block Settings” button (the button with the “Gear” icon), and enter the block name in the “Title” field.
Select the “My Audio File” radio button to upload an audio file, and upload the file in the “Audio File” field. To play audio for incoming calls from another Phonexa instance, check the “Play audio for intra-system incoming calls” box.
Click the “Save” button to complete the settings.
Select the “Media Library” radio button to select the file from the available in the Media Library in the “Media Library File” field. To play audio for incoming calls from another Phonexa instance, check the “Play audio for intra-system incoming calls” box.
Click the “Save” button to complete the settings.
To delegate the audio file creation to professional artists, select the “Professional Recordings” radio button. Select the record language in the “Message Language” field and enter the text to voice-over in the “Text Message for Keypad Mode” field.
Click the “Save” button to complete the settings.

The “Route to IVR” Block
The “Route to IVR” block is used to transfer the caller from the current IVR flow to another IVR flow. This block helps in structuring complex call flows by routing callers to specific flows based on their selections or predefined rules, ensuring a seamless and guided experience. The “Route to IVR” block can distribute calls by the product. When switching to IVR in the same product, it transfers to a new IVR without creating a new call. When switching to a different product's IVR, the unit initiates call termination on the current IVR product and "creates" a new call to the new product. As a result, there will be two leads in Lead Details.
To set up the block, click the “Block Settings” button (the button with the “Gear” icon), enter the block name in the “Title” field, and select the IVR in the “Go to IVR” field.
Click the “Save” button to complete the settings.

The “Go To Block” Block
The “Go To Block” block allows the lead to get back to any preselected block within the IVR flow. It acts as a navigation tool, allowing the call to jump from the current point to another step or menu without executing intermediate steps. This block helps optimize call flows, reduce duplication, and simplify IVR design by reusing existing menus or logic paths.
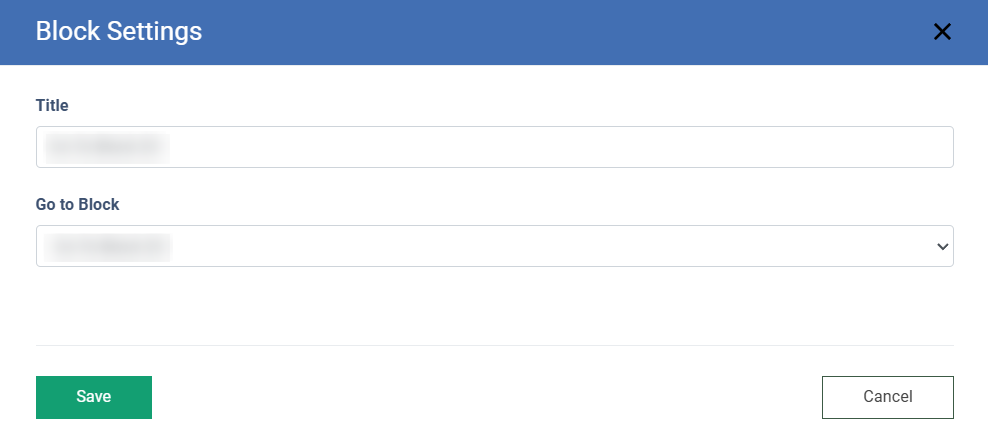
To set up the block, click the “Block Settings” button (the button with the “Gear” icon), enter the block name in the “Title” field, select the block the call should be transferred to in the “Go to Block” field, and click the “Save” button to complete the settings.
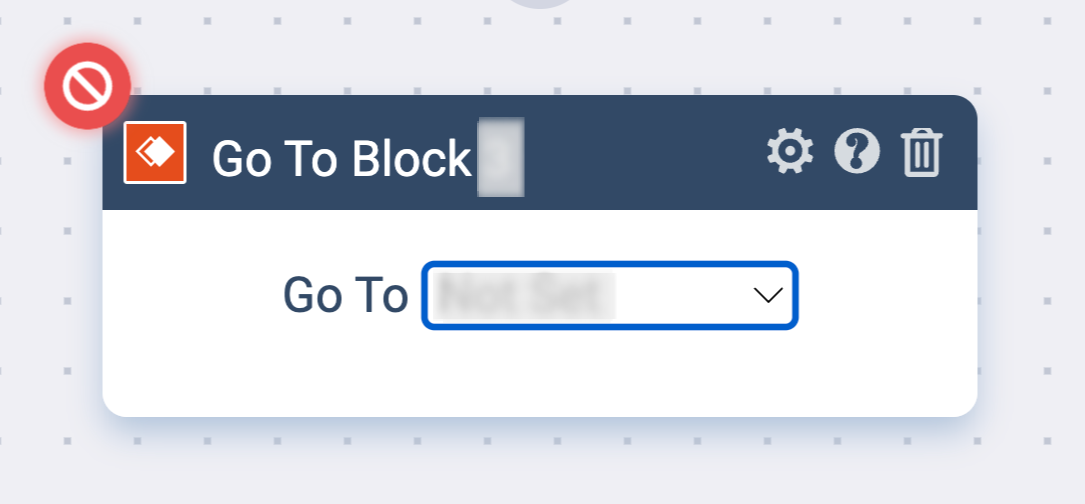
You can also select the block for the call transfer in the “Go To” field of the block directly in the IVR constructor section without opening the “Block Settings” pop-up.
The “Transfer To” Block
The “Transfer To” block allows you to set the transfer for the call to an external phone number, Queue, SIP Trunk, Operator, or Voicemail Box. To manage this block, click the “Block Settings” button (the button with the “Gear” icon) and fill in the following fields in the “Block Settings” pop-up window:
- Title: Enter the name of the block.
- Transfer To: Select the entity to which the call should be transferred (Call Campaign, External Phone, Queue, SIP trunk, Operator, Voicemail Box). Depending on the selected option, the following fields are available:
- Campaign: Select the Call Campaign.
- External Phone: Enter the external phone number.
- Queue: Select the Queue.
- SIP trunks: Select the SIP Trunk.
- Trunk number: Enter the SIP Trunk number.
- Operator: Select the Operator.
- Voicemail Box: Select the Voicemail Box.
- Timeout, sec: Enter the timeout for the call transfer.
Click the “Save” button to complete the settings.
![]()
The “Time Schedule” Block
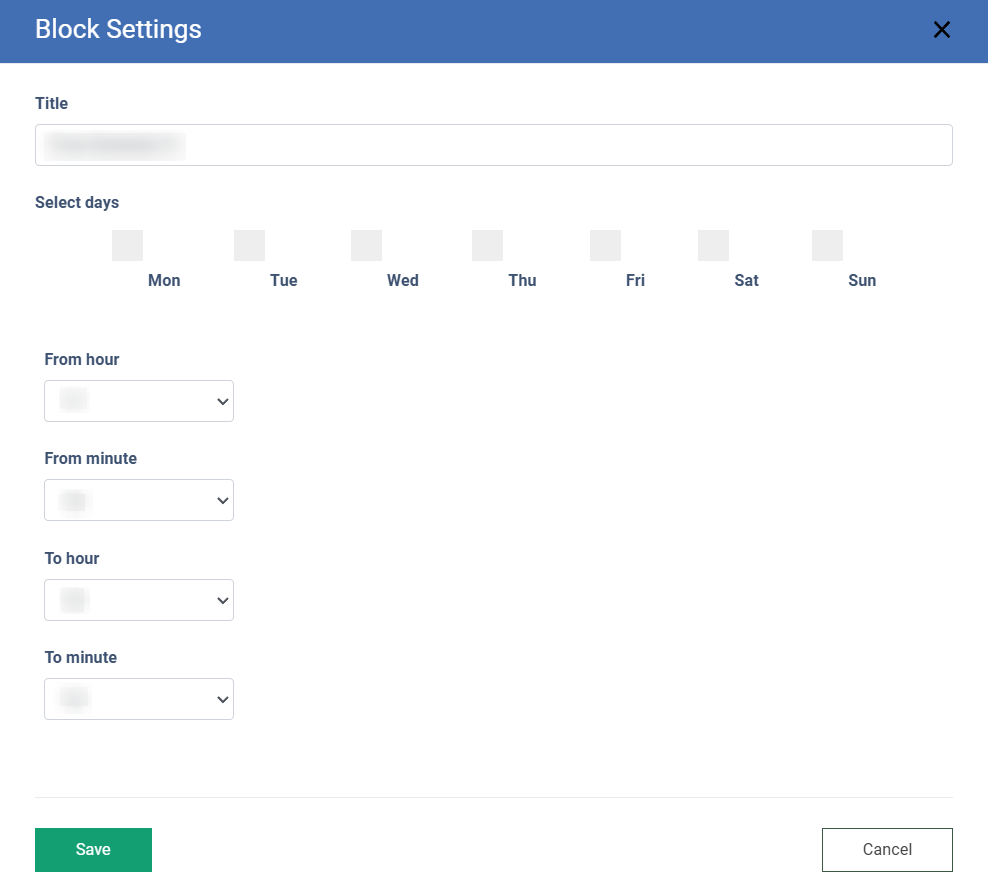
The “Time Schedule” block allows you to transfer the call to the corresponding branch depending on the set time limitations and ranges. To set the branching in case the call reaches the block in the time range set in the limitations, click the “IN” button, then click the “Block Settings” button (the button with the “Gear” icon), check the boxes with the corresponding days of the week in the “Select Days” field, and set the from/to limitations for hours and minutes in the “From hour”, “From minute”, “To hour”, “To minute” fields in the “Block Settings” pop-up window. To set the branching in case the call reaches the block out of the set time range limitations, click the “OUT” button.
Click the “Save” button to complete the settings.
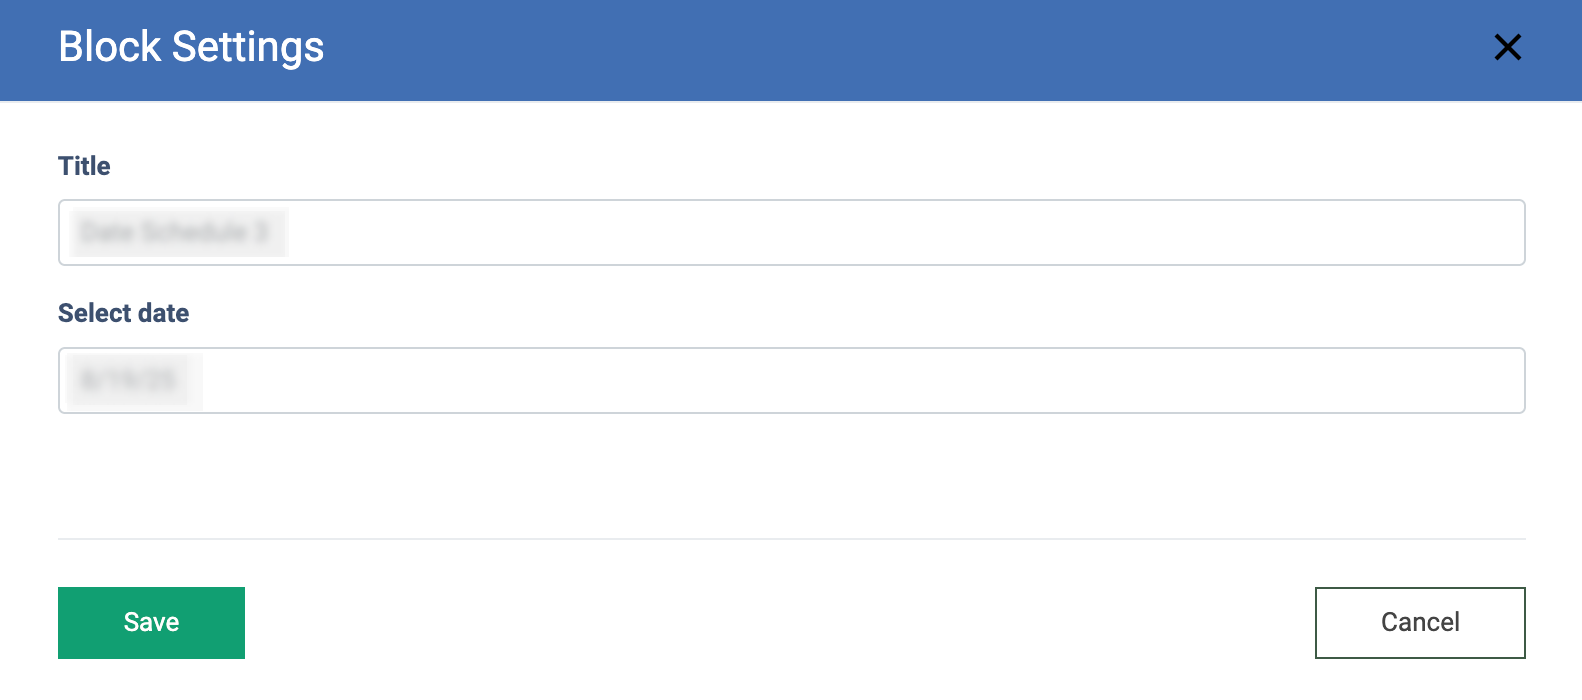
The “Date Schedule” Block
The “Date Schedule” block allows you to transfer the call to the corresponding branch depending on the set particular date limitation. To set the branching in case the call reaches the block in the date range set in the limitations, click the “IN” button, then click the “Block Settings” button (the button with the “Gear” icon), and select the particular date in the “Select date” field in the “Block Settings” pop-up window. To set the branching in case the call reaches the block outside the set particular date limitations, click the “OUT” button. Click the “Save” button to complete the action.
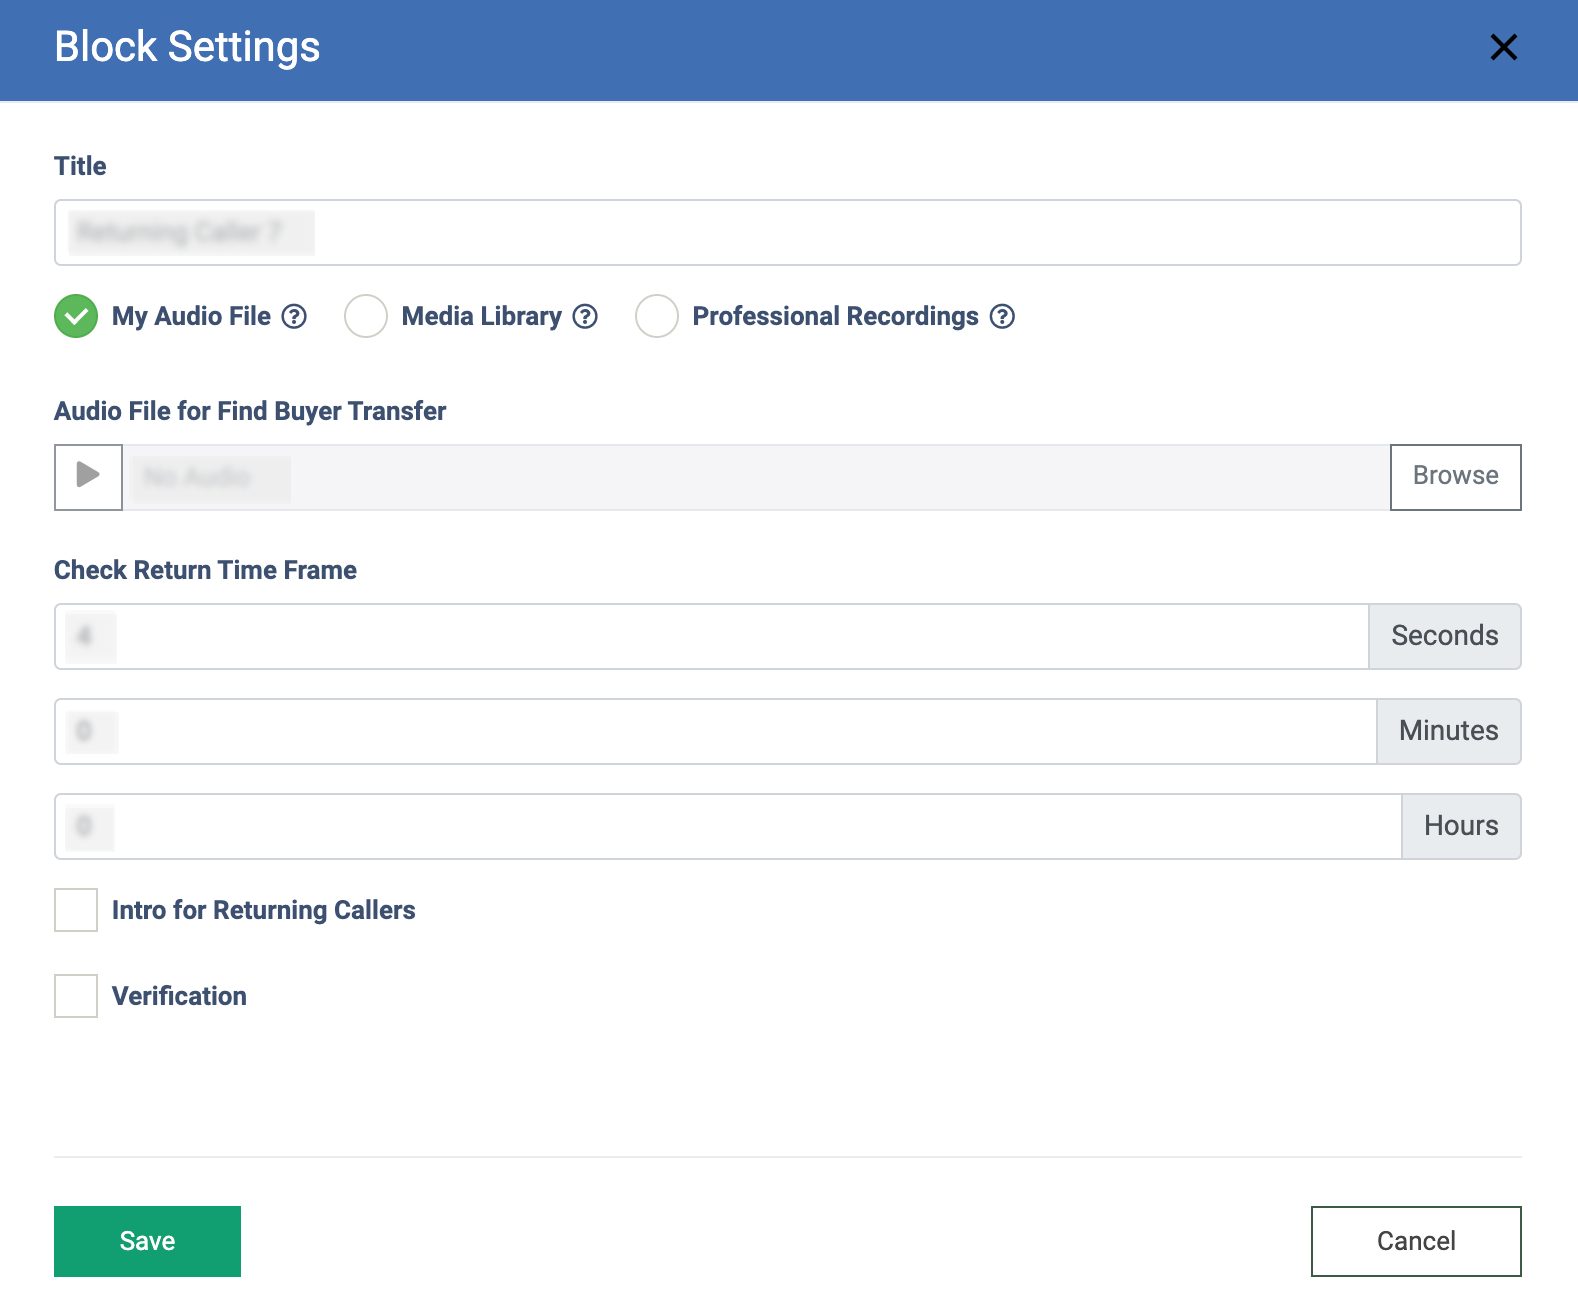
The “Returning Caller” Block
The “Returning Caller” block allows you to route a returning caller back to where they left off during the previous call if the lead calls back within the set timeframe.
To set up the block, click the “Block Settings” button (the button with the “Gear” icon) and fill in the following fields:
- Title: Enter the name of the block.
- Audio File for Find Buyer Transfer: If the lead was transferred to the buyer during the previous call, the Returning Caller block would navigate the lead back to the Find Buyer block. To set up an audio message for the Find Buyer block for returning callers, you may upload a custom audio file (select the “My Audio File'' radio button), select the file from the available in the Media Library (select the“Media Library” button), or delegate the audio file creation to professional recording artists. To do it, select the “Professional Recordings'' radio button, then select the record language in the “Message Language'' field and enter the text to voice over in the “Text Message for Keypad Mode” field.
- Check Return Time Frame: Set the time frame to check if the lead was called before by entering seconds, minutes, and/or hours in the corresponding fields.
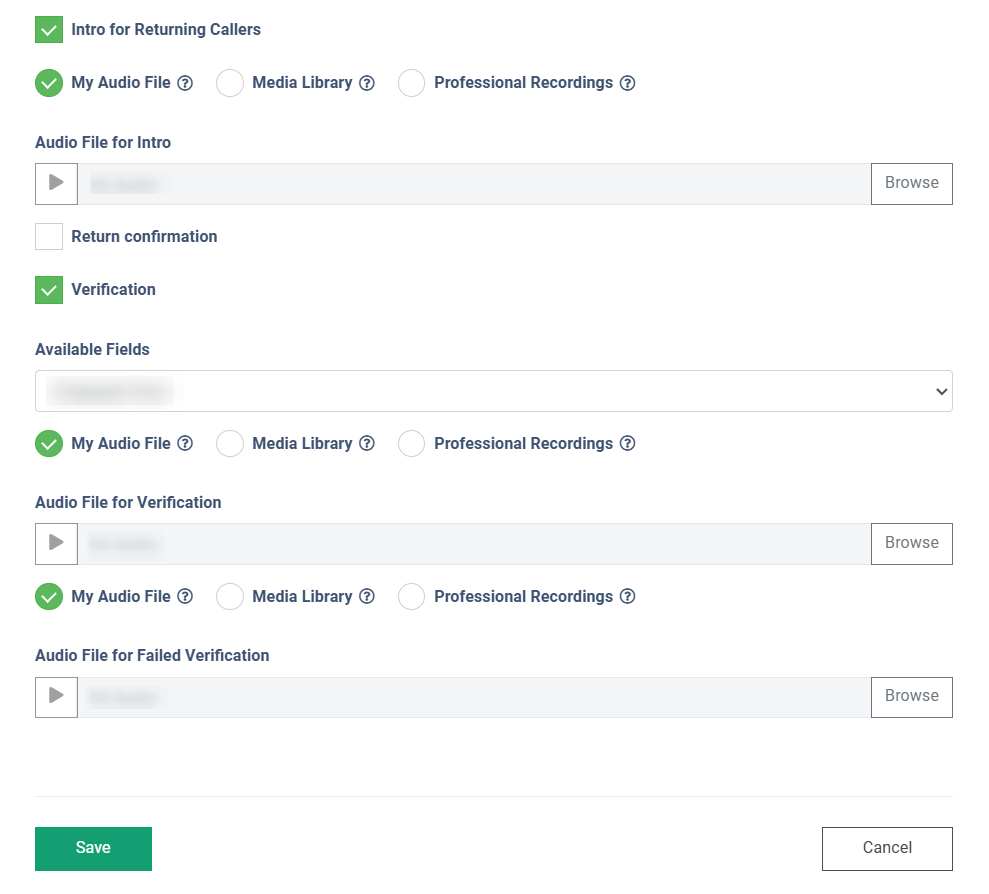
- Intro for Returning Callers: Check the box to play a custom intro audio message for returning callers.
- Audio File for Intro: Upload a custom intro audio file. You may upload a custom audio file (select the “My Audio File'' radio button), select the file from the available in the Media Library (select the“Media Library” button), or delegate the audio file creation to professional recording artists. To do it, select the “Professional Recordings'' radio button, then select the record language in the “Message Language'' field and enter the text to voice over in the “Text Message for Keypad Mode” field.
- Return confirmation: Check the box to turn the intro into the YES/NO logic block and let a caller decide to either continue from where they’d left the call or start over. If this box is checked, the intro audio message should be phrased to support the YES/NO logic, e.g., “Welcome back! If you want to continue answering questions, say YES or press one, otherwise say No or press 2”. Note: This setting is optional.
- Verification: Check the box to ask callers to verify their identity.
- Available Field: Select the field for identity verification, e.g., SSN, year of birth, etc. It should be information that callers provide on the first steps of the IVR, so when they call back, there is data to check against to verify their identity.
- Audio File for Verification: Upload an audio file for verification. You may upload a custom audio file (select the “My Audio File'' radio button), select the file from the available in the Media Library (select the“Media Library” button), or delegate the audio file creation to professional recording artists. To do it, select the “Professional Recordings'' radio button, then select the record language in the “Message Language'' field and enter the text to voice over in the “Text Message for Keypad Mode” field.
- Audio File for Failed Verification: Upload an audio message to be played if the verification is failed. You may upload a custom audio file (select the “My Audio File'' radio button), select the file from the available in the Media Library (select the“Media Library” button), or delegate the audio file creation to professional recording artists. To do it, select the “Professional Recordings'' radio button, then select the record language in the “Message Language'' field and enter the text to voice over in the “Text Message for Keypad Mode” field.
Click the “Save” button to complete the settings.
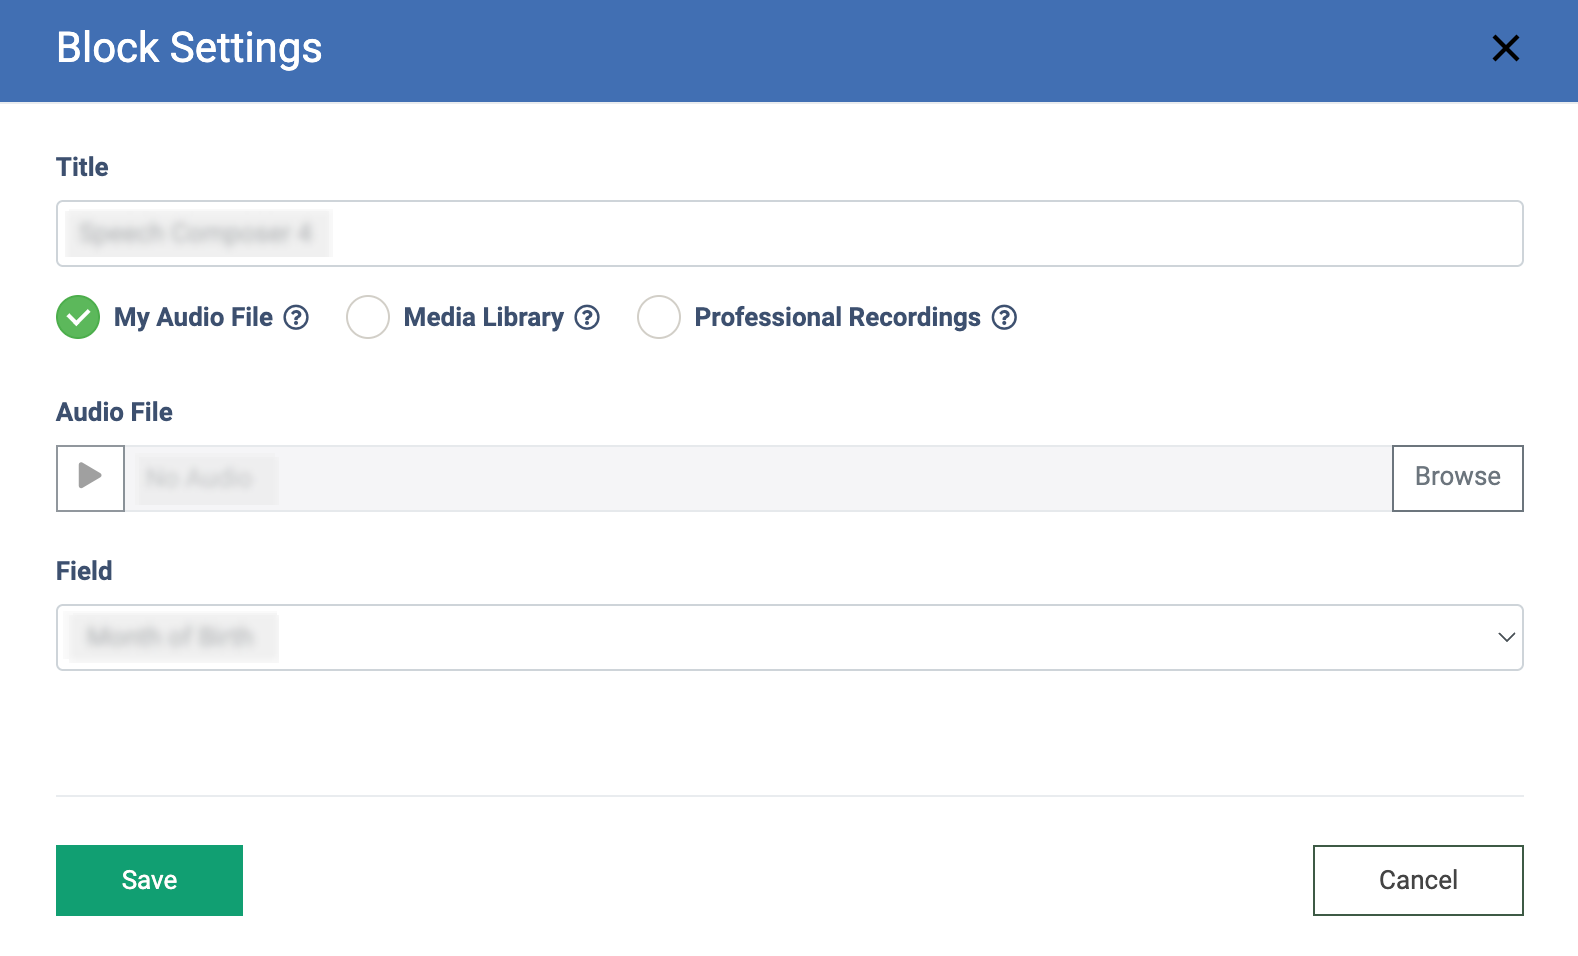
The “Speech Composer” Block
The “Speech Composer” block allows you to verbally relay specific information to a caller from the particular lead field, similar to how a CAPTCHA system works.
Note that the corresponding “Lead Stash” block should be added before the ongoing block, and the data for playback should be available.
The example of the block workflow: The information from the particular lead field should be played back to the caller as the confirmation code in case the lead is found in the Lead Stash. As soon as the call reaches the corresponding Lead Stash block, and the system is able to find the particular lead according to the set search criteria, the call is transferred to the “Speech Composer” block, where the specific lead field, data from which should be played back to the caller, is set. The block plays an intro audio message and afterwards provides the data from the particular lead field verbally to the caller.
To set up the block, click the “Block Settings” button (the button with the gear icon) and fill in the following fields:
- Title: Enter the name of the block.
- My Audio File / Media Library / Professional Recordings: Upload a custom audio file, select the file from the list available in the library, or delegate audio file creation to professional artists. When selecting the “Professional Recordings” radio button, the additional fields will appear.
- Message Language: Select the record language.
- Text Message for Keypad Mode: Enter the text for voice-over.
- Field: Select the field from which the confirmation code (data for the confirmation code) will be obtained.
Click the “Save” button to complete the settings.
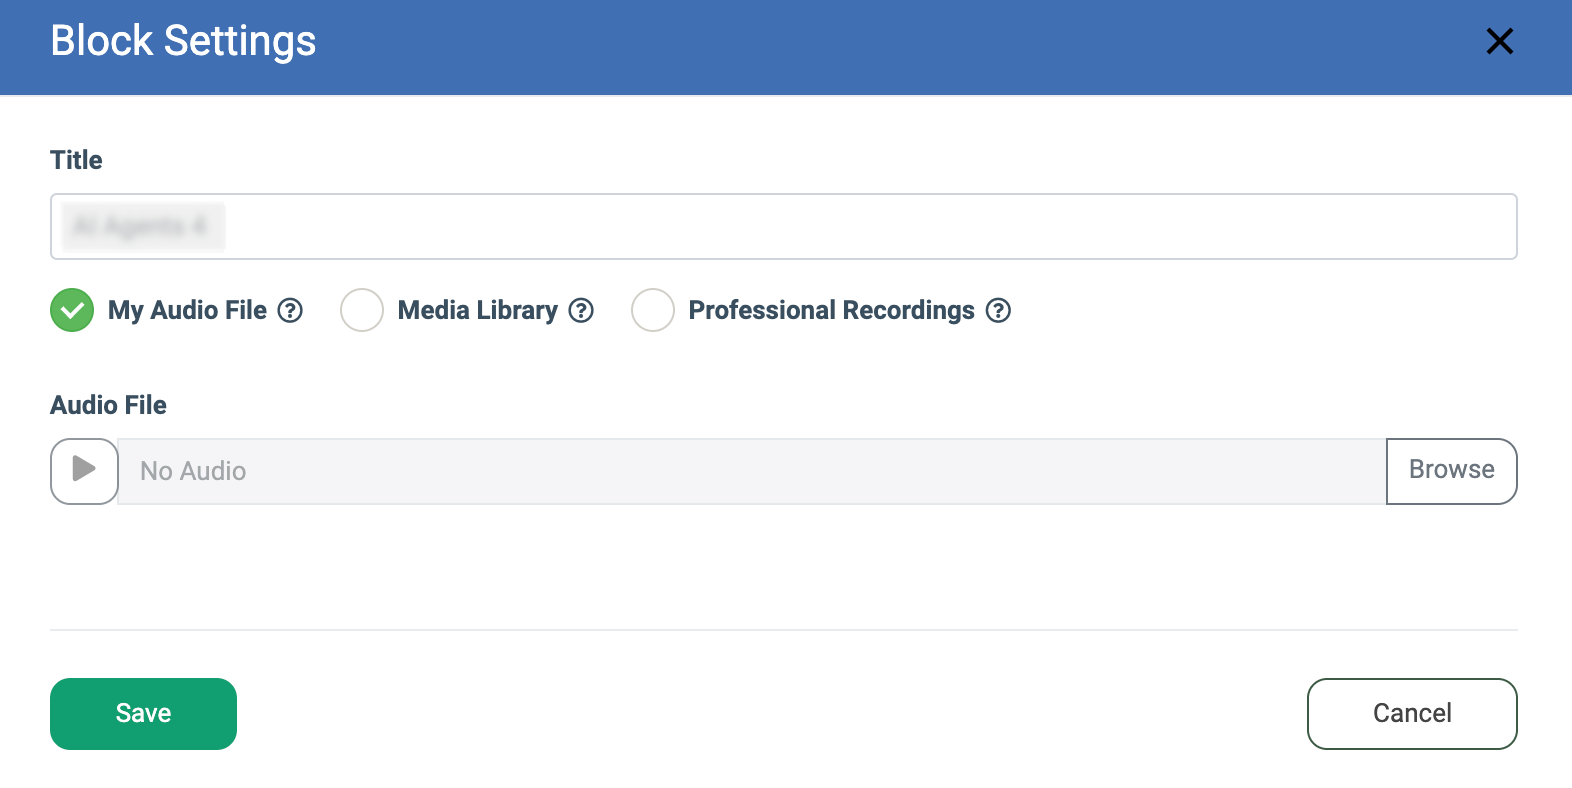
The “AI Agents” block
Voice AI Agents for IVR systems are intelligent, speech-enabled software designed to automate and enhance voice-based customer interactions. Powered by advanced technologies like natural language processing (NLP), speech recognition, and machine learning, these agents can understand, interpret, and respond to spoken language in a natural, conversational way.
The “AI Agents” block within the IVR constructor allows you to setup and manage embed call processing, including the creation of the questions list that the client can ask the system, a voice input feature for the specific field using predefined questions, the transmission of the client’s data to the Lead Stash, and the logging of the AI call processing results in the Lead Info.
Read more about the AI Agents feature and the corresponding IVR block configuration in the following Knowledge Base article.
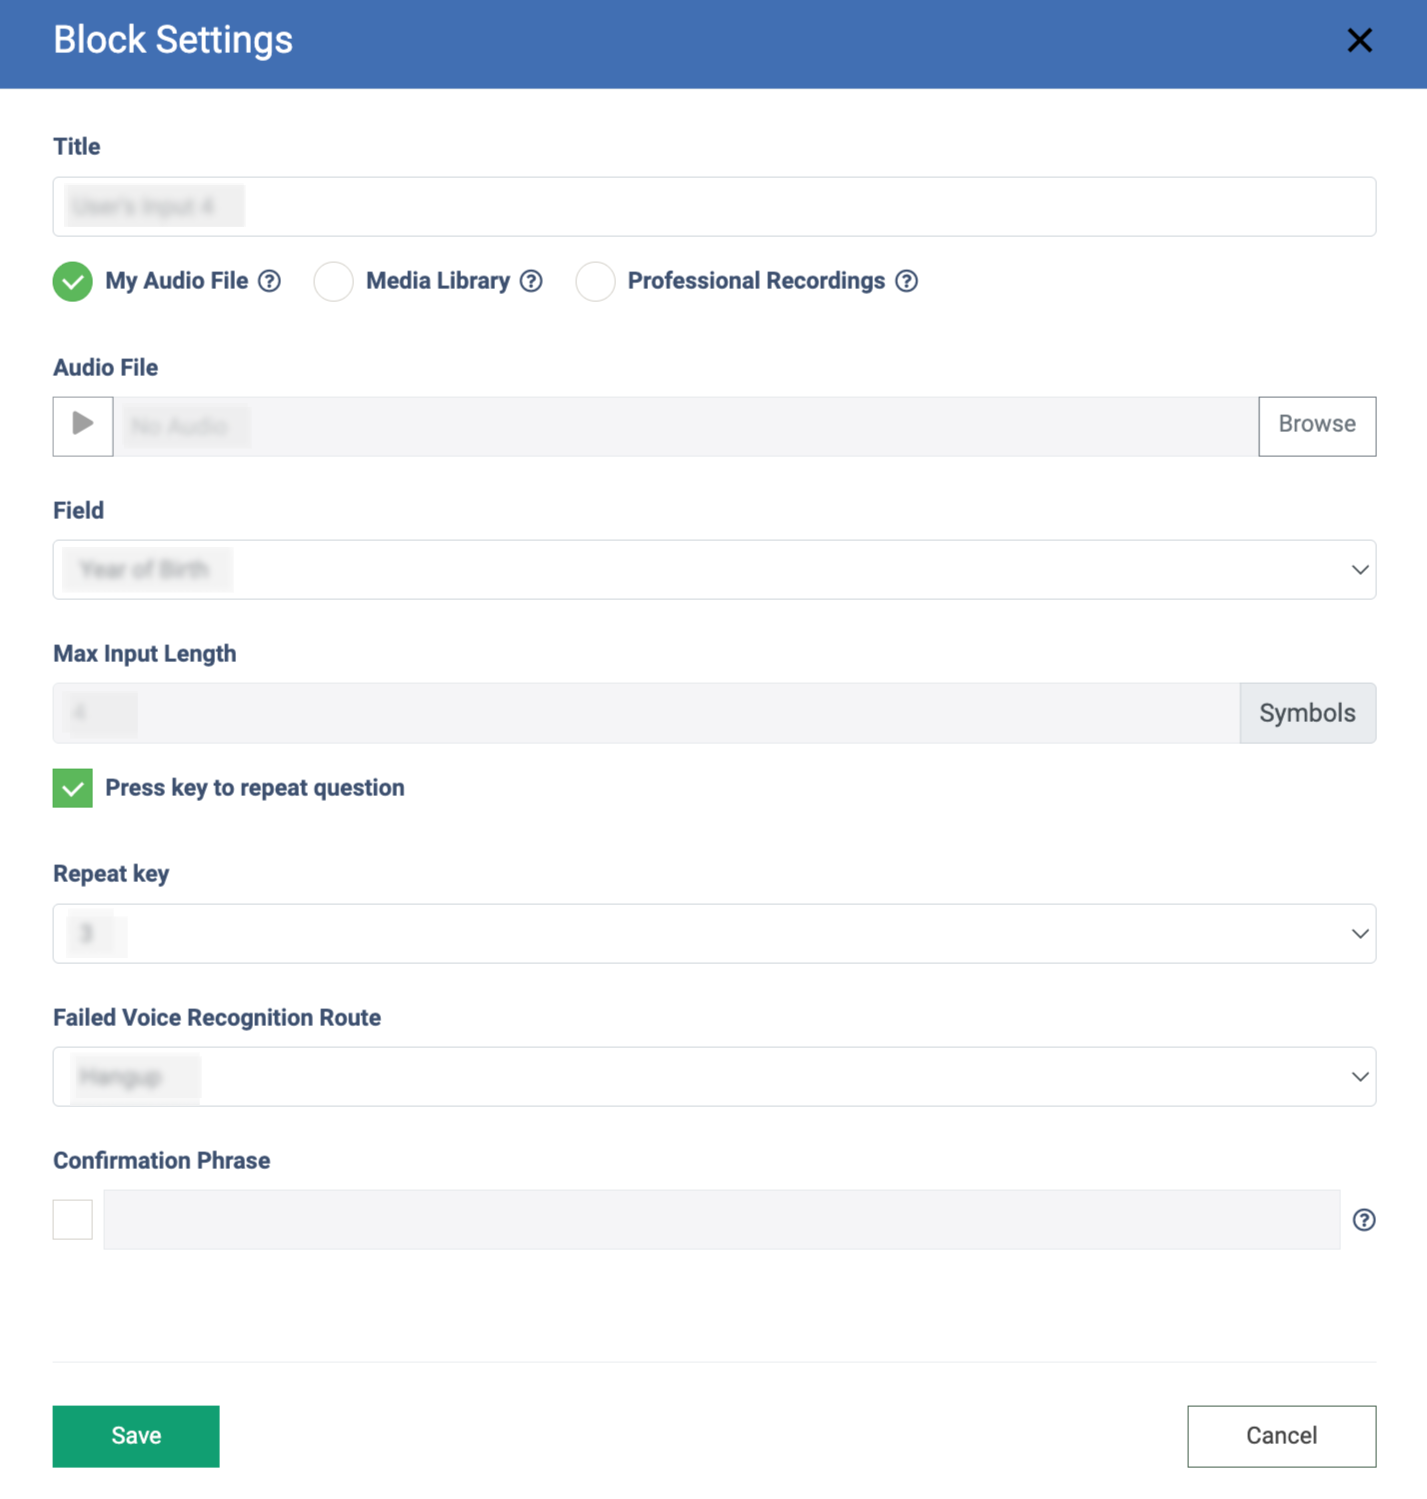
The “User's Input” Block
The “User's Input” block is used to capture input from the caller by collecting data based on predefined fields, which can then be used to route the call, trigger actions, and more.
To set up the block, click the “Block Settings” button (the button with the “Gear” icon) and fill in the following fields:
- Title: Enter the block name.
- My Audio File / Media Library / Professional Recordings: The corresponding radio button allows you to upload a custom audio file, select audio from default IVR messages, or delegate audio file creation to professional artists. When selecting the “Professional Recordings” radio button, the additional fields will appear.
- Message Language: Select the record language.
- Text Message: Enter the text to voice-over.
- Field: Select the corresponding field.
- Max Input Length: Enter the number of expected characters (if required).
- Press key to repeat question: Check the box to play the message twice.
- Repeat key: Select the key that should be pressed to repeat the user’s input attempt.
- Failed Voice Recognition Route: Select the action for the system if the system fails to recognize the answer (available for the Voice Recognition + Keypad recognition type):
- Hangup: Select to hang up the call.
- Go To Block: Select to forward the call to another IVR block.
- Go to Block: Select the block for the system to forward the call if the voice recognition fails. Note: Available blocks to forward the call, in this case, are “Find Buyer”, “Go to Campaign”, and “Go to IVR”.
- Confirmation Phrase: Check the box when confirmation is required. Enter the phrase next to it. Use the keyword *value* as a placeholder for a recognized value. E.g., “Did you mean *value*?.”
Click the “Save” button to complete the settings.
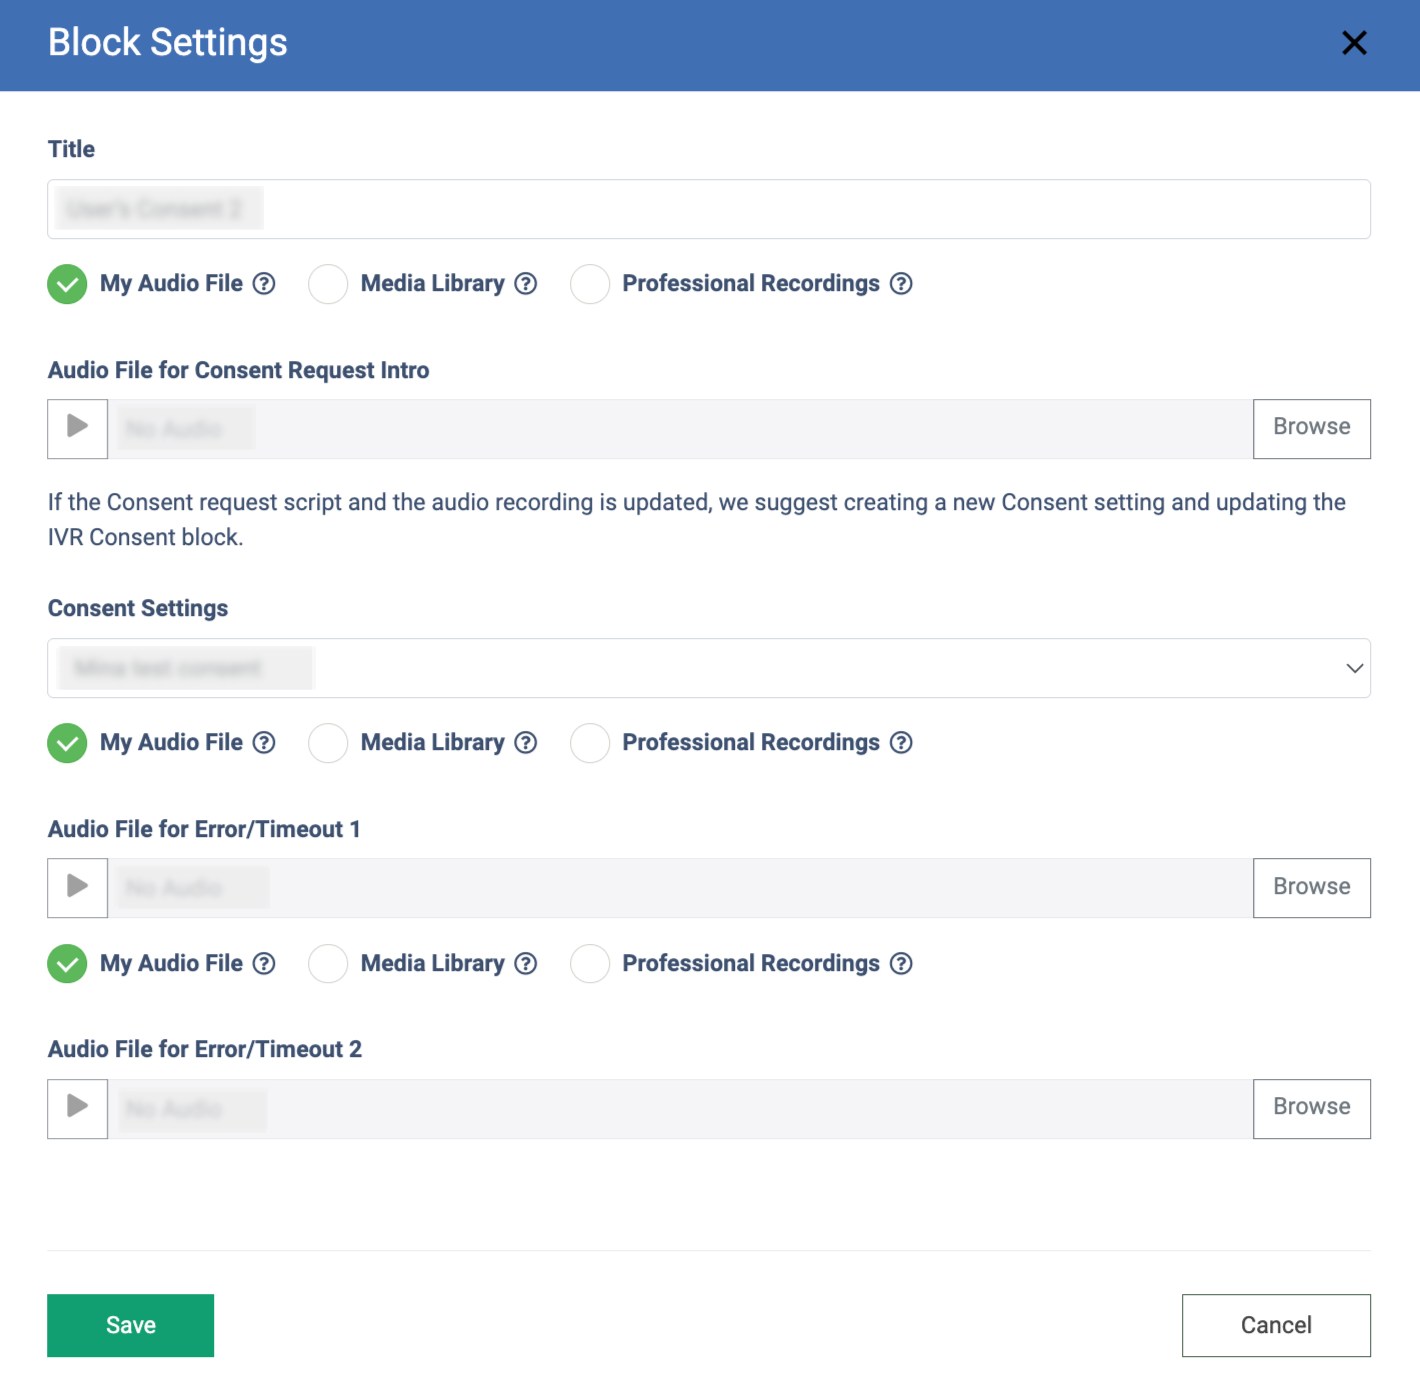
The “User’s Consent” Block
The “Consent” block allows you to collect and record a caller’s voice consent in IVR and ping a caller’s phone number to E-Delivery when the consent is obtained. You can add the block only to the IVR with the “Voice recognition + Keyboard” recognition type.
To set up the block, click the “Block Settings” button (the button with the gear icon) and fill in the following fields:
- Title: Enter the name of the block.
- My Audio File / Media Library / Professional Recordings: Upload a custom audio file, select the file from the list available in the library, or delegate audio file creation to professional artists. When selecting the “Professional Recordings” radio button, the additional fields will appear.
- Message Language: Select the record language
- Text Message for Keypad Mode: Enter the text for voice-over.
- Audio File for Consent Request Intro: Upload the intro audio file that will be used as a request for the Consent intro, but should not include Consent verbiage. Say “Yes” if you agree, or “No” if you don’t agree, is a pre-recorded audio file selected in the Consent Settings. The option is available only when the “My Audio File” radio button is selected.
- Consent Settings: Select the active IVR Consent settings.
- Audio File for Error/Timeout 1: The audio file that will be played when the caller has pronounced words other than “Yes or No” or did not enter a value at all. You can select to upload the custom audio file or delegate audio file creation to professional artists.
- Audio File for Error/Timeout 2: The audio file that will be played when the caller has pronounced words other than "Yes or No" twice or did not enter a value at all. If there is an invalid entry during the second attempt, the system records that the lead did not Consent, and the call is transferred to the “No” branch. You can select to upload the custom audio file or delegate audio file creation to professional artists.
Note: All audio files are required.
Click the “Save” button to complete the settings.
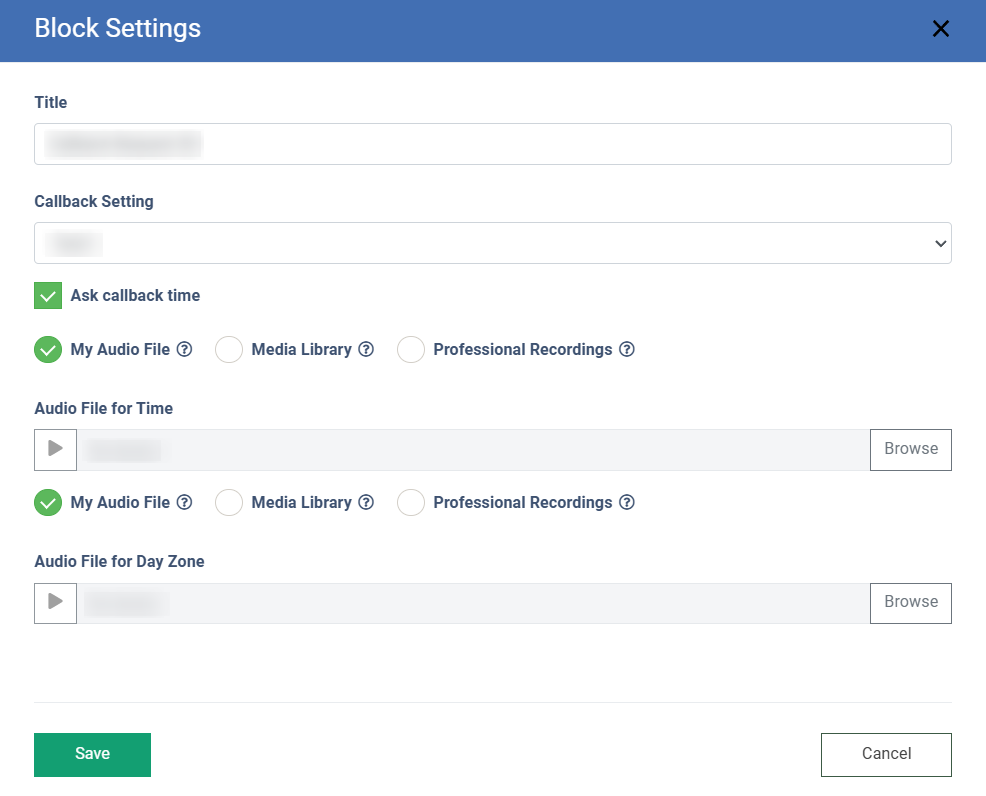
The “Callback Request” block
The “Callback Request” block allows the lead to request a callback from the IVR.
To set up the block, click the “Block Settings” button (the button with the “Gear” icon) and fill in the following fields:
- Title: Enter the block name.
- Callback Setting: Select the active Callback. To create the callback, go to the Callbacks > Callback List section and click the “Add New Callback” button.
- Ask callback time: Check the box to let the IVR ask if the caller requires the callback.
- Audio File for Time: Upload the audio file to ask the caller about the callback time. The caller should enter four digits, e.g., 1300. You may upload a custom audio file (select the “My Audio File'' radio button), select the file from the available in the Media Library (select the“Media Library” button), or delegate the audio file creation to professional recording artists. To do it, select the “Professional Recordings'' radio button, then select the record language in the “Message Language'' field and enter the text to voice over in the “Text Message for Keypad Mode” field.
- Audio File for Day Zone: Upload the audio file to ask the caller about the time of day. The caller should select AM or PM. You may upload a custom audio file (select the “My Audio File'' radio button), select the file from the available in the Media Library (select the“Media Library” button), or delegate the audio file creation to professional recording artists. To do it, select the “Professional Recordings'' radio button, then select the record language in the “Message Language'' field and enter the text to voice over in the “Text Message for Keypad Mode” field.
Click the “Save” button to complete the settings.
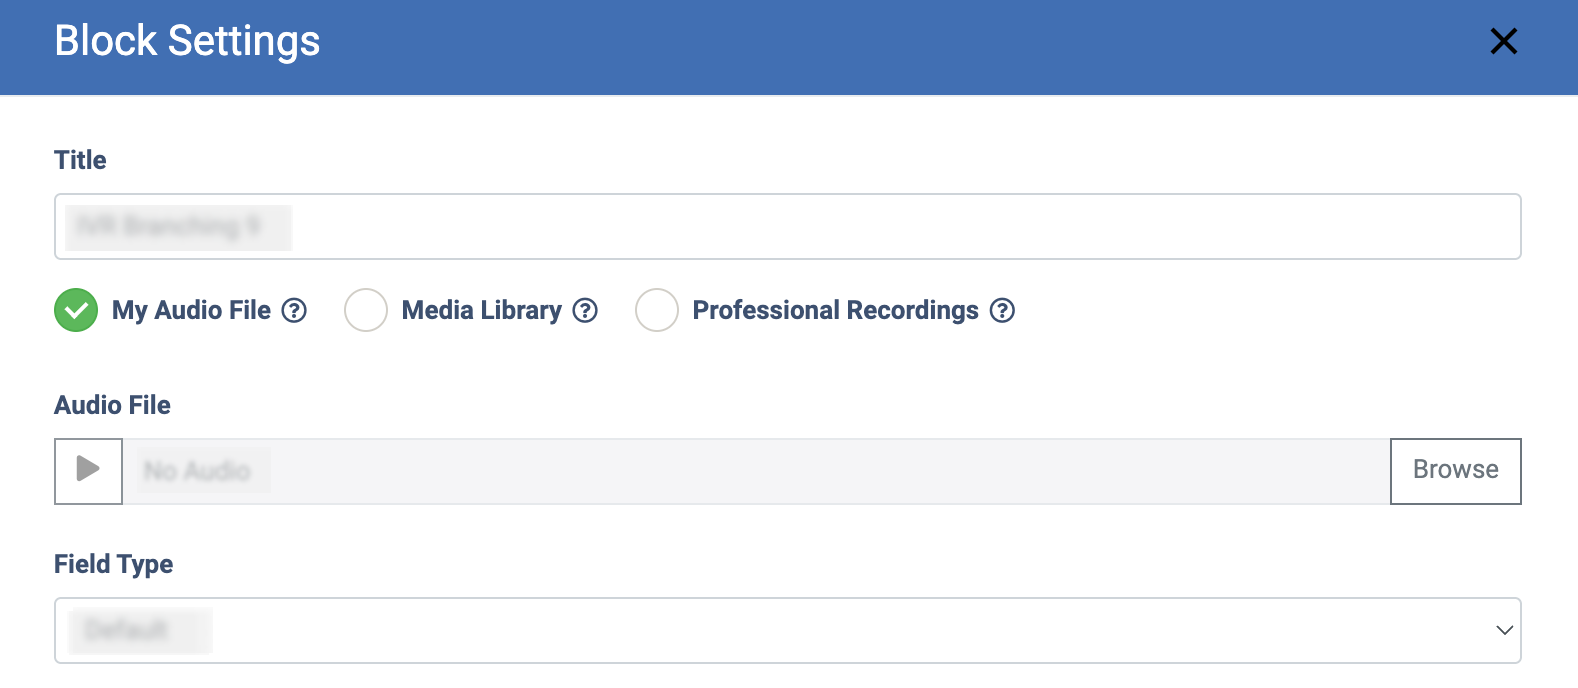
The “IVR Branching” Block
The “IVR Branching” block allows you to route calls depending on the lead input. The additional option “N” allows the IVR to route a call if there is no reply from a caller after a defined period (5-7 seconds).
To set up the block, click the “Block Settings” button (the button with the “Gear” icon) and fill in the following fields:
- Title: Enter the name of the block.
- My Audio File: Select the radio button to upload a custom audio file
- Audio File: Upload the audio file from your computer.
- Media Library: Select the radio button to choose the file from the available in the Media Library
- Media Library File: Select the file from the available in the Media Library.:
- Professional Recordings: Select the radio button to delegate the audio file creation to professional artists.
- Message Language: Select the record language.
- Text Message for Keypad Mode: Specify the language in which the professional voice recording will be created and delivered.
- Field Type: Select the field type option.
- Default: The default setting. The caller will answer the question and go through the IVR, but the data will not be recorded in the database.
- Block Field: This parameter will be considered as the block parameter and will not be related to the product. The data will be recorded in the database and linked to the current lead.
- Field Name: Enter the name of the field.
-
- Product Field: The option allows you to select the product field. The caller will enter the data during the call processing, and it will be recorded as a value for the selected field.
-
-
- Available Fields: Select the product field.
-
- Block (1-0): To set up the branching, enter example words for each branch for voice recognition.
- Block (1-0): Select the corresponding IVR block for each branch for the number input.
- Confirmation Phrase: When confirmation is required, check the box and enter the phrase next to it. Use the keyword *value* as a placeholder for a recognized value. E.g., “Did you mean *value*?.”
Click the “Save” button to complete the settings.

To set up the next blocks for each branch, click on the number (1-0/N) and continue to create the IVR.
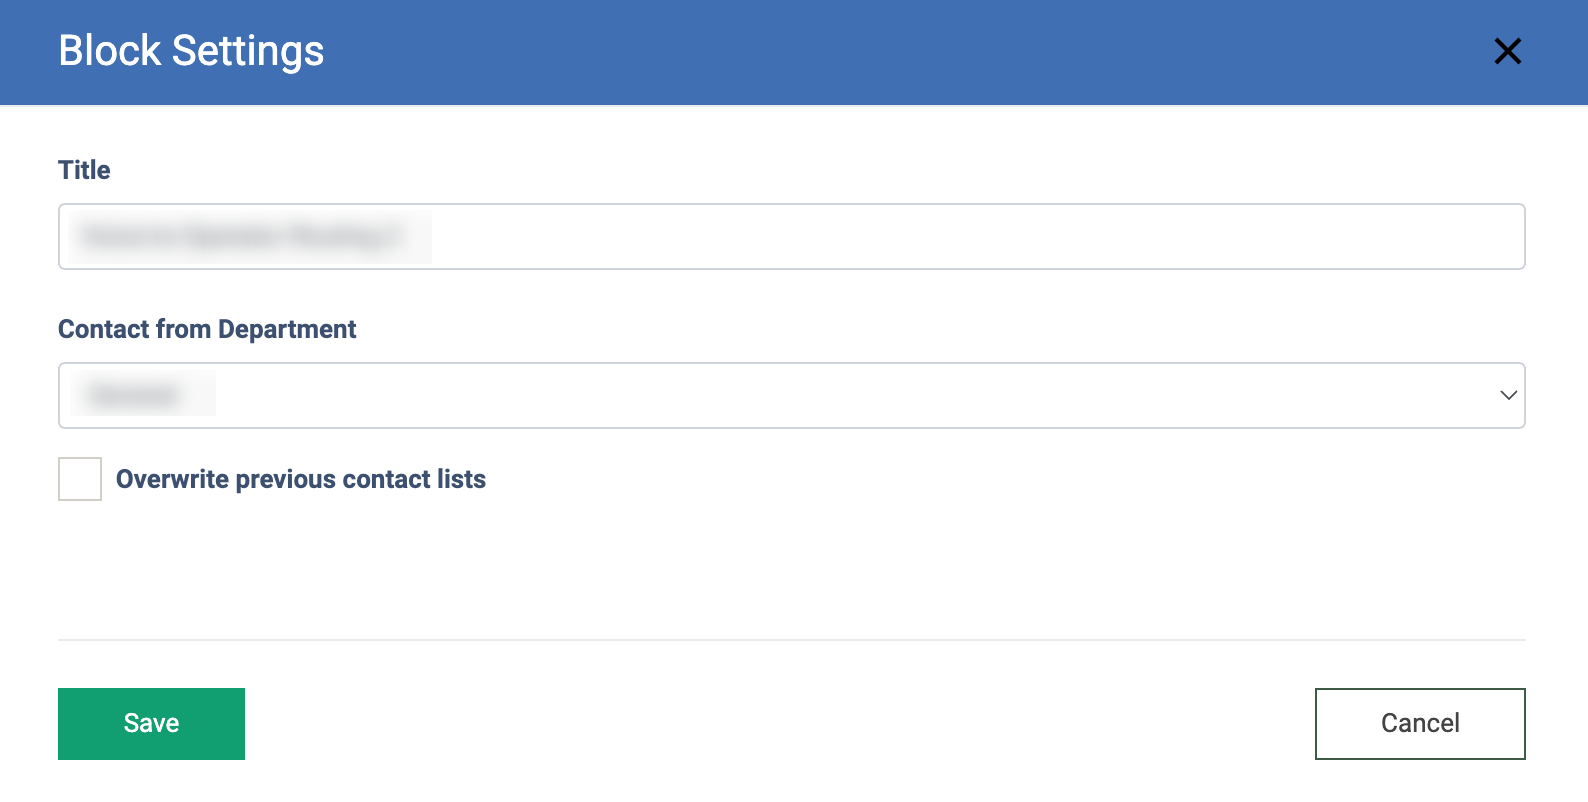
The “Voice-to-Operator Routing” Block
The “Voice-to-Operator Routing” block allows the caller to be routed to a specific operator during the next steps of the IVR flow. The routing will be performed by either saying the operator’s full name if the IVR recognition type is set to “Voice Recognition + Keypad”, or by entering the operator’s extension after pressing the “*” key if the IVR recognition type is set to “Keypad”.
To manage the block settings, click the “Block Settings” button (the button with the “Gear” icon) and fill in the following fields in the “Block Settings” pop-up window:
- Title: Enter the name of the block.
- Contact from Department: Select the Department to operators from which the transfer should be performed.
- Overwrite previous contact lists: Check the box to overwrite the operator list from the previous contact book block.
Click the “Save” button to complete the settings.
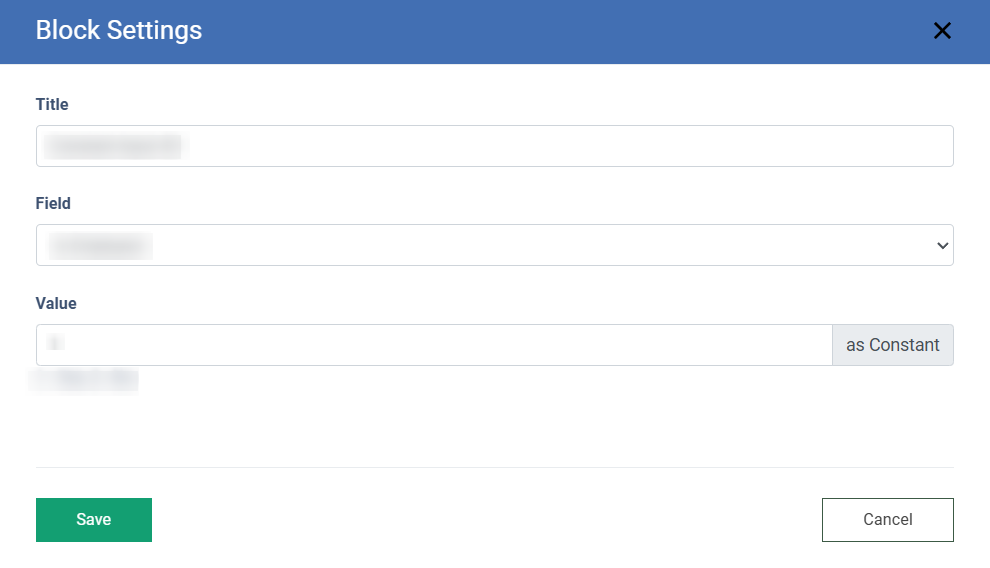
The “Constant Input” Block
The “Constant Input” block is used to insert a fixed, predefined value into the lead body as soon as the call passes this block in the IVR flow without requiring any input from the caller. The main purpose of this block is to insert the fixed value into the corresponding field of the lead body.
It can be used in combination with branching or as a standalone block, depending on the client's requirements.
To set up the block, click the “Block Settings” button (the button with the “Gear” icon) and enter the block name in the “Title” field. Select the filter in the “Field” field (ZIP, Is Military, SSN, etc.) and enter the data in the “Value” field.
Click the “Save” button to complete the settings.
The “Find Buyer” Block
The Find Buyer block is an essential block in the IVR flow, routing incoming calls to the most suitable buyer based on predefined criteria. Factors such as priority logic, call distribution rules, campaign settings, and buyer availability are evaluated in this block through a selected ping tree, ensuring that each call is directed to the right buyer in real-time.
Note: No blocks are allowed to be placed after the "Find Buyer" block, except another "Find buyer", “Hangup Rejection Message”, or the "Go to IVR" blocks.
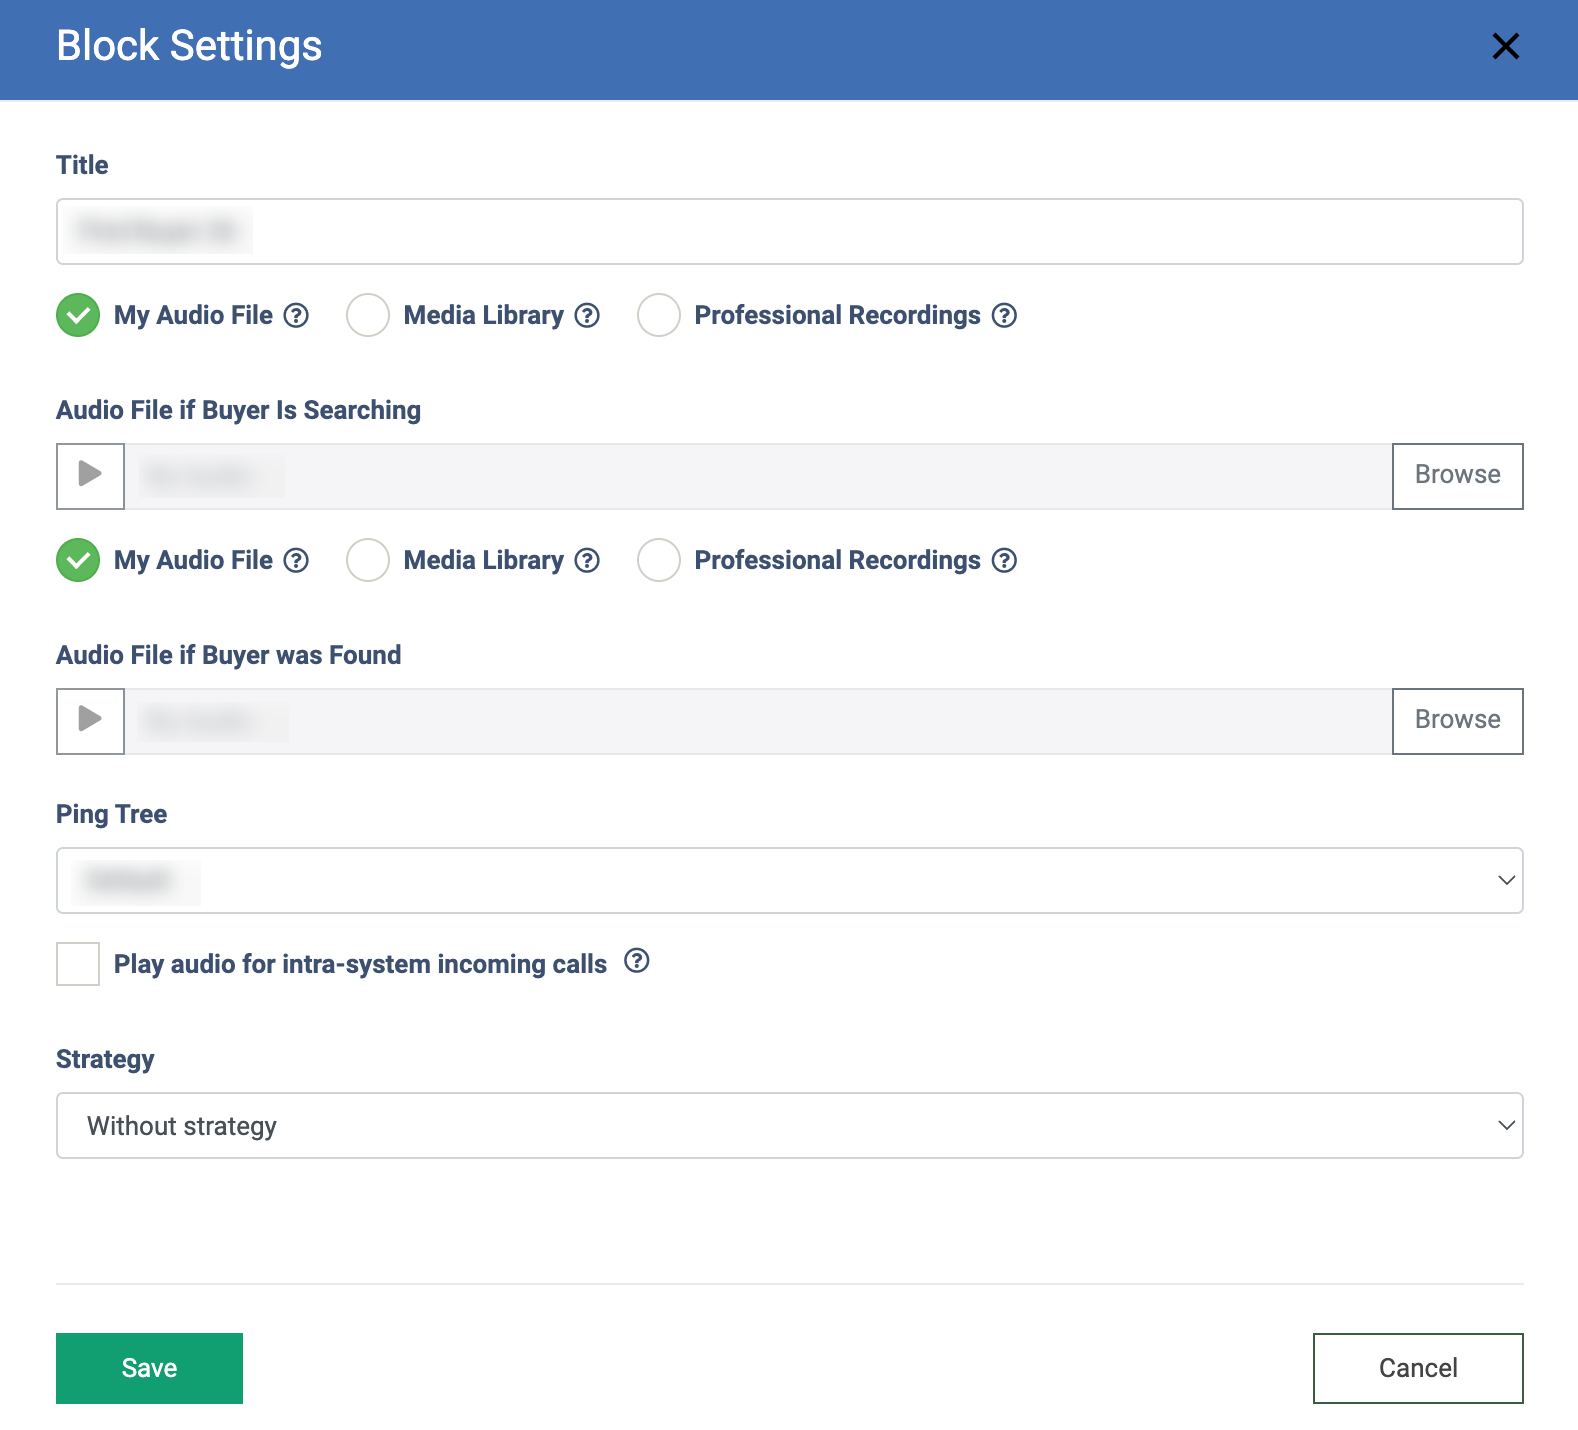
To set up the block, click the “Block Settings” button (the button with the “Gear” icon) and fill in the following fields:
- Title: Enter the name of the block.
- My Audio File: Select the radio button to upload the custom audio file.
- Media Library: Select the radio button to select the audio from the Default IVR Messages in the “Media Library File” field. Note: To listen to all Default IVR Messages, go to the Media >Global Media Library section and select the “Default IVR Messages” folder from the library list. The folder cannot be edited. Read more about the Global Media Library in this Knowledge Base article.
- Professional Recordings: Select the radio button to delegate the audio file creation to professional artists.
- Message Language: Select the record language.
- Text Message (Text Message if Buyer was Found): Enter the text to voice over.
- Audio File if Buyer Is Searching: Upload the audio file indicating the Buyer's search.
- Audio File if Buyer was Found: Upload the audio file indicating that the Buyer has been found.
- Ping Tree: Select the PingTree.
- Play audio for intra-system incoming calls: Check the box for the system to play audio for incoming calls from another Phonexa instance. Note: If the box is checked, audio in this block will not be played when calling this IVR from another IVR or Phonexa instance, i.e., the system skips playing audio from the block, but the call continues in its original flow. If the call comes directly from the caller, audio will be played in any case (checkbox on/off).
- Strategy: Select the strategy for the lead distribution processing through the ongoing IVR. The following options are available:
- Without Strategy: Select this option to perform the simple transfer of the ongoing call to the Buyer that was selected by the system according to the Ping Tree settings.
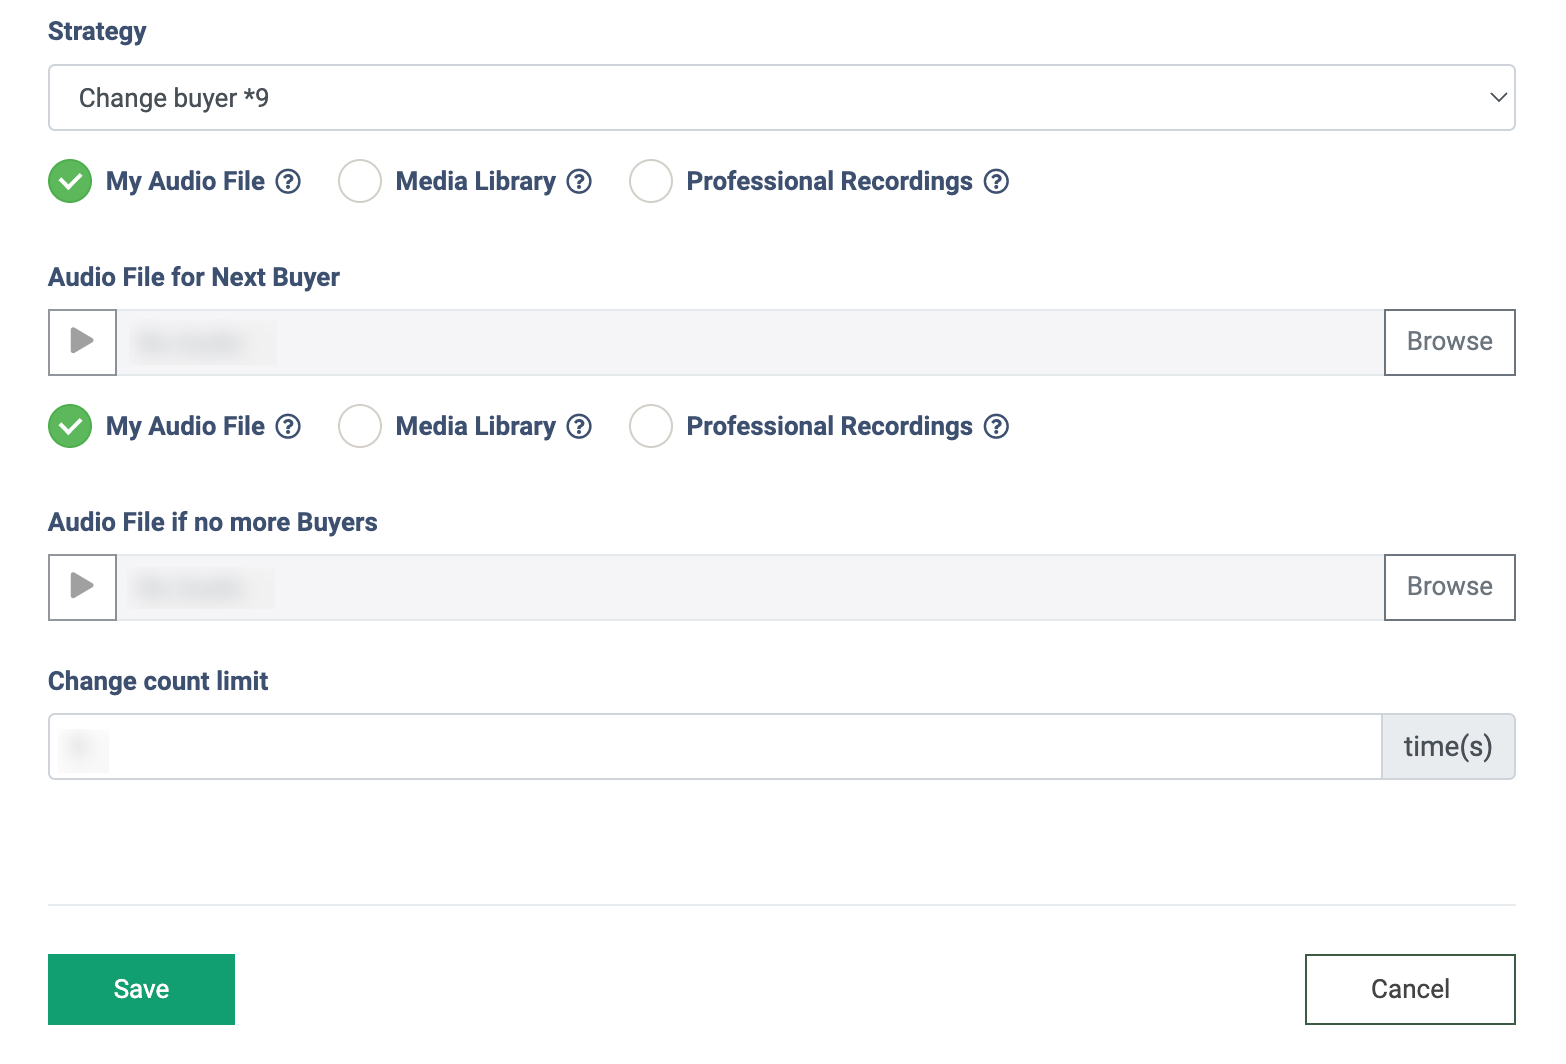
- Change buyer *9: Select this strategy to allow the caller to request the next Buyer by dialing the combination “*9”. Use case: A caller answered the IVR questions and was connected to a Buyer. If the caller doesn't like the Buyer for some reason, they can press the combination “*9”, get transferred back to Phonexa’s IVR (as a new lead), and get connected to another Buyer, bypassing the IVR questions (the entered data will no longer be asked). Note: The caller can request another Buyer regardless of the lead status. If the lead status is “Sold”, the call status will be “Sold”. If the lead status is “Reject”, the call status will be “Hang up by lead”. The buyer is charged for each lead whose talk time has reached the time of sale. A call is recorded every time the caller requests a new Buyer.
- Audio File for Next Buyer: Upload the audio file indicating the next Buyer search
- Audio File if no more Buyers: Upload the audio file indicating no more available Buyers.
- Change count limit: Enter the number of times the system will look for another Buyer (enter the values 1-5).
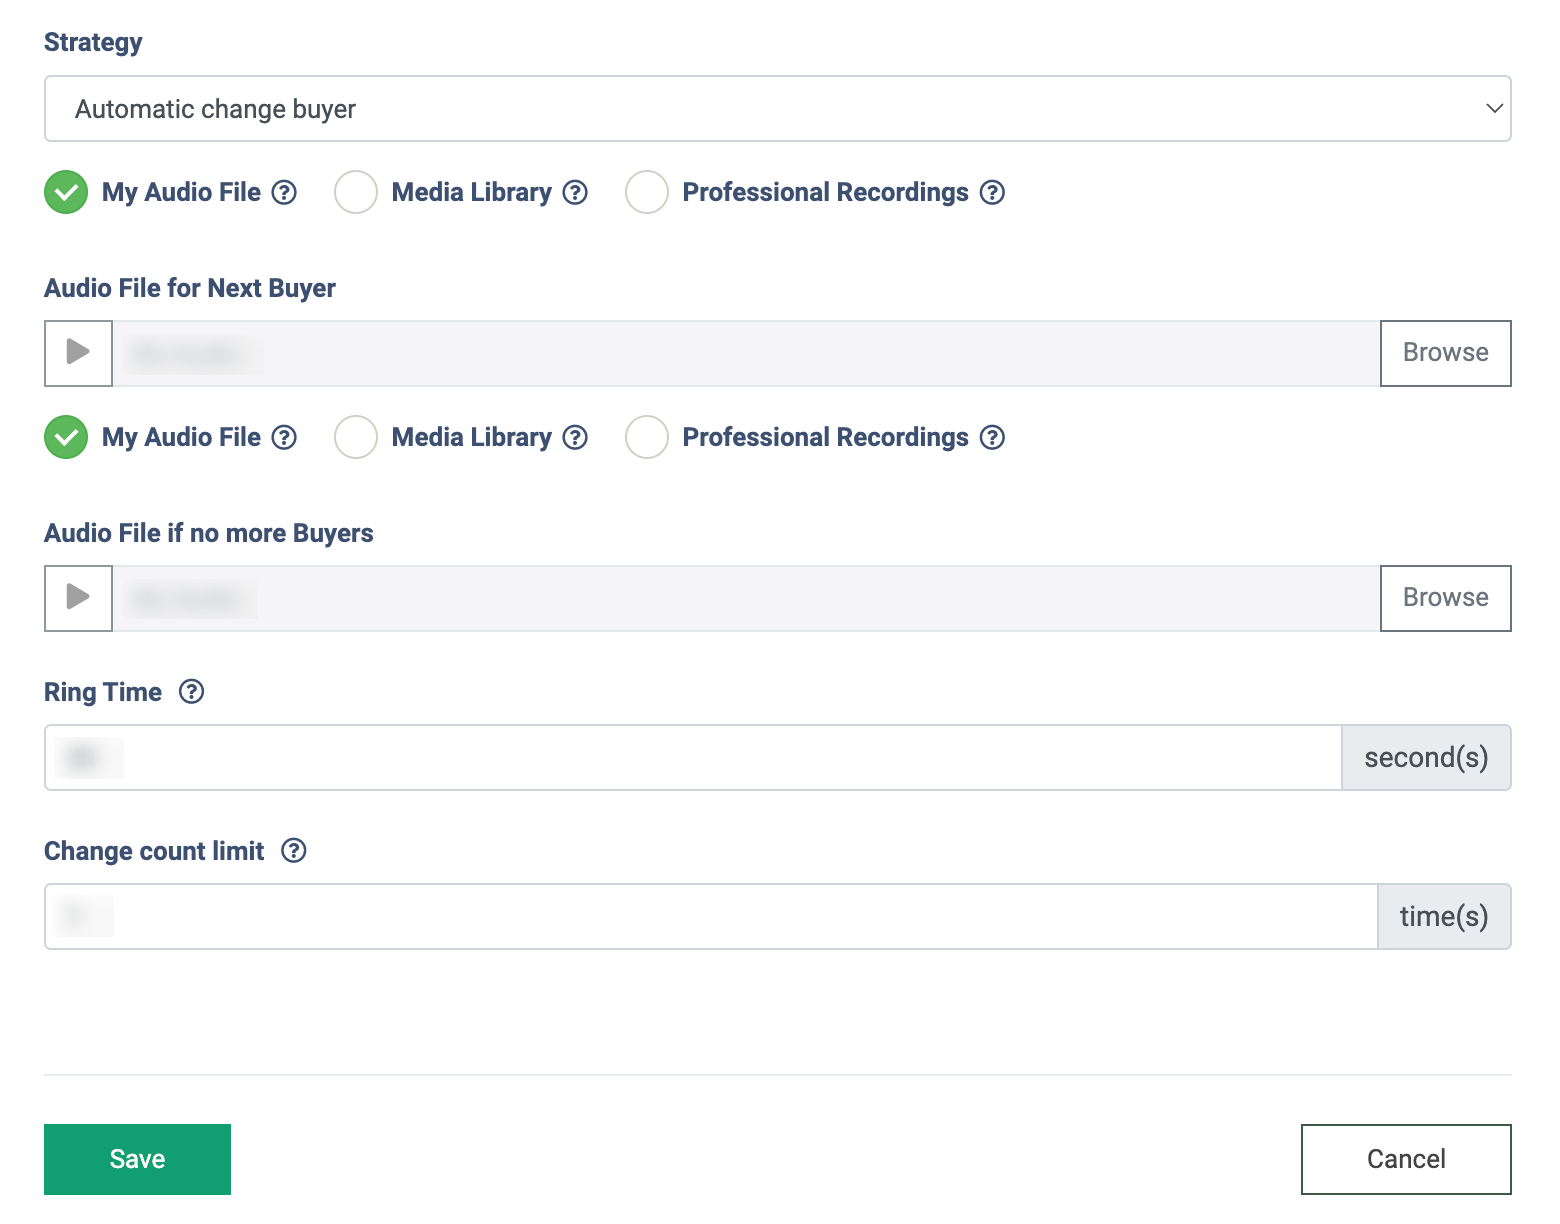
- Automatic Change Buyer: Select the radio button to allow the system to automatically search for another buyer if the call has been rejected, busy, timeout, etc. Use case: A caller has answered the IVR questions and is connecting to a Buyer. If the Buyer doesn't take the call (e.g., the line is busy), the system starts searching for another Buyer due to a timeout. The caller returns to Phonexa’s IVR (as a new lead) and gets connected to another Buyer, bypassing the IVR questions (the entered data will no longer be asked). Note: A call is recorded every time the system searches for a new Buyer. In the IVR Log, the status of previous calls will be displayed as “Automated Next Buyer Request”.
- Audio File for Next Buyer: Upload the audio file indicating the next Buyer search.
- Audio File if no more Buyers: Upload the audio file indicating that there are no more available Buyers.
- Ring Time: Enter the duration of a call to a Buyer, after which the call will be transferred to search for another Buyer. (value in sec, 1-60).
- Change count limit: Enter the number of times the system will look for another Buyer (values 1-5).
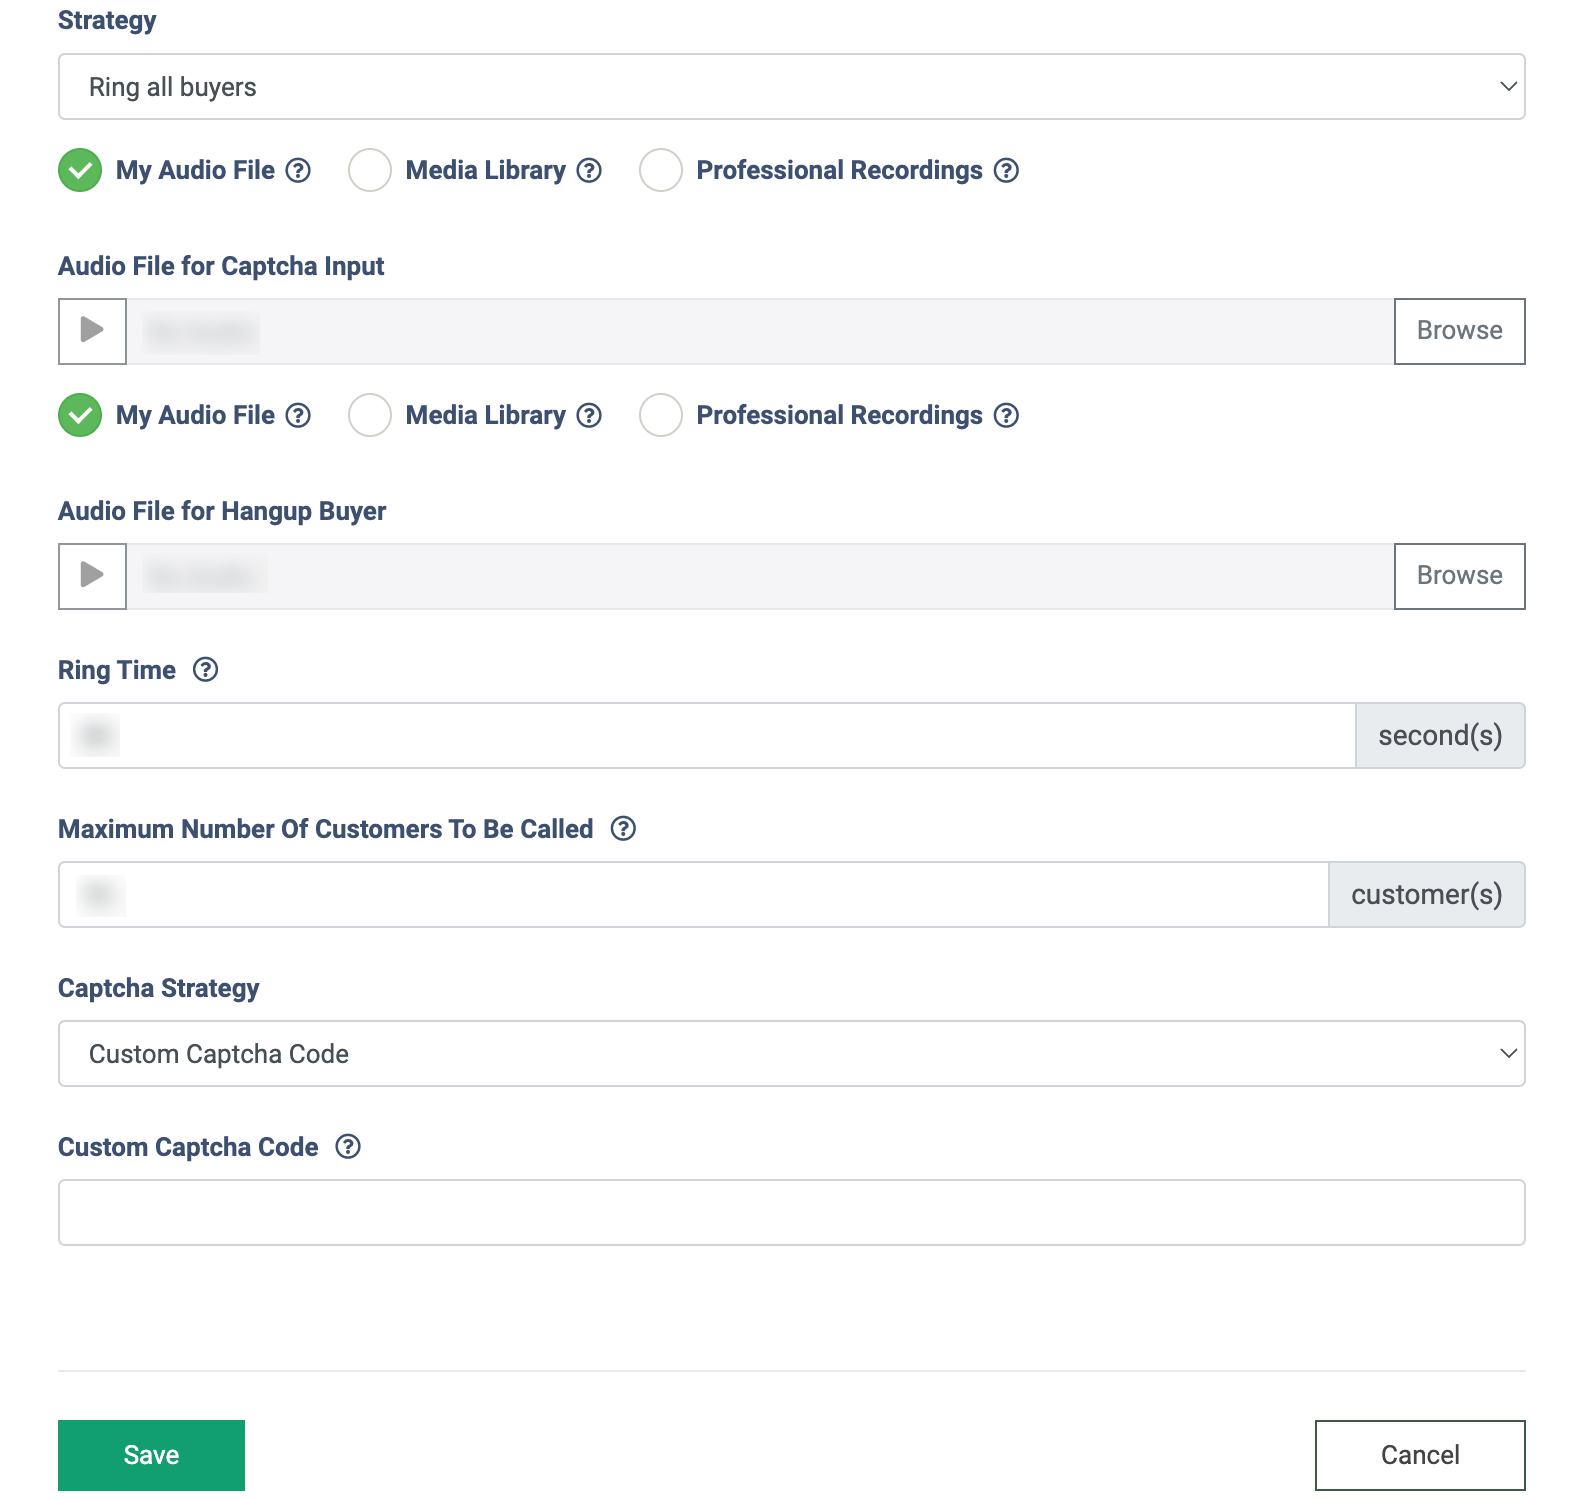
- Ring all buyers: Select this strategy to allow the simultaneous lead calling to all Buyers that are assigned to the particular PingTree. Note: Any strategy that is set for the Ping Tree will be overridden with the Ring all option. Use case: The caller has answered IVR questions and is connecting to the Buyer. As soon as this lead call reaches the Find Buyer block, the system detects the list of all Buyers that are assigned to the particular PingTree to perform the simultaneous calling. The first Buyer who has answered this call and successfully passed the Captcha check will be connected with the lead, and for the rest of the Buyers who answered the lead call, the set audio message will be played, and the call will be ended.
- Audio File for Captcha Input: Upload or select the audio file that will be played before entering the Captcha. Note: This field is not mandatory for setting up. If no audio file is selected in this field, the default Captcha message will be played.
- My Audio File: Select the radio button to upload the custom audio file.
- Media Library: Select the radio button to select the audio from the Default IVR Messages in the “Media Library File” field. Note: To listen to all Default IVR Messages, go to the Media >Global Media Library section and select the “Default IVR Messages” folder from the library list. The folder cannot be edited. Read more about the Global Media Library in this Knowledge Base article.
- Professional Recordings: Select the radio button to delegate the audio file creation to professional artists.
- Message Language: Select the record language.
- Text Message: Enter the text to voice over.
- Audio File for Captcha Input: Upload or select the audio file that will be played before entering the Captcha. Note: This field is not mandatory for setting up. If no audio file is selected in this field, the default Captcha message will be played.
- Audio File for Hangup Buyer: Upload or select the audio file that will be played for all Buyers who have answered the call, but it was too late, and the lead call was already accepted by another Buyer. Note: This field is not mandatory for setting up. If no audio file is selected in this field, the standard audio message for the Buyer’s hangup will be played.
- My Audio File: Select the radio button to upload the custom audio file.
- Media Library: Select the radio button to select the audio from the Default IVR Messages in the “Media Library File” field. Note: To listen to all Default IVR Messages, go to the Media >Global Media Library section and select the “Default IVR Messages” folder from the library list. The folder cannot be edited. Read more about the Global Media Library in this Knowledge Base article.
- Professional Recordings: Select the radio button to delegate the audio file creation to professional artists.
- Message Language: Select the record language.
- Text Message: Enter the text to voice over.
- Ring Time: Enter the duration of a call to all Buyers that are assigned to the selected Ping Tree, after which the call will be finished or sent to the next batch of Buyers that is set in the “Maximum Number Of Customers To Be Called” field, in case none of the buyers from the first batch answered the call. The process repeats until the moment there are no Buyers left in the Ping Tree, and then the lead’s call will be finished.
- Maximum Number Of Customers To Be Called: Enter the maximum number of Buyers to whom the ongoing lead call will be transferred (1-100). Note that the system can handle up to 10 simultaneous lead calls to Buyers. For example, the value in the ongoing field is set as 30. The system will perform 3 lead calls iterations of 10 simultaneous calls each, in case there is no answer from any Buyer during each of them.
- Captcha Strategy: Select the strategy for the captcha check processing. The following options are available:
- Custom Captcha Code: Select this option to set the constant combination of numbers (Captcha Code) that will be used for the Captcha check.
- Custom Captcha Code: Enter the constant combination of numbers (Captcha Code) for the Captcha check.
- Generated Captcha Code: Select this option to generate a random combination of numbers (Captcha Code) for the Captcha check with the defined number of digits. Note that this combination will be different for each lead’s phone number.
- Number of digits: Enter the number of digits that will be set for the generated random combination of numbers (Captcha Code).
- Custom Captcha Code: Select this option to set the constant combination of numbers (Captcha Code) that will be used for the Captcha check.
Click the “Save” button to complete the settings.

To check the Campaign to which the Lead was sold in case of the “Ring All” strategy usage, go to the Buyer Reports > Call Details section, select the corresponding call from the list, and click the “Lead ID” button in the “Lead ID” column.
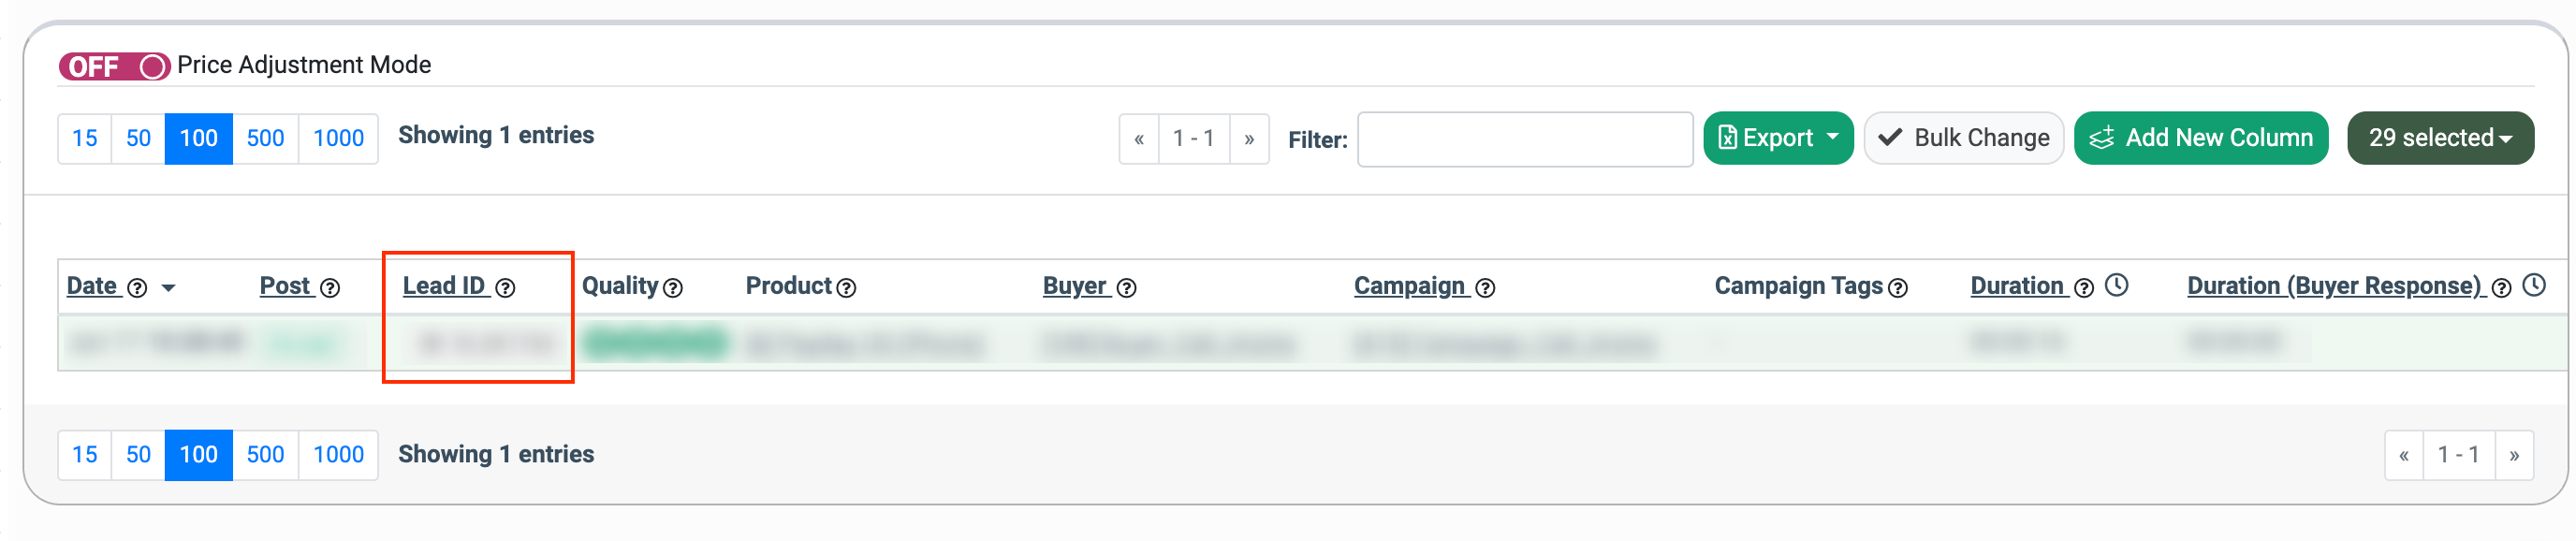
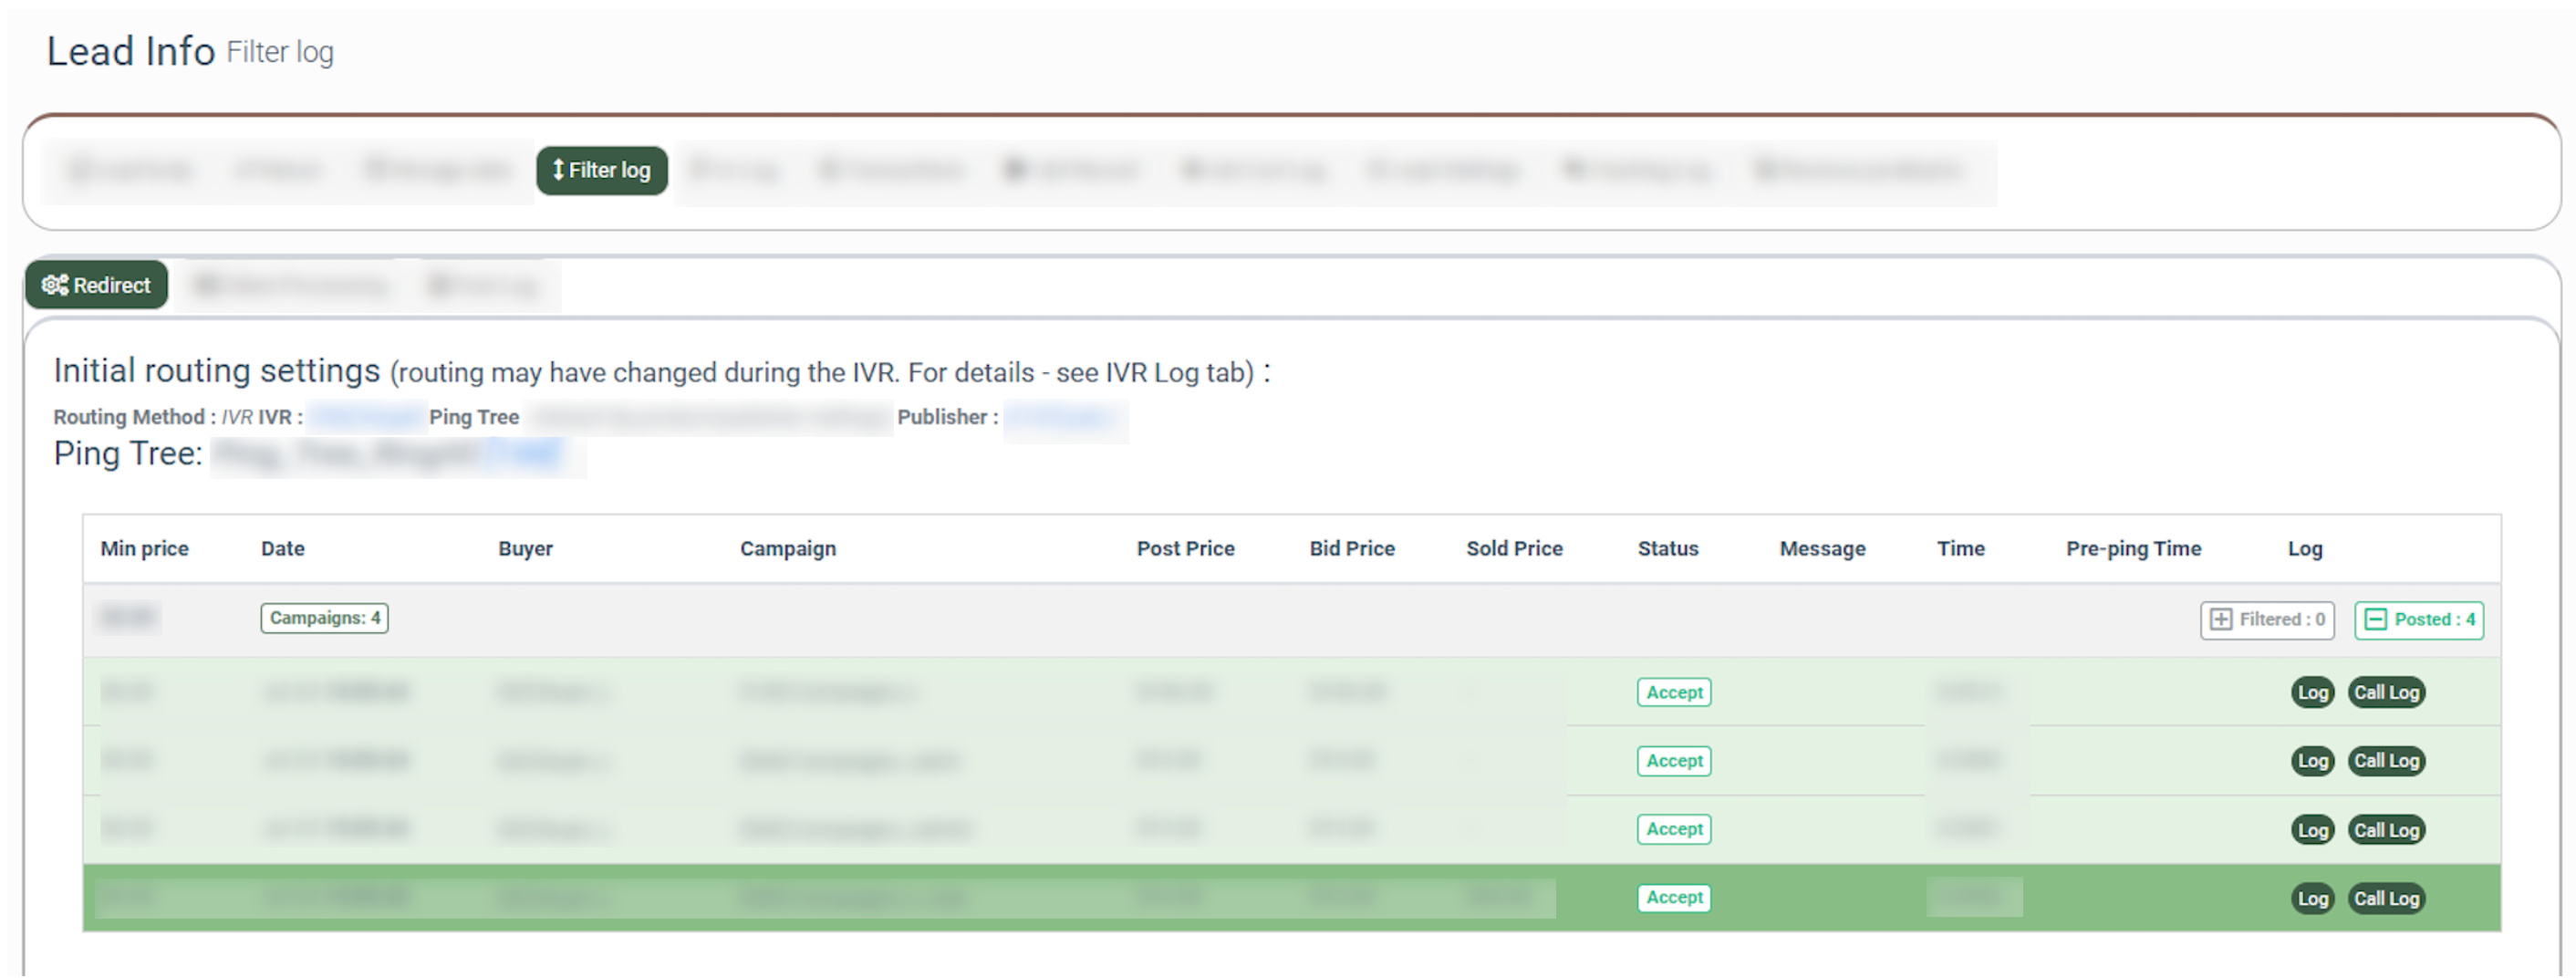
You will be redirected to the Lead Info report, where you need to go to the “Filter Log” tab and select the “Redirect” subtab. The Campaign to which the Lead was sold during the Ring All strategy workflow will be highlighted in the list.
The “Reconnect to Buyer” Block
The “Reconnect to Buyer” block checks the lead’s last sale to the campaign within X days and suggests the lead connect with the same buyer. Depending on the lead’s choice, the block will redirect to the campaign, which it was already sold to, or a new campaign will be selected according to the route that is built in the IVR flow and additional settings applied.
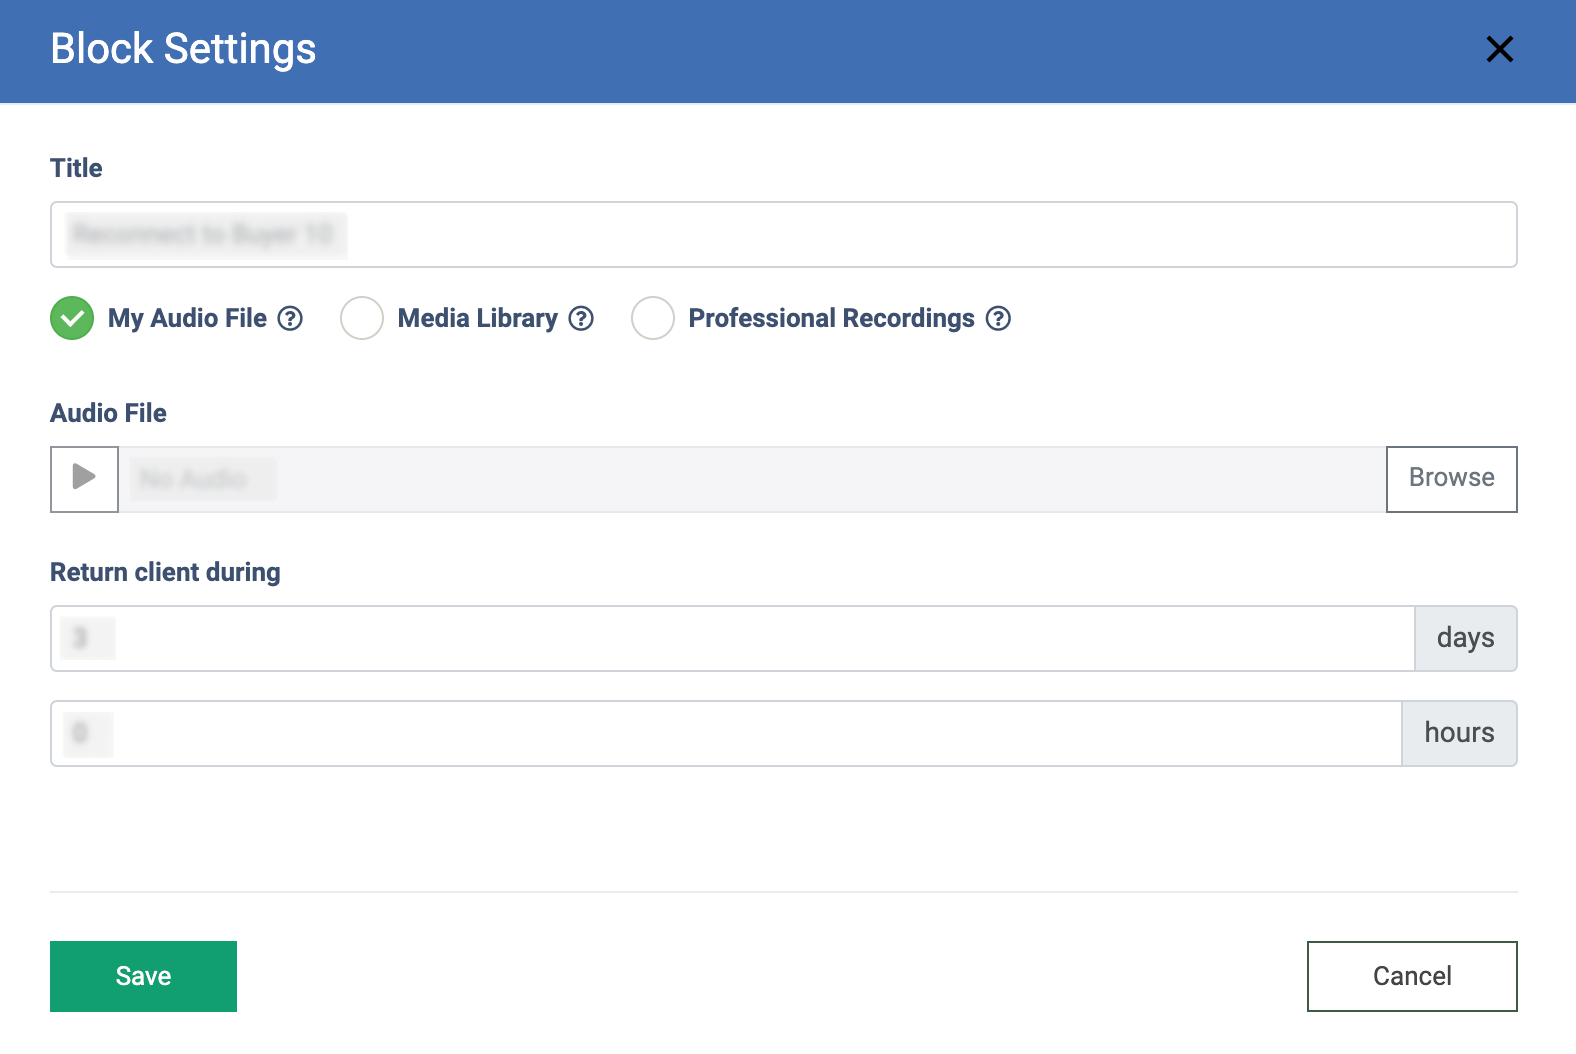
To set up the block, click the “Block Settings” button (the button with the “Gear” icon) and fill in the following fields:
- Title: Enter the name of the block.
- My Audio File: Select the radio button to upload the custom audio file.
- Media Library: Select the radio button to select the audio from the Default IVR Messages in the “Media Library File” field. Note: To listen to all Default IVR Messages, go to the Media >Global Media Library section and select the “Default IVR Messages” folder from the library list. The folder cannot be edited. Read more about the Global Media Library in this Knowledge Base article.
- Professional Recordings: Select the radio button to delegate the audio file creation to professional artists.
- Message Language: Select the record language.
- Text Message (Text Message if Buyer was Found): Enter the text to voice over.
- Return client during: Enter the number of days and/or hours that determine the time for the system to check how much time has passed since the lead sale. Note that the maximum value for this field is 365 days
Click the “Save” button to complete the settings.
The “Route to Campaign” Block
The “Route to Campaign” block directs calls to a specific campaign. If the Buyer is active, they will accept the call.
You can make a simple rerouting to the particular Campaign (the default routing option), or set the smart routing option where the Campaign for the call routing will be determined according to its ID value from the set placeholder or the ID can be entered manually.
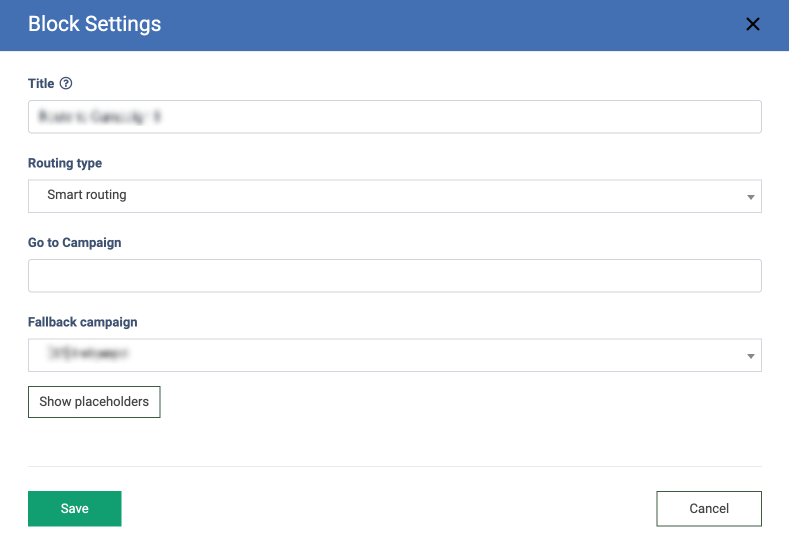
To set up the block, click the “Block Settings” button (the button with the “Gear” icon), and fill in the following fields in the “Block Settings” pop-up window:
-
Title: Enter the name of the block.
-
Routing Type: Select the type of call routing (Default routing, Smart routing).
-
If the “Default routing” option is selected:
-
Go To Campaign: Select the Campaign to which the call should be routed. The list of options includes Campaigns related to the Product to which the specific IVR is assigned.
-
-
If the “Smart routing” option is selected:
-
Go To Campaign: Enter the ID of the specific Campaign to which the call should be routed. You can also set the placeholder for the field from which the ID of the Campaign should be retrieved. Note that the Campaign ID value should be entered or sent as a value via a placeholder to ensure the correct workflow of the smart routing option, not the name of the Campaign. To view the list of available placeholders, click the “Show placeholders” button.
-
Fallback campaign: Select the Campaign to which the call should be routed in case of impossibility to redirect the Campaign to the one set in the “Go To Campaign” field. The cases of the redirect impossibility may be the following: the placeholder value is empty, the Campaign ID is invalid, the Campaign is inactive, the Campaign is assigned to a different Product, or the Campaign’s name is sent via placeholder instead of the ID.
-
-
Click the “Save” button to complete the settings.

The “Temporary Deny List” Block
The “Temporary Deny List” block allows you to block a client temporarily for a specified period of time for a specific product. When the lead falls in the “Temp Deny List” block of the IVR scheme, he is recorded in the “Gray list” for the configured time. The “Gray list” is updated in real-time, so the client will be removed from the list automatically after the expiration of the block time.
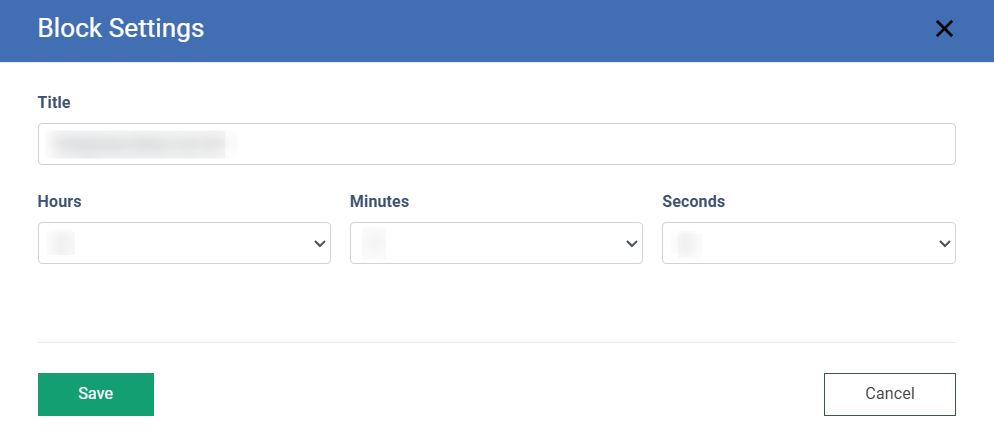
To set up the block, click the “Block Settings” button (the button with the “Gear” icon), enter the block name in the “Title” field, and fill in the “Hours”, “Minutes”, and “Seconds” fields to establish the ban time.
Click the “Save” button to complete the settings.
When a caller goes through the “Temporary Deny List” block of the IVR, a caller's phone number is added to the “Gray list” for a set period of time.
This is a "temporary" or "conditional" list. Numbers here are not fully blocked, but not immediately allowed either. Instead:
- Calls are delayed/screened before being connected.
- The caller can hear a temporary message like “We are currently unable to take your call. Please try again later.”
- After the block period expires, phone numbers on the gray list automatically move back to normal access if no issue is detected.
The “Gray list” is updated in real-time.
Example: A consumer calls and gets the message: “Press 1 for a new loan, press 2 for an existing loan”. The consumer presses “2” for an existing loan, and gets the message: “This line is for new applications only, and we are unable to help you at this time”. The consumer’s phone number is then placed on a temporary gray list for the time set in the block settings to prevent spam or irrelevant calls. The “Temporary Deny List” block ensures that if consumers call back and try to choose another option, the system does not transfer them to someone who cannot help them.
The maximum time frame of the “Gray List” is 23 hours, 59 minutes, 59 seconds.
Note: The “Temporary Deny List” block adds a caller’s phone number to the “Gray List” for the specific product only.
To view the list of blocked phone numbers, go to the System Management> General > Phone Number Deny List section.
Read more about the “Phone Number Deny List” section in the following Knowledge Base article.
The “Permanent Deny List” Block
The “Permanent Deny List” block allows you to permanently block a caller's phone number by adding it to the permanent Phone Number Deny List.
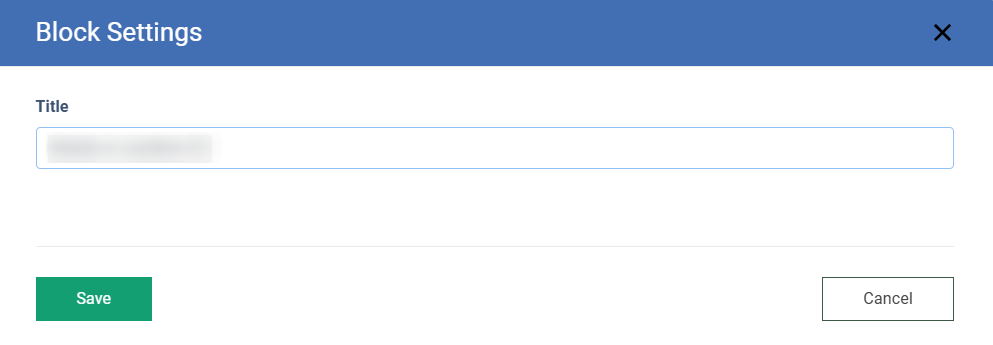
To set up the block, click the “Block Settings” button (the button with the “Gear” icon) and enter the block name in the “Title” field.
Click the “Save” button to complete the settings.

To view the list of blocked phone numbers, go to the System Management> General > Phone Number Deny List section.
Read more about the “Phone Number Deny List” section in the following Knowledge Base article.
The “Condition” block
The “Condition” block allows you to route calls in the IVR based on the configured conditions set here. The “Y” button corresponds to “Yes” (when the call meets the set condition), and the “N” button corresponds to “No” (when the call does not meet the set condition).
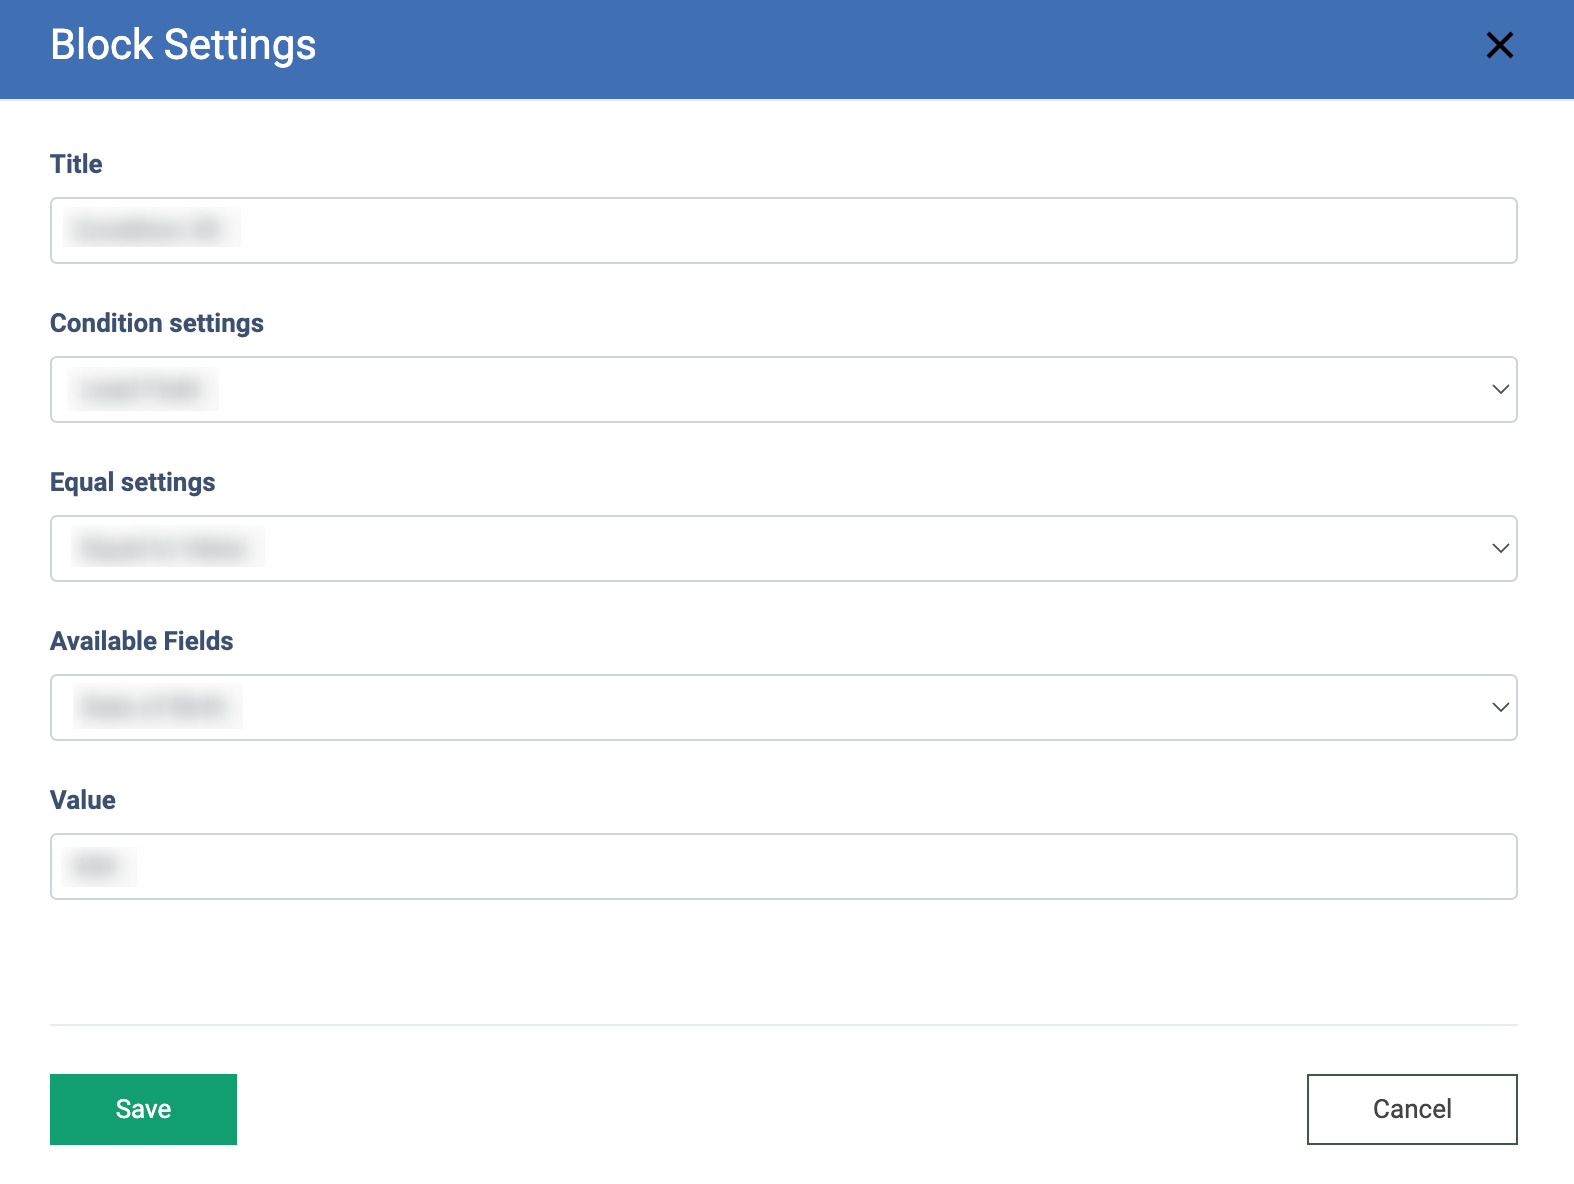
To set up the block, click the “Block Settings” button (the button with the “Gear” icon) and fill in the following fields:
- Title: Enter the name of the block.
- Condition setting: Select the required condition (when selecting one of the options, the additional field(s) will appear):
- Return Client: Set the condition to check if the caller is a returning client (a call from this number was sold to a buyer before) within the set period.
- Return client during: Enter the number of days and/or hours to set up the time frame for the system to check for a previously sold call.
- Return Client: Set the condition to check if the caller is a returning client (a call from this number was sold to a buyer before) within the set period.
- Lead Field: Set the condition to check if the value the caller input during the previous call or the data obtained from the Lead Stash matches the value set in the block. You can select a value that matches any product field or any value requested in the branching block of this IVR.
- Equal Settings: Select the setting for the type of comparison for the field value with the value set in the ongoing block (Equal to Value, Less Than, More Than, In List, Non Empty).
- Equal to Value: Checks if the field value equals the value set in the ongoing block.
- Less Than: Checks if the field value is less than the value set in the ongoing block.
- More Than: Checks if the field value is more than the value set in the ongoing block.
- In List: Checks if the field value is available in the selected present or do not present list (the option selected in the “List” field).
- Non Empty: Checks if the field value in the selected lead field is non-empty.
- Available Fields: Select the field for comparison.
- Value: Enter the value to compare (the number from 0 to 999999)
- Equal Settings: Select the setting for the type of comparison for the field value with the value set in the ongoing block (Equal to Value, Less Than, More Than, In List, Non Empty).
- Last Block Previously Call: Set the condition to check the last block in the previous call. For example, during the previous call, the lead hung up the phone on the particular selected block. When the lead calls again and it reaches the specific Condition block where the block on which the last call was dropped is set, the call processing will continue via the “Yes” branch. Note: To set up this condition, you need to build your IVR flow first and then return to this block to configure it.
- IVR Block: Select the IVR Block.
Click the “Save” button to complete the settings.
The “Do Not Call List” Block
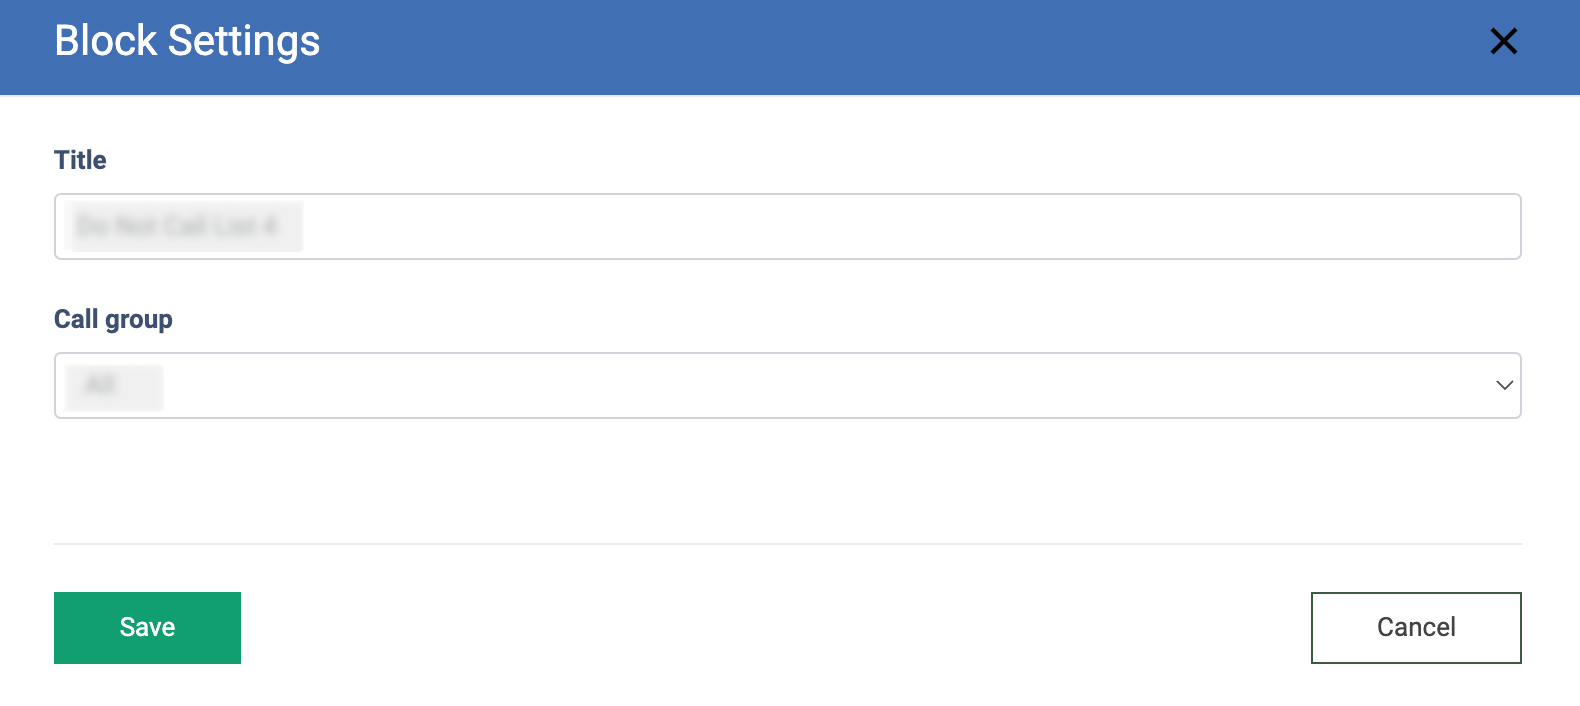
The “Do Not Call List” block adds the lead’s phone number to the Cloud PBX Do Not Call List. As soon as the client reaches this block, his phone number will be added to the Cloud PBX Do Not Call List at the Call Group or Call Campaign level. For example, if a Call Campaign attempts to make an outbound call to the client’s phone number, the call will not be performed. To set up the block, click the “Block Settings” button (the button with the “Gear” icon) and fill in the following fields:
- Call Group: Select the corresponding Call Group. The limitation for the call processing on the particular phone number will be applied on the Call Group level.
- Call Campaign: Select the related Call Campaign. The limitation for the call processing on the particular phone number will be applied to the particular Call Campaign.
Click the “Save” button to complete the settings.
The “Audio CAPTCHA” Block
The “Audio CAPTCHA” block allows you to filter out spam or bot calls by requesting callers to input a random code that is unique for every call to continue.
If the caller inputs the code correctly, the call will be routed to the “Y” branch. If the caller inputs the incorrect code, the call will go to the "N" branch, which can end the call or temporarily block the caller.
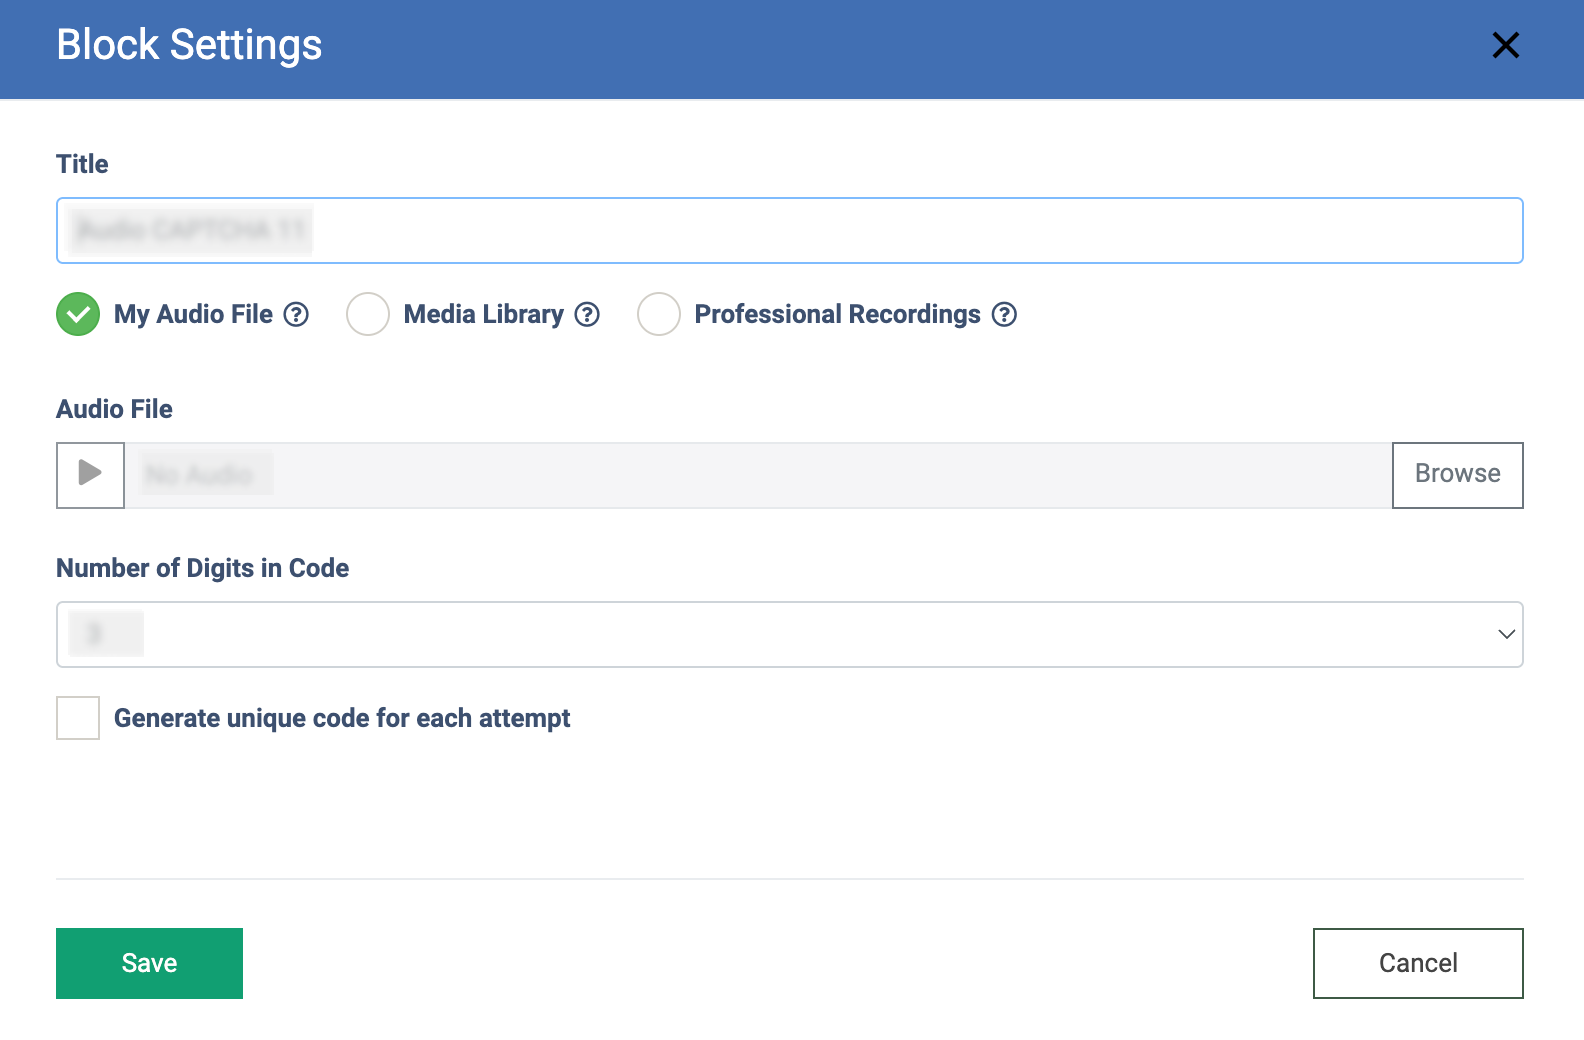
To set up the block, click the “Block Settings” button (the button with the “Gear” icon) and fill in the following fields:
- Title: Enter the name of the block.
- My Audio File: Select the radio button to upload a custom audio file.
- Audio File: Upload the audio file from your computer.
- Media Library: Select the radio button to select the file from the available in the Media Library.
- Media Library File: Select the file from the Media Library.
- Professional Recordings: Select the radio button to delegate the audio file creation to professional artists.
- Message Language: Select the record language.
- Text Message for Keypad Mode: Enter the text to voice-over.
- Number of Digits in Code: Select how many digits the code will have (1 to 5).
- Generate unique code for each attempt: Check the box to generate a new code for each attempt. The number of input attempts is set in the IVR Additional settings, the “User Input Attempts Count” field.
Click the “Save” button to complete the settings.
The “Lead Stash” Block
The “Lead Stash” block allows you to search for lead information in the Lead Stash based on the set parameters and then routes the call based on the results of the search. If the lead information is found in the Lead Stash, IVR blocks will be pre-filled with the lead information, and the caller will skip these blocks. The data for a specific lead can be searched within the time frame selected in settings.
The “Lead Stash” block allows you to route the IVR. The “Y” button corresponds to “yes” (if the caller’s data was found in the Lead Stash), and the “N” button corresponds to “no” (if the caller’s data was not found).
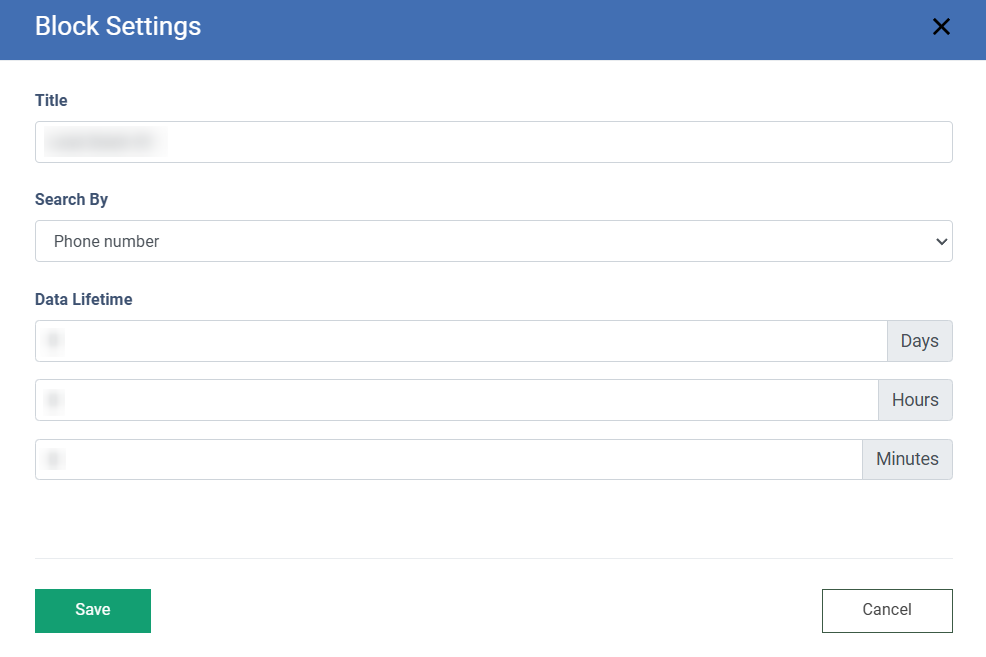
To set up the block, click the “Block Settings” button (the button with the “Gear” icon) and enter the block name in the “Title” field.
You can set a time period to search for the caller's data, up to the past six months, in the "Data Lifetime" field. The “Search By” field allows you to choose the parameter the system will use to look up data in the Lead Stash:
- Phone number: The system will look up data based on the caller’s phone number, identified by the system.
- Short SSN+ZIP+YOB: The combination of the caller’s ZIP code, year of birth, and the last 4 digits of the SSN.
- Strict mode: Check the box to perform the search for matches in the Lead Stash according to the data entered in the current IVR processing.
Please reach out to your account manager to find out more details about this option.
Example:
In the “Lead Stash” block settings, we have the “Data Lifetime” field set to 1 day and the “Search By” field set to Phone number.
When we have a call from the same phone number within 1 day (24 hours), the caller will be directed to the Y branch in the Lead Stash block and will skip IVR blocks, going straight to the Find Buyer block. Information requested in these blocks will be pre-filled and recorded into the lead details. If we have a new caller, they will be directed to the N branch and go through the standard IVR flow.
The “DNPL Lookup” block
The “DNPL Lookup” block compares the lead data to the DNPL list according to the set filter. When the input data corresponds to the filter (the parameter is listed in the DNPL list), the call will be ended. When the parameter is not listed in the DNPL list, the IVR continues.
To set up the block, click the “Block Settings” button (the button with the “Gear” icon). Enter the block name in the “Title” field, select the filter in the “Field” field, and select the DNPL list in the “DNPL” field.
Click the “Save” button to complete the settings.
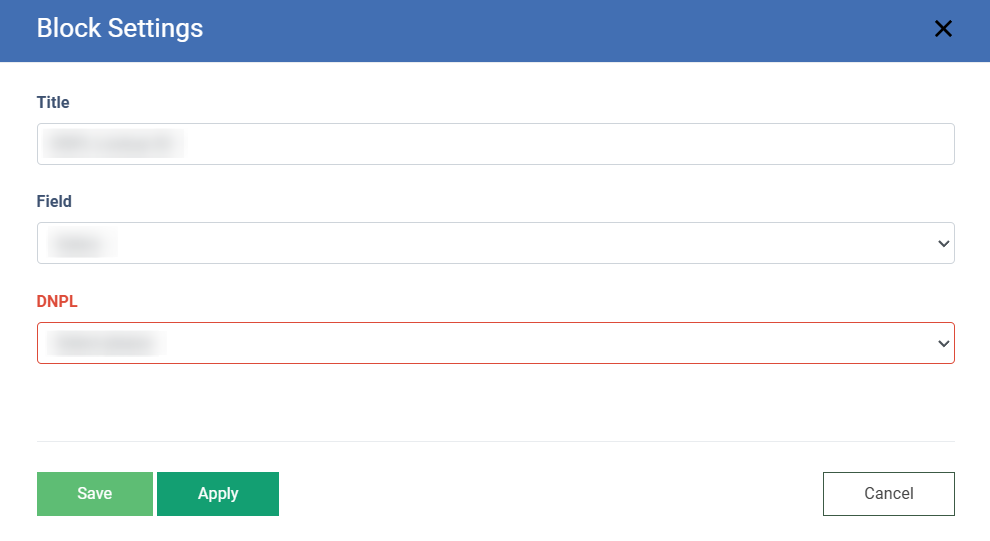
The “DNPL Lookup” block allows you to fork the IVR. Select the “Y” button (corresponds to “yes”) to add an extra block and finish the IVR, and select the “N” button (corresponds to “no”) to continue the IVR.
To create the Phone Number Deny List, go to the Client Management > Setup > Present & Do Not Present Lists section.
Read more information about the “Present & Do Not Present Lists” section in the Knowledge Base article.
The “Mobile or Landline” Block
The “Mobile or Landline” block automatically verifies the phone number (mobile or landline) and routes the call according to the autodetection.
The “Mobile or Landline” block branches out to the “Mobile” line (the “M” icon) and the “Landline” line (the “L” icon).
Note that this service is provided without any additional usage cost applied.
To set up the block, select the icon, click the “Block Settings” button (the button with the “Gear” icon), and enter the block name in the “Title” field.
Click the “Save” button to complete the settings.
The “Integration” Block
The “Integration” block allows you to set up different tracking actions when callers reach this point in the IVR. This feature makes your IVR more dynamic and personalized for callers. This functionality enhances the flexibility of your IVR, enabling it to respond dynamically to caller behavior.
To set up the “Integration” block, click the “Configure” button (the button with the “Gear” icon) and select the trigger in the corresponding field:
- [Call Logic] Trigger by IVR block: The Call Logic IVR block is reached. Note: This trigger is available only for the Call Logic component.
Select one of the available actions:
- E-Delivery Contact List Status V2 (API)
- E-Delivery Suppression List(s) V2
- Publisher Payout
- Send to E-Delivery Contact List V2 (API)
- [E-Delivery] Add to unsubscribe list
- [E-Delivery] Send To Contact List (API)
- [Leads] Add to DNPL
- [Leads] Post Lead To LMS/Lead Stash
- [Opt-Intel] Add to unsubscribe list (API)
- [Opt-Intel] Send to Opt-Intel (API)
- [PBX] Add to DNPL (API)
- [PBX] Export to Cloud PBX
- [TPS] Add to Five9 List
- [TPS] Facebook Conversion
- [TPS] Google Ads Enhanced Conversions
- [TPS] Google Analytics
- [TPS] Google Sheets
- [TPS] Ping URL
- [TPS] SMTP
- [TPS] Send Slack Message
- [TPS] TikTok Ads
- [TPS] Trusted Form Claim
- [TPS] Trusted Form Retain
- [TPS] Twilio
- [TPS] iClaim
Read more about Event Tracking Types in the following Knowledge Base articles.
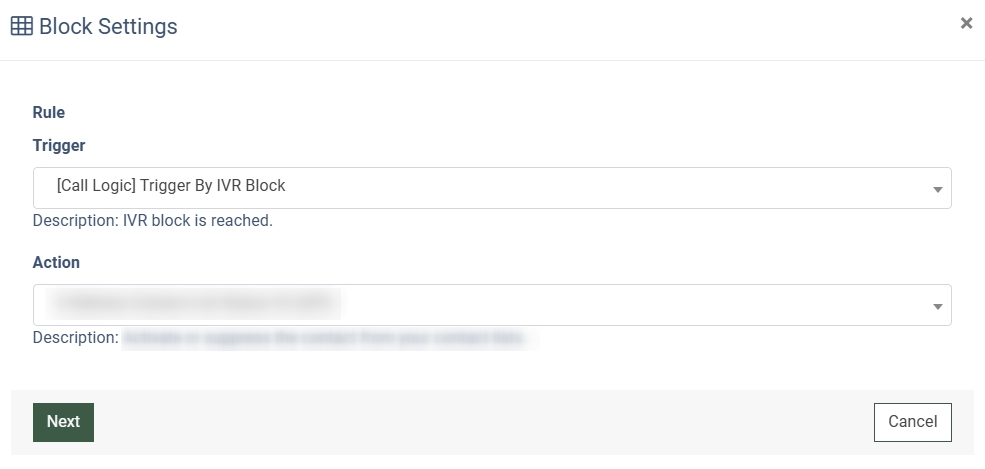
Click the “Next” button to proceed.
In the “Block Settings” pop-up window, fill in the required fields:
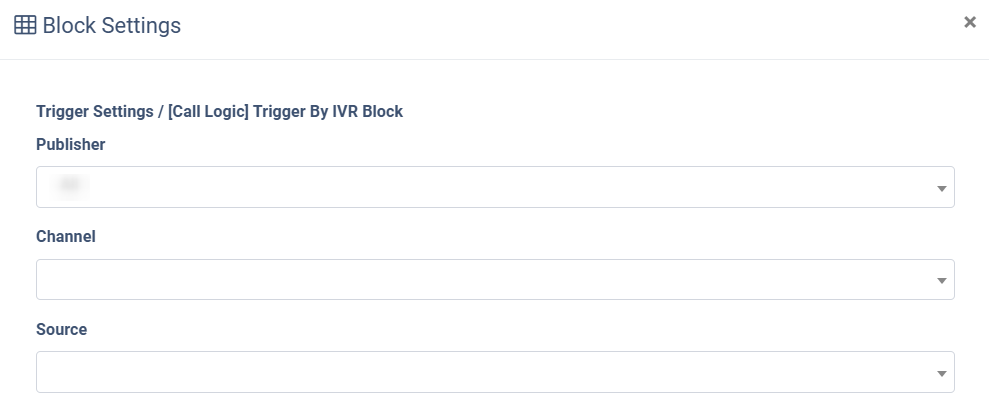
- The “Trigger Settings” block allows you to set up filters for events on three different levels:
- Publisher: Select the Publisher.
- Channel: Select the Publisher Channel.
- Source: Select the Publisher Source.
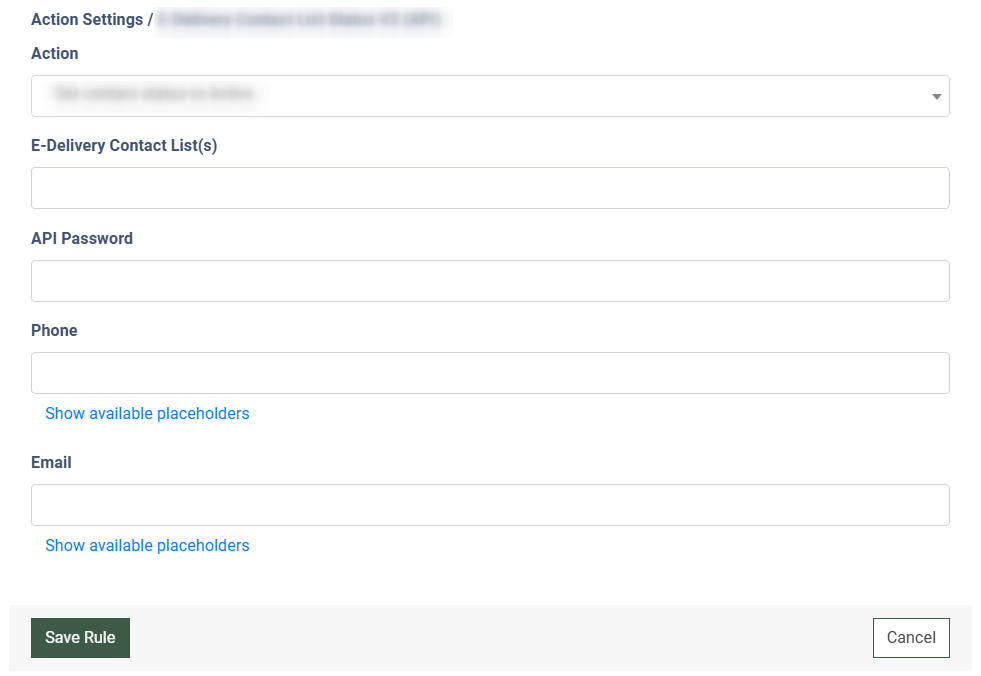
- Depending on the selected Action, the “Action Settings” block can differ from one another. Fill in the required fields, and click the “Save Rule” button to complete the settings.
The “External Connector” Block
The “External Connector” block allows users to send a request to the API to receive a response from there and save it in the lead body and lead stash.
For example, this block allows your IVR to instantly exchange data with your external CRM or database in the middle of a call, letting you automatically fetch, update, and save caller information directly into the lead body and lead stash. This enables your system to make real-time routing decisions or provide automated, self-service answers based on up-to-date customer data.
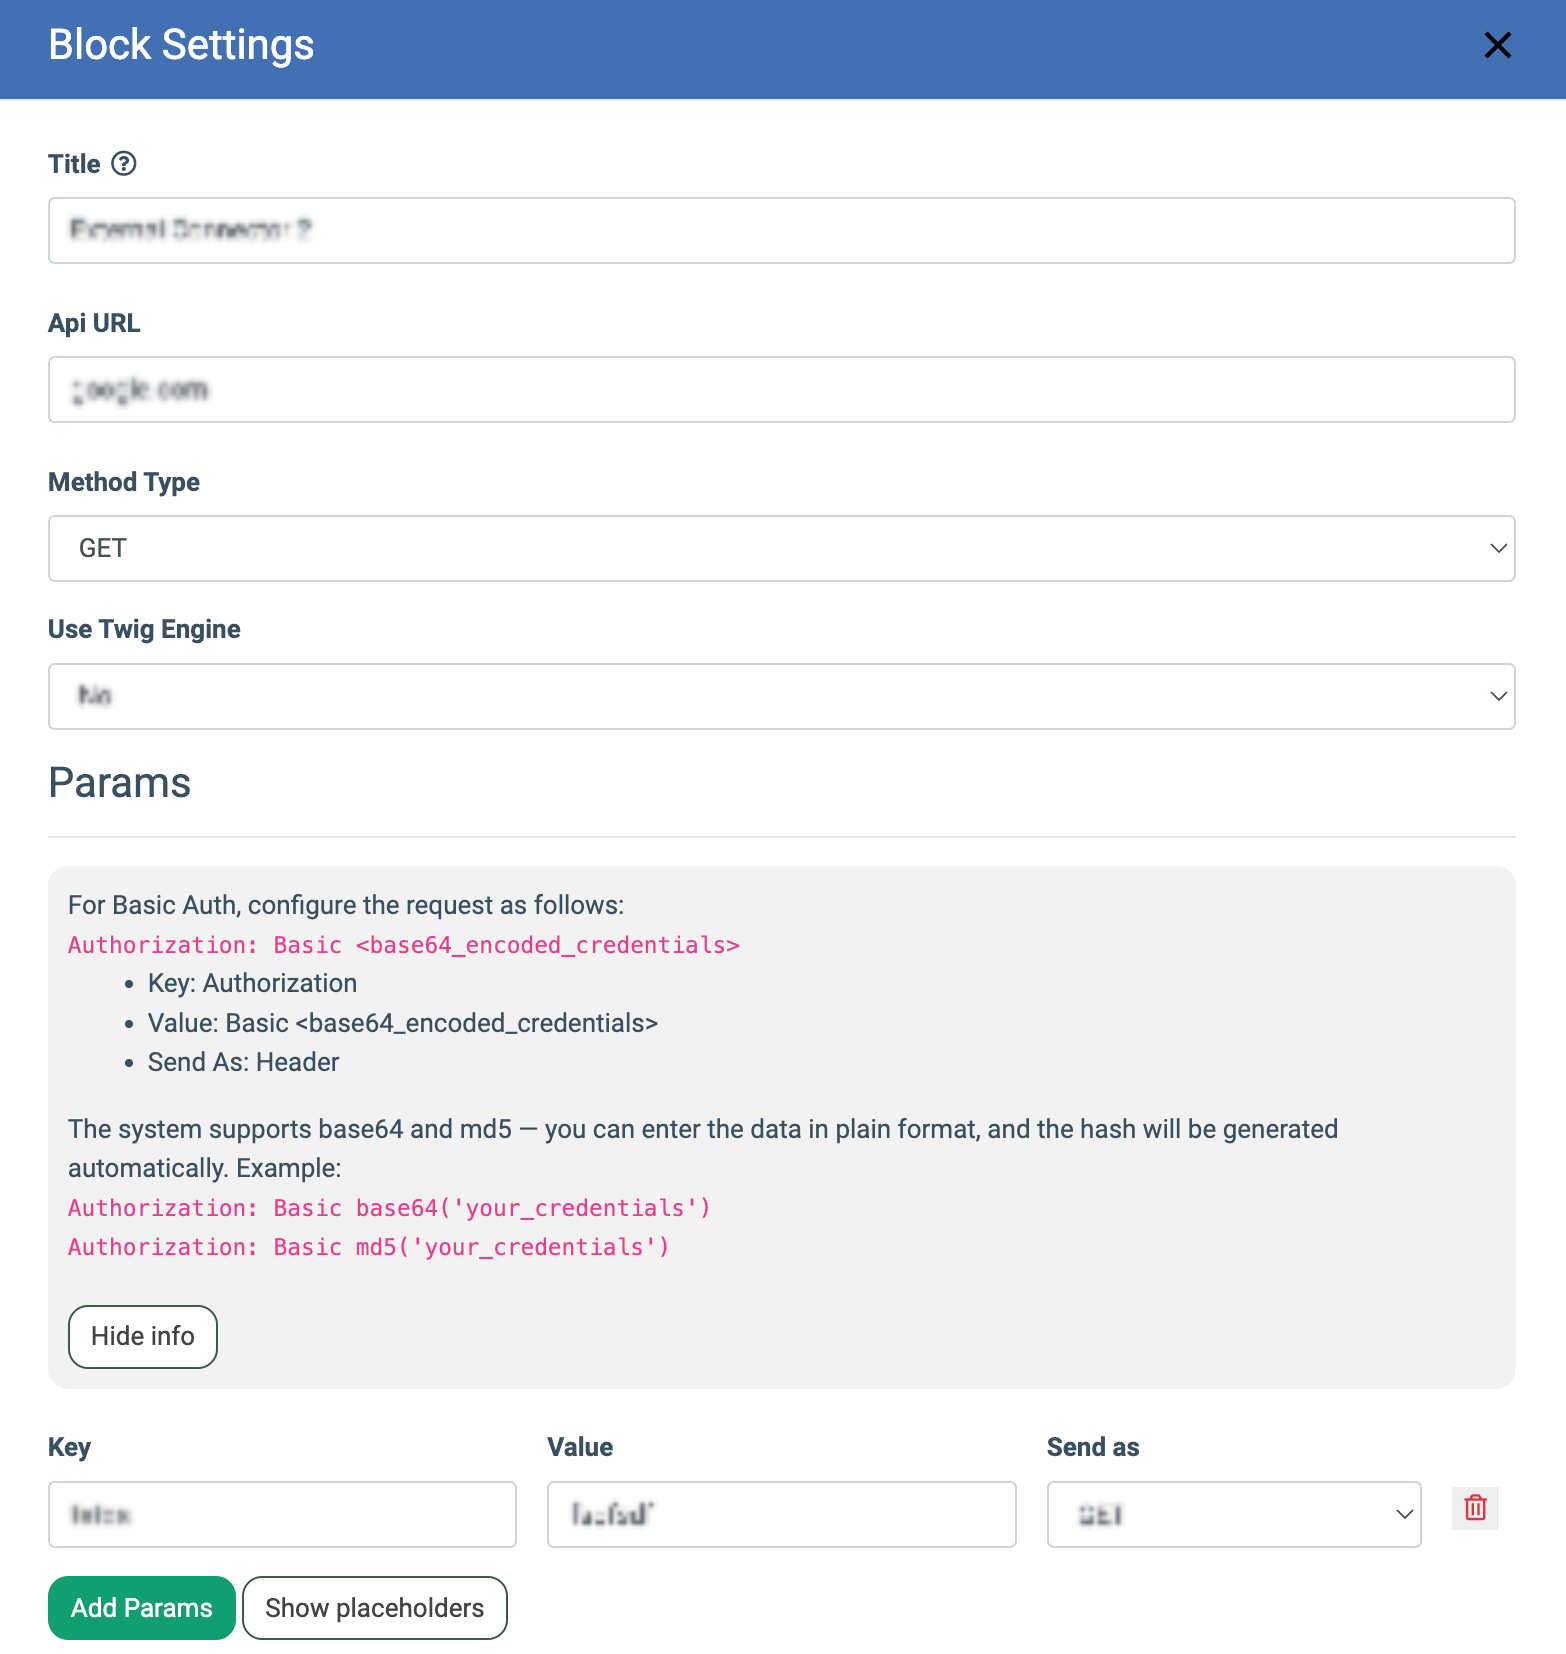
To set up the “External Connector” block, click the “Configure” button (the button with the “Gear” icon) and fill in the required fields:
- Title: Enter the name of the block.
- Api URL: Enter the URL where the request should be sent.
- Method Type: Select the method to send data (Get / Post / Put / Patch).
- Content-Type: Select the form to send data (Application/json / Application/x-www-form-urlencoded / Application/xhtml+xml). Note: This field is available only for Post / Put / Patch method types.
- Use Twig Engine: Select the (Yes / No) option to process placeholders through Twig Engine.
In the “Params” block, you should enter the parameters to send to the API. Each parameter can be sent as a header, GET method, or in the method selected in the Method Type parameter. Note: To view the list of available placeholders, click the “Show placeholders” button.
- Key: Enter the API key.
- Value: Enter the parameter value.
- Send as: Select the option for how to send the parameter (Get / Header / Put / Post / Patch).
In the “Response Params” block, you should indicate in which Product field you want to write the response, and the name of the parameter in the API response that corresponds to this Product field.
- Product Field: Select the Product field in which you want to write the response.
- Response Field: Enter the name of the parameter in the API response that corresponds to this Product field.
- Response Method Type: Select the response type that your system should receive the response to parse it correctly (JSON / XML).
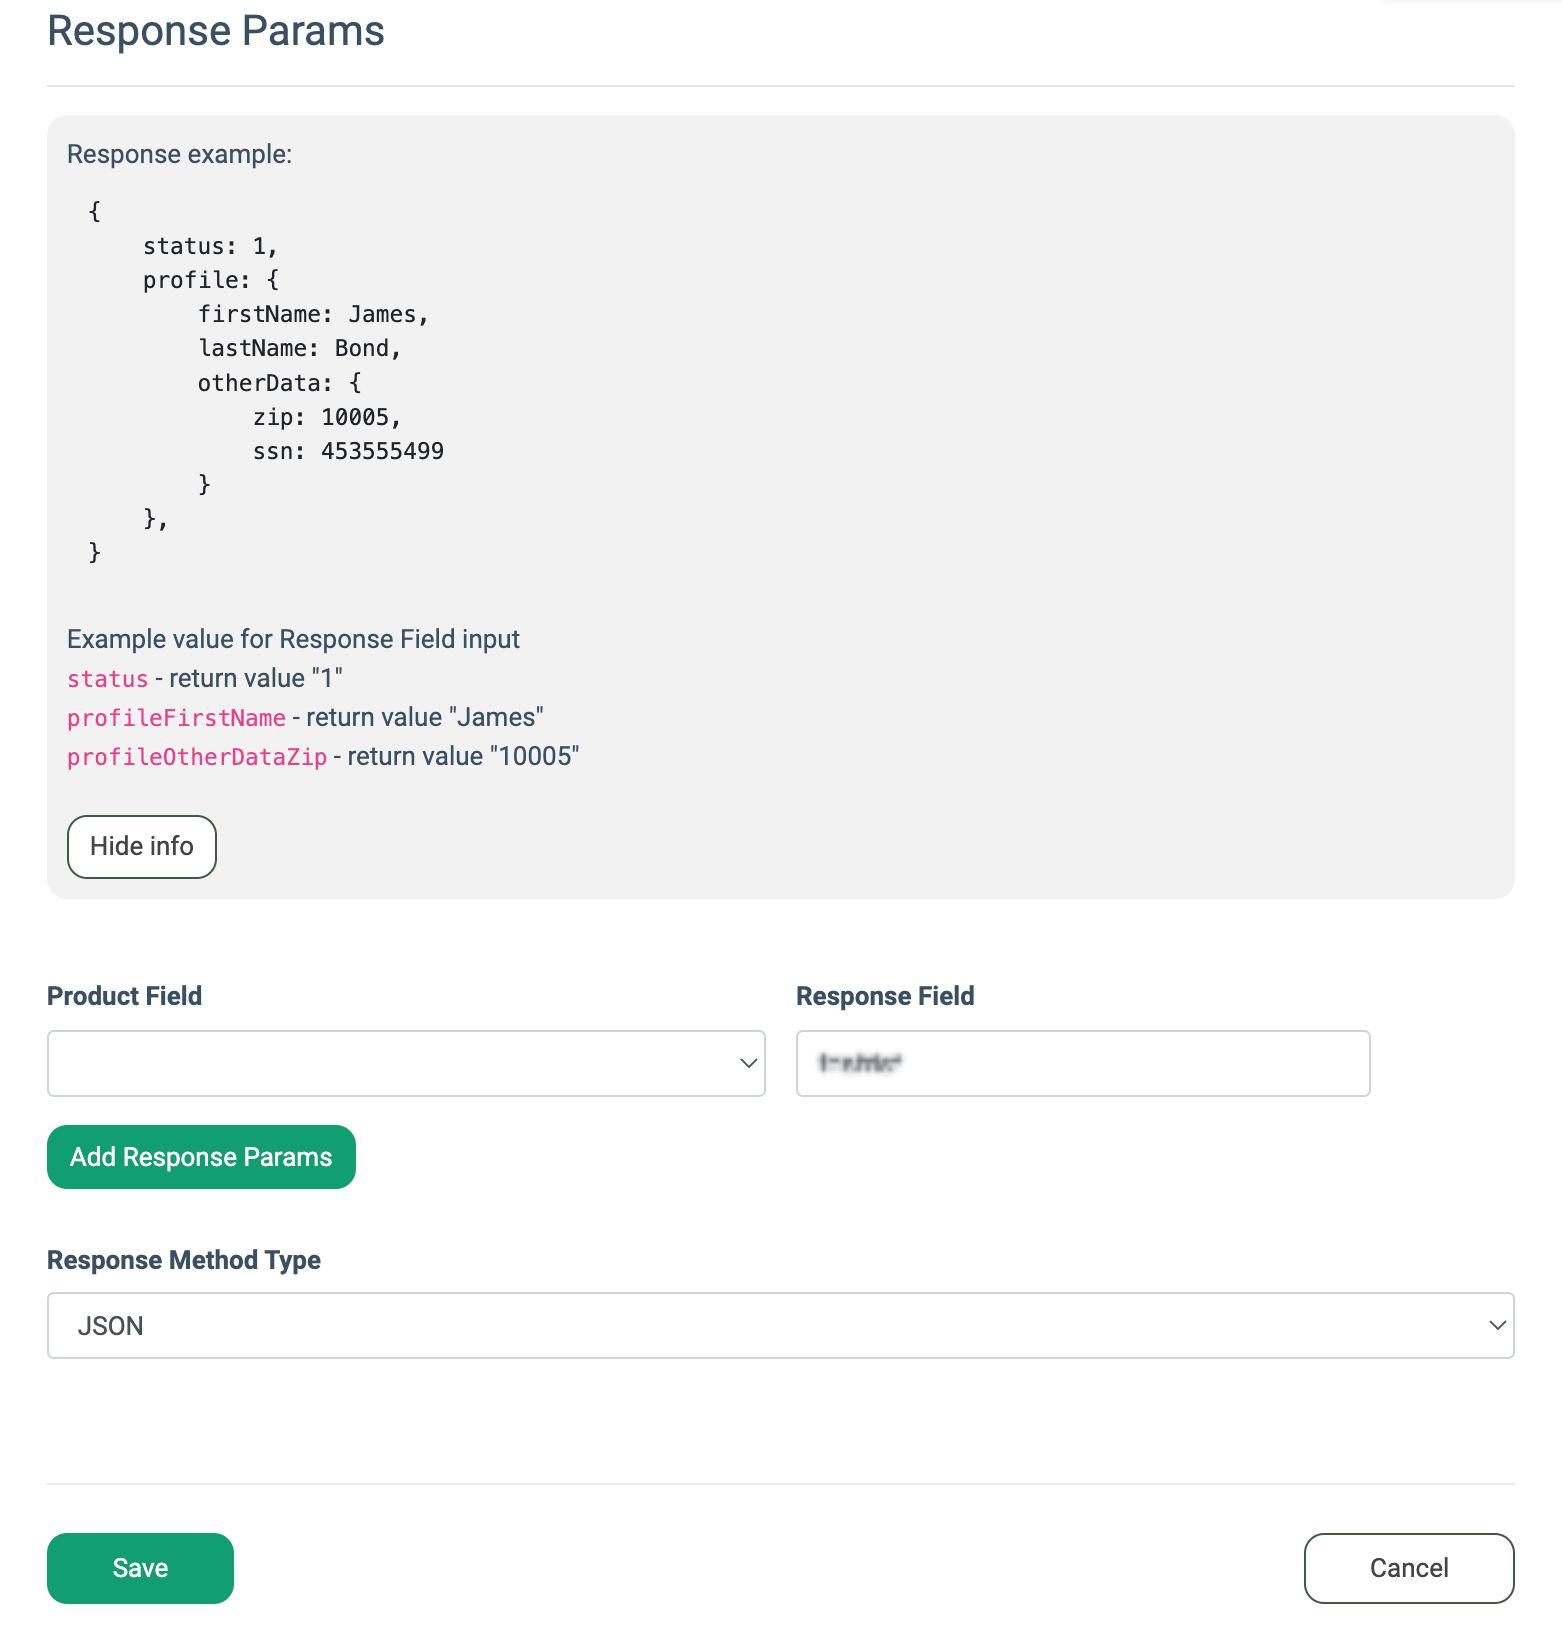 Click the “Save” button to finish.
The “State From ZIP” Block
The “State from ZIP” block allows you to extract and save the state of the lead from the ZIP code. When performing integration, the system obtains the ZIP code from the “ZIP from” field, determines the state, and writes it in the “State To” field.
To set up the “State from ZIP” block, click the “Configure” button (the button with the “Gear” icon) and fill in the required fields:
- Title: Enter the name of the block.
- ZIP from: Select the Product field to obtain the ZIP code from.
- State To: Select the Product field for the system to write the determined ZIP code to.
