Create a Campaign
To create a Campaign in Call Logic, go to the Client Management > Setup > Campaigns section.
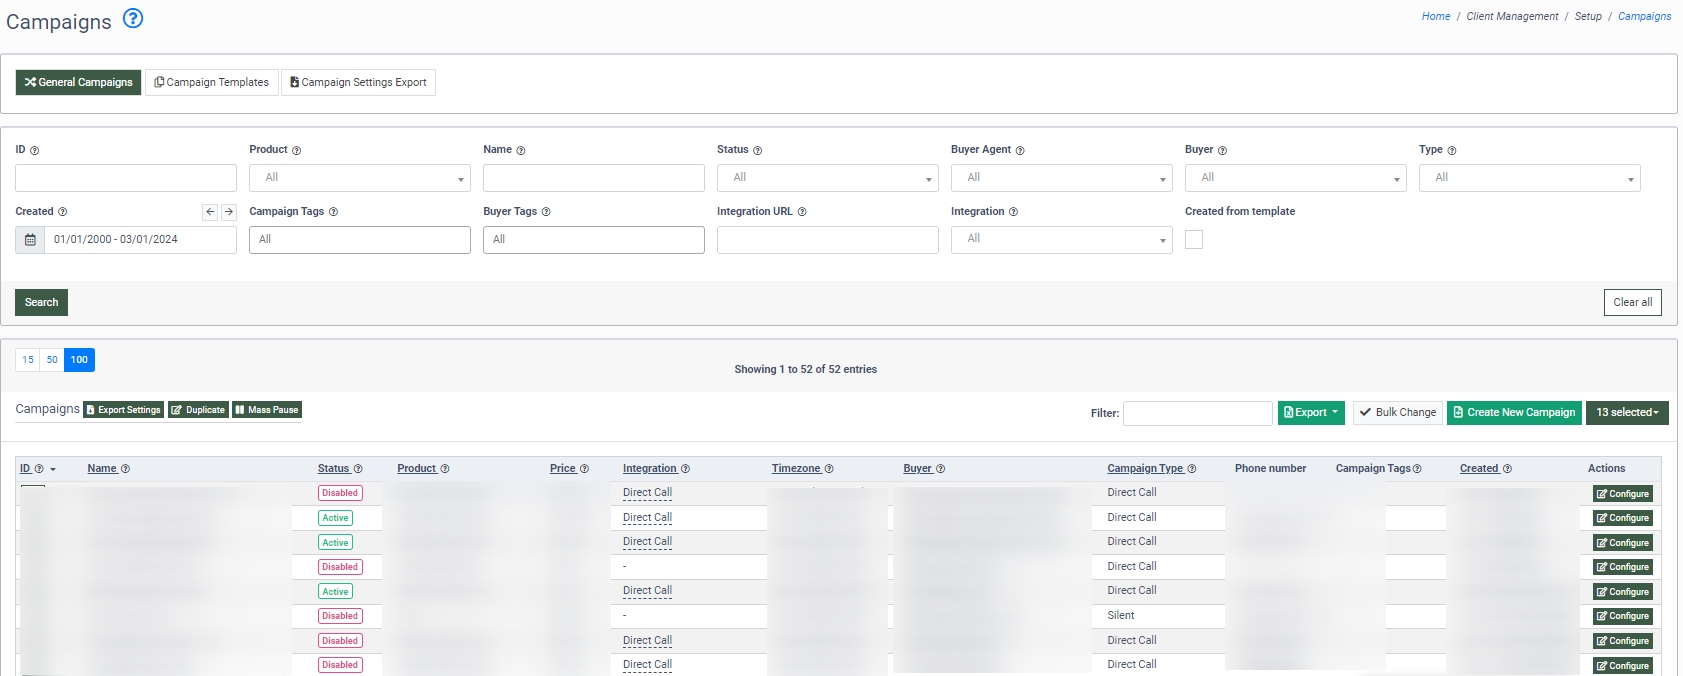
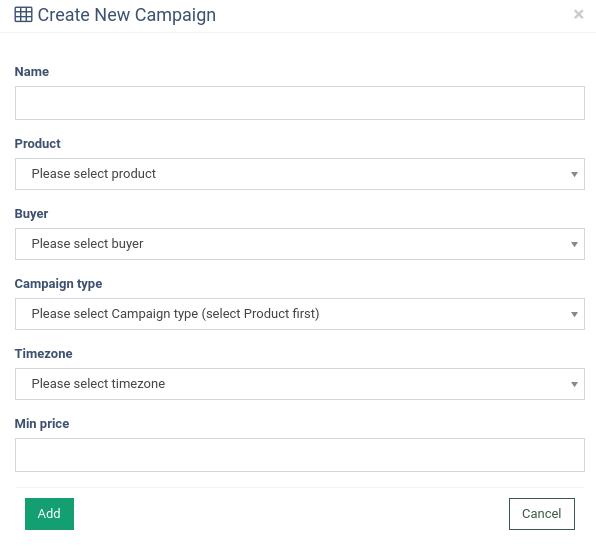
To create a Campaign, click the “Create New Campaign” button and fill in the following fields in the “Create New Campaign” pop-up window:
- Name: Enter the name of the Campaign.
- Product: Select which Product the Campaign will be assigned to.
- Buyer: Select which Buyer the Campaign will be assigned to.
- Campaign type: Select the Campaign type. Read more about the Campaign types in the Knowledge Base article.
- Timezone: Select the timezone of the Campaign from the drop-down list.
- Min Price: Enter the minimum price of the Campaign.
Click the “Add” button to save.
Configure a Campaign
To configure the Campaign, click the “Configure” button in the “Actions” column.
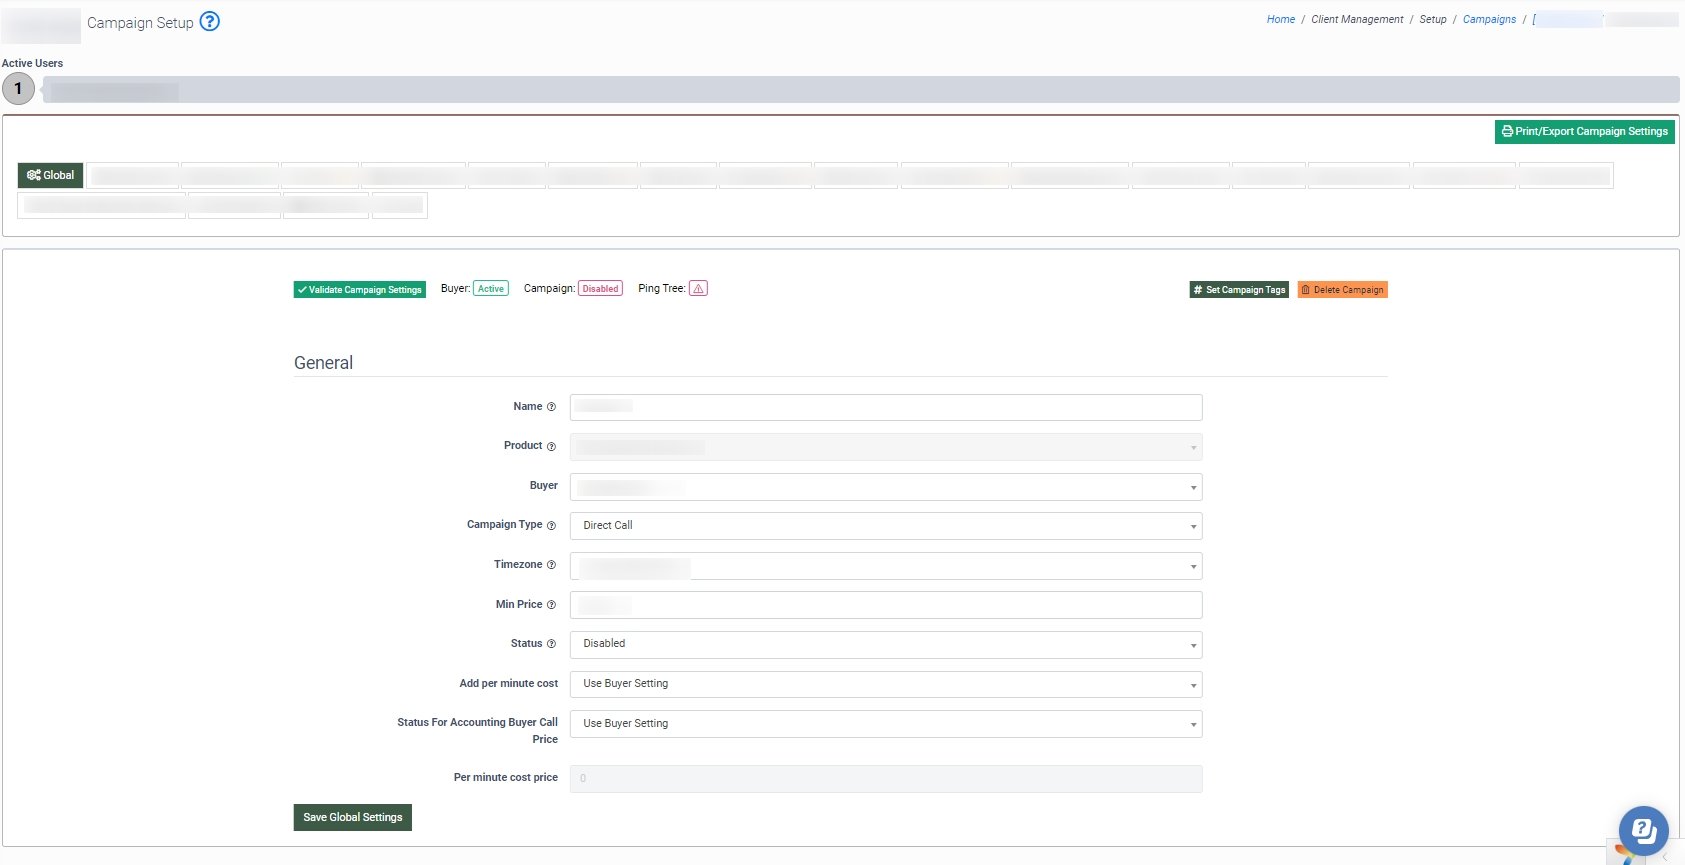 It is mandatory to configure the “Duplicates”, “Schedule”, “Integration”, and “Phone/IVR” tabs to activate a Campaign. To check if all required fields are set up, click the “Validate Campaign Settings” button.
Required Tabs
Duplicates
A duplicate lead is a lead that has already been seen in the system. Duplicate leads are identified by set criteria such as phone number or phone number + SSN. To set up the duplication rules, go to the Client Management > Setup > Campaigns section, choose the Campaign, click the “Configure” button in the “Actions” column, and select the “Duplicates” tab.

The Campaign Duplicates block allows you to configure the rules that filter out leads on the Campaign level based on the chosen duplicate filtration method and time frame. You can manage the following fields:
- Duplicate Method: The duplicate method used to identify which criteria determine a duplicate lead (Phone number/Phone number + SSN).
- Duplicate Sold: Select the time frame for lead purchase by the current Campaign to consider it as a duplicate lead.
- Duplicate Posted: Select the time frame for lead posting to the current Campaign to consider it as a duplicate lead.
- Do Not Charge Buyers For Duplicates Within Last X Day: This option allows you to specify the duration during which the Buyer won't pay for duplicates.
The System Duplicates section allows you to set the system-level duplication rule that defines the maximum number of times a lead can be seen in the system within the selected time frame before it gets filtered out from the specific Campaign. Additionally, you can set the system-level duplication rule expiration date. You can manage the following fields:
- System Dup. Time Frame: The time frame for checking lead duplication in the system. When OFF is selected, the system-level duplication rule is disabled.
- System Dup. Limit: The maximum number of times the lead can be seen in the system within the selected time frame before it gets filtered out. The default value is set to 1. If the value is set to 0, this duplication rule is disabled.
- System Dup. Settings Expiration: Optionally, you can set the expiration date for the system-level duplication rule.
Click the “Save Duplicate Settings” button to complete the duplicate configuration.
Schedule
The “Schedule” tab allows you to manage the Campaign schedule and set up limits for post and sold leads.
To configure the Schedule settings for a Campaign, go to the Client Management > Setup > Campaigns section, select the Campaign, click the “Configure” button in the “Actions” column, and select the “Schedule” tab.
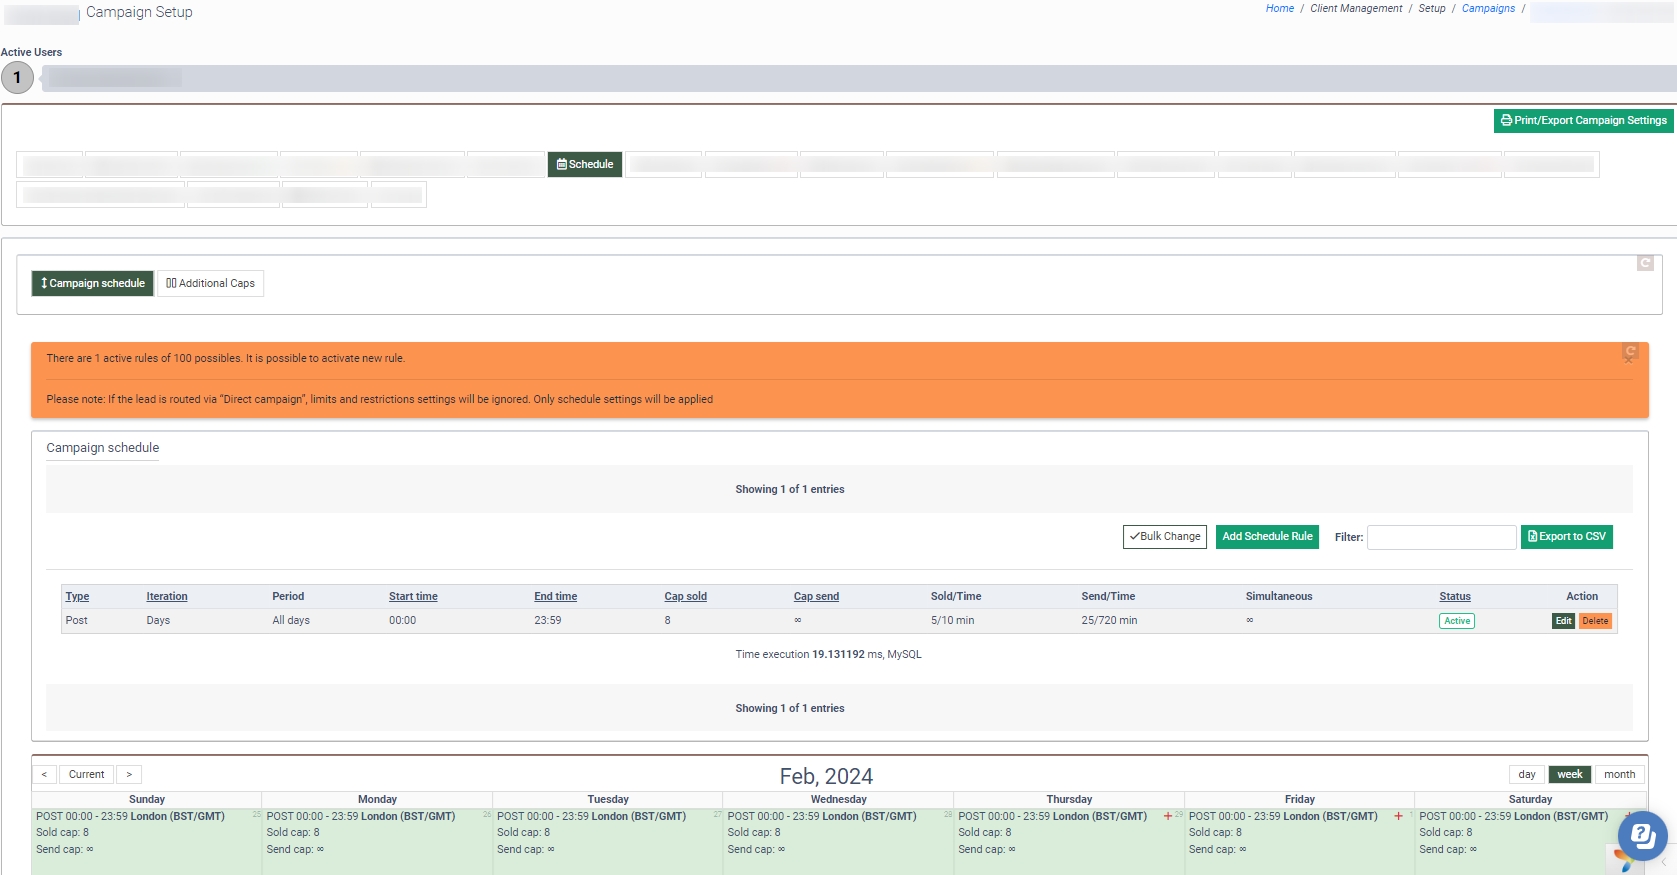 To add a new rule, click the “Add Schedule Rule” button.
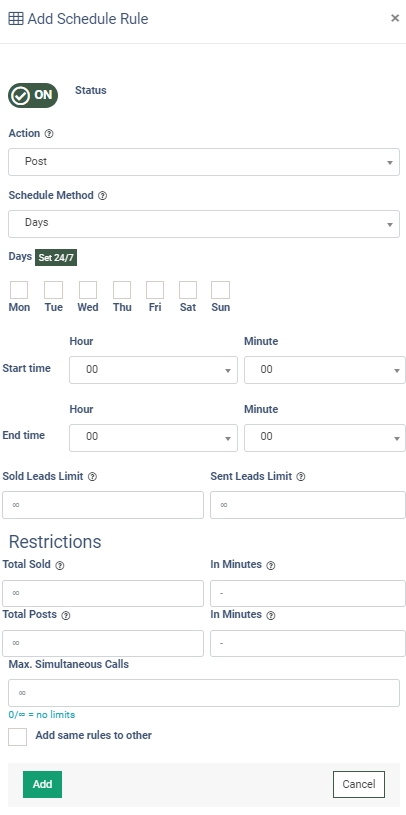
Fill in the following fields in the pop-up window:
- Status: Switch the toggle to the “On” position to activate the schedule rule.
- Action: Select the action to perform during the set schedule (Post / Do Not Post).
- Schedule Method: Select the method of schedule setup (Days / Date Range).
- If the “Days” option is selected, you can set a schedule for the particular day of the week using the corresponding checkboxes.
- If the “Date Range” option is selected, you can select the “Start Date” and “End Date” for the rule in the corresponding fields.
- Start Time: Select the daily start time for the schedule rule.
- End Time: Select the daily end time for the schedule rule.
- Sold Leads Limit: Enter the maximum number of sold leads for the schedule rule.
- Sent Leads Limit: Enter the maximum number of sent leads for the schedule rule.
In the “Restrictions” block, you can set up the lead processing limits. You can manage the following values:
- Total Sold: Enter the maximum number of leads that can be purchased by the Campaign within a selected time frame.
- In Munites: Enter the time frame for the lead purchase limitation set in the “Total Sold” field.
- Total Post: Enter the maximum number of leads that can be sent to the Campaign within a selected time frame.
- In Minutes: Enter the time frame for the lead posting limitation set in the “Total Sent” field.
- Max. Simultaneous Calls: Set the number of calls that can be processed by the current Campaign simultaneously.
- Add same rules to other: Check the box to select Buyers or Campaigns you want to set the same rule for.
Click the “Add” button to complete the action.
To change the rule, click the “Edit” button in the “Action” column.
To delete an existing rule, click the “Delete” button.
To copy the schedule settings to other Campaigns, click the “Copy Schedule” button at the bottom of the page.
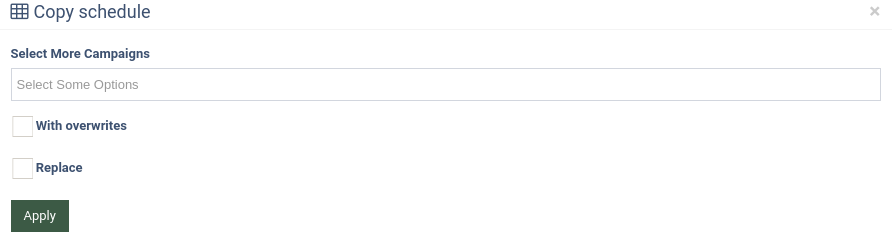
Select the Campaign(s) in the “Select More Campaigns” field to assign them the same schedule rules. (Only Campaigns with the “Active” status are available for selection).
Click the “Apply” button to copy the settings.
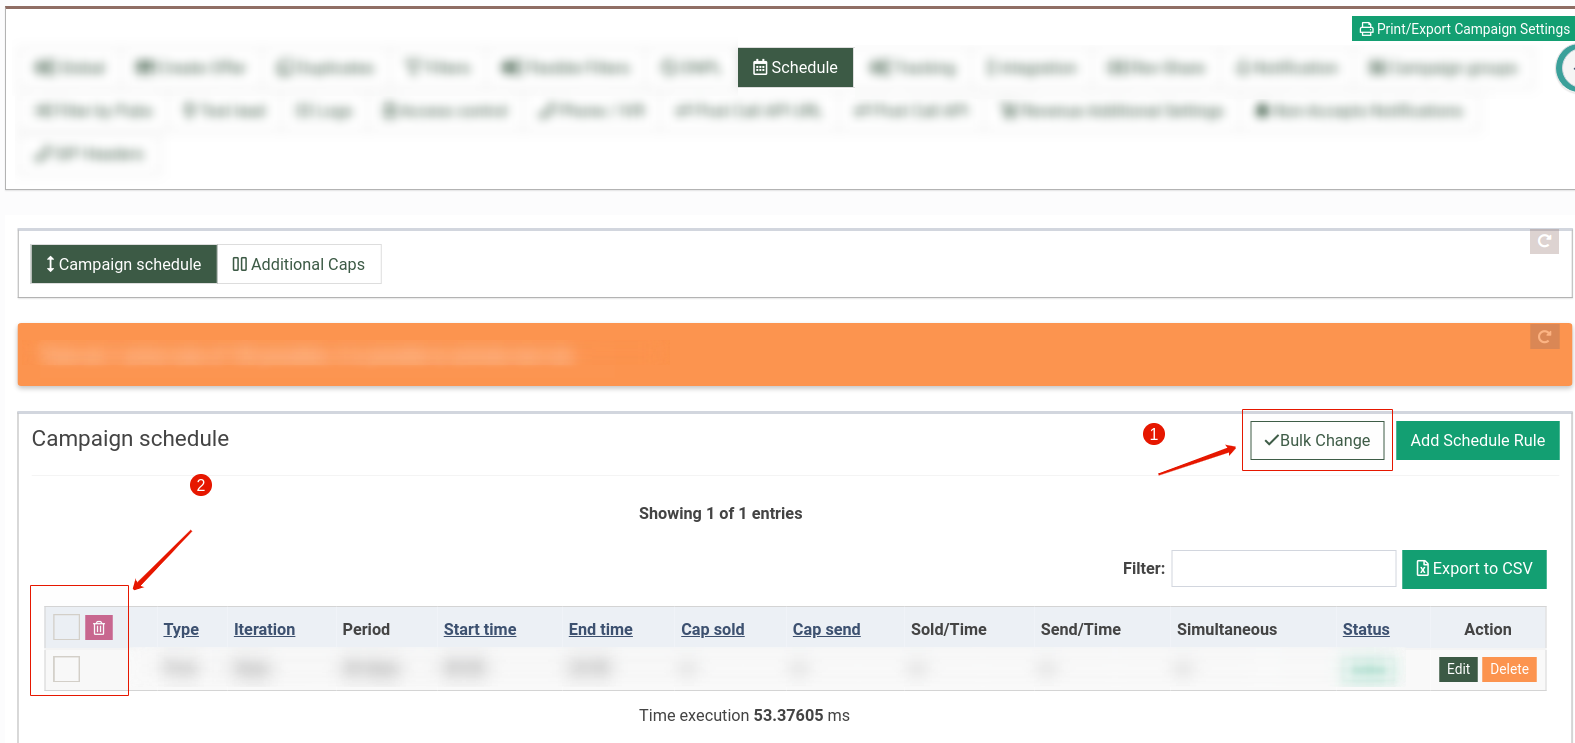
To bulk-remove Schedule Rules, click the “Bulk change” button (1) and select the schedule rules (2) you want to delete. Click the red delete icon to delete the chosen Schedule Rules.
Read more about the Additional Caps tab in this Knowledge Base article.
Integration
The “Integration” tab allows you to manage integration settings for the Campaign. There are four tabs available for the integration setup: “Integration”, “Campaign Pause Settings”, “Duration To Sell (Advanced)”, and “Trigger Silent Campaigns”.
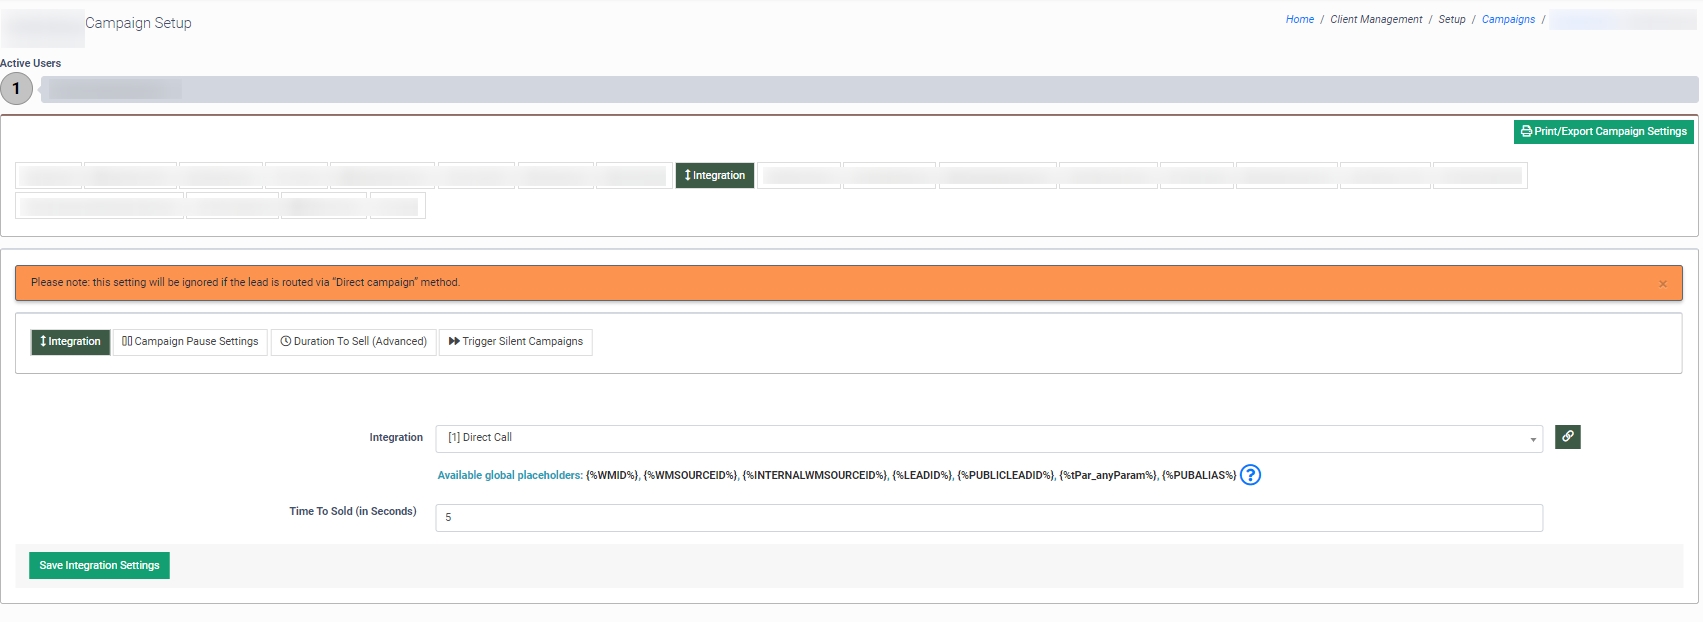
The “Integration” tab allows you to configure the integration settings. Select the Integration in the “Integration” field.
Enter the time range for the system to consider the lead sold into the “Time To Sold (in Seconds)” field.
Global Placeholders are available for all Integrations and can be used in most integration fields except for some fields specific to an Integration.
{ %WMID% } - the internal publisher ID in the system. You can find the Publisher ID in the Publisher List in the ID field column.
{ %WMSOURCEID% } - the source name/ID sent by the Publisher. You can find it in the "Name" column of the Publisher Sources section.
{ %INTERNALWMSOURCEID% } - the internal Publisher Source ID in the system. You can find it in the "ID" column of the Publisher Sources section.
{ %LEADID% } - the internal Lead ID in your system. You can find it in the "ID" column of the Lead Details Report.
Click the “Save Integration Settings” button to complete the action.
The “Campaign Pause Settings” tab allows you to temporarily pause a Сampaign based on a buyer’s response through API.
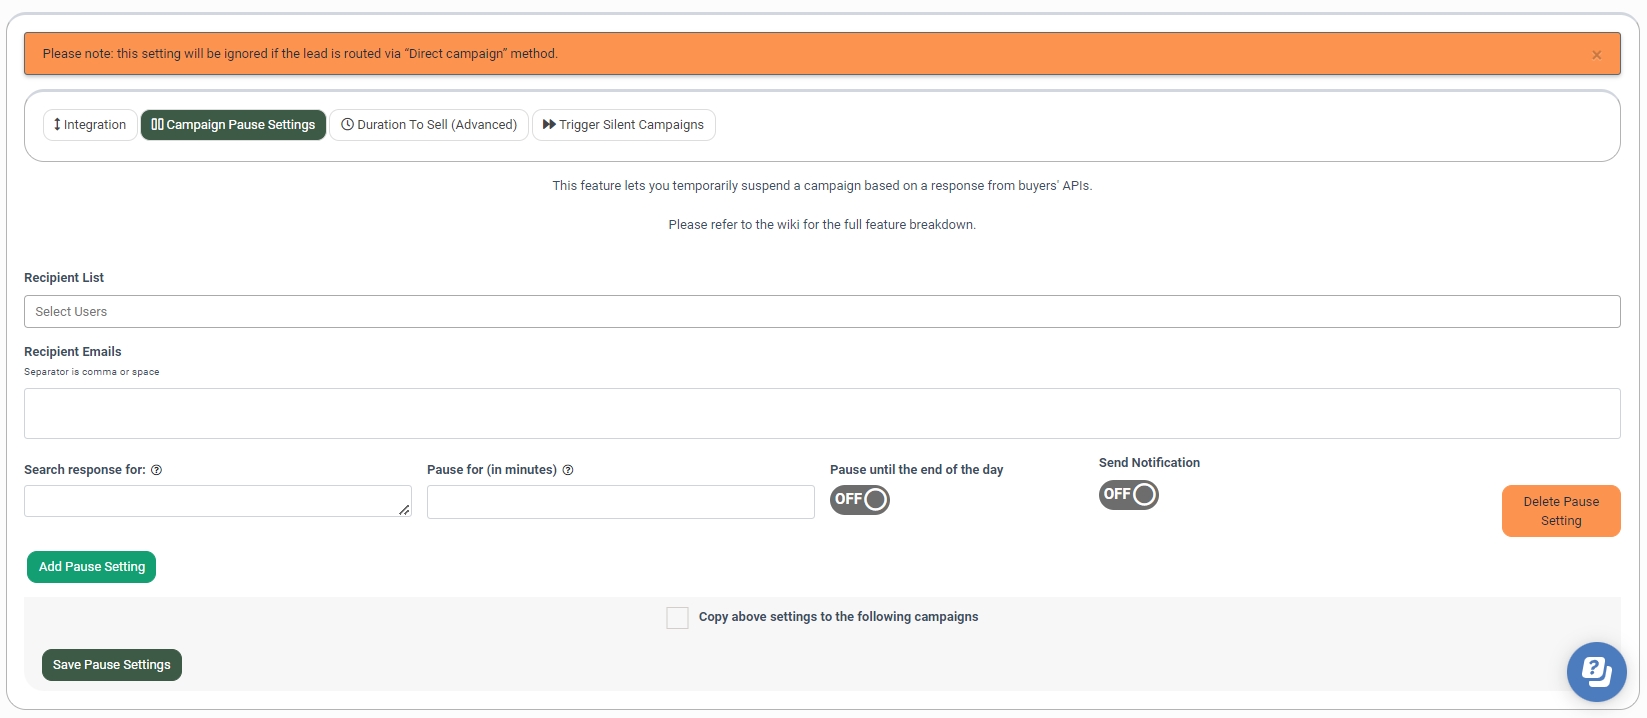 Select users to receive the notification about Campaign pause in the “Recipient List” field.
Enter emails to receive the notification about Campaign pause into the “Recipient Emails” field.
In the “Search response for” field, enter the text from the response that will trigger the system to pause the Campaign.
In the “Pause for (in minutes)'' field, enter the pause duration (in minutes) if the system triggers a Campaign pause based on the Buyer's response.
Switch the “Pause until the end of the day” toggle to the “On” position to pause the Campaign till the end of the current day (the “Pause for (in minutes)” field will be disabled).
Switch the “Send Notification” toggle to the “On” position to enable notifications about the Campaign’s paused status.
To add another rule, click the “Add Pause settings” button.
To delete the rule, click the “Delete Pause Setting” button.
Click the “Save Pause Settings” button to apply the changes.
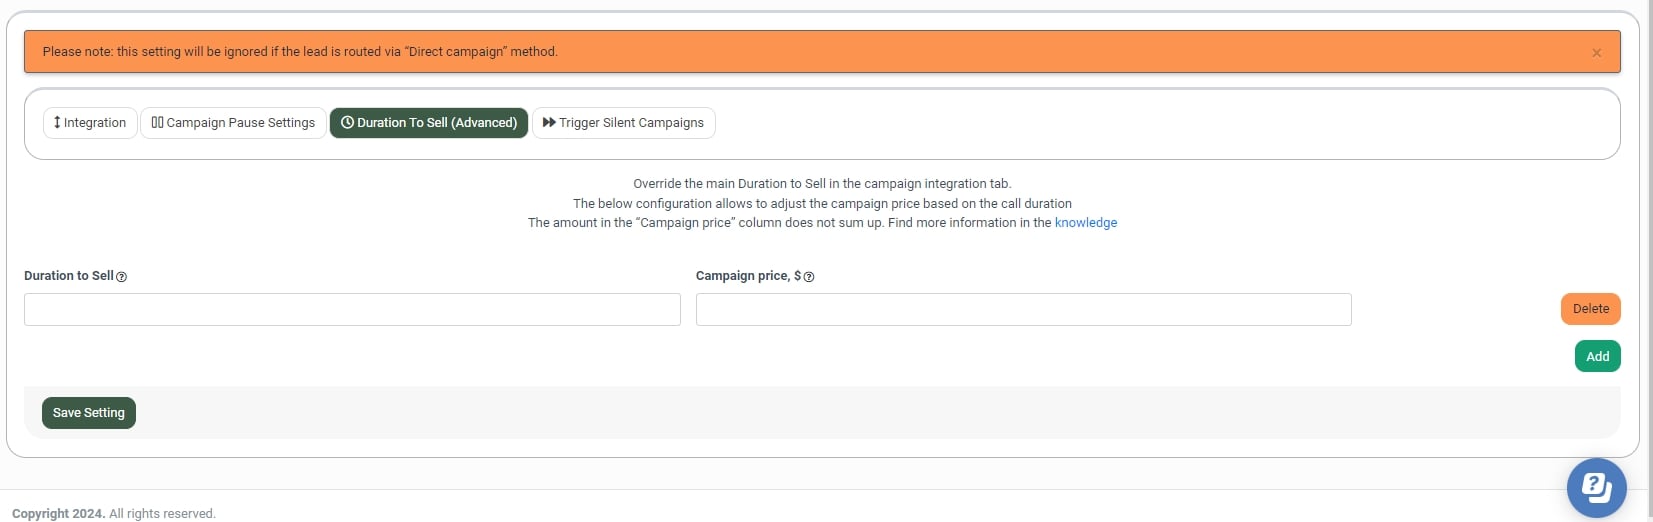
The “Duration To Sell (Advanced)” tab allows you to set additional payouts depending on the call duration. Read more about this tab in the Knowledge Base article.
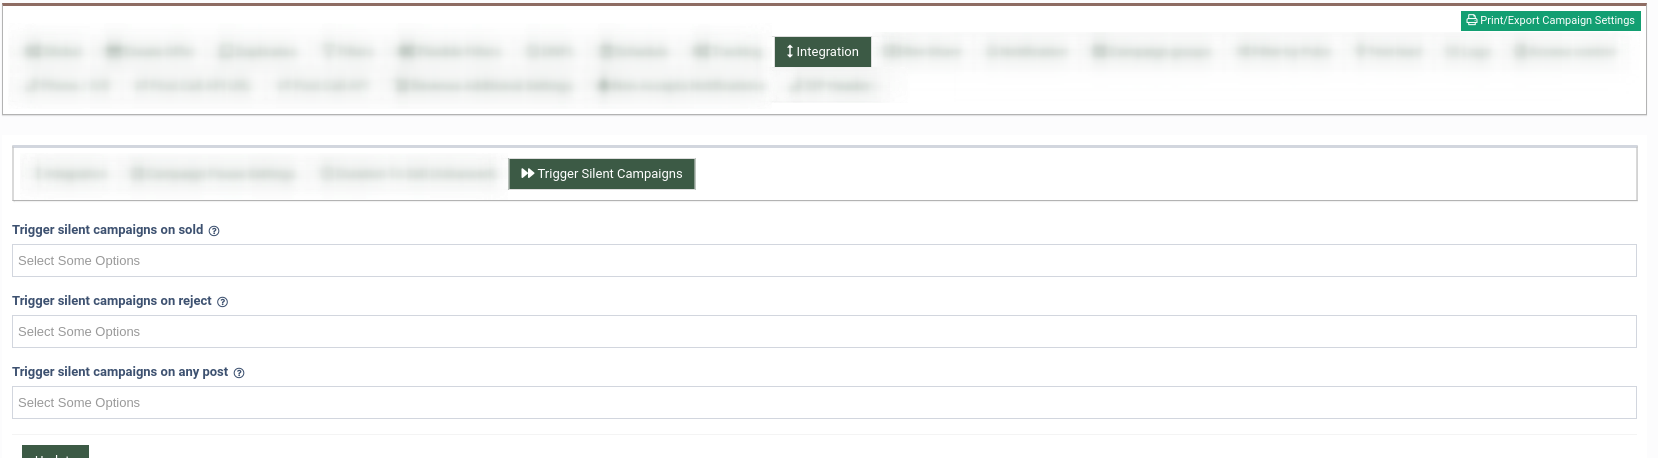
 The “Trigger Silent Campaigns” tab allows you to set up triggers for silent Campaigns. Read more about this tab in the Knowledge Base.
Phone / IVR
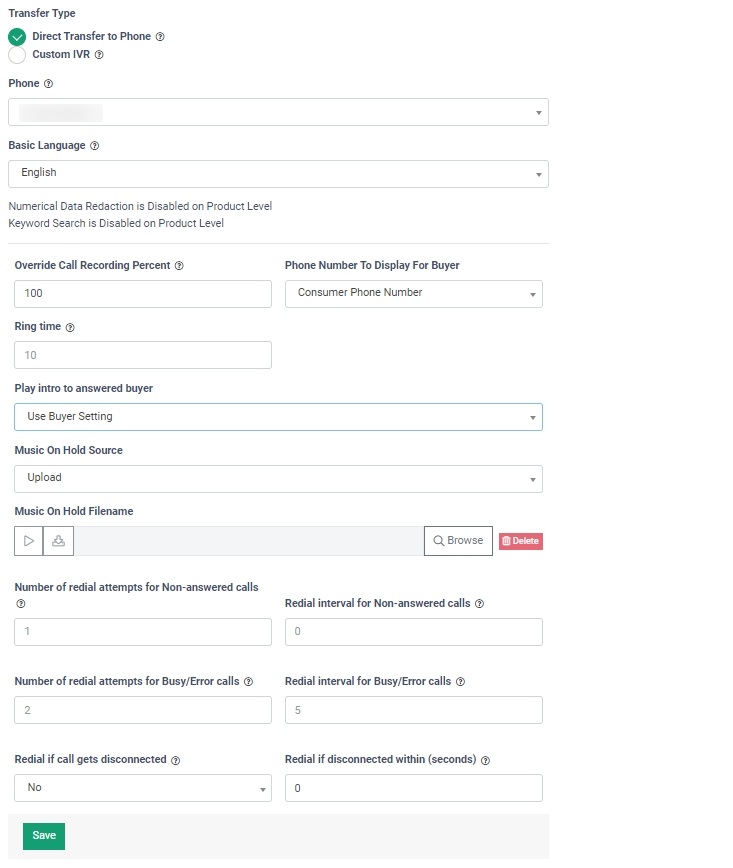
The Phone/IVR tab allows you to set up a phone number or IVR for redirecting leads purchased by this Campaign and manage the additional dialing settings. To manage the settings, go to the Client Management > Setup > Campaigns section, select the Campaign, click the “Configure” button in the “Actions” column, and select the “Phone/IVR” tab.
Fill in the following fields:
- Transfer type: Select the transfer type that determines where purchased leads are transferred. Select the “Direct Transfer” type for calls to be forwarded to the phone number specified in the Phone field. Select the “Custom IVR” type for calls to be transferred to the custom IVR that may contain additional questions or perform additional validation.
- Phone (for Direct Transfer): Select the phone number you want to transfer the purchased leads to.
- Name (for Custom IVR): Enter the name of the Custom IVR.
- Recognition Type (for Custom IVR): Select the IVR recognition type (Keypad or Voice Recognition + Keypad).
- Basic Language: Select the language for data reduction.
- Numerical Data Redaction: Call Logic users who utilize the Call Recording feature can set up numerical data reduction, such as phone number, ZIP code, credit card number, etc., from the audio recording of the conversation. Read more about the Numerical Data Redaction feature in this Knowledge Base article.
- Select the “Use Product Setting” option to apply the Product settings the Campaign is assigned to.
- Select the “Enabled” option to enable numerical data reduction for this Campaign, regardless of the Product settings.
- Select the “Disabled” option to disable numerical data reduction for this Campaign, regardless of the Product settings.
- Keyword Search: Call Logic users who utilize the Call Recording feature can set up a keyword search that allows you to search for phrases or keywords in audio recordings. Note: Read more about the Keyword Search feature in this Knowledge Base article.
- Select the “Use Product Setting” option to apply the Product settings the Campaign is assigned to.
- Select the “Enabled” option to enable the keyword search for this Campaign, regardless of the Product settings.
- Select the “Disabled” option to disable the keyword search for this Campaign, regardless of the Product settings.
- Override Call Recording Percent: Set the percentage of the phone calls that will be recorded for this Campaign.
- Phone Number To Display For Buyer:
- Select the “Consumer Phone Number” option to display the lead`s phone number for the Buyer.
- Select the “Publisher Phone Number” to display the Publisher`s phone number for the Buyer.
- Publisher Phone Number To Display For Buyer: Select the Publisher’s phone number from the list of all Publisher phone numbers in the system to choose which of the numbers to display for the Buyer.
- Ring time: Enter how long the system should wait for a Buyer’s agent to pick up the incoming call.
- Play intro to answered buyer: This field implements the ability to play audio to the Buyer before connecting to the lead.
- Select the “Use Buyer Settings” option to apply specific Buyer settings. Note: To view the settings, go to the Client Management > Buyer List section, open the configurations for the specific Buyer, and navigate to the “Phone Numbers” tab, the “Call settings” subtab.
- Select the “No” option to disable the intro.
- Select the “Yes” option to upload an audio file for the intro. Upload a file to play using the “Intro file for answered buyer" field.
- Music On Hold Source:
- Select the “Upload” option to upload a file to play when a lead is waiting to connect to the Buyer. Upload a file using the “Music On Hold Filename” field.
- Select the “Media library” option to select a file to play from the Media library. Select the file in the “Media Library File” field. Note: To view files in the Media library, go to the Media > Global Media Library section.
- Number of redial attempts for Non-answered calls: Enter the number of attempts the system will make to reach the Buyer if there is no response during the “Ring Time” period.
- Redial interval for Non-answered calls: Enter the duration of time between call attempts.
- Number of redial attempts for Busy/Error calls: Enter the number of attempts the system will make to reach a Buyer if a “Busy” signal was received (the call was dropped/the line is busy).
- Redial interval for Busy/Error calls: Enter the duration between call attempts if the system receives a “Busy” signal (the call was dropped/the line is busy).
- Redial if call gets disconnected: Select the “Yes” value to enable the feature that allows you to redial the same Buyer’s phone number (the “Phone” field) if the call duration was less than the specified value in the “Call duration less than” field.
- Redial if disconnected within (seconds): Enter the call duration time. If the current call duration is less than the specified value, the call will be redialed to the same Buyer’s phone number (the “Phone” field).
Click the “Save” button to apply changes.
Additional tabs
-
The General tab allows you to view general information about the Campaign and manage global campaign settings. Read more about this tab in the Knowledge Base.
-
The Filters tab allows you to configure and manage additional filtering options for the Campaign. Read more about this tab in the Knowledge Base.
- The “Filter iClear” subtab allows you to configure the campaign filters for third-party services enabled for the product. Read more about this tab in the Knowledge Base.
- The DNPL subtab allows you to set up a Present or Do Not Present Lists for the Campaign. Read more about this tab in the Knowledge Base.
-
- The Filter by Publishers subtab allows you to set up caps for Publishers, add Publishers to White and Black Lists, temporarily block Publishers and manage the traffic percentage settings. Read more about this tab in the Knowledge Base.
-
The Tracking tab allows you to set URL tracking to send lead parameters to your third-party tracking system. Read more about this tab in the Knowledge Base.
-
The Revenue tab allows you to set up a custom payout scheme for a Publisher. Read more about this tab in the Knowledge Base.
- The Revenue Settings subtab allows you to manage additional revenue settings. Read more about this tab in the Knowledge Base.
-
The Notifications tab allows you to manage Campaign notifications. Read more about this tab in the Knowledge Base.
- The Non-Accepts Notifications subtab allows you to set notifications if the Buyer does not accept leads within the specified period.
-
The Campaign Groups tab allows you to manage Campaign groups. Read more about this tab in the Knowledge Base.
- The "Post Call API" tab allows the Buyer to accept data appended call leads. Read more details about tab configurations in the Knowledge Base article.